S
e
tting Up
23
2
2.3
Using Quick Setup Menu
When setting up the printer environment, you can use the Quick Setup menu to set the basic
necessary items all at once.
Quick Setup menu items
The following menu items can be set by the Quick Setup menu. Set each item by answering
the questions displayed on the printer control panel.
You can also specify settings for the individual items without using the Quick Setup Menu. For items that
cannot be set using the Quick Setup Menu or details on setting individual items, refer to "2.4 Flow of
Setting Different Printer Environments" and "5.3 Common Menu Items".
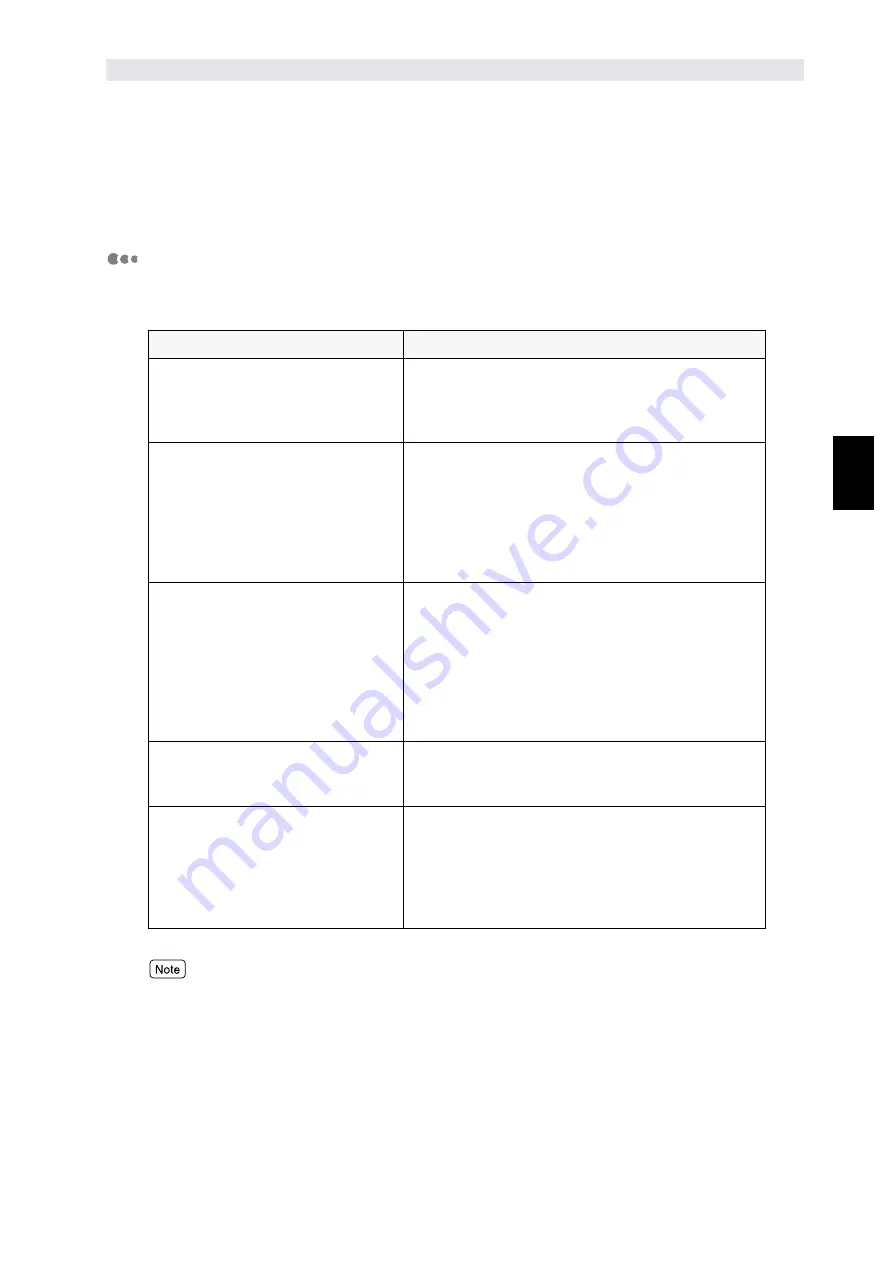
Item
Remarks
Sets whether you want an auto
print of the Job History Report.
The Job History Report includes information on
the latest 50 print jobs. Sets whether you want to
print the Job History automatically for every 50
print jobs reached.
Sets system clock.
The system clock displays the date and time in
the following formats:
•
YYYY.MM.DD (year.month.date)
(for years between 2000-2099 only)
•
HH:MM (hour:minute).
The date and time set here will be printed in lists
and reports.
Sets the network port, protocol
and spool setting.
You can use the Quick Setup menu to define
settings for multiple ports all at once:
•
SMB, LPD, IPP, NetWare, EtherTalk (optional)
Sets the port, protocol and spool setting to be
used for the network environment.
•
SNMP
Sets this when using software like for managing
multiple printers remotely.
Sets whether to use Internet
Service.
The CentreWare Internet Services can be used,
through a web browser, to display the printer/job
status and change the printer settings.
Sets whether to use Dynamic Host
Configuration Protocol (DHCP),
BOOTP or RARP as well as to set
the IP address.
(To be set only when using TCP/
IP)
Sets whether to obtain automatically essential
information for using TCP/IP (e.g. IP address,
subnet mask, gateway address) from the DHCP
server, BOOTP or RARP.
Enter the IP address manually if the DHCP
server, BOOTP or RARP is not used.
Summary of Contents for document centre285 series
Page 12: ...This page is intentionally left blank...
Page 37: ...2 3 Using Quick Setup Menu 25 Setting Up 2...
Page 42: ...2 5 Setting IP Address 30 Setting Up 2 Setting Subnet Mask and Gateway Address...
Page 43: ...2 5 Setting IP Address 31 Setting Up 2...
Page 47: ...2 6 Setting Port 35 Setting Up 2...
Page 52: ...This page is intentionally left blank...
Page 74: ...This page is intentionally left blank...
Page 108: ...This page is intentionally left blank...
Page 143: ...5 4 Outputting Reports Lists 131 Mode Menu and Common Menu 5...
Page 147: ...5 4 Outputting Reports Lists 135 Mode Menu and Common Menu 5...
Page 149: ...5 4 Outputting Reports Lists 137 Mode Menu and Common Menu 5...
Page 151: ...5 4 Outputting Reports Lists 139 Mode Menu and Common Menu 5...
Page 153: ...5 4 Outputting Reports Lists 141 Mode Menu and Common Menu 5...
Page 155: ...5 4 Outputting Reports Lists 143 Mode Menu and Common Menu 5...
Page 157: ...5 4 Outputting Reports Lists 145 Mode Menu and Common Menu 5...
Page 159: ...5 4 Outputting Reports Lists 147 Mode Menu and Common Menu 5...
Page 168: ...This page is intentionally left blank...
Page 169: ...6Precautions and Limitations 6 1 In General 158 6 2 On Using TCP IP 160...
Page 174: ...This page is intentionally left blank...
Page 194: ...This page is intentionally left blank...


