17
Wilo-WiBooster - Installation and Operation Manual
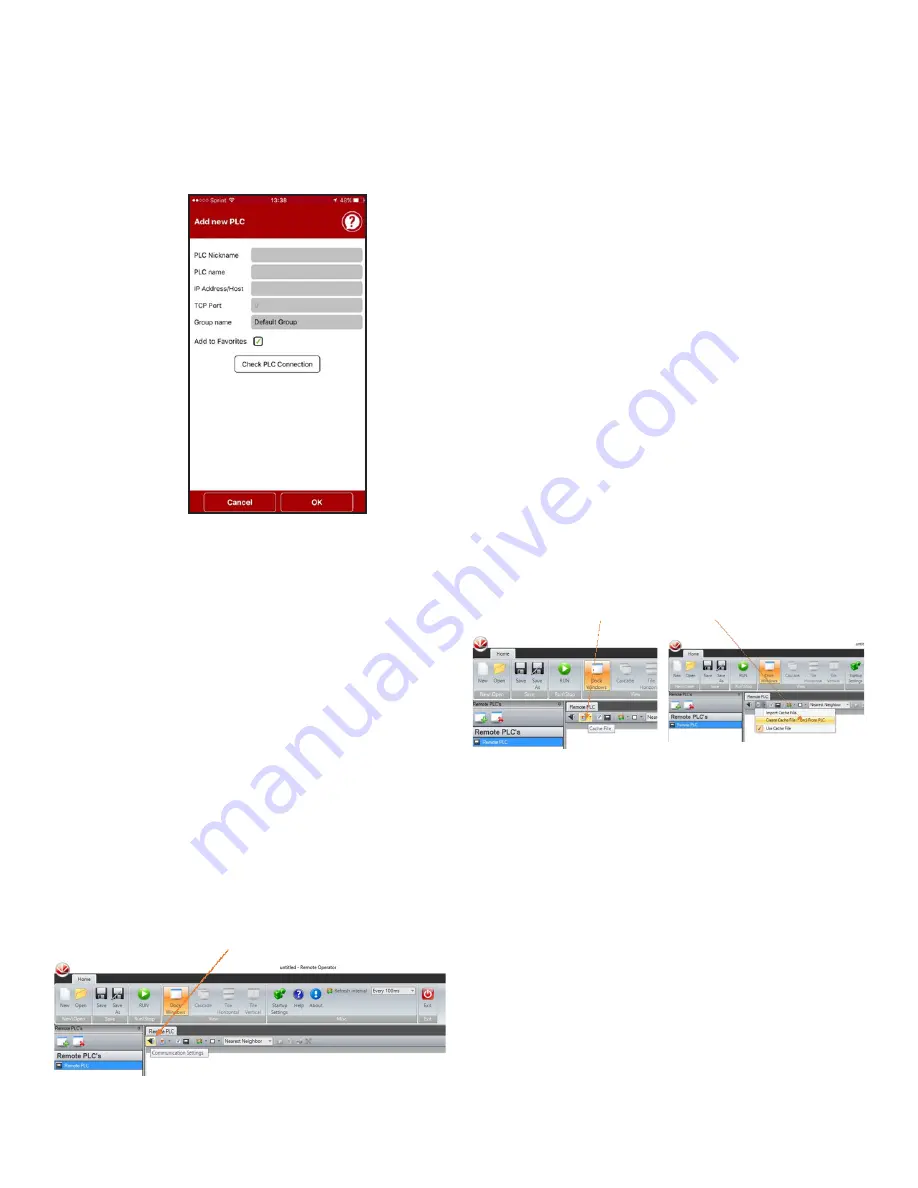
i. Enter any nickname for the PLC.
ii. Enter PLC Name -V700-1 is the default name. See
section 08 User Config to change PLC name.
iii. Enter applicable IP address (Note 1).
iv. Enter 20256 as the TCP port.
v. Click on “Check PLC Connection” to verify the
connection settings and then click “OK”.
d. The nickname that was entered should appear on the
screen. Click on it to begin connection with the PLC
panel.
e. After connection the phone screen will function the
same way as the screen of the PLC panel. To disconnect
from the PLC, click on the red arrow pointing left located
in the bottom right of the screen.
i. Local operation of the touchscreen is still possible
while a remote connection is in progress. Only one
remote connection is allowed at a time.
1. Note
If connecting to the PLC from the same network, enter the
internal IP address which can be found on the PLC by clicking
Menu Page->IP Configuration from the main page.
If connecting to the PLC from outside the network, enter the
WAN address of your network as the IP address. This can be
obtained from a network administrator. In addition, the network
administrator will need to enable port forwarding of port 20256
to the local IP address of the PLC panel. The local IP address can
be found on the PLC by clicking Menu Page->IP Configuration.
2.
PC Configuration
a. Download the Remote Operator application from the
Unitronics website and install the program. http://www
unitronics.com/support/downloads
b. Open Remote Operator.
c. Click on “Communication Settings”
i. Enter Connection Type: Ethernet(Call)
ii. IP Address
1. If connecting to the PLC from the same network,
enter the internal IP address which can be
found on the PLC by clicking Menu Page->IP
Configuration from the main page.
2. If connecting to the PLC from outside the
network, enter the WAN address of your network
as the IP address. This can be obtained from a
network administrator. In addition, the network
administrator will need to enable port forwarding
of port 20256 to the local IP address of the PLC
panel. The local IP address can be found on the
PLC by clicking Menu Page->IP Configuration.
3. If connecting to the PLC directly with an Ethernet
cable, enter the internal IP address which can
be found on the PLC by clicking Menu Page->IP
Configuration from the main page. Then, adjust
your computers IP settings by going to Windows
Control Panel – Networks setup – Connection
Properties – TCP/IPv4 Properties - Fixed IP
address. IP: 192.168.1.XXX, (XXX can be any
number from 2-254 but not 8. [192.168.1.8 is the
default PLC IP address. If the default is changed,
do not give the computer the same IP address]),
Subnet: 255.255.255.0 Gateway: 192.168.1.1
You may need to refresh.
iii. Enter 20256 as the Port Number.
iv. Enter PLC Name -V700-1 is the default name, (case
sensitive). See section 08 User Config to change PLC
name.
v. Left click “Check Connection” If connections are
correct, PLC Model etc. will appear. Click OK.
d. Click on Cache File.
i.
Create Cache file from PLC
ii.
Enter a file name and click Next twice.
iii. After the cache is done loading, click Finish
e.
Go to Save As and enter a file name.
f. Click Run to operate the panel remotely. Only one re-
mote connection can be made at a time. Local opera-
tion of the panel is possible while remotely connected.
g. To discontinue remote operation, click on the Stop
button.
h.
When you run Remote Operator in the future click, first
click Open and then choose the appropriate file. After
the file is loaded, click Run to make the remote con
-
nection.


