


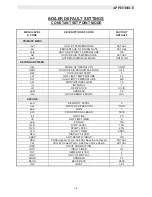
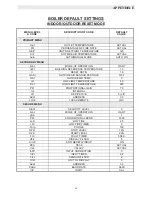


TROUBLESHOOTING
50
14. If there is no continuity, replace the actuator
or switch.
15. Start the unit. If the unit sequence resumes
normal operation, proceed no further. If the
Lockout still persists, proceed to Step 16.
16. Disconnect AC power and remove wires #21
and #22 from the proof of closure switch.
Disconnect the 15 pin connector from the
control panel.
17. Referring to system schematic 161413 in
Appendix H, locate wires #21 and #22,
check each for continuity using an ohm
meter.
18. Check for loose connections.
19. Check wires #21 and #22 at the control
panel connector end for worn pins and/or
proper pin insertion.
20. Repair as necessary.
21. If connections and continuity are okay,
reconnect wires #21 and #22 to the proof of
closure switch and reconnect the 15 pin
connector to the control panel ensuring it
locks into place.
22. Replace the cover plate on the actuator and
reposition the actuator on the valve body
and lock into place using the set screws.
23. Reconnect AC power to the unit.
24. Start the unit. If the condition still persists
proceed to section 8.7.6.
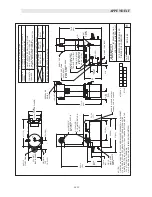
8.7.6 AIR/FUEL VALVE OPEN, PROVING
SWITCH
1. Remove the air/fuel valve cover.
2. Start
the
unit.
3. If the air/fuel valve rotates to its full open
position, and engages the air/fuel valve
open switch, proceed to Step 5.
4. If the air/fuel valve does not rotate, proceed
to 8.8.7.
5. Disconnect AC power to the unit.
6. Referring to system schematic 161413, in
Appendix H, locate wires #59 and #60.
Remove wires #59 and #60 from the air/fuel
valve open, proving switch, noting their
location. (The air/fuel valve open proving
switch, is the one closest to the blower.)
7. Connect an ohm meter across the terminals
of the switch, where wires #59 and #60 were
located
8. Manually depress the switch and check the
ohm meter for continuity.
9. If the switch does not show continuity,
replace the switch.
10. If the switch shows continuity disconnect the
12 pin connector from the control panel.
11. Referring to system schematic 161413 in
Appendix H, locate wires #59 and #60.
Check wires #59 and #60 for continuity.
12. Check for loose connectors at the switch
end of wires #59 and #60.
13. Check the 12 pin connector end for worn
and/or properly inserted pins.
14. If connections and continuity are okay,
reconnect wire #59 and #60 to the air/fuel
valve open switch. Reconnect the 12 pin
connector to the control panel and start the
unit.
15. If the fault persists, restart the unit and
check for AC voltage at wires #59 and #60.
16. If 120 VAC is present, go to section 7.7.3.
17. If 120VAC is not present proceed to section
7.7.5.
8.7.7 AIR/FUEL VALVE NOT ROTATING
1. Disconnect AC power to the unit.
2. Remove the air/fuel valve cover.
3. Check for loose wires at the wire nuts
connecting the air/fuel valve wiring harness
to the stepper motor.
4. Holding the coupling between the top of the
stepper motor and the potentiometer with
your thumb and forefinger, rotate the valve.
NOTE:
Do not rotate the air/fuel valve with power
applied to the unit.
Summary of Contents for AERCO KC Series
Page 51: ...TROUBLESHOOTING 41...
Page 65: ...APPENDIX C ix...
Page 72: ...APPENDIX F xvi...
Page 74: ...APPENDIX F xviii...
Page 76: ...APPENDIX G xx...
Page 77: ...APPENDIX G xxi...
Page 78: ...APPENDIX H xxii...
Page 79: ...APPENDIX H xxiii...
Page 80: ...APPENDIX H xxiv...


