TROUBLESHOOTING
38
SECTION 8- TROUBLESHOOTING GUIDE
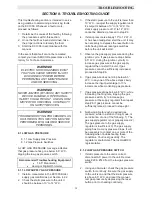
This troubleshooting section is intended to serve
as a guideline to determining and solving faults
on the KC1000. Whenever a fault occurs,
proceed as follows:
1. Determine the cause of the fault by following
the procedures within this section.
2. Once the fault has been determined, take
the proper actions to remedy the fault.
3. Start the KC1000 in accordance with this
manual.
In the event that a fault cannot be remedied,
contact your local AERCO Representative or the
factory for Technical Assistance.
WARNING!
ELECTRIC SHOCK HAZARDS EXIST
THAT CAN CAUSE SEVERE INJURY.
DISCONNECT POWER BEFORE
PERFORMING ANY MAINTENANCE
AND/OR SERVICING
.
WARNING!
NEVER JUMPER (BY-PASS) ANY SAFETY
DEVICE. DAMAGE, OR PERSONAL
INJURY COULD RESULT. USE AN OHM
METER FOR CHECKING CONTINUITY
ON SAFETY DEVICES.
WARNING!
TROUBLESHOOTING PROCEDURES, AS
OUTLINED IN THIS SECTION MUST BE
PERFORMED BY QUALIFIED SERVICE
PERSONNEL
.
8.1 LOW GAS PRESSURE
8.1.1 Low Supply Gas Pressure
8.1.2 Gas Pressure Switches
A LOW GAS PRESSURE message indicates
that gas pressure has gone below 6.5” W.C.,
tripping the low gas pressure switch.
Recommended Troubleshooting Equipment
x
16.5”
Manometer
x
Analog or Digital Ohmmeter
8.1.1 LOW SUPPLY GAS PRESSURE
1. Install a manometer in the KC1000 Boiler
supply gas manifold as per Section 4.2.2.
2. Check the static pressure to the unit. It
should be between 10” to 14” W.C.
3. If the static pressure to the unit is lower than
10” W.C., readjust the supply regulator until
it’s output is between 10” to 14” W.C. If a
static supply pressure of 10” to 14” W.C.
cannot be obtained, proceed to step #8.
4. If static pressure is already 10” to 14” W.C.
or has been readjusted, start the unit. It may
be necessary to depress the reset button on
units having manual reset gas switches
before the unit will restart.
5. Observe the gas supply pressure during the
ignition cycle. If gas pressure drops below
6.5” W.C. during the ignition cycle try to
increase gas pressure at the gas supply
regulator then re-start the unit. If gas
pressure cannot be sufficiently increased,
proceed to Step #8.
6. If gas pressure does not drop below 6.5”
W.C. in any one of the above steps slowly
increase the input percentage in 10%
increments while monitoring gas pressure.
7. If gas pressure drops below 6.5” W.C. while
increasing the firing rate, tripping the gas
pressure switch, try to increase gas
pressure at the supply regulator then repeat
step #6. If gas pressure cannot be
sufficiently raised, proceed to step eight.
8. Not being able to reach a desired gas
pressure, while in a static or firing mode, is
an indication of one of the following. 1) The
gas supply regulator is not properly sized. 2)
The gas pressure to the gas supply
regulator is insufficient. 3) The gas supply
piping has too many pressure drops. It will
be necessary to contact one or more of the
following when troubleshooting these
conditions. Your local gas utility. The
regulator manufacturer. The local AERCO
representative.
8.1.2 LOW GAS PRESSURE SWITCH
1. If static pressure to the unit is correct,
disconnect AC power to the unit. Remove
wires #20 & #140 from the low gas pressure
switch.
2. Using an ohmmeter, check the gas pressure
switch for continuity. Be sure the gas supply
to the unit is on and that the static pressure
is above 6.5” W.C. and reset the manual
rest gas pressure by depressing the reset
button prior to checking continuity.
Summary of Contents for AERCO KC Series
Page 51: ...TROUBLESHOOTING 41...
Page 65: ...APPENDIX C ix...
Page 72: ...APPENDIX F xvi...
Page 74: ...APPENDIX F xviii...
Page 76: ...APPENDIX G xx...
Page 77: ...APPENDIX G xxi...
Page 78: ...APPENDIX H xxii...
Page 79: ...APPENDIX H xxiii...
Page 80: ...APPENDIX H xxiv...

