background image

WattMaster WHP

Section 4

Start-Up and Troubleshooting

4-3

All communications wiring should be labeled to avoid confusion and to aid future
servicing.

COMPUTER
(OPTIONAL)

SYSTEM MANAGER

Remote Link

(OPTIONAL)

UNIT COMES WITH

STANDARD WALL MOUNT

120/24 VAC POWER SUPPLY

( MAY ALSO BE POWERED FROM 24VAC )

COMM LINK II

INTERFACE

(MULTIPLE LOOP)

TO OTHER MINILINKS

(NETWORK TERMINALS ONLY)

TO OTHER WHP CONTROLLERS

YS101716  REV. 1

SYSTEM MANAGER POWER SUPPLY

SHLD

COMMUNICATIONS

RS-485

R

T

GND

24VAC

POWER

LOOP

NETWORK

T

T

SH

SH

R

R

24V

A

C

GN

D

RELAY

OUTPUT

COM

1-3

OUT
OUT

1
2

COM

4-5

OUT
OUT
OUT

3
4

5

24VAC

24VAC

GND

GND

PWR

COMM

T

T

SHLD

SHLD

LD4

REC.

12V
AIN

1
2
3

4
5

GND
GND
AOUT

AIN

AIN
AIN
AIN

4-5

OUT

COMM

TEST

32K

8K

RAM

EPROM

ADDRESS           ADD

PRESSURE

SENSOR

485

COMM

R

R

YS101564

EW

D

O

G

0-

5

VD

C

0-

1

VD

C

CPU

RELAY

OUTPUT

COM

1-3

OUT

OUT

1
2

COM

4-5

OUT

OUT
OUT

3
4

5

PWR

COMM

LD4

REC.

12V
AIN

1
2
3

4
5

GND
GND

AOUT

AIN

AIN
AIN
AIN

4-5

OUT

COMM

TEST

32K

8K

RAM

EPROM

ADDRESS           ADD

PRESSURE

SENSOR

485

COMM

YS101564

EW

D

O

G

0-

5

VD

C

0-

1

VD

C

CPU

AIN1

AIN2

AIN3

AIN4

GND

AOUT1

YS101784

4 ANALOG IN  MOD I/O BD.

4RLY  IO BD.

4RLY  IO BD.

YS101790

YS101790

2

4

V

A

C

G

N

D

RL

Y

1

D1

D2

D3

D4

D5

CX

3

RAM

EPROM

C3

C2

U6

P

H

IL

IP

S

CX6

C1

CX2

U2

U3

PAL

CX4

U4

TUC-5R PLUS

YS101816 REV. 2

V1

V2

V3

V5

V4

TB2

4

NETWORK

TOKEN

16

32

8

SW1

ADD

2

1

ADDRESS

V6

PO

W

ER

GND

24VAC

L1

D1

6

R6

C9

SC1

R1

1

U1

1

MC340

64A

D1

3

C16

9936

VR2

7824C T

M

TB4

R2

7

C13

R1

0

VR1

C1

9

C1

8

NE5090NPB3192

0PS

U8

CX

8

U9

X1

R7

D1

0

R13

D12

C7

CX10

U10

CX12

U12

U14

CX14

PJ

3

PJ

2

PJ1

EXPANSION

PRESSURE
SENSOR

T'STAT

C17

D15

R26

C20

R25

R24

R22

U15

CX13

U13

C15

R19

R15

C14

D1

8

D1

7

PU1

PU2

PU3

PU4

PU5

PU7

D6

D7

D8

D9

D11

D14

C12

C10

0-

5

VD

C

0-

1

VD

C

JP1

C1

1

X2

GND

TB3

INPUTS

GND

GND

+VDC

AIN1

AIN2

AIN3

AIN4

AIN5

AOUT1

AOUT2

AIN7

RN4

1

RN5

RS-485

CX5

U5

R

TB1

SHLD

T

COMM

COMM

RN3

1

RN1

U1

CX1

1

LD6

COMM

PWR

LD7

LED1

LED2

LD9

LD8

R1

U7

RV1
VREF ADJ

R28

+VREF 

5.11V

TEST POINT

EWDOG

D19

RN2

1

COM1-3

COM4-5

R5

R4

R3

R2

R1

RL

Y

2

RL

Y

3

RL

Y

4

RL

Y

5

CX15

(1 MEG)

HH

P1

C2
1

03/31/04 03:38PM WED

OCCUPIED

NO ALARMS

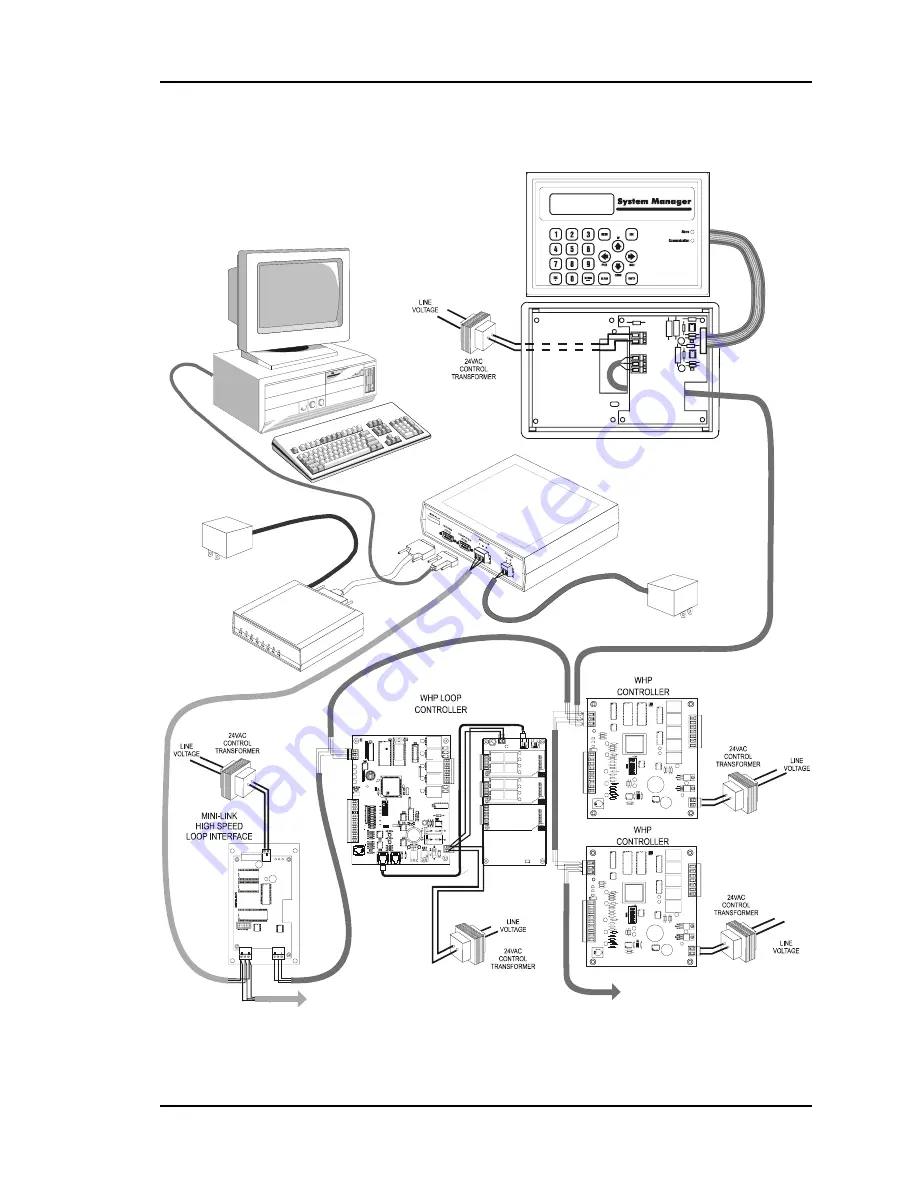
Figure 4-2: Communications Loop Routing

Summary of Contents for Water Source Heat Pump

Page 1: ...WHP Water Source Heat Pump Design Installation Operations Manual Revision 02A...

Page 2: ......

Page 3: ...ection 3 Programming Section 4 Start Up and Troubleshooting This document is subject to change without notice WattMaster Controls Inc assumes no responsibility for errors or omissions herein WHP Insta...

Page 4: ......

Page 5: ...of Operation 7 HVAC Operation w Reversing Relay 8 HVAC Operation w Heat Cool Relays 9 WHP Loop Controller Sequence of Operations 10 Summary 10 Pump Control 10 Pump VFD Control 11 Compressor Control 11...

Page 6: ......

Page 7: ...g the nature of the information presented Note Additional information which may be helpful Tip Suggestion to make installation set up and troubleshooting easier Caution Items which may cause the equip...

Page 8: ...ter source heat pump is a self contained water cooled packaged heating and cooling unit with a reversible refrigerant cycle Its components are typically enclosed in a common casing and include a tube...

Page 9: ...ths when the interior zones of a typical building require cooling while the exterior zones require heating When a water source heat pump system is used the heat rejected by the cooling units is used t...

Page 10: ...cupant Placing units away from the occupied space and ducting the supply air to the zone can minimize potential noise problems WattMaster WHP Control System The WattMaster WHP system is used to contro...

Page 11: ...its various pieces of equipment The Loop Controller can operate stand alone or used with the Water Source Heat Pump Controller WHP and in this configuration communicates common data such as outside a...

Page 12: ...occupied mode of operation The fan will be on if the WHP is programmed for Constant Fan operation The compressor demand request will not be sent to the Loop Controller If no WHP units are sending a re...

Page 13: ...again the override will reset for another 2 hour period if they programmed a 2 hour period bringing the total override time to 3 hours and 45 minutes If the user wants to cancel an override before it...

Page 14: ...the valve relay is activated Relay 5 The Minimum Off Timer is reset to ZERO and must be satisfied before any further operations are allowed c If the current mode requires the Reversing Valve to be act...

Page 15: ...nimum Cycle Time has been satisfied d If the last mode was the opposite demand mode make sure the Changeover Delay has been satisfied e Check the current Minimum Off Timer to make sure this stage has...

Page 16: ...n is configured the Loop Controller can generate a Global broadcast to force the Heat Pumps to open their Isolation Valves to reduce loop pressure if the high limit has been exceeded Pump Control If W...

Page 17: ...e relay 5 on the Loop Controller board so that it may used to turn on a local alarm signal Loop flow can be determined by a binary contact closure on input 3 or a 0 to 50 PSI pressure sensor on input...

Page 18: ...ated at 4 above setpoint it would de activate when the temperature fell to within 2 of setpoint stage 2 would de activate at setpoint and stage 1 would de activate 2 below setpoint A user defined stag...

Page 19: ...ter Temperature is below the current staging level and the timer has been satisfied an additional stage can be added up to the maximum available 8 stages If the selected Water Temperature is above the...

Page 20: ...down only pertains to the controlling water temperature This does not affect the pump operation If a external manual alarm reset button is connected between ground and input 5 All outputs are turned o...

Page 21: ...TEST 32K 8K RAM EPROM ADDRESS ADD PRESSURE SENSOR 485 COMM R YS101564 EWDOG 0 5 VDC 0 1 VDC CPU RELAY OUTPUT COM 1 3 OUT OUT 1 2 COM 4 5 OUT OUT OUT 3 4 5 24VAC GND PWR COMM T SHLD LD4 REC 12V AIN 1...

Page 22: ...Section 1 WattMaster WHP 1 16 Design Guide Notes...

Page 23: ...Wiring Overview 4 WHP Loop Controller 6 WHP Loop Controller Addressing 9 Supply Return Water Temperature Sensors 10 Outside Air Temperature Sensor 12 CommLink II Interface 13 WHP Controller 14 WHP Co...

Page 24: ...Thermowell 10 Figure 2 7 Strap On Water Temperature Sensor 11 Figure 2 8 Outside Air Temperature Sensor 12 Figure 2 9 CommLink Interface Wiring 14 Figure 2 10 WHP Controller 14 Figure 2 11 WHP Contro...

Page 25: ...unting Use the WHP Address Worksheet to list all WHP unit locations This will assist you greatly when setting up the system Be sure and install all wiring according to local state and national electri...

Page 26: ...AIN 4 5 OUT COMM TEST 32K 8K RAM EPROM ADDRESS ADD PRESSURE SENSOR 485 COMM R YS101564 EWDOG 0 5 VDC 0 1 VDC CPU RELAY OUTPUT COM 1 3 OUT OUT 1 2 COM 4 5 OUT OUT OUT 3 4 5 24VAC GND PWR COMM T SHLD L...

Page 27: ...60 or equivalent Tip Incorrect wiring of the communications loop is the most common mistake made during installation Before beginning installation write down the wire color used on each terminal conne...

Page 28: ...IN AIN AIN 4 5 OUT COMM TEST 32K 8K RAM EPROM ADDRESS ADD PRESSURE SENSOR 485 COMM YS101564 EWDOG 0 5 VDC 0 1 VDC CPU AIN1 AIN2 AIN3 AIN4 GND AOUT1 YS101784 4 ANALOG IN MOD I O BD 4RLY IO BD 4RLY IO B...

Page 29: ...a combination of the two can also be used Remember the best communication loop wiring is the one which utilizes the minimum number of ends while using the shortest wiring path Note The loop does not h...

Page 30: ...20 Dia Typ of 4 4 0 9 5 8 29 8 96 4 24 0 28 2 12 R 2 0 C 8 T B 2 P W R L D 1 2 4 V A C IN G N D G N D T B 1 P J 2 2 4 V D C O U T 7 8 2 4 C T 4 S L O T M O D U L A R I O B D V R 8 Y S 1 0 1 7 8 2 R 9...

Page 31: ...AC 24 VAC Heating Cooling 4 Heating Cooling 4 Heating Cooling 3 Heating Cooling 3 Heating Cooling 2 Heating Cooling 2 Heating Cooling 1 Heating Cooling 1 RLY1 D1 D2 D3 D4 D5 CX3 RAM EPROM C3 C2 U6 PHI...

Page 32: ...th shield 18 Ga Minimum Belden 82760 WattMaster Cable or equivalent Supply Water Temperature Sensor 24 ga Min 2 Conductors Return Water Temperature Sensor 24 ga Min 2 Conductors Outside Air Temperatur...

Page 33: ...2 U14 CX14 PJ3 PJ2 PJ1 EXPANSION PRESSURE SENSOR C17 D15 R26 C20 R25 R24 R22 U15 CX13 U13 C15 R19 R15 C14 D18 D17 PU1 PU2 PU3 PU4 PU5 PU7 D6 D7 D8 D9 D11 D14 C12 C10 0 5 VDC 0 1 VDC JP1 C11 X2 GND TB3...

Page 34: ...r is provided with a 4 long stainless steel thermowell It has MPT external threads and FPT internal threads A FPT fitting to accept the thermowell must be provided by others in the pipe to be monitore...

Page 35: ...n order to insure accurate temperature readings The sensor assembly is secured to the pipe by using the supplied wire ties to wrap and secure the sensor to the pipe Thermal conductive compound is also...

Page 36: ...most always be shown to be the result of poor sensor location Note All temperature sensors supplied with the system utilize the same thermistor type sensing element For troubleshooting sensor problems...

Page 37: ...5 OUT COMM TEST 32K 8K RAM EPROM ADDRESS ADD PRESSURE SENSOR 485 COMM R R YS101564 EWDOG 0 5 VDC 0 1 VDC CPU RELAY OUTPUT COM 1 3 OUT OUT 1 2 COM 4 5 OUT OUT OUT 3 4 5 PWR COMM LD4 REC 12V AIN 1 2 3...

Page 38: ...Y OUTPUT COM 1 3 OUT OUT 1 2 COM 4 5 OUT OUT OUT 3 4 5 24VAC GND PWR COMM T SHLD LD4 REC 12V AIN 1 2 3 4 5 GND GND AOUT AIN AIN AIN AIN 4 5 OUT COMM TEST 32K 8K RAM EPROM ADDRESS ADD PRESSURE SENSOR 4...

Page 39: ...ADD Connection To AUX Terminal is Reqd Only When Sensor Is Specified With Slide Adjust Option CAUTION WHP CONTROLLERS MUST HAVE ADDRESS SWITCHES SET BETWEEN 1 AND 30 UP TO 30 UNITS PER LOCAL LOOP EXC...

Page 40: ...perature Sensor 24 ga Min 2 Conductors for standard sensor 3 Conductors for sensors with setpoint adjustment Outside Air Temperature Sensor 24 ga Min 2 Conductors WHP Unit Control Wiring 24 ga Min 24...

Page 41: ...ER RECONNECT POWER AND THEN RECONNECT THE COMMUNICATIONS LOOP TO THE CONTROLLER To determine the boards address add the values of all the switches which are toggled down in the direction of the arrow...

Page 42: ...n Order For Any Changes To Take Effect Caution Disconnect All Communication Loop Wiring From The MiniLink Before Removing Power From The MiniLink Reconnect Power And Then Reconnect Communication Loop...

Page 43: ...id locating the sensor in dead air areas of a room This will result in slow response to temperature changes in the space Mount the sensor approximately 50 60 inches from the floor for best results The...

Page 44: ...inal block If the zone sensor has a setpoint adjust slider then connect the sensor terminal labeled AUX to the WHP Controller AIN 2 terminal block Tip If sensors must be installed on walls which are s...

Page 45: ...using the supplied sheet metal screws Be sure the gasket is compressed to provide an air tight seal For best accuracy apply insulation on the outside of the duct over the sensor This will help prevent...

Page 46: ...Sensor Leads Are Non polarized Butt Splice Leads To 24 Gauge Wire Minimum Connect Leads To Analog In And Ground At Controller The OE230 Duct Sensor Threads Into The OE291 Stainless Steel Thermowell T...

Page 47: ...tus Only 4 View Alarms 8 Menu Setpoints 9 Set Time Date 9 New Passcodes 11 Rebuild Alarm Map 12 Heat Pump Setpoints 13 Heat Pump Setpoint Menu 13 1 WHP Setpoints 13 2 WHP Schedules 20 Holidays 21 3 Re...

Page 48: ......

Page 49: ...operations are simple and straight forward utilizing non cryptic plain English messages The System Manager automatically detects the type of unit that has been selected and displays the appropriate st...

Page 50: ...t to leave the system unattended you should press the ESC key until the Main Screen appears CLEAR If you make a mistake while entering setpoint data you can clear the bad data from the display by pres...

Page 51: ...nly For quick access to an individual heat pump or the loop controller select this menu item No passcode is required to access the status of any unit installed on your system 2 View Alarms If the Syst...

Page 52: ...ed to access these status screens and no setpoints are available to the user from these screens To access a unit enter the Unit ID you wish to view The Unit ID is actually two separate numbers combine...

Page 53: ...emperature Line 3 Current Cooling Setpoint CSP and Heating Setpoint HSP Line 4 Effect of optional Sensor Slide Adjustment on the current operating setpoints WSHPRV 1 V2 03 Space Temp xxx x F CSP xx x...

Page 54: ...Start Delay ON OFF Line 4 Current Enable Status from Loop Controller Operations Disabled Operations Enabled Line 2 Current Compressor ON OFF Status Line 3 Current Reversing Valve ON OFF Status Line 4...

Page 55: ...ged by 5 F a Cooling Failure alarm is generated A Heating Failure is generated in the same manner only during the heating mode instead of the cooling mode The Hi Space Temp and Lo Space Temp Alarms ar...

Page 56: ...ndition This alarm may or may not be current as the System Manager latches the condition This makes it possible to determine if any intermittent alarm conditions have occured To find out what the alar...

Page 57: ...r the System Manager to broadcast the time and date to all controllers they must be powered up and communicating Programming Time If you selected the Menu key from the first menu screen you can access...

Page 58: ...ed Use Left Right Arrow If your area of the country requires Daylight Savings changes you can enable the System Manager to automatically reset its own clock during the Daylight Savings changeover If y...

Page 59: ...n enter any 4 digit number between 1000 and 9999 If you forget the passcode you programmed you can still access the system with a built in backdoor code This backdoor code is 9288 and is not programma...

Page 60: ...s to poll for alarms since none are connected This is useful during building startup when you don t want nuisance alarms bothering you The screen will display each address it is testing and if a unit...

Page 61: ...x F Heating Setpt xx F Minimum Default Maximum Cooling Setpt 50 F 74 F 90 F Heating Setpt 50 F 72 F 90 F From the main menu screen select MENU on the keypad select MENU again for Setpoints Then select...

Page 62: ...mum amount of change that it can have on the Heating and Cooling Setpoint and it is programmed here The SP Deadband is divided in half across the current heating and cooling setpoint and is used in st...

Page 63: ...Min 1 Min 20 Min Min Off Time 0 Min 6 Min 20 Min Min Cycle 0 Min 12 Min 60 Min WHP 1 Setpoints Changeover Delay Between Heat Cool Modes xx Min To prevent rapid cycling between heating and cooling mode...

Page 64: ...reversing valve you must select which mode requires it to be active Select either the COOLING MODE or the HEATING MODE message WHP 1 Setpoints Reversing Valve Used During COOLING MODE Use Left Right...

Page 65: ...hedule select the AUXILIARY RELAY MODE and then see the Aux Relay 5 Schedule assignment screen WHP 1 Setpoints Relay5 Configuration AUXILIARY RELAY MODE Use Left Right Arrow WHP 1 Setpoints Fan Mode o...

Page 66: ...time by a Startup Delay Period that is determined by their address switch setting The address is multiplied by the number of seconds you enter on this screen up to a maximum of 60 seconds per address...

Page 67: ...ster Type III Sensor readings can be calibrated Enter Positive values to increase the reading or Negative values to decrease the reading If no sensor is attached the calibration offset will still allo...

Page 68: ...events available per day The first line is the start time for event 1 and the next line is the stop time for event 1 The screens will step through the Start Time and then the Stop Time for each day o...

Page 69: ...want to be able to schedule all Water Source Heat Pumps on and off at the same time you can input a schedule on the Loop Controller and it will broadcast that schedule to all WHPs The screens will st...

Page 70: ...If you don t want to send the command select the Disabled message with the arrow keys If you do want to send the command select the Enabled message with the arrow keys and then press the Enter button...

Page 71: ...ns for the Loop Controller Menu item 2 accesses the alarms for the Loop Controller Menu can be selected to access the Setpoints screens Loop Controller Status Screens If you selected menu item 1 View...

Page 72: ...3 Current Water Flow Status Water Flow Proved No Flow Detected Line 4 Current Request to Operate Status LOOP ENABLED LOOP DISABLED Loop Control v1 06 LEAD Pump 1 ON STANDBY Pump 2 OFF Line 2 LEAD Pum...

Page 73: ...OFF Cool Stage 6 OFF Cool Stage 7 OFF Cool Stage 8 OFF Loop Control v1 06 Pressure xxx x PSI Pump VFD xx x VDC Heat VFD xx x VDC Line 2 Current Loop Water Pressure Line 3 Current Variable Speed Pump V...

Page 74: ...pansion board opens the Fire Smoke Alarm is generated The Phase Shutdown Alarm is generated as follows If the NO normally open contact from a phase monitoring device that is wired between GND and AIN7...

Page 75: ...the temperature rises above the Setpoint by the number of active stages times the deadband value Example There are 2 stages on a 3 deadband and the setpoint is 79 2 x 3 79 85 before stage 3 can activa...

Page 76: ...2 x 3 73 before stage 3 can activate WHP Loop Setpoints HEATING ADDITION Setpoint xx F Stage Deadband xx F Minimum Default Maximum Setpoint 50 F 76 F 99 F Stage Deadband 1 F 3 F 10 F The Staging Dela...

Page 77: ...Lo Limit 0 F 0 F 120 F Alarm Delay 0 Min 30 Min 120 Min The Loop Controller can modulate a Variable Speed Pump Select the PRESSURE option in place of the CONSTANT option for variable speed pumping The...

Page 78: ...SP xxx PSI If you attached a Pressure Sensor for proof of flow instead of a differential pressure contact closure for proof of flow the controlling pressure is programmed on this screen This Setpoint...

Page 79: ...50 PSI The Thermister Type III Sensor readings can be calibrated Enter a Positive value to increase the reading or a Negative value to decrease the reading If no sensor is attached the calibration off...

Page 80: ...Section 3 WattMaster WHP 3 32 Programming Notes...

Page 81: ...3 0 Loop Controller Overview 9 3 1 How It Works 9 3 1 1 Initialization 9 3 1 2 Operating Summary 9 3 2 Loop Controller Inputs Outputs 10 3 2 1 Analog Inputs 10 3 2 2 Analog Output 10 3 2 3 Binary Outp...

Page 82: ...iver Chip 34 5 4 Troubleshooting Loop Controller 35 5 4 1 Checking the Loop Controller Analog Inputs 35 5 4 2 Checking the Loop Controller Outputs 37 5 4 3 Checking the Local Loop at a WHP Loop Contro...

Page 83: ...1 2 WattMaster WHP System The standard WattMaster WHP system may have only one communications loop or as many as thirty communication loops depending on the number of WHP Controllers to be connected...

Page 84: ...4 5 OUT COMM TEST 32K 8K RAM EPROM ADDRESS ADD PRESSURE SENSOR 485 COMM R YS101564 EWDOG 0 5 VDC 0 1 VDC CPU RELAY OUTPUT COM 1 3 OUT OUT 1 2 COM 4 5 OUT OUT OUT 3 4 5 24VAC GND PWR COMM T SHLD LD4 R...

Page 85: ...M TEST 32K 8K RAM EPROM ADDRESS ADD PRESSURE SENSOR 485 COMM YS101564 EWDOG 0 5 VDC 0 1 VDC CPU AIN1 AIN2 AIN3 AIN4 GND AOUT1 YS101784 4 ANALOG IN MOD I O BD 4RLY IO BD 4RLY IO BD YS101790 YS101790 24...

Page 86: ...on volatile EEPROM memory and initializes all outputs to an OFF condition Note All future references to the Water Source Heat Pump Controller in this docu ment use WHP as the designation 2 1 2 Operati...

Page 87: ...PU Space Sensor Slide Adjust Supply Air Temp Leaving Water Temp or Dirty Filter Lockout 24 VAC Common for Inputs 1 3 Compressor On Off Heat 2 Heat Pump Reset Cool 1 Aux Heating or Cooling Cool 2 Rev V...

Page 88: ...lure Once the com pressor has activated the discharge air temperature has 10 minutes to change by 5 F or the controller assumes a mechanical failure has occurred AIN4 Leaving Water Temp and or Dirty F...

Page 89: ...d to follow an externally broadcast schedule signal 3 Auxiliary relay In this mode it can be used for any function requiring a man ual user intervention 4 Isolation valve May be used to initiate openi...

Page 90: ...WattMaster WHP Section 4 4 8 Start Up and Troubleshooting 2 2 6 WHP Controller Wiring Figure 4 4 Typical WHP Controller Wiring Diagram Communication LED...

Page 91: ...olatile EEPROM memory and initializes all outputs to an OFF condition 3 1 2 Operating Summary There is a standard set of operating instructions that are continuously performed over and over during nor...

Page 92: ...ture is used to determine if pumps should be turned on during off periods to prevent freezing When the OA tem perature is below 40 F the pumps will be turned on AIN5 Manual Reset Input Used to restart...

Page 93: ...ut relay dry contact open closed signal Relays 1 4 Heat Addition Rejection Stages Can be configured to be used for either stages of heating or cooling of water when required Relays 5 8 Heat Addition R...

Page 94: ...ND on the WHP Controller R RS 485 Communications terminal 3 2 7 Power Terminal This connector provides power to the Loop Controller 24 VAC Connect to the HOT side of the control transformer GND The gr...

Page 95: ...ction 4 Start Up and Troubleshooting 4 13 Figure 4 5 Loop Controller Inputs Outputs Line Voltage Local Loop RS 485 9600 Baud See Note 3 Connect To Next Controller And Or MiniLink On Local Loop Optiona...

Page 96: ...nds COMM LED blinks the board address Address 14 14 blinks Five second pause Twenty second time delay LED blinks twenty times Status code is repeatedly blinked every ten seconds to indicate controller...

Page 97: ...se Shutdown 5 Water Pressure Alarm Highest 6 Fire Alarm Figure 4 7 Diagnostic LED Blink Codes Only the highest priority failure code will be shown You must correct the highest priority alarm before ot...

Page 98: ...oded and labeled Communication Cable insures a quality installation It also makes your installation much easier and less likely to have communications wiring errors 4 Communication cable must always b...

Page 99: ...he address is incorrect reset the dipswitch then reapply power to the controller 13 After each controller is connected and completes its initialization sequence use the PC or System Manager to verify...

Page 100: ...OG 0 5 VDC 0 1 VDC CPU AIN1 AIN2 AIN3 AIN4 GND AOUT1 YS101784 4 ANALOG IN MOD I O BD 4RLY IO BD 4RLY IO BD YS101790 YS101790 24VAC GND RLY1 D1 D2 D3 D4 D5 CX3 RAM EPROM C3 C2 U6 PHILIPS CX6 C1 CX2 U2...

Page 101: ...SWITCH T SH R 24VAC GND T SH R 32 16 8 4 1 2 1 2 3 4 7 5 6 8 OFF 32 16 8 4 1 2 1 2 3 4 7 5 6 8 OFF NOTE THE POWER TO THE MINILINK MUST BE REMOVED AND RECONNECTED AFTER CHANGING THE ADDRESS SWITCH SET...

Page 102: ...CHANGING THE ADDRESS SWITCHES IN ORDER FOR ANY CHANGES TO TAKE EFFECT ALWAYS REMOVE THE COMMUNICATIONS LOOP PRIOR TO DISCONNECTING POWER RECONNECT POWER AND THEN RECONNECT THE COMMUNICATIONS LOOP TO T...

Page 103: ...rect Are the WHP and Loop Controller address switches set correctly See the addressing chart WHP Loop Controller should always be set to address 30 see Figure 4 10 Is the MiniLink address switch set c...

Page 104: ...problem The sensor should be mounted on an inside wall away from heat sources and in a location with adequate room air circulation Is the resistance reading correct Check with the Temperature Resistan...

Page 105: ...p Alarm If space temperature is 5 or more above cooling setpoint Lo Space Temp Alarm If space temperature is 5 or more below heating setpoint Dirty Filter Alarm Contacts between AIN4 and GND are short...

Page 106: ...on Proper loop voltages are essential for reliable communications It is normal to see fluctua tions at this point on the CommLink II The average value should be close to the acceptable range described...

Page 107: ...ing it at the CommLink II Note Be sure that the loop you are testing does not have a short circuit from T to R Tip The Loop LED located on the front panel should flicker when the CommLink II is attemp...

Page 108: ...roper loop voltages are essential for reliable communications It is normal to see fluctua tions at this point on the CommLink II The average value should be close to the acceptable range described bel...

Page 109: ...wered Overview Proper loop voltages are essential for reliable communications It is normal to see fluctua tions on an operating communications loop The average value should be close to the ac ceptable...

Page 110: ...LED is not flickering the unit is not communicating with the CommLink II Damage typically occurs when the communications loop is exposed to excessive voltage as may occur during installation due to w...

Page 111: ...liable communications It is normal to see fluctua tions on an operating communications loop The average value should be close to the ac ceptable range described below Values will vary upon initial pow...

Page 112: ...llers will float both of their communications connections at about 2 45 Volts you can quickly check an entire loop by unplugging it at the MiniLink Note Be sure that the loop you are testing does not...

Page 113: ...ondition Action If voltages are too high or too low on either side 1 One or more of the attached controllers has a damaged Comm Driver chip Lo cate and replace the driver chip s See 1 3 11 Comm Driver...

Page 114: ...he LED is not flickering the unit is not functioning Proper loop voltages are essential for reliable communications It is normal to see fluctua tions at this point on the MiniLink The average value sh...

Page 115: ...op The average value should be close to the ac ceptable range described below Values will vary upon initial powerup for about 30 45 sec onds The voltages may fluctuate as normal communications occur M...

Page 116: ...ur during installation due to wiring errors The driver chips are socketed on all boards to facilitate servicing It is unusual for driver chips to fail during normal operation Almost all failures occur...

Page 117: ...rm and Request to Run inputs should read greater than 5 0 volts if the at tached contact is OPEN and less than 0 5 volts if the contact is CLOSED contacts CLOSE between the input and GND The Fire Alar...

Page 118: ...stalled since this is a normally closed contact input If this is not done the system will not operate AIN2 Exp Bd Request to Run If the input is OPEN the voltage will be greater than 5 0 volts If the...

Page 119: ...analog output wiring can be checked at the Loop Controller by checking voltages on the Analog Output Connector Note The Loop Controller must be pow ered for these tests Measurements Meter Acceptable...

Page 120: ...loop The average value should be close to the ac ceptable range described below Values will vary upon initial powerup for about 30 45 sec onds The voltages may fluctuate as normal communications occu...

Page 121: ...occur during installation due to wiring errors The driver chips are socketed on all boards to facilitate servicing It is unusual for driver chips to fail during normal operation Almost all failures oc...

Page 122: ...RD SURFACE A SMALL SCREWDRIVER MAY BE INSERTED BETWEEN THE CHIP AND THE SOCKET TO AID IN REMOVAL OF THE CHIP BE VERY CAREFUL NOT TO INSERT THE SCREWDRIVER UNDER THE SOCKET DAMAGE TO THE BOARD IS NOT C...

Page 123: ...voltage with meter set on DC volts Place the minus lead on GND terminal and the plus lead on the sensor input terminal being investigated If the voltage is above 5 08 VDC then the sensor or wiring is...

Page 124: ...13 28 3 32 30 13 60 3 40 31 13 92 3 48 32 14 24 3 56 33 14 56 3 64 PRESSURE PSI CURRENT MILIAMPS VOLTAGE AT INPUT VDC 34 14 88 3 72 35 15 20 3 80 36 15 52 3 88 37 15 84 3 96 38 16 16 4 04 39 16 48 4...

Page 125: ...WattMaster WHP Section 4 Start Up and Troubleshooting 4 43 Notes...

Page 126: ...WHP IO 02A Printed in the USA October 2004 All rights reserved Copyright 2004 Wattmaster Controls Inc 8500 NW River Park Drive Parkville MO 64152 Phone 816 505 1100 E mail mail wattmaster com Fax 816...

Reviews: