19
5608 741 - 04
Vitodens Rigid and Flex Venting Systems Installation
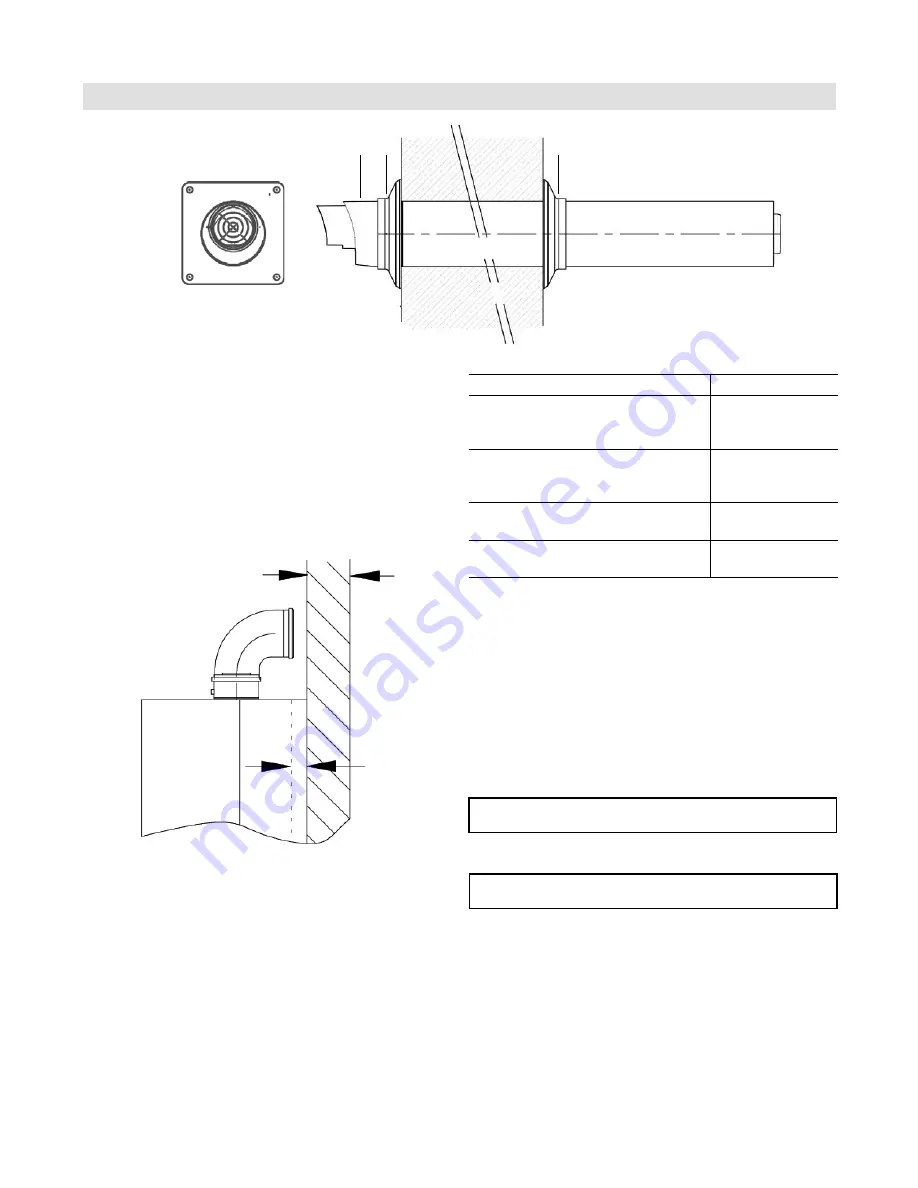
Side Wall Vent Installation (Coaxial)
Coaxial Vent Termination
Legend
1
Vent termination
2
Wall flashing (inside)
3
Wall flashing (outside)
Side wall vent termination installation
1. Provide side wall opening (see table above) to install
vent
termination.
2. Slide vent termination
1
with wall flashing
3
into
opening (drain openings must be located on the
outside of the wall, pointing downward).
3. Attach wall flashing
2
to inside of wall using the
screws and plugs provided.
4. Attach wall flashing
3
to outside of wall.
If required the vent termination may be shortened.
IMPORTANT
Potential gaps between the vent-air intake and the
surrounding construction which may cause air, rain or flue
gases to leak into the wall or the building, must be sealed
with approved outdoor sealant/caulking to prevent leakage
of any kind.
When installing a side wall vent system with the minimum
equivalent vent length (87º elbow and vent termination,
a wall thickness of at least 6 in. (152 mm) is required.
For walls with a thickness less than 6 in. (152 mm), means
must be provided to offset the boiler from the wall (see
illustration above).
6 in. (152 mm)
Offset
Wall opening information
Vent system
Opening Ø
60/100
M&G/Duravent, PolyFlue,
Z-Flex, ECCO, Centrotherm InnoFlue
4
a
in. (108 mm)
80/125
M&G/Duravent, PolyFlue,
Z-Flex, ECCO, Centrotherm InnoFlue
5
a
in. (133 mm)
100/150
M&G/Duravent, PolyFlue
6
e
in. (160 mm)
110/160
Z-Flex, ECCO, Centrotherm InnoFlue
6
11
/
16
in (170 mm)
IMPORTANT
1
2
3
Front view


