26
Installation and maintenance instructions ecoTEC plus 937 0020031552_06
5.9
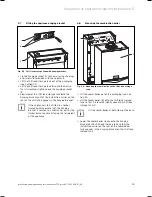
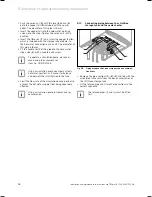
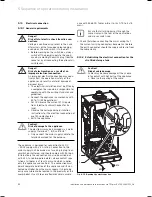
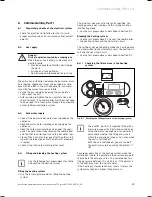
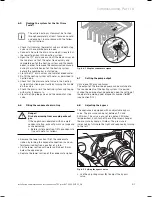
Removing the front case
1
2
Fig. 5.5 Removing/fixing the front case
Proceed as follows to remove the front cladding:
Release the screw (
1
) on the base of the unit.
Push the two retaining clips (
2
) on the base of the
unit inwards until the front case releases.
Hold the front case by the bottom edge, pull forwards
and remove the front case from the unit.
5.10
General instructions concerning the heating
system
b
Caution!
Risk of damage to the unit.
Residue in the pipes, such as welding beads,
scale, hemp, putty, rust and coarse dirt, may
be deposited in the appliance and cause mal-
functions.
Flush the heating system thoroughly
before connecting the appliance in order to
remove any possible residue.
i
The heating system is fitted with an expan-
sion tank (10 l/0.75 bar).
Before connecting the unit, make sure that this vol-
ume is adequate. Otherwise the installation must be
fitted with an additional expansion vessel (see Sec-
tion 4.8.6).
>
>
>
>
>
5.11 Gas
connection
a
Danger!
Risk of death caused by improper gas
installation.
An improper gas installation may impair the
operational safety of the appliance and result
in material damage or personal injury.
The gas installation should only be fitted
by a competent person approved at the
time by the Health and Safety Executive
and in accordance with the gas safety
(installation and use) regulations 1998.
In doing so, the legal directives and the
local regulations for gas supply companies
must be observed.
a
Danger!
Risk of poisoning and explosion due to
escaping gas.
Possible leaks in the gas line.
Make sure there is no tension in the gas
line when it is installed.
b
Caution!
Risk of damage due to excessive pressure.
The gas valve may be damaged by high pres-
sure.
Check the tightness of the gas valve using
a maximum pressure of 150 mbar.
b
Caution!
Risk of damage to gas shut-off valves
caused by heat transfer.
If the final connections are soldered, the heat
transferred during the process may damage
the gas shut-off valves.
Use extra care when soldering.
>
>
>
>
>
5 Sequence of operations during installation
Summary of Contents for ecoTEC plus 937
Page 1: ...For the heating engineer Installation and maintenance instructions GB IE ecoTEC plus 937 VUI...
Page 74: ...74 Installation and maintenance instructions ecoTEC plus 937 0020031552_06...
Page 76: ...76 Installation and maintenance instructions ecoTEC plus 937 0020031552_06...
Page 77: ...Installation and maintenance instructions ecoTEC plus 937 0020031552_06 77...
Page 78: ......
Page 79: ......
Page 80: ...0020031552_06 GBIE 102010 Subject to alterations...

