Utax CD 1325 Instruction Handbook Manual Download Page 18

Copying Functions 

1-4

ADVANCED OPERATION GUIDE

Paper Selection

Select the paper source that contains the required paper size.

NOTE: 

Specify in advance the size and type of the paper loaded in the 

cassette (refer to 

Original/Paper Setup on page 6-6

).

Selecting the Cassette

Use the procedure below to select the paper supply cassette.

1

Place the originals on the platen.

2

Press the 

Copy

 key.

3

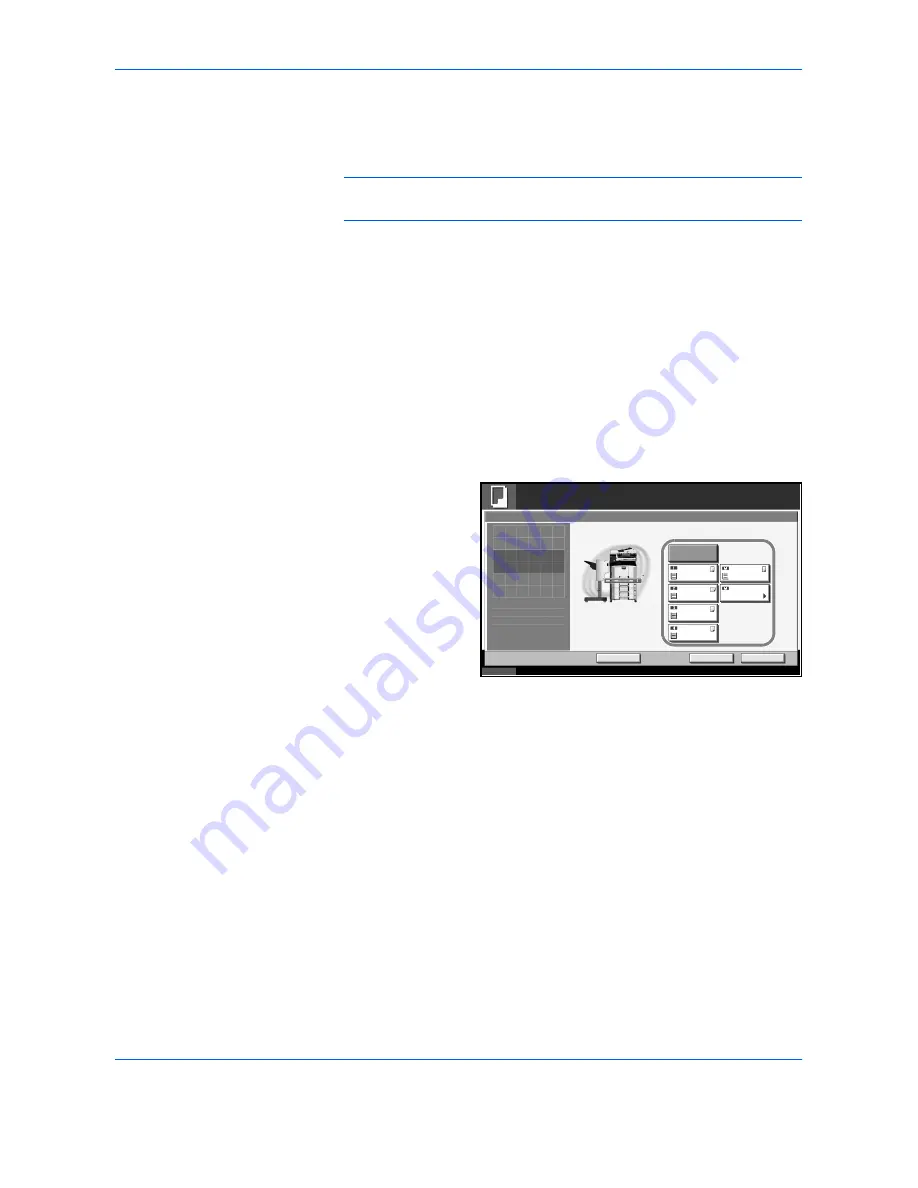
Press [Org./Paper/Finishing] and then [Paper Selection].

4

Press the key of the paper source corresponding to the required paper 
size. The cassette in which the paper is loaded is selected.

If [Auto] is selected, 
the paper matching 
the size of the 
original is selected 
automatically.

5

Press [OK].

6

Press the 

Start

 key to start copying.

Status

10/10/2007    10:10

Ready to copy.

Press [OK] to  display

Copies

Add Shortcut

Cancel

OK

Paper Selection

Auto

MP Tray

Setting

Letter

Plain

Letter
Plain

Ledger
Plain

Letter

Plain

Plain

1

Original
Zoom
Send

100%

- - -

:
:
:

- - -

the image.

Letter

Summary of Contents for CD 1325

Page 1: ...INSTRUCTION HANDBOOK DIGITAL MULTIFUNCTIONAL SYSTEM CD 1325 ADVANCED ...

Page 2: ... you operate the machine correctly perform routine maintenance and take a simple troubleshooting action as necessary so that you can always use the machine in good condition Please read this Advanced Operation Guide before you start using the machine and keep it close to the machine for easy reference ...

Page 3: ...D OPERATION GUIDE i Legal and Safety Information Please read this information before using your machine This chapter provides information on the following topics Legal Information ii Regarding Trade Names iii ...

Page 4: ...AX GmbH is prohibited Legal Restriction on Copying Scanning It may be prohibited to copy scan copyrighted material without permission of the copyright owner It is prohibited under any circumstances to copy scan domestic or foreign currencies Local laws and regulations may prohibit or restrict copying scanning of other items not mentioned above ...

Page 5: ... Seiko Epson Corporation This machine has been developed using embedded real time operating system Tornado by Wind River Systems Inc PCL6 a command language of HP LaserJet emulated by this machine is using the compatible system PeerlessPrintXL developed by Peerless Systems Corporation PeerlessPrintXL is a trademark of Peerless Systems Corporation 2381 Rosecrans Ave ElSegundo CA 90245 U S A TrueTyp...

Page 6: ... names are registered trademarks or trademarks of their respective companies The designations and will not be used in this Operation Guide GPL Firmware of this machine is using in part the GPL applied codes www fsf org copyleft gpl html Please access http www kyoceramita com gpl for more information on how to make GPL applied codes available ...

Page 7: ...atus Job Cancel Explains how to check the job status and job history and how to cancel jobs being printed or waiting to print Also explains how to check the remaining paper and device status and how to cancel fax transmission 6 System Menu Describes the System Menu options for general machine operation 7 Management Explains user login administration and job accounting Also describes the procedure ...

Page 8: ...ention Description Example Bold Indicates the operation panel key or a computer screen Press the Start key Regular Indicates the touch panel keys Press OK Italic Indicates the message displayed on the touch panel Ready to copy is displayed Used to emphasize a key word phrase or references to additional information For more information refer to Sleep and Auto Sleep on page 3 4 Note Indicates supple...

Page 9: ...de continuous operation of the keys on the touch panel is as follows Actual procedure Description in this Operation Guide Press Copy T Press Change of Quick Setup T Press T twice T Press Change of Original Image Press Copy Change of Quick Setup T twice and then Change of Original Image ...

Page 10: ... icons are used to indicate originals and paper set directions on the touch panel Set direction Indicated size The size of original paper that can be used depends on the function and source tray For further details refer to the page detailing that function or source tray Vertical direction A4 B5 A5 B6 A6 16K Letter Statement For original paper dimension A is longer than B Horizontal direction A4 R...

Page 11: ...g 1 38 Memo Mode 1 40 Density Adjustment 1 42 Image Quality 1 43 EcoPrint 1 44 Continuous Scan 1 45 Auto Image Rotation 1 47 Negative Image 1 48 Mirror Image 1 49 Job Finish Notice 1 50 File Name 1 52 Priority Override 1 53 Repeat Copy 1 54 Programm Copying and Sending 1 56 Registering Shortcuts Copying and Sending 1 58 2 Sending Functions Original Size Selection 2 2 Sending Size Selection 2 4 Zoo...

Page 12: ...obs 5 13 Canceling of Jobs 5 14 Priority Override for Waiting Jobs 5 14 Reordering Print Jobs 5 15 Checking the Remaining Amount of Toner and Paper 5 16 Device Communication 5 17 6 System Menu Return to Top on the System Menu 6 2 Common Settings 6 2 Copy Settings 6 38 Sending Settings 6 44 Document Box Removable Memory Settings 6 46 Printer Settings 6 48 Network Setup 6 56 Printing Reports Sending...

Page 13: ...urity Kit Functions 8 2 Touch Panel Display after the Security Kit is Installed 8 4 Installing the Security Kit 8 5 Changing Security Functions 8 6 System Initialization 8 8 Warning Message 8 9 Appendix Paper Appendix 2 Glossary Appendix 9 Index Index 1 ...

Page 14: ...Contents xii ADVANCED OPERATION GUIDE ...

Page 15: ...1 17 Combine Mode 1 20 Margin Centering Mode 1 23 Border Erase 1 25 Booklet from Sheets 1 28 Duplex 1 31 Cover Mode 1 35 Form Overlay 1 36 Page Numbering 1 38 Memo Mode 1 40 Density Adjustment 1 42 Image Quality 1 43 EcoPrint 1 44 Continuous Scan 1 45 Auto Image Rotation 1 47 Negative Image 1 48 Mirror Image 1 49 Job Finish Notice 1 50 File Name 1 52 Priority Override 1 53 Repeat Copy 1 54 Program...

Page 16: ...ndard Sizes 1 Inch models A3 B4 A4 A4 R B5 B5 R A5 A5 R B6 B6 R A6 R Folio 8K 16K and 16K R Metric models Ledger Legal Letter Letter R Statement Statement R 8 5 13 5 Oficio II 11 15 8K 16K and 16K R Others Select from envelope postcard or the custom sized originals For instructions on how to specify the custom original sizes Custom 1 to 4 refer to Custom Original Size Setup on page 6 6 The input u...

Page 17: ...ress OK 6 Press the Start key to start copying Status 10 10 2007 10 10 Ready to copy the image Copies Add Shortcut Ledger Cancel OK Letter Legal Letter Statement Executive 11x15 8 5x13 5 OficioII Auto Standard Sizes 1 Standard Sizes 2 Others Size Entry Original Size 1 Original Zoom Send 100 Press OK to display Status 10 10 2007 10 10 Ready to copy Press OK to display Copies Add Shortcut Cancel OK ...

Page 18: ...Press the Copy key 3 Press Org Paper Finishing and then Paper Selection 4 Press the key of the paper source corresponding to the required paper size The cassette in which the paper is loaded is selected If Auto is selected the paper matching the size of the original is selected automatically 5 Press OK 6 Press the Start key to start copying Status 10 10 2007 10 10 Ready to copy Press OK to display...

Page 19: ...tom sizes ISO B5 Envelope 10 Envelope 9 Envelope 6 Envelope Monarch Envelope DL Envelope C5 Envelope C4 Hagaki Oufuku Hagaki Youkei 4 Youkei 2 and Custom 1 to 4 For instructions on how to specify the custom paper sizes Custom 1 to 4 refer to Adding a Custom Size and Media Type for Paper to Print on page 6 6 Size Entry Enter the size not included in the standard sizes 1 and 2 Inch models Horizontal...

Page 20: ... sizes You can enter the size directly using the numeric keys after pressing Keys 5 Press Media Type 6 Press Media Type to select paper type and press OK 7 Press OK 8 Press OK 9 Press the Start key to start scanning the originals 10 When the machine is ready the confirmation screen for the specified paper appears Load the required paper in the Multi Purpose tray and press Continue to start copying...

Page 21: ...at the same time Supported Combinations of Originals Originals of the Same Width The supported combinations of originals are as follows Ledger and Letter A3 and A4 Ledger and Letter R Folio and A4 R B4 and B5 Originals of Different Widths Place all originals of different widths The supported combinations of originals are as follows NOTE You cannot scan two sided originals when placing originals of...

Page 22: ... R and B5 R Selecting How to Copy Originals Select whether you wish to create individual copies on different size papers matching the original sizes or to produce all copies on the same size papers NOTE This function is available regardless of whether originals have the same width or not ...

Page 23: ...opies or Same Size Copies as finish size 5 Select the combination of originals from Same Width and Diff Width When Same Size Copies is selected select Long Edge Left or Short Edge Left as the first original orientation 6 Press OK 7 Press the Start key to start copying Option Description Mixed Sized Copies Originals are detected individually for size and copied to the same size papers as originals ...

Page 24: ...re If On is selected as the Orientation Confirmation setting in the System Menu the selection screen for original orientation appears when you select any of the above functions When placing originals on the platen When placing originals on the optional document processor NOTE To change the default setting for the original orientation refer to Original Orientation on page 6 21 Original Top Edge Top...

Page 25: ... key 3 Press Org Paper Finishing and then Original Orientation 4 Select Top Edge Top or Top Edge Left as the way the original is oriented 5 Press OK 6 Press the Start key to start copying Status 10 10 2007 10 10 Ready to copy Copies Cancel OK Original Orientation Press OK to display Add Shortcut Top Edge Left Enter the orientation of the original document s top edge Top Edge Top 1 the image ...

Page 26: ... same sized paper with different orientation in the paper source other than the selected paper source The paper sizes supported in Offset are A4 B5 Letter and 16K The procedure for using collate offset copying is explained below 1 Press Org Paper Finishing and then Collate Offset 3 2 1 3 2 1 3 2 1 3 2 1 Original Copy 3 2 1 3 2 1 3 2 1 3 2 1 Original Copy Status 10 10 2007 10 10 Image Quality Set O...

Page 27: ...ress OK 4 Use the numeric keys to enter the copy quantity 5 Place the originals and press the Start key Copying begins Status 10 10 2007 10 10 Ready to copy Copies Cancel OK Collate Offset Press OK to display Add Shortcut Off Each Set Off On Collate Offset 1 the image Status 10 10 2007 10 10 Ready to copy Copies Cancel OK Collate Offset Press OK to display Add Shortcut Off Each Page Off On Collate...

Page 28: ...ent finisher or built in finisher The following stapling options and orientations are available Use the procedure below to produce stapled copies 1 Press the Copy key 2 Press Org Paper Finishing and then Staple Original Document processor Platen Orientation of Original Copy Document finisher Built in finisher Document finisher Built in finisher ...

Page 29: ...ientation of the originals either Top Edge Top or Top Edge Left Then press OK 5 Press OK 6 Place the originals on the platen and press the Start key Copying begins Status 10 10 2007 10 10 Ready to copy Copies Cancel OK Staple Punch Press OK to display Add Shortcut Top Edge Top 1 staple Staple Off Original Orientation Upper Left Upper Right 1 the image ...

Page 30: ...Output Tray 3 Select the output destination for finished copies When you select Finisher tray select the orientation of output copy Face Up print facing up or Face Down print facing down 4 Press OK 5 Place the originals in the document processor or on the platen Press the Start key to start copying Destination Description Top tray Top tray of the machine where copies are stored Finisher Tray Copy ...

Page 31: ...he sizes before and after copying original size paper size are as follows Letter R Ledger 129 Statement R 64 A3 141 A5 70 A4 25 400 Model Zoom Level OriginalCopy Inch Models 100 Auto 400 Max 200 STMT Ledger 154 STMT Legal 129 Letter Ledger 121 Legal Ledger 78 Legal Letter 77 Ledger Legal 64 Ledger Letter 50 Ledger STMT 25 Min Metric Models 100 Auto 400 Max 200 A5 A3 141 A4 A3 A5 A4 127 Folio A3 10...

Page 32: ...e platen 2 Press the Copy key 3 Press Layout Edit and then Zoom 4 Press Auto to use Auto Zoom Press or to change the displayed magnification as desired You can also enter the magnification directly using the numeric keys by pressing Keys To use Preset Zoom select the key of desired magnification Y X Status 10 10 2007 10 10 Ready to copy Copies Cancel OK Zoom Press OK to display Add Shortcut 25 400...

Page 33: ...ctly using the numeric keys by pressing Keys Press Original Orientation to choose orientation of the originals either Top Edge Top or Top Edge Left Then press OK 5 Press OK 6 Press the Start key to start copying Status 10 10 2007 10 10 Ready to copy Copies Cancel OK Zoom Press OK to display Add Shortcut X Standard Zoom XY Zoom 25 400 Y 25 400 Keys Keys Top Edge Top Original Orientation 1 the image...

Page 34: ...5 Letter Letter R Statement R 8K 16K and 16K R 2 in 1 Mode For copying two originals onto a single sheet This mode can be used with Duplex mode to copy four originals onto one sheet The following 2 in 1 options and output orientations are available NOTE When placing the original on the platen be sure to copy the originals in page order 4 in 1 Mode For copying four originals onto a single sheet Thi...

Page 35: ...platen be sure to copy the originals in page order Types of Page Boundary Lines The following types of the boundary lines are available The procedure for using Combine mode copying is explained below 1 Press the Copy key 2 Press Layout Edit and then Combine Original Document processor Platen Orientation of Original Copy None Dotted Solid Borders Cropmark ...

Page 36: ...op or Top Edge Left Then press OK 6 Press OK 7 Place the originals and press the Start key If the original is placed on the platen replace the original and press the Start key After scanning all originals press Scan finish to start copying Status 10 10 2007 10 10 Ready to copy Copies Cancel OK Combine Press OK to display Add Shortcut Layout 4 in 1 2 in 1 Left then Down Top Edge Top Original Orient...

Page 37: ... When Auto is selected an appropriate margin is applied automatically on the rear page depending on a margin specified for the front page and a binding orientation Separate Front Back Margins Enables you to specify the front and back settings separately NOTE You can set the default margin width Refer to Margin Default on page 6 29 for details Use the procedure below to make copies with margins 1 P...

Page 38: ...ge Top or Top Edge Left Then press OK 6 Press OK 7 Press the Start key to start copying Status 10 10 2007 10 10 Ready to copy Copies Cancel OK Margin Centering Press OK to display Add Shortcut Left Right Off Margin 0 75 0 75 Top Bottom 0 75 0 75 Keys Keys Top Edge Top Original Orientation Centering Auto Back Page Margin 1 0 00 0 00 the image Status 10 10 2007 10 10 Ready to copy Copies Cancel OK M...

Page 39: ...rder Erase Sheet Erases black borders around the single sheet original Border Erase Book Erases black borders around the edges and in the middle of the original such as a thick book You can specify the widths individually to erase the borders around the edges and in the center of the book Individual Border Erase Specify border erase widths individually for all edges Original Copy Original Copy Ori...

Page 40: ...e or to enter the width in Top Bottom Left or Right Press Keys to use the numeric keys for entry Press Original Orientation to select the original orientation from either Top Edge Top or Top Edge Left Then press OK 5 Press OK Input units Border Erase Range Inch Models 0 to 2 in 0 01 increments Metric Models 0 mm to 50 mm in 1 mm increments Status 10 10 2007 10 10 Ready to copy Copies Cancel OK Bor...

Page 41: ...CopyingFunctions ADVANCED OPERATION GUIDE 1 27 1 6 Press the Start key to start copying ...

Page 42: ...per from the cassette refer to Paper Source for Cover Paper on page 6 15 The supported original and paper sizes are as follows For binding on the left side The folded copies can be read from left to right Type of Original Original Size Paper Size One sided original Two sided original All Except for custom sized originals A3 B4 A4 A4 R B5 B5 R A5 A5 R Ledger Legal Letter and Letter R All A3 B4 A4 R...

Page 43: ...ided originals Press 2 sided Booklet to produce a booklet from two sided originals Press Book Booklet to produce a booklet from an open book original 4 If you selected 2 sided Booklet or Book Booklet choose the binding orientation in Finishing Original Copy Original Copy Status 10 10 2007 10 10 Ready to copy Copies Cancel OK Booklet Press OK to display Add Shortcut Original 2 sided Booklet 1 sided...

Page 44: ...inal Orientation to choose orientation of the originals either Top Edge Top or Top Edge Left Then press OK 7 Press OK 8 Place the originals in the document processor or on the platen and press the Start key NOTE When using the platen be sure to place the originals in page order If the originals are placed on the platen consecutively replace each original after pressing the Start key After scanning...

Page 45: ... sided to Two sided Produces two sided copies from one sided originals In case the originals are an odd number the back side of the last copy will be blank The following binding options are available A Original Left Right Binding Copy Left Right Binding Images are copied onto the back side without being rotated B Original Left Right Binding Copy Top Binding Images are copied onto the back side aft...

Page 46: ...e copied onto the back side without being rotated Top Binding Images are copied onto the back side after being rotated 180 Two sided to Two sided Produces two sided copies from two sided originals Optional document processor is required NOTE The paper sizes supported in Two sided to Two sided mode are Ledger Legal Letter Letter R Statement Oficio II 8 5 13 5 A3 B4 A4 A4 R B5 B5 R A5 R and Folio 2 ...

Page 47: ...Letter R A3 B4 A4 R B5 R A5 R and 8K Paper Letter A4 and B5 When you select the paper size change the zoom level to match that size Book to Two sided Produces two sided copies from originals with facing pages NOTE The following sizes of originals and paper are supported in Book to Two sided mode Original Ledger Letter R A3 B4 A4 R B5 R A5 R and 8K Paper Letter A4 and B5 The procedure for using dup...

Page 48: ... press the Start key If the originals are placed on the platen consecutively replace each original after pressing the Start key After scanning all originals press Scan finish to start copying Status 10 10 2007 10 10 Ready to copy Copies Cancel OK Duplex Press OK to display Add Shortcut Book 2 sided 1 sided 2 sided Top Edge Top Original Orientation 1 sided 1 sided 2 sided 2 sided Finishing Binding ...

Page 49: ...en Cover 4 Press Front Cover or Front and Back Covers 5 Press OK 6 Press the Start key If the originals are placed on the platen consecutively replace each original after pressing the Start key After scanning all originals press Scan finish to start copying Type of Cover Description Front Cover First page of the originals is copied on a different paper Front and Back Covers First page and last pag...

Page 50: ...y to adjust the density of the form Choose from ten levels in 10 increments To use the forms already registered press Select Stored Form Press Select Form to view the form list Select the desired form from the list and press OK Original Copy Forms Status 10 10 2007 10 10 Ready to copy Copies Cancel OK Form Overlay Press OK to display Add Shortcut Density Scan New Form Select Stored Form Off 10 100...

Page 51: ... to view the selected form data 4 Press OK 5 Place the originals Place the original for the form on top of the other originals When using the optional document processor the first page of the originals should be placed on the top 6 Press the Start key to start copying ...

Page 52: ...age 4 Select the numbering format from 1 P 1 or 1 n 5 To start page numbering from a page other than the first page press or of 1st Page and select the starting page You can also enter the number with the numeric keys after pressing Keys 6 To start the numbering with a number other than 1 press or of Start Number and enter the starting number You can also enter the number with the numeric keys aft...

Page 53: ...after pressing Keys 8 The total number of pages n in the format 1 n can be changed manually Press Denominator and select Manual Press or to enter the total number of pages and press OK You can also enter the number with the numeric keys after pressing Keys 9 Press Original Orientation to choose orientation of the originals either Top Edge Top or Top Edge Left Press OK 10 Press OK 11 Press the Star...

Page 54: ...de is available for the copy paper sizes of Ledger Legal Oficio II 8 5 13 5 Letter Letter R Statement R A3 B4 Folio A4 A4 R B5 B5 R A5 R 8K 16K and 16K R Layout A Reduces images of each original page for printing onto half of a page leaving the other half blank for notes Layout B Reduces images of two original pages for copying onto half of a single page leaving the other half blank for notes Orig...

Page 55: ... page layout from Layout 5 Press Border Line to select the page boundary line Press OK 6 Press Original Orientation to select orientation of the originals either Top Edge Top or Top Edge Left Press OK 7 Press OK 8 Press the Start key to start copying None Dotted Solid Borders Cropmark Status 10 10 2007 10 10 Ready to copy Copies Cancel OK Memo Page Press OK to display Add Shortcut Off Layout B Top...

Page 56: ... and then Density 4 To adjust density manually press 3 3 Lighter Darker You can change the density level 3 3 Lighter Darker by half a step To change density automatically press Auto 5 Press OK 6 Press the Start key to start copying Mode Description Manual Density is adjustable to either 7 or 13 different levels Auto Optimum density is selected depending on density of original Status 10 10 2007 10 ...

Page 57: ...e Quality and then Original Image 4 Select the image quality 5 Press OK 6 Press the Start key to start copying Image Quality Mode Description Text Photo Text and photos together Text Only text no photos Photo Only photos no text Status Ready to copy Copies Cancel OK Original Image Press OK to display Text Select original document type for best copy results Text Photo Text and photos together Text ...

Page 58: ... EcoPrint is explained below 1 Place the originals on the platen 2 Press the Copy key 3 Press Image Quality and then EcoPrint 4 Press On 5 Press OK 6 Press the Start key to start copying Status Ready to copy Copies Cancel OK EcoPrint Press OK to display On Conserve toner when printing Please use EcoPrint for test copies and other situations where high quality copies are not necessary Off Add Short...

Page 59: ...e Density If you use Job Build you can insert a blank paper during scanning or a blank page during duplex copying The procedure for making copies using Continuous Scan is explained below 1 Press the Copy key 2 Press Advanced Setup and then Continuous Scan 3 If Continuous Scan is selected press On If Job Build is selected press Job Build and select desired binding orientation 4 Press OK 5 Place the...

Page 60: ...fter scanning all originals press Scan finish to start copying Status 10 10 2007 10 10 Copies Cancel Scan Finish Scanner Setting Original Size Original Orientation Original Image 2 sided Book Original Zoom Border Erase Density 1 Auto Auto 2 sided Top Edge Top 100 Text Photo Off Next Copy On Front Sheet Insertion Next Copy On Back Finished Pages Pages Letter Paper Selection Plain Scan next original...

Page 61: ...on on page 6 31 The procedure for making copies using Auto Image Rotation is explained below 1 Place the originals on the platen 2 Press the Copy key 3 Press Advanced Setup and then Auto Image Rotation 4 Press On to select Auto Image Rotation 5 Press OK 6 Press the Start key to start copying Status 10 10 2007 10 10 Ready to copy Copies Cancel OK Auto Image Rotation Press OK to display Add Shortcut...

Page 62: ...pies 1 Place the originals on the platen 2 Press the Copy key 3 Press Advanced Setup and then Negative Image 4 Press On to select Negative Image 5 Press OK 6 Press the Start key to start copying Status 10 10 2007 10 10 Ready to copy Copies Cancel OK Negative Image Press OK to display Add Shortcut Off Invert black and white in image to print negative copies On 1 the image ...

Page 63: ...ies 1 Place the originals on the platen 2 Press the Copy key 3 Press Advanced Setup and then Mirror Image 4 Press On to select Mirror Image 5 Press OK 6 Press the Start key to start copying Status 10 10 2007 10 10 Ready to copy Copies Cancel OK Mirror Image Press OK to display Add Shortcut Off Print left right mirrored copies of original On 1 the image ...

Page 64: ...o finish NOTE PC should be configured in advance so that E mail can be used Example of Job Finish Notice Use the procedure below to enable job finish notification when making copies 1 Place the originals on the platen 2 Press the Copy key 3 Press Advanced Setup and then Job Finish Notice To h_pttr owl net net Subject 1234 Job end report mail Job No 000002 Result OK End Time Wed 27 Apr 2005 14 56 0...

Page 65: ...nter the E mail address press Address Entry Press E mail Address enter the address and press OK 5 Press OK 6 Press the Start key to start copying Upon completion of the job an E mail notice is sent to the selected destination Status 10 10 2007 10 10 Ready to copy Cancel OK Job Finish Notice Add Shortcut Address Entry Destination Address Book Off Detail User A abc def com Detail Address Book Copies...

Page 66: ...e platen 2 Press the Copy key 3 Press Advanced Setup and then File Name Entry 4 Press File Name enter the name for a copy job and press OK To add date and time press Date and Time To add job number Job No Added information is displayed in Additional Info 5 Press OK 6 Press the Start key to start copying Status 10 10 2007 10 10 Ready to copy Copies Cancel OK File Name Entry Add Shortcut Add a file ...

Page 67: ...low 1 Place the originals on the platen 2 Press the Copy key 3 Press Advanced Setup and then Priority Override 4 Press On to select Priority Override 5 Press OK 6 Press the Start key The current copy job is suspended and the copy job selected in Priority Override starts The suspended job resumes after Priority Override copying is finished Status 10 10 2007 10 10 Ready to copy Copies Cancel OK Prio...

Page 68: ... in the document box is set to zero refer to Maximum Number of Repeat Copy Jobs Retained on page 1 55 You can select Repeat Copy as default setting Refer to Repeat Copying on page 6 35 Giving a file name to a copy job will facilitate identification of the data when copying refer to File Name on page 1 52 Selecting Repeat Copy Use the procedure below to select repeat copying 1 Press the Copy key 2 ...

Page 69: ...jobs retained 1 Press the System Menu key 2 Press Document Box Removable Memory and then Next of Job Box 3 Press Change of Repeat Copy Job Retention 4 Use the or key to enter the maximum retention number You can also enter the number from the number keypad A number between 0 and 50 can be entered as the number of retained jobs NOTE If you enter a value of 0 zero you cannot use the Repeat Copy func...

Page 70: ...re is an example of registering the copying function 1 Press the Program key while the copy mode is accessed 2 Press Register and press a number 01 to 50 for the program number If entering Program screen from the Copy screen or Send screen go to step 4 NOTE If you select a program number already registered the currently registered functions can be replaced with a new set of functions 3 Check that ...

Page 71: ...the procedure below to edit or delete a program 1 Press the Program key 2 Press Edit and press the key s corresponding to the program number 01 to 50 to change or delete 3 To edit a program use the procedure for registering a program and press Change Then change the program number and program name and press Register Choose Yes in the confirmation screen to change the program To delete the program ...

Page 72: ...ns in which Add Shortcut appears on the screen Use the procedure below to register a shortcut 1 After making the desired settings in the setup screen of each function press Add Shortcut 2 Press the keys corresponding to the shortcut number 01 to 06 to register NOTE If you select a shortcut number already registered the currently registered shortcut can be replaced with a new one 3 Enter the shortc...

Page 73: ...r registering the shortcut and press Change Then change the shortcut button number and name and press Register To delete the shortcut press Delete this Shortcut Choose Yes in the confirmation screen to delete the shortcut Status 10 10 2007 10 10 Ready to copy Copies Cancel OK Memo Page Press OK to display Add Shortcut Off Layout B Top Edge Top Original Orientation Layout A None Border Line Upper R...

Page 74: ...Copying Functions 1 60 ADVANCED OPERATION GUIDE ...

Page 75: ...sided Selection 2 11 Original Orientation 2 12 File Format 2 14 PDF Encryption Functions 2 16 File Separation 2 19 Image Quality 2 20 Scan Density 2 21 Scan Resolution 2 22 Sharpness 2 23 Background Density Adjustment 2 24 Color Grayscale Monochrome Selection 2 25 Continuous Scan 2 26 Border Erase 2 27 Enter Document Name File Name 2 30 Enter E mail Subject and Body 2 31 Finish Notice 2 32 Send an...

Page 76: ...elect from standard sizes except Standard Sizes 1 Inch models A3 B4 A4 A4 R B5 B5 R A5 A5 R B6 B6 R A6 R Folio 8K 16 K 16K R Metric models Ledger Legal Letter Letter R Statement Statement R 8 5 13 5 Oficio II R 11 15 8K 16K 16K R Others Select from Hagaki and Custom Original Size Regarding the setting method of Custom Original Size Custom 1 to 4 refer to Custom Original Size Setup on page 6 6 The ...

Page 77: ...e Start key to start sending Status 10 10 2007 10 10 Place original Cancel OK Add Shortcut Ready to send Standard Sizes 2 Standard Sizes 1 Press OK to display Auto Others Size Entry Letter Statement OficioII Ledger Legal 11x15 Letter Statement 8 5x13 5 Original Size Destination 1 the image Status 10 10 2007 10 10 Place original Cancel OK Add Shortcut Ready to send Standard Sizes 2 Standard Sizes 1...

Page 78: ...platen 2 Press the Send Key 3 Press Type of Original Transmission and then Sending Size Item Detail Size Standard Sizes 1 Select from Same as Original Size or Standard Size Inch models Same as Original Size Ledger Legal Letter Statement 8 5 13 5 Oficio II 11 15 Metric models Same as Original Size A3 B4 A4 B5 A5 B6 A6 Folio Standard Sizes 2 Select from standard size except Standard Sizes 1 Inch mod...

Page 79: ...ze 5 Press OK 6 Specify the destination and press the Start key to start sending Status 10 10 2007 10 10 Ready to send Destination Add Shortcut Ledger Cancel OK Legal Statement Letter 11x15 8 5x13 5 OficioII Same as Original Standard Sizes 1 Standard Sizes 2 Others Sending Size Place original 1 Press OK to display the image ...

Page 80: ...the page use the centering setting described in Centering on the page 2 7 Use the procedure below to enlarge or reduce the original to match the transmission size 1 Place the originals on the platen 2 Press the Send key 3 Select the transmission size 4 Press Advanced Setup and then Zoom 5 Press 100 or Auto 6 Press OK 7 Specify the destination and press the Start key to start sending Item Detail 10...

Page 81: ... each of the page Top Bottom and Left Right Use the procedure below to center then image when sending a scanned image 1 Place the originals on the platen 2 Press the Send key 3 Press Advanced Setup and then Centering 4 Press On Centering is performed 5 Press OK 6 Specify the destination and press the Start key to start sending Status 10 10 2007 10 10 Ready to send Destination Add Shortcut Move ima...

Page 82: ...e time Originals of the Same Width When the original widths are the same the combinations of originals that can be placed are as follows Ledger and Letter A3 and A4 Legal and Letter R Folio and A4 R B4 and B5 When the original widths are different The combinations of originals of different sizes that can be placed together are as follows NOTE You cannot scan two sided originals when placing origin...

Page 83: ...batch 1 Place the original into the document processor IMPORTANT When you place originals of different width place the top edge of originals to align with the width guide at the backside If the originals are placed unevenly they may not be scanned correctly 2 Press the Send key 3 Press Type of Original Transmission and then Mixed Sized Originals ...

Page 84: ...ecify the destination and press the Start key to start sending Status 10 10 2007 10 10 Destination Add Shortcut Scan all sheetsin documentprocessor even if differentlysized then send Up to 30 sheets can be placedin documentprocessor Cancel OK Off Same Width Mixed SizedOriginals DiffWidth 1 Press OK to display the image Ready to send ...

Page 85: ...hen 2 sided Book Original 4 Press 1 sided 2 sided or Book 5 If you selected 2 sided or Book you should also select the binding direction and press Original Orientation to select the direction in which the original is set on the platen 6 Press OK 7 Specify the destination and press the Start key to start sending Original Type Binding 1 sided Sheet Original 1 sided 2 sided Sheet Original 2 sided Onl...

Page 86: ...tion Confirmation setting in the System Menu the selection screen for original orientation appears when you select any of the above functions When placing the original on the platen When placing the original on the optional document processor Use the procedure below to select the orientation when placing the originals on the platen for sending 1 Place the originals on the platen 2 Press the Send k...

Page 87: ...e Left 5 Press OK 6 Specify the destination and press the Start key to start sending Status 10 10 2007 10 10 Ready to send Destination Add Shortcut Enter the orientation of the original document s top edge Cancel OK Top Edge Left Original Orientation Place original Top Edge Top 1 Press OK to display the image ...

Page 88: ... from PDF TIFF JPEG and High Comp PDF When the color mode in scanning has been selected for Grayscale or Full Color set the image quality If the optional PDF upgrade kit is installed press Encryption and specify the encryption settings File Format Adjustable range of image quality Color mode PDF 1 Low Quality High Comp to 5 High Quality Low Comp Full Color Grayscale Monochrome TIFF 1 Low Quality H...

Page 89: ...SendingFunctions ADVANCED OPERATION GUIDE 2 15 2 5 Press OK 6 Specify the destination and press the Start key to start sending ...

Page 90: ...F and Encryption 4 Press T of Compatibility select Acrobat4 0 and later or Acrobat5 0 and later 5 When you enter the password to open the PDF file select On of Password to open document Item Value Detail Compatibility Acrobat4 0 or later Acrobat5 0 or later Select the version that is compatible with the PDF file Password to open document Off On Enter the password to open the PDF file Password to e...

Page 91: ...o select the item the scope of limit The item to be displayed differs according to the version of Acrobat selected in Compatibility in step 4 The table below shows the available settings 12 Press T of Changes Allowed and select the item the scope of limit The item to be displayed differs according to the version of Acrobat selected in Compatibility in step 4 Item Detail Not Allowed Make the printi...

Page 92: ...dd commenting Inserting Deleting Rotating Pages Only displayed when Acrobat5 0 and later is selected in Compatibility Can only insert delete and rotate the pages of the PDF file Page Layout except extracting Pages Only displayed when Acrobat4 0 and later is selected in Compatibility Can change the page layout except extracting the pages of the PDF file Any except extracting Pages Can conduct all o...

Page 93: ...inal Transmission and then File Separation 4 Press Each Page to set File Separation 5 Press OK 6 Specify the destination and press the Start key The scanned original is sent after being divided into files of one page each Three digit serial number such as abc_001 pdf abc_002 pdf is attached to the end of the file name Status 10 10 2007 10 10 Ready to send Destination Add Shortcut Create and send a...

Page 94: ...age and then Original Image 4 Select Image Quality 5 Press OK 6 Specify the destination and press the Start key to start sending Item Detail Text Photo Text and photos together Text Only text no photos Photo Only photos no text for OCR For documents to be read by OCR Status 10 10 2007 10 10 Ready to send Destination Add Shortcut Select the original document type for OCR For documents to be read by...

Page 95: ...Press Color Image and then Density 4 When selecting manual density adjustment press 3 to 3 Lighter Darker to adjust density When selecting auto density adjustment press Auto 5 Press OK 6 Specify the destination and press the Start key to start sending Item Detail Manual density adjustment Can set density using 7 or 13 levels Auto density adjustment Can set the optimal scan density according to the...

Page 96: ...50 to 600 dpi are generally standard To enlarge an image and print it in a large size you should scan the original at a high resolution The procedure for adjusting the scanning resolution when sending a scanned image is explained below 1 Place the originals on the platen 2 Press the Send key 3 Press Color Image and then Scan Resolution 4 Select the resolution 5 Press OK 6 Specify the destination a...

Page 97: ...s the Send key 3 Press Color Image and then Sharpness 4 Press 3 to 3 Unsharpen Sharpen to adjust the sharpness 5 Press OK 6 Specify the destination and press the Start key to start sending Item Detail Sharpen Emphasize the image outline Make letters and lines appear sharper Unsharpen Blur the image outline Can weaken a Moire effect grids appearing as wavelike patterns when scanning printed photos ...

Page 98: ...e background density when sending scanned images 1 Place the originals on the platen 2 Press the Send key 3 Press Color Image and then Background Density Adj 4 Press On and press 1 to 5 Lighter Darker to adjust the density 5 Press OK 6 Specify the destination and press the Start key to start sending Status 10 10 2007 10 10 Place original Cancel OK Add Shortcut Ready to send On Off Background Backg...

Page 99: ... Contact your service representative Use the procedure below to select the color mode when sending scanned images 1 Place the originals on the platen 2 Press the Send key 3 Press Color Image and then Color Selection 4 Press either Full Color Grayscale or Monochrome 5 Press OK 6 Specify the destination and press the Start key to start sending Status 10 10 2007 10 10 Ready to send Destination Add Sh...

Page 100: ...continuous scanning when sending scanned images is explained below 1 Press the Send key 2 Press Advanced Setup and then Continuous Scan 3 Press On Continuous Scan is selected 4 Press OK 5 Specify the destination 6 Place the original and press the Start key When the scanning is completed change the settings as necessary 7 Place the next original and press the Start key Scan the remaining originals ...

Page 101: ...ding originals The following options can be selected Border Erase Sheet Erases black borders around the single sheet original Border Erase Book Erases black borders around the edges and in the middle of the original such as a thick books You can specify the widths individually to erase the borders around the edges and in the center of the book Original Copy Original Copy ...

Page 102: ...orders for a book Use or to enter the width in Border or Gutter Press Keys to use the number keys for entry Press Individual Border Erase to select the individual border erase Use or to enter the border width or press Keys and enter the width using the numeric keys Input units Border Erase Range Inch models 0 to 2 in 0 01 increments Metric models 0 mm to 50 mm in 1 mm increments Original Copy Stat...

Page 103: ... 5 Press OK 6 Specify the destination and press the Start key to start sending Status 10 10 2007 10 10 Ready to send Destination Add Shortcut Off Cancel OK Border Erase Sheet Top Border Erase Place original Individual Border Erase Border Erase Book Bottom Left Right 0 00 2 00 Keys 1 Press OK to display Top Edge Top Original Orientation 0 00 0 00 0 00 0 00 the image ...

Page 104: ... then File Name Entry 4 Press File Name 5 Enter the document name and press OK NOTE Up to 30 characters can be entered for the document name 6 Press Job No to enter the job No and Date and Time to enter the date and time 7 Press OK 8 Specify the destination and press the Start key to start sending Status 10 10 2007 10 10 Enter Destination Cancel OK Add Shortcut Ready to send Add a file name Additi...

Page 105: ...nced Setup and then E mail Subject Body 3 Press Subject 4 Enter the subject and press OK NOTE Up to 60 characters can be entered for the subject 5 Press Body 6 Enter the body and press OK NOTE Up to 500 characters can be entered for the body 7 Press OK 8 Specify the destination and press the Start key to start sending Status 10 10 2007 10 10 Ready to send Destination Add Shortcut Subject Cancel OK...

Page 106: ...ress OK You can view information on the notification destination by pressing Detail 5 Specify the destination to send the finish notice and press OK NOTE For the procedure to select the destination from the Address Book refer to the Operation Guide 6 To directly enter the address press Address Entry and then E mail Address 7 Enter the E mail address and press OK 8 Press OK Status 10 10 2007 10 10 ...

Page 107: ...endingFunctions ADVANCED OPERATION GUIDE 2 33 2 9 Specify the destination and press the Start key to start sending When the sending is completed the finish notice is sent to the specified E mail address ...

Page 108: ... the originals on the platen 2 Press the Send key 3 Press Advanced Setup and then Send and Print 4 Press On 5 Press OK 6 Specify the destination and press the Start key Transmission begins and a copy of the transmitted document is printed Status 10 10 2007 10 10 Ready to send Destination Add Shortcut Print a copy of documents to be sent Cancel OK Send and Print Enter Destination 0 Press OK to disp...

Page 109: ... not user login administration is enabled If a password has been set for the Document Box and login administration is enabled there is no need to enter the password if the user currently logged in is the owner of the Document Box Otherwise the password must be entered If the current user is not the owner but is logged in with administrator privileges there is no need to enter the password 6 Press ...

Page 110: ...Sending Functions 2 36 ADVANCED OPERATION GUIDE 7 Specify the destination and press the Start key Transmission begins and a copy of the transmitted document is stored in the specified Document Box ...

Page 111: ...ADVANCED OPERATION GUIDE 3 1 3 Printer This chapter explains the settings for using printer functions of this machine Emulation 3 2 Setting of Other Printers 3 7 ...

Page 112: ...mulation NOTE If you selected KPDL Auto you should also select an alternative emulation as described in Setting of Alternative Emulation below When you have selected KPDL or KPDL Auto set KPDL Error Report too Refer to page 3 3 When you have selected KC GL set the print size and pen too Refer to page 3 5 4 Press OK 5 Press the Power key and after confirming that the Power key indicator and memory ...

Page 113: ... Select the desired alternative emulation 4 Press OK 5 Press the Power key and after confirming that the Power key indicator and memory indicator have turned off turn the main power off and on Setting of KPDL error report When an error has occurred during printing in KPDL emulation mode set whether or not the error report is output The default setting is Off not output Use the procedure below to s...

Page 114: ...ess OK 5 Press the Power key and after confirming that the Power key indicator and memory indicator have turned off turn the main power off and on Status 10 10 2007 10 10 Printer KPDL Error Report Print an error report when a KPDL error occurs Off On Cancel OK ...

Page 115: ...face 1 Press the System Menu Key 2 Press Printer Change in Emulation KC GL Page Set 3 Select the print size NOTE Special Size is the size designated in Prescribe SPSZ command For details of Prescribe command refer to the Prescribe Command Reference Manual 4 Press OK The previous screen reappears 5 Press Pen Adjust Change for the pen for which you want to change the thickness 1 to 8 Setting item Se...

Page 116: ...the number keypad 8 Press OK 9 Press the Power key and after confirming that the Power key indicator and memory indicator have turned off turn the main power off and on Status 10 10 2007 10 10 Printer Pen 1 Set the thickness of the pen to use for KC GL jobs Use or the numeric keys to select thickness Cancel OK 1 99 dot s ...

Page 117: ...Printer ADVANCED OPERATION GUIDE 3 7 3 Setting of Other Printers Regarding the setting of other printers refer to Printer Settings on page 6 48 ...

Page 118: ...Printer 3 8 ADVANCED OPERATION GUIDE ...

Page 119: ...DVANCED OPERATION GUIDE 4 1 4 Using Document Box This chapter explains the typical procedure for utilizing Document Box What is Document Box 4 2 Basic Operation for Document Box 4 5 Using a Job Box 4 21 ...

Page 120: ...use with job options including Private Print Stored Job Quick Copy Proof and Hold Repeat copy and Image Overlay Form which will be discussed later Four individual Job Boxes corresponding to these job options are already provided in the Document Box These Job Boxes cannot be created or deleted by a user Private Print Stored Job Box page 4 21 In Private Printing you can specify that a job is not pri...

Page 121: ...es only a single proof print of multiple print job and holds printing of the remaining copies Printing a multiple print job in Proof and Hold using the printer driver allows only a single copy to be printed while maintaining the document data in the Job Box To continue to print the remaining copies use the operation panel You can change the number of copies to print Repeat Copy Box page 4 27 Repea...

Page 122: ...izable as a Job Box This allows printing of the PDF data stored in the USB memory You can print PDF data directly from the USB memory without a PC Saving data into the USB memory is not possible For details refer to the Operation Guide Fax Box Fax Box stores the fax data received For details refer to the Operation Guide supplied with the fax kit ...

Page 123: ...User Privileges on page 4 18 Creating a New Custom Box Use the procedure below to create a new box in the user box 1 Press the Document Box key 2 Press Custom Box Edit Box and then Add 3 To number the Custom Box press Change of Box No Custom Box No Box Name Owner Use Edit Box 001 001 Status 10 10 2007 10 10 Store File Detail Open Custom Box Job Box Removable Memory Status 10 10 2007 10 10 Box Box ...

Page 124: ... 10 Press Confirm Password enter the same password again and then press OK When you have finished entering and confirming the password press OK 11 To preserve the hard disk capacity the storage capacity for a box can be restricted Press Change of Usage Restriction 12 To enable a capacity restriction press On Enter a value for the storage capacity of the Custom Box in megabytes by pressing or numbe...

Page 125: ...ox screen NOTE If user login is enabled Owner and Permission are both displayed and you can change the settings Refer to Creating new Custom Boxes when user login administration is enabled on page 4 20 Storing a Document in the Custom Box Use the procedure below to select the interface 1 Place the original to copy in the document processor or on the platen NOTE Refer to the Operation Guide for det...

Page 126: ...ame Owner Use 001 SALES Anonymous 001 001 Edit Box Store File Detail Open Custom Box Job Box Removable Memory Status 10 10 2007 10 10 Custom Box No Box Name Owner Use 001 SALES Anonymous 001 001 Edit Box Store File Detail Open Custom Box Job Box Removable Memory Status 10 10 2007 10 10 Ready to store in Box File Name Storing Image Set Original Original Zoom Store 100 100 Zoom Normal 0 200 x200dpi ...

Page 127: ...a checkmark You cannot select more than one document at a time To deselect press the checkbox again and remove the checkmark 4 Press Print Status 10 10 2007 10 10 Custom Box No Box Name Owner Use 001 SALES Anonymous 001 001 Edit Box Store File Detail Open Custom Box Job Box Removable Memory Status 10 10 2007 10 10 Custom Box No Box Name Owner Use 001 SALES Anonymous 001 001 Edit Box Store File Det...

Page 128: ...om Document Boxes is explained below 1 Press the Document Box key and select the box containing the document onto which you want to overlay the image Status 10 10 2007 10 10 Ready to print from Box Press Start to start printing Printing Image Original Zoom Paper 100 Letter Auto Paper Selection Off Delete after Printed 1 sided 1 sided Collate Duplex Collate Offset Quick Setup Functions Cancel Lette...

Page 129: ...orm density setting through 10 levels from 10 to 100 Press the or buttons in Density 6 In Form Overlay Select Form select the image file to be overlaid onto the document You can only select one image file Status 10 10 2007 10 10 Custom Box No Box Name Owner Use 001 SALES Anonymous 001 001 Edit Box Store File Detail Open Custom Box Job Box Removable Memory Status 10 10 2007 10 10 Custom Box Detail ...

Page 130: ...or descending order or by name in alphabetical order This allows you to check the list of custom boxes on screen The custom boxes can be listed by box number or by box name To view the custom box list press the document box key Status 10 10 2007 10 10 Custom Box No Box Name Owner Use 001 SALES Anonymous 001 001 Edit Box Store File Detail Open Custom Box Job Box Removable Memory Listing the boxes b...

Page 131: ...01 04 04 2007 10 58 Send Print Store File 21 MB 30 MB SALES Preview Status 10 10 2007 10 10 Custom Box Detail 001 001 2007040410575501 Join Move Delete Close 2007040410575502 Send Print Store File 2007040410575503 SALES Preview Listing the documents by name in alphabetical order Listing the documents by time of update in ascending descending order Listing the documents by size in ascending descend...

Page 132: ... can check and modify box information Use the procedure below 1 Press the Document Box 2 Press Edit Box 3 Highlight the box you wish to view or whose details you wish to edit and press Detail Edit NOTE If a password has been registered for a custom box enter the password and then press OK Document Box Removable Memory Custom Box No Name Owner Use 001 SALES Anonymous 001 001 Add Detail Edit Delete ...

Page 133: ...a Document in the Custom Box on page 4 7 for details Previewing Document Boxes You can use this function to display a preview of the documents stored in a Document Box The procedure for previewing documents is explained below 1 Press the Document Box key and select the box containing the document you want to preview Status 10 10 2007 10 10 Box Box No Box Name Box Password Usage Restriction Change ...

Page 134: ...ail Open Custom Box Job Box Removable Memory Status 10 10 2007 10 10 Custom Box Name Date and Time Size Detail 001 001 2007040410574501 04 04 2007 10 57 Join Move Delete Close 2007040410585501 04 04 2007 10 58 Send Print Store File 21 MB 30 MB SALES Preview Status 10 10 2007 10 10 Close Preview No 1 6 2007040410574501 When you have zoomed in you can use these keys to move the displayed area In mul...

Page 135: ...ocuments stored in a custom box Use the procedure below 1 Press the Document Box key 2 Press Custom Box and choose the box which contains the document you wish to delete 3 Press Open NOTE If the Custom Box is password protected enter the password and press OK Status 10 10 2007 10 10 Custom Box No Box Name Owner Use 001 SALES Anonymous 001 001 Edit Box Store File Detail Open Custom Box Job Box Remo...

Page 136: ...d a document in a Custom Box refer to the Operation Guide for details User Privileges When User Login is activated accessibility to the Document Box components will vary depending on the given user privilege Accessibilities vary depending on user privilege as follows Custom Box Name Date and Time Size 002 2007040411301702 04 04 2007 11 30 001 001 Edit Box Send Join Status 10 10 2007 10 10 Print Mo...

Page 137: ...ssword differs depending on the level of privileges as follows Administrator The administrator is not required to enter a password to gain access to any box User The user is required to enter a password to gain access to a box which is protected by a password The user is not required to enter a password to gain access to his her own boxes Box infor mation Renaming a box Others Yes No Owner Yes Yes...

Page 138: ... For information on specifying other settings refer to Creating a New Custom Box on page 4 5 Working With User Privileges When User Login is Enabled When user login is enabled the owner of a box with user privileges set can change the following box information the box name the box password the permission and the auto file deletion setting Status 10 10 2007 10 10 Box Box No Box Name Box Password Us...

Page 139: ...Box 3 Select Private Print Stored Job and press Open 4 Select the creator of the document to print and press Open 5 Select the document and press Print 6 If the document is protected by a password enter the password using the numeric keys 7 Specify the number of copies to print as desired Job Box Status 10 10 2007 10 10 Close Private Print Stored Job 001 002 Open 5 2 1 1 1 User1 User2 User3 User4 ...

Page 140: ...d press Detail 6 If the document is protected by a password enter the password using the numeric keys Press OK 7 To close the document press Close Deleting a Document You can delete documents stored in a Private Print Stored Job box Use the procedure below Job Box Status 10 10 2007 10 10 Close Private Print Stored Job 001 002 Open 5 2 1 1 1 User1 User2 User3 User4 User5 User Name Files 001 001 Sta...

Page 141: ...User Guide on how to print a job as Quick Copy or Proof and Hold Print job using the printer driver Setting the Number of Stored Jobs To maintain free space on the hard disk you can set the maximum number of stored jobs Use the procedure below to set the number of stored jobs 1 Press the System Menu key 2 Press Document Box Removable Memory Next of Job Box then Change of Quick Copy Job Retention J...

Page 142: ...ocuments stored in the Quick Copy Proof and Hold box Use the procedure below 1 Press the Document Box key 2 Press Job Box 3 Select Quick Copy Proof and Hold and press Open 4 Select the creator of the document and press Open Document Box Removable Memory Quick Copy Job Retention Set the maximum number of quick copy proof print jobs to retain Use or the numeric keys to enter a number Set this number...

Page 143: ... Status 10 10 2007 10 10 Detail Close Private Print Stored Job Document 0 pdf Document 1 pdf Document 2 pdf Document 3 pdf Document 4 pdf Print Delete 10 10 2007 09 40 10 10 2007 09 45 10 10 2007 09 50 10 10 2007 10 55 10 10 2007 10 00 Name Date and Time Size MB 30 MB 21 MB 21 MB 36 MB 30 Job Box Status 10 10 2007 10 10 Close 001 002 Open 5 4 3 2 1 User1 User2 User3 User4 User5 User Name Files Qui...

Page 144: ...ocument to delete and press Delete The delete confirmation screen appears 5 Press Yes The document is deleted Job Box Status 10 10 2007 10 10 Close 001 002 Open 5 4 3 2 1 User1 User2 User3 User4 User5 User Name Files Quick Copy Proof and Hold 001 001 Status 10 10 2007 10 10 Detail Close Private Print Stored Job Document 0 pdf Document 1 pdf Document 2 pdf Document 3 pdf Document 4 pdf Print Delete...

Page 145: ... 0 and 50 NOTE If you enter a value of 0 zero no jobs are stored 4 Press OK The maximum number of stored jobs is set 5 Press Close repeatedly to return to the initial system menu screen Printing a Document You can print the documents stored in the Repeat Copy box Use the procedure below 1 Press the Document Box key 2 Press Job Box 3 Select Repeat Copy box and press Open Document Box Removable Memo...

Page 146: ...s turned off Image Overlay Form Copy Box Storing a Form You can store forms to be used for image overlay copy in the Image Overlay Form Copy box You can store a 1 page form Use the procedure below 1 Place the original in the document processor or on the platen NOTE Refer to the Operation Guide for details 2 Press the Document Box key and Job Box Job Box Name Date and Time Size 2007060600531002 06 ...

Page 147: ...of the form preselected in the Image Overlay Form Copy box Viewing a Stored Form You can check the details of the form stored in the Image Overlay Form Copy box Use the procedure below 1 Press the Document Box key 2 Press Job Box Job Box Box Name Files User 001 001 Removable Memory Status 10 10 2007 10 10 Job Box Custom Box Open Quick Copy Proof and Hold Repeat Copy Form for Form Overlay Copy 21 2...

Page 148: ...nd press Open 4 Select the form to delete and press Delete The delete confirmation screen appears 5 Press Yes The form is deleted Status 10 10 2007 10 10 Job Box Name Date and Time Size 001 001 2007040410594501 04 04 2007 10 59 Delete Close 2007040410585501 04 04 2007 10 58 Print Form for Form Overlay Copy 2007040410575501 04 04 2007 10 57 MB 30 MB 36 MB 21 Detail Store File Preview Status 10 10 2...

Page 149: ...er also explains how to check the remaining amount of toner and paper and the status of devices and how to cancel the fax communication Checking Job Status 5 2 Checking Job History 5 10 Pause and Resumption of Jobs 5 13 Canceling of Jobs 5 14 Priority Override for Waiting Jobs 5 14 Reordering Print Jobs 5 15 Checking the Remaining Amount of Toner and Paper5 16 Device Communication 5 17 ...

Page 150: ...ng Jobs The following job statuses are available Displaying Status Screens Use the procedure below to display the Status screen 1 Press the Status Job Cancel key Screen Job statuses to be displayed Printing Jobs Copy Printer FAX reception i FAX reception E mail reception Printing from Document Box Job Report List Printing data from removable memory Sending Jobs FAX transmission i FAX transmission ...

Page 151: ... screen see Displaying Status Screens on page 5 2 Printing Jobs Status Screen Status Scheduled Job Log Job Type All Job No Accepted Time Type abc def com User Name Status InProcess 438 14 47 Status Destination 001 001 Cancel Printing Jobs Sending Jobs Storing Jobs Device Communication Paper Supplies Status Pausing Scanner 10 10 2007 10 10 Detail Status Status Log All Job No Accepted Time Type 438 ...

Page 152: ...r Name User Name for the executed job or Login User Name 6 Status Status of job InProcess The status before starting to print such as when scanning originals Printing Printing Waiting Print Waiting Pause Pausing print job or error Canceling Canceling the job 7 T of Job Type Sorts by specific type of job 8 Pause All Print Jobs Pauses all the printing jobs By pressing this key again the printing job...

Page 153: ...age 5 11 No Item Key Detail Status Scheduled Job Log All Job No Accepted Time Type abc def com User Name Status InProcess 438 14 47 Status Destination 001 001 Cancel Printing Jobs Sending Jobs Storing Jobs Device Communication Paper Supplies Status Pausing Scanner 10 10 2007 10 10 Detail Job Type 1 2 3 4 5 6 7 8 9 No Item Key Detail 1 Job No Acceptance No of job 2 Accepted Time Accepted Time of jo...

Page 154: ...of jobs are displayed 8 Cancel Select the job you want to cancel from the list and press this key 9 Detail Select the job whose detailed information you want to display from the list and press this key Refer to Checking the Detailed Information of Histories on page 5 11 No Item Key Detail Status Log All Job No Accepted Time Type doc20070225144758 User Name Status InProcess 438 14 47 Status Job Nam...

Page 155: ...ype Storing Job Scan Storing Job Printer Storing Job FAX Storing Job i FAX 4 Job Name Job name or file name is displayed 5 User Name User Name for the executed job or Login User Name 6 Status Status of job InProcess The status before starting to save such as during scanning originals Storing Storing Data Canceling Canceling the job 7 T of Job Type Only selected type of jobs are displayed 8 Cancel ...

Page 156: ...01 001 Pause All Print Jobs Cancel Priority Override Detail Printing Jobs Sending Jobs Storing Jobs Device Communication Paper Supplies Status 10 10 2007 10 10 Move Up Job Type Detail Job No Close Job No Status Job Type Destination User Name Job Name Accepted Time 1 2 Sending Job E mail Processing 000080 User01 ABCDE doc20070404115151 11 51 51 000080 Detail Detail Job No Close Job No Status Job Ty...

Page 157: ... Job Cancel ADVANCED OPERATION GUIDE 5 9 5 NOTE Press T or S select a destination and press Detail Information on the selected job is displayed for checking 4 To exit from the detailed information press Close ...

Page 158: ...Jobs Sending Jobs and Storing Jobs The following job histories are available Displaying Job History Screen The procedure for displaying Job History Screen is explained below 1 Press the Status Job Cancel key Screen Job histories to be displayed Printing Jobs Copy Printer FAX reception i FAX reception E mail reception Printing from Document Box Job Report List Printing data from removable memory Se...

Page 159: ... Printing Jobs Sending Jobs Storing Jobs Device Communication Paper Supplies Status Executing TX job 10 10 2007 10 10 Detail doc 20070225142253 OK 000081 02 25 14 22 doc 20070225142310 OK 000082 02 25 14 23 doc 20070225142458 NG 000083 02 25 14 24 doc 20070225143034 OK 000084 02 25 14 30 Job Type Status Log All Job No Date Type doc 20070225141427 User Name Result OK 000080 02 25 14 14 Status Job N...

Page 160: ...Status Job Cancel 5 12 ADVANCED OPERATION GUIDE NOTE To check the information of the next previous page press T or S 4 To exit from the detailed information press Close ...

Page 161: ... 10 10 Printing Jobs Sending Jobs Storing Jobs Device Communication Paper Supplies Status Log All Job No Accepted Time Type Job Name User Name Status Status doc 20070506142153 InProcess 000081 14 21 doc 20070506142210 Waiting 000082 14 22 AAAAA AAAAA 001 001 Pause All Print Jobs Cancel Priority Override Detail Move Up Job Type Status Status Log All Job No Accepted Time Type 438 Job Name User Name ...

Page 162: ...low 1 Press the Status Job Cancel key 2 Press Printing Jobs 3 Select the job to be given priority and press Priority Override 4 Press Yes in the confirmation screen The current job in printing is suspended and the job for override printing starts 5 When the Priority Override is completed the printing job that has been suspended will be resumed Status 10 10 2007 10 10 Printing Jobs Sending Jobs Sto...

Page 163: ... below 1 Press the Status Cancel key 2 Press the Printing Jobs 3 Select the job to be assigned a higher priority and press Move Up The priority of the selected job is increased by 1 To further raise the job s priority press Move Up again Each time you press Move Up the priority increases by 1 Status 10 10 2007 10 10 Printing Jobs Sending Jobs Storing Jobs Device Communication Paper Supplies Status...

Page 164: ...t of toner You can check the remaining amount of toner as one of 11 levels from 100 to 0 Status of waste toner box You can check the status of waste toner box Paper You can check the size orientation type and remaining amount of paper in each paper source Others You can check the status of staples Detail Toner Information Paper Others Toner Status Size Type Status Type Status Black K Ledger Ledger...

Page 165: ...tus of an original scanning in the document processor optional or the error information paper jam opened cover etc is displayed Printer Error information such as paper jam out of toner or out of paper and status such as waiting or printing are displayed Hard Disk The information such as formatting overwriting for erasure and error occurrence is displayed FAX Backup Memory Usage and capacity of the...

Page 166: ...efore receiving the fax originals For details refer to the Operation Guide of FAX kit Press Log to display the fax transmission history For details refer to the Operation Guide of FAX kit Format memory for printer Compact Flash The information such as cannot recognize or unconnected and the usage capacity of memory card are displayed Press Format to format the memory card Press Printing list to pr...

Page 167: ...emory for printer Memory Card Use the procedure below to print the partition list 1 Press the Status Job Cancel key Detail Scanner Printer Removable Memory Hard Disk FAX Backup Memory Memory Card Ready Ready Safely removable Error has occurred Not connected Format Remove Display Error Format Printing list Printing Jobs Sending Jobs Storing Jobs Device Communication Paper Supplies Log Executing TX ...

Page 168: ...accounting is enabled the list may not be printed For details refer to page 7 16 Detail Scanner Printer Removable Memory Hard Disk FAX Backup Memory Memory Card Ready Ready Safely removable Error has occurred Not connected Format Remove Display Error Format Printing list Printing Jobs Sending Jobs Storing Jobs Device Communication Paper Supplies Log Executing TX job 10 10 2007 10 10 ...

Page 169: ...ngs 6 38 Sending Settings 6 44 Document Box Removable Memory Settings 6 46 Printer Settings 6 48 Network Setup 6 56 Printing Reports Sending Notice 6 59 Adjustment Maintenance 6 63 Date Timer 6 71 Editing Destination Address Book Adding One Touch Keys 6 78 System Initialization 6 87 Restarting the System 6 88 SSL Network Security 6 89 Accessibility Enlarged Touch Panel Display 6 90 ...

Page 170: ...play Language 6 2 Default Screen 6 3 Sound 6 5 Original Paper Setup 6 6 Switching Unit of Measurement 6 17 Error Handling 6 17 Output Tray 6 20 Function Defaults 6 21 Orientation Confirmation 6 36 NOTE If user login is enabled you can only change the settings by logging in with administrator privileges Switching the Language for Display Language Select the language displayed on the touch panel Use...

Page 171: ...splay English Français Deutsch Italiano Nederlands Português Español Cancel OK Status 10 10 2007 10 10 Item Description Copy The Copy screen the screen shown when the Copy key is pressed appears Send The Send screen the screen shown when the Send key is pressed appears Status The Status Job Cancel screen the screen shown when the Status Job Cancel key is pressed appears Document Box The Document B...

Page 172: ... as the default screen 4 Press OK Accessibility Send The Accessibility Send screen the screen shown when the Accessibility Display key is pressed in the Send screen appears Item Description Common Settings Default Screen Set the default screen to be displayed when main power switch is turned on English Status Document Box Program Send Copy Cancel OK Status 10 10 2007 10 10 Accessibility Copy Appli...

Page 173: ...elect the buzzer volume level or other sound options 5 Press Close Item Value Description Volume 0 Mute 1 Minimum to 5 Maximum Set the buzzer volume level Key Confirmation Off On Emit a sound when the control panel and touch panel keys are pressed Job Finish Off On Emit a sound when a print job is normally completed Ready Off On Emit a sound when the warm up is completed Warning Off On Emit a soun...

Page 174: ... Size 3 Press Change of any one of Custom 1 to Custom 4 on which you wish to register the size 4 Press On and then press or numeric keys to enter X horizontal and Y vertical dimensions 5 Press OK Adding a Custom Size and Media Type for Paper to Print Set up a maximum of four frequently used custom paper sizes The custom size options are displayed on the screen to select paper set in the Multi Purp...

Page 175: ...key 2 Press Common Settings Next of Original Paper Setup and then Next of Custom Original Size 3 Press Change of any one of Custom 1 to Custom 4 on which you want to register the size 4 Press On and then press or numeric keys to enter X horizontal and Y vertical dimensions 5 Press Media Type to select the type of paper and press OK if necessary 6 Press OK Input units Dimensions Inch models H 5 83 ...

Page 176: ...r size press Standard Sizes 1 or Standard Sizes 2 for Paper Size Item Description Paper Size Auto Automatically detect paper size Select Metric or Inch for paper size Standard Sizes 1 Available options are as follows Inch models Ledger Legal Letter Letter R Statement R 8 5 13 5 Oficio II Metric models A3 B4 A4 A4 R B5 B5 R A5 R Folio Standard Sizes 2 Select a standard size except that selected in ...

Page 177: ...5 R A5 R B6 R A6 R Folio 8K 16K 16K R Metric models Ledger Legal Letter Letter R Statement R 8 5 13 5 Oficio II Executive 8K 16K 16K R Others Select special standard sizes or custom sizes ISO B5 Envelope 10 Envelope 9 Envelope 6 Envelope Monarch Envelope DL Envelope C5 Envelope C4 Hagaki Oufuku Hagaki Youkei 4 Youkei 2 Refer to Adding a Custom Size and Media Type for Paper to Print on page 6 6 for...

Page 178: ... 5 Press Change of Media Type to select the media type and press OK Paper Weight Select weight for each media type The options for media type and weight of paper are as follows Common Settings Paper Size Set the multi purpose tray paper size Standard Sizes 1 Auto Cancel OK Status 10 10 2007 10 10 Paper is remaining in Document Processor Standard Sizes 2 Others Size Entry Ledger Letter Letter Legal...

Page 179: ... m2 to 135g m2 136g m2 to 170g m2 171g m2 and more Transpar encies Plain z z z z Transparency z z z z Vellum z z z z Labels z z z z z z z z Recycled z z z z Preprinted z z z z Bond z z z z z z z Cardstock z z z z Color z z z z Prepunched z z z z Letterhead z z z z Thick z z z z z Envelope z z z z High Quality z z z z Custom 1 8 z z z z z z z z Item Description Duplex Prohibit Duplex printing not a...

Page 180: ...settings for Custom 1 8 press Change of Duplex select Prohibit or Permit and press OK The previous screen reappears 7 To change the name for Custom 1 8 press Change of Name to enter the name and press OK NOTE Refer to the Operation Guide for entering characters Common Settings Media Weight Select weight of paper Please refer to the manual for details Heavy 2 Heavy 1 Normal 3 Heavy 3 Extra Heavy Ca...

Page 181: ... Automatically detect originals of special or non standard size The table below lists the special or non standard original sizes Use the procedure below to set automatic detection of originals 1 Press the System Menu key 2 Press Common Settings Next of Original Paper Setup and then Change of Original Auto Detect Common Settings Default Paper Source Select paper cassette for default setting Cassett...

Page 182: ...dia type used by Auto Selection 1 Press the System Menu key 2 Press Common Settings Next of Original Paper Setup and then Change of Media for Auto Selection 3 Select All Media Types or any media type for paper selection 4 Press OK Common Settings Original Auto Detect Setup Automatically detect originals of special or non standard size Hagaki A6 Cancel OK Status 10 10 2007 10 10 A6 Hagaki On Off Fo...

Page 183: ...ead punch holes might not be aligned or the print direction might be upside down depending on how originals are set and the combination of copying functions In such a case select Adjust Print Direction to adjust the print direction When paper orientation is not important select Speed Priority The table below lists the available settings and their details Common Settings Paper Source for Cover Sele...

Page 184: ... performed for special paper types 1 Press the System Menu key 2 Press Common Settings Next of Original Paper Setup and then Change of Special Paper Action 3 Select Adjust Print Direction or Speed Priority 4 Press OK Original Original Finished Finished Cassette Cassette Multi Purpose tray Multi Purpose tray Paper Paper Common Settings Special Paper Action Select the default action for printing on ...

Page 185: ...4 Press OK Error Handling Select whether to cancel or continue the job when error has occurred The possible errors and what to do for the errors are as follows Duplexing Paper Error Select what to do when duplex printing is not possible for the selected paper size and media type Common Settings Measurement Select the units of measurement for length English mm inch Cancel OK Status 10 10 2007 10 10...

Page 186: ...stalled Stapling Limit Error Select what to do when stapling capacity is exceeded during printing NOTE The messages are displayed when the optional document finisher or built in finisher is installed Processing Description Ignore The setting is ignored and the job is printed Display Error Error message to cancel printing is displayed Item Description Ignore Printing continues without stapling Disp...

Page 187: ...nge the handling 4 Select the error handling method in the selection screen for each of the errors and then press OK 5 The previous screen appears To set the handling for a different error repeat steps 3 and 4 Common Settings Error Handling Change Duplexing Paper Error Display Error Change Change Change No Staple Error Not Stapling End End 10 10 2007 10 10 Finishing Paper Error Not Stapling Stapli...

Page 188: ...tional fax kit is installed If you have 2 optional fax kits installed Fax Port 2 appears You can specify the output tray for the second kit Dual FAX 4 Select Output Tray For Finisher Tray select Face Up print surface up or Face Down print surface down for paper orientation at output 5 Press OK Output Tray Descriptions Top Tray Delivery on Top Tray of the machine Finisher Tray Select Face Up print ...

Page 189: ... the default orientation when originals are placed on the platen 1 Press the System Menu key 2 Press Common Settings Next of Function Defaults and then Change of Original Orientation 3 Select Top Edge Top or Top Edge Left for the default 4 Press OK Continuous Scan Set the continuous scan defaults The available default settings are shown below Item Description Top Edge Top Select the original s top...

Page 190: ...fault quality setting for originals 4 Press OK Original Image Set the default original document type The available default settings are shown below Use the procedure below to select the default quality setting for originals 1 Press the System Menu key 2 Press Common Settings Next of Function Defaults and then Change of Original Image Common Settings Continuous Scan Select the default Continuous Sc...

Page 191: ...n Change of Scan Resolution 3 Select the default resolution 4 Press OK Color Selection Select the default scanning color setting The available default settings are shown below Common Settings Original Image Set the default original document type Text Photo Text Cancel OK Status 10 10 2007 10 10 Photo Common Settings Scan Resolution Select default scan resolution 400x400dpi Ultra Fine 600x600dpi 30...

Page 192: ...dure below to select the default file format 1 Press the System Menu key 2 Press Common Settings Next of Function Defaults and then Change of File Format Monochrome Scan document in black and white File size is smaller than Full Color or Grayscale Color mode Description Common Settings Color Selection Select default color Grayscale Full Color Monochrome Cancel OK Status 10 10 2007 10 10 File Forma...

Page 193: ...key 2 Press Common Settings Next of Function Defaults and then Change of File Separation 3 Select the default for Off or Each Page 4 Press OK Common Settings File Format Set default file type Cancel OK Status 10 10 2007 10 10 PDF TIFF High Comp PDF JPEG File Format Description Off No file separation performed all the pages are compiled in one file Each Page Each scanned page is created into a sepa...

Page 194: ...density 4 Press OK Zoom Select the enlarged reduced default when paper size sending size changed after the originals set The available default settings are shown below Use the procedure below to select the default zoom setting 1 Press the System Menu key Item Description Manual Normal 0 Set to Normal 0 in the Manual density Auto Set to Auto density Common Settings Density Select the default Densit...

Page 195: ...Press Common Settings Next of Function Defaults T and then Change of File Name Entry 3 Press File Name to enter the file name in not more than 30 characters NOTE Refer to the Operation Guide for entering characters 4 Press OK 5 Press Date and Time to add the date time to the job or press Job No to add the job number to the job The added information will be displayed in Additional Info Common Setti...

Page 196: ...bject Body 3 Press Subject to enter an E mail subject not more than 60 characters NOTE Refer to the Operation Guide for entering characters 4 Press OK 5 Press Body to enter an E mail subject not more than 500 characters 6 Press OK 7 Check that the entries are correct and press OK Border Erase Default Set the default width to be erased as a border The table below shows the measurement ranges that c...

Page 197: ...ault Set the default margin The table below shows the measurement ranges that can be set Use the procedure below to set the default margin width 1 Press the System Menu key 2 Press Common Settings Next of Function Defaults T and then Change of Margin Default Common Settings Border Erase Default Select the default border erase width Use or the numeric keys to enter a number Border 0 00 2 00 0 23 Ca...

Page 198: ... and then Change of Collate Offset 3 Select the defaults for Collate and Offset respectively 4 Press OK Common Settings Margin Default Select the default margin width Use or the numeric keys to enter a number L R 0 75 0 75 0 23 Cancel OK Status 10 10 2007 10 10 Keys Paper is remaining in Document Processor T B 0 75 0 75 0 47 Keys Item Description Collate Off Collate not performed On Collate perfor...

Page 199: ...3 Select the default for Off or On 4 Press OK Form Overlay Copy Select the default form and form density from Form Box for form overlay for copy jobs NOTE Refer to page 1 36 for Form Overlay Copy The table below shows the available settings 1 Press the System Menu key 2 Press Common Settings Next of Function Defaults T and then Change of Form Overlay Copy 3 Press Select Stored Form Item Descriptio...

Page 200: ...able below shows the available settings 1 Press the System Menu key 2 Press Common Settings Next of Function Defaults T and Change at Form Overlay Box 3 Press Select Stored Form Common Settings Form Overlay Copy Set the default form overlay for copies Select Stored Form Density 10 100 100 Off Cancel OK Status 10 10 2007 10 10 None Select Form Select a form Date and Time Size Name Common Settings S...

Page 201: ...ata Size and Date Stored in the Form 8 Press OK EcoPrint Select the EcoPrint default The table below shows the available settings NOTE Refer to page 1 44 for EcoPrint Common Settings Form Overlay Box Set the default form overlay for box print jobs Select Stored Form Density 10 100 100 Off Cancel OK Status 10 10 2007 10 10 None Select Form Owner Use Name Common Settings Select Form 001 200 Cancel P...

Page 202: ...les larger Refer to page 2 14 for file formats Use the procedure below to select the default file quality setting 1 Press the System Menu key 2 Press Common Settings and Next of Function Defaults Press T twice and then Change of PDF TIFF JPEG Image 3 Select the default image quality from 1 Low Quality High Comp to 5 High Quality Low Comp 4 Press OK Common Settings EcoPrint Cancel OK Status 10 10 2...

Page 203: ...ssion Ratio Priority Standard or Quality Priority 4 Press OK Repeat Copying Select the Repeat Copy default The options are as follows The table below shows the available settings Item Description Compression Ratio Priority Compression Ratio is given priority with smaller file size Standard Standard quality Quality Priority Image quality is given priority with larger file size Common Settings High ...

Page 204: ...ation Confirmation Select whether to display a screen for selecting the orientation of the originals to be placed on the platen when using the following functions For more information refer to page 1 10 for Original Orientation Duplex Margin Centering originals Border erase Combine mode Memo mode Page numbering Booklets Stapling optional feature If On is selected as the Orientation Confirmation se...

Page 205: ...ientation Confirmation Setting Use the procedure below to select the default Orientation Confirmation setting 1 Press the System Menu key 2 Press Common Settings and Change of Orientation Confirmation 3 Select the default for Off or On 4 Press OK ...

Page 206: ...ettings by logging in with administrator privileges Border Erase for Back Page Select the Border Erase Method for Back Page of a sheet The table below shows the available settings NOTE Refer to page 1 25 and page 2 27 for Border Erase Use the procedure below to specify the border erase setting for the back of the page 1 Press the System Menu key 2 Press Copy and Change of Border Erase to Back Page...

Page 207: ...er Selection 3 Press Auto or Default Paper Source 4 Press OK Copy Border Erase to Back Page Cancel OK Status 10 10 2007 10 10 Select the border erase method for back of page Do Not Erase Same as Front Page Item Description Auto Automatically select the cassette containing paper in the same size as originals Default Paper Source Select paper source set by Default Paper Source refer to page 6 13 Cop...

Page 208: ... performed The table below shows the available settings Use the procedure below to specify the automatic zoom priority 1 Press the System Menu key Item Description Most Suitable Size Select paper based on the current zoom and the size of the original Same as Original Size Select paper that matches the size of the original regardless the zoom Copy Auto Paper Selection Cancel OK Status 10 10 2007 10...

Page 209: ...he limit for the number of copies 4 Press OK Quick Setup Registration Select the copying functions to be registered for Quick Setup Six keys of the Quick Setup screen are allocated to typical functions but can be changed as necessary Six items from the following options are available Paper Selection Zoom Staple Copy Auto Priority Cancel OK Status 10 10 2007 10 10 When a specific paper source is se...

Page 210: ...y 1 6 allocated on the Quick Setup Registration screen Press Off to delete a key from the Quick Setup 5 Press OK A confirmation screen appears Press Yes Copy Quick Setup Registration Change Paper Selection Key 1 Change Change Change Change Combine Key 6 Duplex Key 5 Status 10 10 2007 10 10 Zoom Key 2 Change Collate Offset Off Change Original Image Off Change Original Size Off Density Key 4 Change ...

Page 211: ...and for canceling jobs Use the procedure below to select the default Reserve Next Priority setting 1 Press the System Menu key 2 Press Copy and Change of Reserve Next Priority 3 Select the default for Off or On 4 Press OK Common Settings Auto Image Rotation Cancel OK Status 10 10 2007 10 10 Select the default Auto Image Rotation setting On Off ...

Page 212: ...ions are available Original Size 2 sided Book Original Sending Size Original Orientation File Format Density Original Image Scan Resolution Color Selection Zoom Use the procedure below to register the Quick Setup functions 1 Press the System Menu key 2 Press Send Setting and Next of Quick Setup Registration 3 Press Change of the function to be registered in Quick Setup Send Setting Quick Setup Reg...

Page 213: ...ize by specifying that the software automatically detect color and monochrome Use the procedure below to specify the High compression PDF Auto Color setting 1 Press the System Menu key 2 Press Send Setting and then Change in High Comp PDF Auto Color 3 Press On 4 Press OK Status 10 10 2007 10 10 Key 1 Cancel OK Off Key 2 Key 3 Key 4 Key 5 Key 6 Send Setting Original Size Register Original Size func...

Page 214: ...erations can be done For details refer to each page shown below Setting the Number of Stored Jobs page 4 23 Setting the Number of Stored Jobs page 4 27 Quick Setup Registration Select the Storing in Box Sending from Box Printing from Box functions to be registered for Quick Setup Six keys of the Quick Setup screen are allocated to typical functions but can be changed as necessary The options are a...

Page 215: ...d on the Quick Setup screen Press Off to delete a key from the Quick Setup 6 Press OK A confirmation screen appears Press Yes Document Box Removable Memory Store File Change Color Key 1 Change Change Change Change Zoom Key 6 Resolution Key 5 Close Status 10 10 2007 10 10 Storing Size Key 2 Change Original Orientation Off Change Original Size Off Change Original Image Off 2 sided Book Original Key ...

Page 216: ...Wide A4 6 53 Form Feed Timeout 6 53 LF Action 6 54 CR Action 6 54 Emulation Set emulation options to run the machine by the commands for other printers Refer to Emulation on page 3 2 for the setting method Resolution You can set the resolution used for printing Select default resolution from Fast1200 600 dpi or 300 dpi NOTE Fast1200 is our original resolution mode in which photo and other graphic ...

Page 217: ...nge of EcoPrint 3 Press Off or On 4 Press OK KIR The machine is equipped with the smoothing KIR Kyocera Image Refinement function which realizes an excellent output resolution of about 2400 dpi 600 dpi Use the procedure below to select the smoothing KIR setting 1 Press the System Menu key 2 Press Printer and Change of KIR Printer Resolution Select default resolution Fast1200 300dpi 600dpi Cancel O...

Page 218: ... select the interface 1 Press the System Menu key 2 Press Printer and Change of Override A4 Letter 3 Press Off or On 4 Press OK Printer KIR Cancel OK Status 10 10 2007 10 10 Select the default KIR smoothing setting On Off Item Description On A4 and Letter are regarded as the same in size Off A4 and Letter are not regarded as the same in size Printer Override A4 Letter Cancel OK Status 10 10 2007 1...

Page 219: ...Bind LongEdge or 2 sided Bind ShortEdge 4 Press OK Copies Set the default number of copies from 1 to 999 Use the procedure below to select the interface 1 Press the System Menu key 2 Press Printer and Change of Copies Item Description Finish 1 sided No duplex mode 2 sided Bind ShortEdge Shorter edge bound 2 sided Bind LongEdge Longer edge bound Printer Duplex Cancel OK Status 10 10 2007 10 10 Set ...

Page 220: ... orientation for printing 1 Press the System Menu key 2 Press Printer and Change of Orientation 3 Press Portrait or Landscape 4 Press OK Printer Copies Cancel OK Status 10 10 2007 10 10 Set the default number of copies Use or the numeric keys to enter a number copy s 1 999 1 Printer Printer Portrait Landscape Printer Orientation Cancel OK Status 10 10 2007 10 10 Select the default printer orientat...

Page 221: ...en the preset timeout passes the machine automatically prints paper The options are between 5 and 495 seconds Use the procedure below to set the form feed timeout 1 Press the System Menu key 2 Press Printer T and Change of Form Feed Timeout 3 Press or to set the Form Feed Timeout You can set the timeout delay in seconds You cannot use the number keypad to enter this value 4 Press OK Printer Wide A...

Page 222: ...rn action when the machine receives the character return code character code 0DH The table below shows the available settings Use the procedure below to select the interface 1 Press the System Menu key Item Description LF Only Only line feed performed LF and CR Line feed and character return performed Ignore LF No line feed performed Printer LF Action Cancel OK Status 10 10 2007 10 10 Set the line...

Page 223: ...ERATION GUIDE 6 55 6 2 Press Printer T and Change of CR Action 3 Press CR Only LF and CR or Ignore CR 4 Press OK Printer CR Action Cancel OK Status 10 10 2007 10 10 Set the character return action LF and CR CR Only Ignore CR ...

Page 224: ...trator Use the procedure below to specify the TCP IP settings 1 Press the System Menu key 2 Press System Next of Network and then Change of TCP IP 3 Press On on the left side of the touch panel 4 Press Off of DHCP 5 Press IP Address and enter the address using the numeric keys 6 Press Subnet Mask and enter the address using the numeric keys 7 Press Default Gateway and enter the address using the n...

Page 225: ...ext of Network and then Change of TCP IP 3 Press On on the left side of the touch panel 4 Press On of DHCP 5 Press OK 6 Press the Power key and confirm that the Power key indicator and the memory indicator are off After that turn the main power switch off and on NetWare Setup Select the NetWare network connection After that select frame types for NetWare network from Auto Ethernet II 802 3 802 2 o...

Page 226: ...Use the procedure below to select the interface 1 Press the System Menu key 2 Press System Next of Network and then Change of AppleTalk 3 Press On 4 Press OK 5 Press the Power key and confirm that the Power key indicator and the memory indicator are off After that turn the main power switch off and on System NetWare Use NetWare On Off Cancel OK Status 10 10 2007 10 10 Frame Type Ether II Auto IP A...

Page 227: ...lt settings for printing the result reports can also be configured Printing Reports Printable reports are as follows Status Page Check the information including current settings available memory space and optional equipment installed Font List Check the font samples installed in the machine Status Page CD 1325_DC 2325 Firmware Version ...

Page 228: ...em Menu 6 60 ADVANCED OPERATION GUIDE Network Status Page Check the information including network interface firmware version network address and protocol Network Status Page CD 1325_DC2325 Firmware Version ...

Page 229: ...n a transmission is complete The table below shows the available settings 1 Press the System Menu key 2 Press Report Next of Result Report Setting Next of Send Result Report and then Change of E mail Folder Report Report Print Print Status Page Print Print Close 10 10 2007 10 10 Font List Service Status Print Network Status Status Return to Top Item Description Off No result report printed On Resu...

Page 230: ...selected On or Error Only a screen appears for you to specify whether or not transmitted images are attached Press Off or On and then press OK 4 Press OK Report E mail Folder Cancel OK Status 10 10 2007 10 10 Print a report of E mail Folder transmission results On Off Error Only ...

Page 231: ...you can only change the settings by logging in with administrator privileges Copy Density Adjustment Adjust copy density Adjustment can be made in 7 levels both in auto and manual density modes Use the procedure below to adjust the copy density 1 Press the System Menu key 2 Press T Adjustment Maintenance and Next of Copy Density Adjustment 3 Press Change of Auto for auto density mode or of Manual ...

Page 232: ...n be made in 7 levels both in auto and manual density modes 1 Press the System Menu key 2 Press T Adjustment Maintenance and Next of Send Box Density Adjust 3 Press Change of Auto for auto density mode or of Manual for manual density mode 4 Press 3 3 Lighter Darker to adjust density 5 Press OK Adjustment Maintenance Print Density Cancel OK Status 10 10 2007 10 10 Adjust density for all printing jo...

Page 233: ...ou can also execute Drum refresh as needed Refer to Drum Refresh on page 6 66 1 Press the System Menu key 2 Press T Adjustment Maintenance and Change of Auto Drum Refresh 3 Select Off On Low or On High 4 Press OK Item Description Off No Auto Drum Refresh performed On Low Auto Drum Refresh performed as Standard maximum 140 seconds On High Auto Drum Refresh performed as Long maximum 180 seconds Adju...

Page 234: ... Place 11 17 or A3 on the Multi Purpose tray 2 Press the System Menu key 3 Press T Adjustment Maintenance 4 Press Execute of Drum Refresh 1 or Drum Refresh 2 5 Press Yes to feed paper to MP Tray and start Drum Refresh 6 Once Drum Refresh ends return to the Adjustment Maintenance screen Item Description Drum Refresh 1 Use this mode when images are blurred or smeared Refreshing takes about 120 secon...

Page 235: ... fine characters It is recommended to keep the default Off Use the procedure below to specify the setting for correcting fine black lines 1 Press the System Menu key 2 Press T Adjustment Maintenance and Change of Correcting Black Line Item Description Off No correction performed On High Correction performed Select this item if black streak remains after using On Low The reproduction of the image b...

Page 236: ...e machine run more quietly Select this mode when the running noise is uncomfortable Use the procedure below to set Silent mode 1 Press the System Menu key 2 Press T Adjustment Maintenance and Change of Silent Mode Adjustment Maintenance Correcting Fine Black Line Cancel OK Status 10 10 2007 10 10 Reduce the visibility of fine black lines if they appear in a scanned image Small characters will also...

Page 237: ...PDF upgrade kit is installed this option is only displayed if at least 1 GB of memory has been installed Use the procedure below to set the Auto Color Detection Level 1 Press the System Menu key 2 Press T Adjustment Maintenance Change in Auto Color Detection Level 3 Press one of keys 1 to 5 to set the detection level 4 Press OK Adjustment Maintenance Silent Mode Cancel OK Status 10 10 2007 10 10 M...

Page 238: ...ut the initialization procedures Clean the Main Charger Clean the Main Charger if black or white vertical streaks appear on images in printout 1 Press the System Menu key 2 Press T and then Execute of Clean the Main Charger 3 Clean the Main Charger For more information on cleaning the main charger refer to the Operation Guide 4 When you have finished cleaning press End and wait 5 minutes ...

Page 239: ...chine If you perform Send as E mail the date and time set here will be displayed on the header CAUTION Be sure to set Time Zone before the Date Time setup Use the procedure below to set the date and time 1 Press the System Menu key 2 Press T Date Timer and then Change of Date Time 3 Press or to enter the date and time respectively NOTE Set year Y month M date D hour H minute M and second S 4 Press...

Page 240: ...date The year is displayed in Western notation Use the procedure below to select the date format 1 Press the System Menu key 2 Press T Date Timer and then Change of Date Format 3 Select MM DD YYYY DD MM YYYY or YYYY MM DD and press OK Date Timer Time Zone Set time zone Please select the location nearest you Time Zone 12 00 Eniwetok 1 13 Cancel OK Status 10 10 2007 10 10 11 00 Midway Is 10 00 Hawai...

Page 241: ... Date Timer and then Change of Auto Panel Reset 3 Press Off or On 4 Press OK Reset Timer If you select On for Auto Panel Reset set the amount of time to wait before Auto Panel Reset Options are between 5 and 495 seconds every five seconds NOTE If you select Off for Auto Panel Reset the time display does not appear Use the procedure below to set the reset time 1 Press the System Menu key 2 Press T ...

Page 242: ...and then Auto Low Power Mode 3 Press or the numeric keys to enter the time until Auto Power Mode is turned on 4 Press OK Auto Sleep If no job runs for a certain period of time automatically enter Sleep Mode Refer to the Operation Guide for Sleep Mode Auto Sleep ON OFF Select whether to use Auto Sleep or not NOTE Time remaining before Auto Sleep can be modified as necessary Refer to Sleep Timer bel...

Page 243: ...appear Use the procedure below to set the Auto Sleep time 1 Press the System Menu key 2 Press T Date Timer and then Change of Sleep Timer 3 Press or the numeric keys to enter the time until Auto Sleep is turned on 4 Press OK Date Timer Auto Sleep Cancel OK Status 10 10 2007 10 10 Automatically enter Sleep Mode On Off Date Timer Sleep Timer Cancel OK Status 10 10 2007 10 10 Set the amount of time t...

Page 244: ...Press the System Menu key 2 Press T Date Timer and then Change of Auto Error Clear 3 Press Off or On 4 Press OK Error Clear Timer If you select On for Auto Error Clear set the amount of time to wait before automatically clearing errors Options are between 5 and 495 seconds every five seconds If you set 0 as the time errors are not displayed NOTE If you select Off for Auto Error Clear the time disp...

Page 245: ...Clear Timer 3 Press or to enter the time until printing restarts You cannot use the number keypad to enter this value 4 Press OK Date Timer Error Clear Timer Cancel OK Status 10 10 2007 10 10 Set the amount of time to wait before automatically clearing errors Use to enter a number 5 495 sec ...

Page 246: ...s destination name E mail address FTP server folder path computer folder path and FAX No optional Use the procedure below to register a new individual contact 1 Press the System Menu key 2 Press Edit Destination Register Edit of Address Book Add Contact and then Next 3 To specify the address number press Change in Address Number 4 Press or numeric keys to enter a particular Address Number 1 2 500 ...

Page 247: ...st The procedure differs depending on the transmission method selected in step 11 E mail Address 1 Press E mail Address to enter the E mail address and press OK The table below explains the items to be entered NOTE Refer to the Operation Guide for entering characters 2 Check if the entries are correct and press OK Address Change Change Dest Register Status 10 10 2007 10 10 E mail Address Contact N...

Page 248: ...r entering characters 2 Check if the entries are correct and press OK NOTE Press Connection Test to check the connection to the FTP server you chose If the connection fails check the entries you made Item Description Max No of Characters Host name FTP server host name or IP address 62 chars Path Path for the file to be stored E g User ScanData If no path is entered the file is stored in the home d...

Page 249: ... 2 Check if the entries are correct and press OK NOTE Press Connection Test to check the connection to the computer you chose If the connection fails check the entries you made 11 Check if the destination entry is correct and press Register The destination is added to the Address Book Item Description Max No of Characters Host name Host name or IP address of the sending computer 62 chars Path Path...

Page 250: ... group 1 Press the System Menu key 2 Press Edit Destination Register Edit of Address Book Add Group and then Next 3 To specify the address number press Change in Address Number 4 Press or to enter a particular Address Number 1 2 500 NOTE Address Number is an ID for a group You can select any available number out of 2 000 numbers for individuals and 500 numbers for groups 5 Press OK The Group Name ...

Page 251: ...stination 1 Press the System Menu key 2 Press Edit Destination and then Register Edit of Address Book 3 Select a destination or group to edit NOTE Destinations can be sorted or searched by destination name or address number Refer to the Operation Guide for Address List 4 Press Detail The procedure differs depending on the details to be edited Edit Destination Add Sort Search Name Name Dest No Type...

Page 252: ...ey Add a new destination individual or group A maximum of 100 destinations can be registered NOTE Refer to the Operation Guide for use of One touch Key Use the procedure below to register a new destination under a One touch key 1 Press the System Menu key 2 Press Edit Destination and Register Edit of One touch Key 3 Select a One touch Key number 001 to 100 for the destination Pressing No enables d...

Page 253: ... touch Key 3 Select a One touch Key number 001 to 100 for the destination Pressing No enables direct entry of a One touch Key number The procedure differs depending on the details to be edited Changing the Registered Information 1 Press Register Edit Edit Destination Register Sort Search Name Name No Type Name Detail 2 3 E mail Folder Detail Cancel OK Status 10 10 2007 10 10 Search No Group ABC DE...

Page 254: ...tered Information 1 Press Delete 2 Press Yes on the screen to confirm the deletion of the data registered in the One touch Key Edit Destination Register Sort Search Name Name No Type Name Detail 2 3 E mail Folder Detail Cancel OK Status 10 10 2007 10 10 Search No Group ABC DEF GHI JKL MNO PQRS TUV WXYZ 0 9 0003 CCC ABC DEF com 0004 DDD 0005 EEE 0006 FFF 0007 GGG qwe rty com Status 10 10 2007 10 10...

Page 255: ...ou to backup Job accounting data 1 Press the System Menu key 2 Press T Adjustment Maintenance and then Execute of System Initialization 3 If user login is disabled the user authentication screen appears Enter your login user name and password and then press Login For this you need to log in with administrator privileges The default login user name and password are both 3060 4 Press Yes 5 Once the ...

Page 256: ...er restart Use the procedure below to select the interface 1 Press the System Menu key 2 Press System and Execute of Restart 3 Press Yes to restart the machine System Network Network Security Close Status 10 10 2007 10 10 Next Next Execute Restart Return to Top System Change Yes Close Status 10 10 2007 10 10 Execute No Network The system will be restarted Are you sure Network Security Return to To...

Page 257: ... key 2 Press System Next in Network Security and then Change in SSL NOTE If user login is disabled the user authentication screen appears Enter your login user name and password and then press Login For this you need to log in with administrator privileges The default login user name and password are both 3060 3 Press On 4 Press OK System SSL Use SSL for communication Off On Cancel OK Status 10 10...

Page 258: ...turn to the original display Press the Accessibility Display key again Press the Accessibility Display key when in the Copy or Send i e the Copy or Send key indicator is On Enlarged keys or characters appear on the touch panel Operation can also be made by pressing any numeric key corresponding to the number or symbol displayed e g Press the 2 key to adjust density Follow the instructions on the s...

Page 259: ...ADVANCED OPERATION GUIDE 7 1 7 Management This chapter explains the following operations User Login Administration 7 2 Job Accounting 7 11 Security Kit Operations 7 24 ...

Page 260: ...ng Disabling User Login Administration This enables user login administration Select one of the following authentication methods Use the procedure below to enable user login administration 1 Press the System Menu key 2 Press User Login Job Accounting 3 If user login is disabled the user authentication screen appears Enter your login user name and password and then press Login For this you need to ...

Page 261: ...erver If you cannot login because of the setting of the machine login with any administrator registered in the local user list and correct the settings If the server type is Kerberos Win2000 2003 only domain names entered in uppercase will be recognized 6 Press OK Login Logout Once you enable user login administration a user ID and password entry screen appears each time you use this machine Log i...

Page 262: ... NOTE When job accounting is enabled you can use the Counter Check key after you enter your login user name and login password Pressing Counter Check enables you to refer to the number of pages printed and the number of pages scanned 5 Check the login user name and password are correct and press Login Logout To log out the machine press the Logout key to return to the login user name login passwor...

Page 263: ...me login user name and login password regularly for your security Use the procedure below to register a new user Item Description User Name Mandatory at user registration Enter the name displayed on the user list up to 32 characters Login User Name Enter the login user name to log in up to 64 characters The same login user name cannot be registered Login Password Enter the password to log in up to...

Page 264: ...l User List and then Add 6 Press Change of User Name 7 Enter the user name and press OK NOTE Refer to the Operation Guide for details on entering characters 8 Enter the login user name and E mail address following 6 and 7 above 9 Press Change of Login Password and then Password 10 Enter the login password and press OK 11 Press Confirm Password 12 Enter the same login password to confirm and press ...

Page 265: ...and users can be deleted The items which can be added are all able to be changed Use the procedure below to select the interface 1 Press the System Menu key 2 Press User Login Job Accounting 3 If user login is disabled the user authentication screen appears Enter your login user name and password and then press Login For this you need to log in with administrator privileges The default login user ...

Page 266: ...reen The user information is changed Deleting a user 1 Press Delete 2 Press Yes on the screen to confirm deletion The selected user will be deleted NOTE The default user with administrator rights cannot be deleted For a user without administrator rights who logs in These users can partially change their own user properties including user name login password and E mail address Although login user n...

Page 267: ...nknown The table below shows the available settings Use the procedure below to select the interface 1 Press the System Menu key 2 Press User Login Job Accounting 3 If user login is disabled the user authentication screen appears Enter your login user name and password and then press Login For this you need to log in with administrator privileges The default login user name and password are both 30...

Page 268: ... ADVANCED OPERATION GUIDE 5 Press Reject or Permit 6 Press OK User Login Job Accounting Unknown ID Job Select what to do with jobs from unknown user names or account IDs Reject Permit Cancel OK Status 10 10 2007 10 10 ...

Page 269: ...e page increments up to 999 999 copies Resetting the print counter for each account or for all accounts combined First Job Accounting Setup Follow these steps for the first job accounting setup Enable job accounting page 7 11 T Add an account page 7 13 T Log out page 7 13 T Other users log in for operations page 7 12 Enabling Disabling Job Accounting Enable job accounting Use the procedure below t...

Page 270: ...w to login and logout Login 1 In the screen below enter the account ID using the numeric keys and press Login NOTE If you entered a wrong character press the Clear key and enter the account ID again If the entered account ID does not match the registered ID a warning beep will sound and login will fail Enter the correct account ID By pressing Check the counter you can refer to the number of pages ...

Page 271: ...explains how to add a new account The following entries are required Use the procedure below to register a new account 1 Press the System Menu key 2 Press User Login Job Accounting 3 If user login is disabled the user authentication screen appears Enter your login user name and password and then press Login For this you need to log in with administrator privileges The default login user name and p...

Page 272: ...s the registered account information or deletes the account Use the procedure below to select the interface 1 Press the System Menu key 2 Press User Login Job Accounting 3 If user login is disabled the user authentication screen appears Enter your login user name and password and then press Login For this you need to log in with administrator privileges The default login user name and password are...

Page 273: ...unts You can select how the copying and printing page counts are shown either the total of both or each of copying and printing individually The selection may influence restriction on the count and count method Refer to Restricting the Use of the Machine on page 7 16 Counting the Number Status 10 10 2007 10 10 User Login Job Accounting Accounting List 1 2 Register an account that is permitted to u...

Page 274: ... Change of Copier Printer Count 5 Press Total or Split 6 Press OK Restricting the Use of the Machine This section explains how to restrict the use of the machine by account or the number of sheets available Restriction Items Print Restriction Copier The number of sheets copiable is restricted This is displayed when Split mode is selected for Managing the Copy Print Count Print Restriction Printer ...

Page 275: ... Print Restriction Copier Print Restriction Printer Scan Restriction Others or FAX TX Restriction 3 Select Off Counter Limit or Reject Usage If Counter Limit is selected press or numeric keys to select the number of pages 4 Press OK 5 Repeat steps 2 to 3 for other accounts to be restricted 6 Press Register 7 The restricted account is added Item Description Off No restriction given Counter Limit Re...

Page 276: ...t Immediately Subsequently or Alert Only 6 Press OK Counting the Number of Pages Printed This counts the number of pages printed Counts are classified into Total Job Accounting and Each Job Accounting A new count can also be started after resetting the count data which was stored for a certain period of time Item Description Immediately The next job will be prohibited in sending or in storing in t...

Page 277: ... and then Next of Total Job Accounting Item Description Print Pages by Function When Split is selected for Managing the Copy Print Count Number of pages copied printed faxed and the total number of those pages are displayed When Total is selected for Managing the Copy Print Count Number of pages printed by copier and printer number of pages faxed and the total number of those pages are displayed O...

Page 278: ...led the user authentication screen appears Enter your login user name and password and then press Login For this you need to log in with administrator privileges The default login user name and password are both 3060 4 Press Next of Job Accounting Setting and Check of Each Job Accounting 5 Select the account to check the count User Login Job Accounting Total Job Accounting Print Pages by Function ...

Page 279: ...5 These types are specified in accounting reports Refer to Printing an Accounting Report on page 7 22 In addition to paper size media type can also be specified e g count the letter size color paper used If no media type is specified usage is counted for all media types of that size Use the procedure below to select the interface 1 Press the System Menu key 2 Press User Login Job Accounting 3 If u...

Page 280: ... Accounting Report Total pages counted at all relevant accounts can be printed as an accounting report Reports have different formats depending on how the count of copiers and printers is administered When Split is selected for Managing the Copy Print Count User Login Job Accounting Paper Size 1 Select the paper sizes and types to count On Off Cancel OK Status 10 10 2007 10 10 A5 All Media Types P...

Page 281: ...e default login user name and password are both 3060 5 Press Next of Job Accounting Setting and then Print of Print Accounting Report 6 Press Yes on the screen to confirm the printing Unknown Account ID Jobs The behavior of the machine when it receives a job from unknown account ID i e unsent ID can be specified Refer to Unknown login user name Job on page 7 9 for details Checking and Printing Cou...

Page 282: ... ADVANCED OPERATION GUIDE Security Kit Operations Installing the optional Security Kit adds Security on the System Menu Refer to Security on page 8 1 for the descriptions and operations related to the Security options ...

Page 283: ...structions for General Users for Both General Users and Administrators Security Kit Functions 8 2 Touch Panel Display after the Security Kit is Installed 8 4 Instructions for Administrators for Those in Charge of Installation and Operation of the Security Kit Installing the Security Kit 8 5 Changing Security Functions 8 6 System Initialization 8 8 Warning Message 8 9 ...

Page 284: ...data or deleted data so as not to be restored No special procedures are required for overwriting which will be automatically performed CAUTION Canceling a job immediately starts overwriting the data that was stored in the hard disk Overwrite Methods There are two overwrite methods which can be switched at any time Once Overwrite Method Overwrite a target storage area of the hard disk for overwriti...

Page 285: ...rity because no data cannot be decoded by ordinary output or operations Encryption is automatically performed and no special procedure is required CAUTION Encryption helps enhance security However the data stored in the Document Box can be decoded by ordinary operations Do not store any strictly confidential data in the Document Box Functions of Security Kit Security Kit Printing Copying Send Send...

Page 286: ...t the main power switch Overwriting or erasing automatically resumes If you accidentally turn the main power switch off during overwriting or initialization the hard disk icon might not switch to the second icon shown above This would be caused by a possible crash or failed overwriting of the data to be overwritten This will not affect subsequent overwriting processes However system initialization...

Page 287: ...el The only thing required by the administrator during the installation is to enter the encryption code Encryption Code An encryption code of 6 alphanumeric characters 0 to 9 A to Z a to z to encrypt data needs to be entered By default the code is set 000000 As an encryption key is then created from this code it is safe enough to continue using the default code CAUTION Be sure to remember the encr...

Page 288: ...ord are both 3060 4 Enter the default security password 000000 5 Press Change of Security Password 6 Press Password to enter a new security password 6 to 16 alphanumeric characters CAUTION Avoid any easy to guess numbers for the security password e g 11111111 or 12345678 7 Press Confirm Password to enter the same password again 8 Press OK Changing the Method for Erasing the Entire Hard Disk Change...

Page 289: ... and password and then press Login For this you need to log in with administrator privileges The default login user name and password are both 3060 4 Enter the security password By default the code is set 000000 5 Press Data Overwrite Method of Change 6 Press 3 time Overwrite default or Once Overwrite 7 Press OK Security Data Overwrite Method Cancel OK Status 10 10 2007 10 10 Select data overwrite...

Page 290: ...tem 1 Press the System Menu key 2 Press T and then Security 3 If the user authentication screen appears enter the login user name and login password and press Login If the user authentication screen does not appear go to Step 5 4 Enter the default security password 000000 5 Press Execute of System Initialization 6 Press Yes on the screen to confirm the initialization Initialization starts 7 When t...

Page 291: ...g the installation of the Security Kit CAUTION Even though entering a different encryption code can also enable continuation of a job this will erase all the data stored in the hard disk Exercise extreme caution when entering an encryption code The encryption code is not the same as the security password 2 Press the Power key and confirm that the Power key indicator and the memory indicator are of...

Page 292: ...Security 8 10 ADVANCED OPERATION GUIDE ...

Page 293: ...ADVANCED OPERATION GUIDE Appendix 1 Appendix Paper Appendix 2 Glossary Appendix 9 ...

Page 294: ...ations of paper that is supported with this machine Refer to the subsequent sections for further details NOTE Some recycled paper does not meet requirements for use with this machine as listed in the Basic Paper Specifications shown below such as moisture or pulp content For this reason we recommend purchasing a small amount of recycled paper as a sample for testing prior to use Choose recycled pa...

Page 295: ... produce harmful fumes from the heat of printing and may damage the drum Be sure to use the standard paper that contains at least 80 pulp i e not more than 20 of the total paper content consists of cotton or other fibers Supported Paper Sizes Paper of the following sizes is supported by the machine Measurements in the table take into account a 0 7 mm dimensional accuracy for length and width Corne...

Page 296: ...60 to 220 g m2 for the Multi Purpose tray Thickness Avoid using paper that is too thick or thin Signs that paper may be thin include frequent problems with paper jams or with several sheets being supplied at once Paper jams may also indicate that the paper is too thick The proper thickness is between 0 086 and 0 110 mm Moisture Content Paper moisture content is the ratio of moisture to dryness exp...

Page 297: ...rough the fixing unit it curls upward slightly To deliver flat printouts load the paper so that the curl faces towards the bottom of the paper tray Static electricity During printing paper is electrostatically charged so that the toner adheres Choose paper that can be discharged quickly so that copies do not cling together Whiteness Paper whiteness affects print contrast Use whiter paper for sharp...

Page 298: ...gh special paper that meets the following requirements can be used with the machine print quality will vary considerably due to differences in the construction and quality of special paper Thus special paper is more likely than regular paper to cause printing problems Before purchasing special paper in volume try testing a sample to ensure the print quality is satisfactory General precautions when...

Page 299: ...ructure of envelopes printing evenly over the entire surface may not be possible in some cases Thin envelopes in particular may be wrinkled by the machine in some cases as they pass through Before purchasing envelopes in volume try testing a sample to ensure the print quality Storing envelopes for a long period may cause them to become wrinkled Thus keep the package sealed until you are ready to u...

Page 300: ...ad the paper in the Multi Purpose tray with the leading edge raised a few millimeters as shown in the figure Colored Paper Colored paper must conform to the specifications listed on the page 2 of the Appendix In addition the pigments in the paper must be able to withstand the heat of printing up to 200 C or 392 F Preprinted Paper Preprinted paper must conform to the specifications listed on the pa...

Page 301: ...tware that is on another computer on the same AppleTalk network Auto Form Feed Timeout During data transmission the machine may sometimes have to wait until receiving the next data This is the auto form feed timeout When the preset timeout passes the machine automatically put paper out However no output is performed if the last page has no data to be printed Auto Paper Selection A function to auto...

Page 302: ...CL6 KC GL KPDL and KPDL automatic FTP File Transfer Protocol A protocol to transfer files on the TCP IP network whether the Internet or an intranet Along with HTTP and SMTP POP FTP is now frequently used on the Internet Grayscale A computer color expression Displayed images of this sort are typically composed of shades of gray varying from black at the weakest intensity to white at the strongest w...

Page 303: ...from the server in which the mail is stored on the Internet or an intranet PostScript A page description language developed by Adobe Systems It enables flexible font functions and highly functional graphics allowing higher quality printing The first version called Level 1 was launched in 1985 followed by Level 2 that enabled color printing and two byte languages e g Japanese in 1990 In 1996 Level ...

Page 304: ...other over a network TWAIN Technology Without Any Interested Name A technical specification for connecting scanners digital cameras and other image equipment to the computers The TWAIN compatible devices enable to process image data on any relevant application software TWAIN is adopted on a large number of graphic software e g Adobe Photoshop and OCR software USB Universal Serial Bus 2 0 A USB int...

Page 305: ...ight side 1 29 Top binding 1 29 Border Erase Copy 1 25 Send 2 27 Buzzer 6 5 C Centering 2 7 Clean the Main Charger 6 70 Collate Offset Copying 1 12 Color Background Density Adjustment 2 24 Color Grayscale Monochrome Selection 2 25 Combine Mode 1 20 2 in 1 Mode 1 20 4 in 1 Mode 1 20 Page Boundary Lines 1 21 Continuous Scan Copy 1 45 Send 2 26 Conventions in This Guide vi Copy Originals 1 2 Setup 6 ...

Page 306: ...6 22 Margin 6 29 Overlay Box 6 32 Overlay Copy 6 31 PDF TIFF JPEG Image 6 34 Repeat Copying 6 35 Scan Resolution 6 23 Zoom 6 26 Default Gateway Appendix 9 Default Screen 6 3 Density Adjustment Copy 1 42 Send 2 21 Destination 6 78 Adding 6 78 Adding a Group 6 82 Adding an individual 6 78 Editing 6 83 One touch Key 6 84 Device 5 17 Canceling FAX Communication 5 19 Checking Status 5 17 Configuring 5 ...

Page 307: ...Copy Proof and Hold Print Box 4 23 Repeat Copy Box 4 27 Job Finish Notice Copy 1 50 Send 2 32 K KPDL Appendix 10 L Low Power Mode 6 74 M Management 7 1 Margin Centering Mode 1 23 Memo 1 40 Mirror Image 1 49 Mixed Sized Originals 1 7 Combinations 1 7 Copy Size 1 8 Send 2 8 Multi Purpose MP Tray Appendix 11 N Negative Image 1 48 NetBEUI Appendix 11 NetWare 6 57 Appendix 11 Setup 6 57 Network Setup 6...

Page 308: ...tter 6 50 Resolution 6 48 Wide A4 6 53 Printing Reports Sending Notice 6 59 Font List 6 59 Network Status Page 6 60 Service Status Page 6 61 Status Page 6 59 Transmission Result Reports 6 61 Priority Override 1 53 5 14 Programmed Copying 1 56 Editing and Deleting 1 57 Recalling 1 56 Registering 1 56 R Repeat Copy 1 54 Maximum Number 1 55 Outputting 1 55 Selecting 1 54 Reserve Next Priority 6 43 Re...

Page 309: ...ting and Deleting 1 59 Staple 1 14 Status Job Cancel 5 1 Status Page Appendix 12 Subnet Mask Appendix 12 Supplies Checking the Remaining Amount 5 16 Switching Unit of Measurement 6 17 Switching the Language 6 2 System Initialization 6 87 System Menu 6 1 T TCP IP 6 56 6 57 Appendix 12 Setup 6 56 6 57 TWAIN Appendix 12 U USB Appendix 12 User Login Administration 7 2 Adding 7 5 Changing Properties 7 ...

Page 310: ...Index Index 6 ADVANCED OPERATION GUIDE ...

Page 311: ...UTAX GmbH Ohechaussee 235 22848 Norderstedt Germany ...

Reviews: