background image

18

3. Attach the wire head (1) by screwing it coun-
terclockwise (viewed from the head).
4. Remove the hexagonal wrench (2).
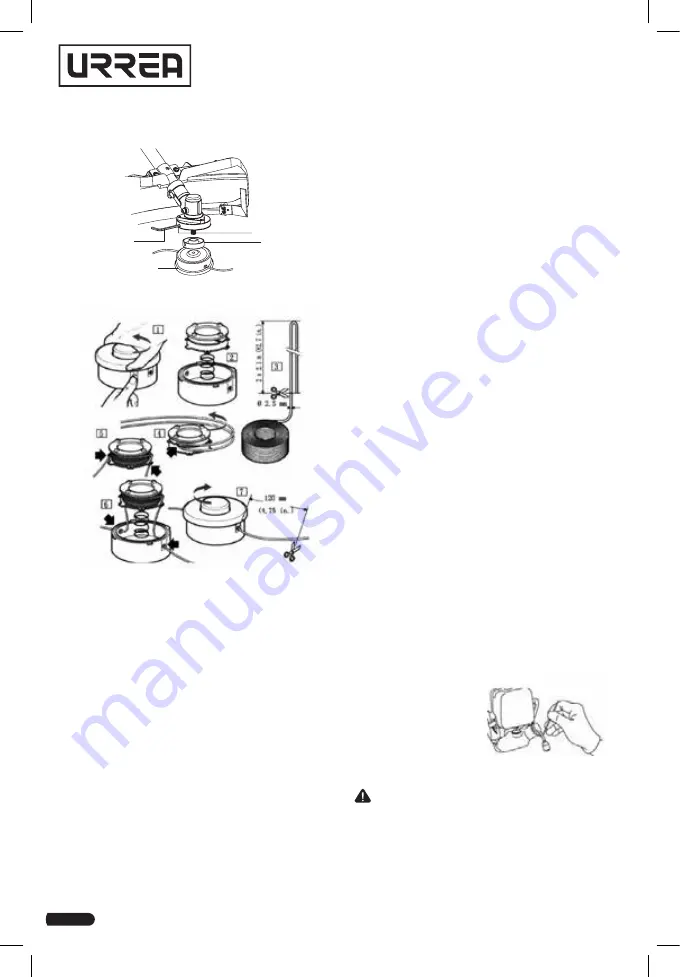
REPLACING THREAD

1. Turn the stopper knob counterclockwise and 
remove it.
2. Remove the empty spool from the thread 
head. Keep the spring attached to the spool.
3. Cut up to 2 m of thread to place it on the reel.
4. Hook one of the ends of the nylon in the head 
and wind it, make sure that you place the two 
threads in the slots opposite each other in the 
new reel.
5. Thread the threads through the guides on the 
spool.
6. Thread the threads through the eyes in the 
thread head. Carefully push the spool on the 
thread head (pull the threads out slightly if nec-
essary). When placing the spool on the thread 
head, hold the threads and pull them hard to 
disengage them from the slots in the spool. 
Press and turn the spool counterclockwise until 
it stops. Grasp the spool and turn it slightly to 
the right. Release the spool. The spool must be 
secured in the thread head. Otherwise, hold it 
and turn it until it engages.

Make sure that the thread head and the spool 
retainer are installed on the drive shaft.
Pull the threads again to rotate the spool to the 
cutting position. Press the spool retainer while 
pulling the thread or threads, to advance it to 
advance manually to verify the correct assembly 
of the thread head.
7. Position the retainer and make sure that the 
ends of each wire protrude approximately 6 in. 
(152 mm) of each slot.

FUEL TANK CAP SERVICE
A breather passage is incorporated in the tank 
cap. If the breather passage is clogged, the fuel 
will not flow into the carburetor, causing prob-
lems with starting or running the engine.
At the same time, make sure that the base of 
the breather assembly is fitted firmly into the 
groove inside the tank cap as shown below.

AIR CLEANER SERVICE

Clean the air cleaner element every 20 hours.
• Remove the air cleaner cap from the air clean-
er case by removing the air cleaner cap screw.
• Remove the element from the air cleaner case.
• Wash the element in detergent and water, and 
dry it thoroughly.
• Reinstall the element in the air cleaner case 
and reinstall the air cleaner, and tighten the 
screw.
NOTE: improper element cleaning can result in 
engine damage. Do not use compressed air to 
clean or dry element. Always clean element with 
an approved high flash point solvent only. Never 
use gasoline. Do not operate engine with air fil-
ter parts removed.

FUEL FILTER SERVICE
Every 20 hours of operation.
• Pull the fuel filter out from the fuel tank.
• Clean the fuel filter 
in a bath of high flash-
point solvent.
• Dry the fuel filter and 
reinstall it into the fuel 
tank.
NOTE: if a fuel still does not flow well after the 
cleaning, replace the fuel filter with new one.

 IMPORTANT: many solvents are highly flam-

mable and may cause serious burns. Improper 
use of solvents can result in fire or an explosion. 
Do not use gasoline or low flash-point solvents 
to clean the fuel filter. Clean only in a well-venti-
lated area away from sources of sparks or flame, 
including any appliances with a pilot light.

2

1

3

4

Summary of Contents for DG843

Page 1: ...ad contenidas en este manual antes de operar esta herramienta WARNING Read understand and follow the safety rules in this manual before operating this tool DG843 DG852 DESBROZADORAAGASOLINA GAS TRIMME...

Page 2: ...20 21 24 3 4 4 5 5 6 8 9 11 20 21 24 E N G L I S H E S P A O L CONTENIDO CONTENT S MBOLOS SYMBOLS PELIGRO ADVERTENCIA PRECAUCI N indica un riesgo personal o la posibilidad de un da o Utilice protecci...

Page 3: ...estas partes se calien tan durante el funcionamiento Siempre apague el motor y retire el tap n de la buj a antes de realizar cualquier ajuste o re paraciones excepto para los ajustes del carbu rador...

Page 4: ...urante su operaci n normal Para evitar el peligro del incendio coloque el motor a una distancia m nima de 1 m 3 3 pies de edificios obstrucciones y otros objetos infla mables NO coloque objetos inflam...

Page 5: ...o mientras el cabezal gira a la velocidad normal de operaci n 16 BLOQUEO DEL ACELERADOR Presione para operar continuamente 17 CUBIERTA TRASERA DEL EMBRAGUE 18 RETR CTIL Tire de la manija hasta que el...

Page 6: ...haya ning n piloto encendido de ning n tipo de aparato ATENCI N si utiliza solo gasolina sin mezclar aceite para motores 2 tiempos causar da os irreversibles al motor y esto invalidara la garan t a L...

Page 7: ...r fig 1 3 para mantenerlo acelerado 5 Tire de la soga de arranque hasta que el mo tor comience a encenderse 6 Empuje la palanca del estrangulador hacia adentro el arranque excesivo provocar el aho go...

Page 8: ...do en la cadera derecha y el seguro de liberaci n r pida est situado en el exterior 4 Si la desbrozadora no se equilibra ajuste el gancho del arn s y el manubrio hasta que se equilibre 5 Para desmonta...

Page 9: ...ue el opera dor pierda el control de la desbrozadora El con tragolpe de la cuchilla puede ocurrir sin previo aviso si la cuchilla se engancha o se atasca Esto es m s probable que ocurra en reas donde...

Page 10: ...a que enganche Aseg rese de que el cabezal del hilo y el ret n del carrete est n instalados en el eje de impul si n Vuelva a tirar de los hilos para girar el carrete a la posici n de corte Presione el...

Page 11: ...a 2 Limpie todo material extra o de la desbrozadora 3 Retire la buj a vierta 0 5 ml de aceite para motor de 2 tiempos a trav s del orificio de la buj a tire del arrancador varias veces y vuelva a colo...

Page 12: ...aynaud s Syndrome in certain individuals Symptoms may include tingling numbness and blanching of the fingers usually apparent upon exposure to cold Hereditary factors exposure to cold and damp ness di...

Page 13: ...IGNITION SWITCH Move switch forward to stop back to start 5 THROTTLE LOCKOUT Before acceleration compress it please 6 U HANDLE this handle can be adjusted at your convenience for comfort 7 HARNESS AS...

Page 14: ...then drag the U handle lock bar to turn the U handle ASSEMBLY OF THE GUARD 1 Install the safety cover on the shaft with the safety cover bracket and the provided screws 2 Tighten the screws after plac...

Page 15: ...Pour the mixture slowly to prevent it from spilling and thus allow air to escape from the fuel tank Close the lid firmly IMPORTANT never fill the tank so the fuel level rises into the filler neck If...

Page 16: ...ck off and push the blade SAFETY HARNESS 1 Mount and adjust the shoulder harness and belt 2 Adjust the shoulder harness button and move the hook to your waist then adjust the belt if there is a belt 3...

Page 17: ...ifficult to see the material be ing cut To cut safely get close to the weeds that will be cut from right to left in case it is the case that an unexpected object or dangerous mate rial is found this c...

Page 18: ...mm of each slot FUEL TANK CAP SERVICE A breather passage is incorporated in the tank cap If the breather passage is clogged the fuel will not flow into the carburetor causing prob lems with starting...

Page 19: ...ll ventilated place that is inac cessible to children Keep away from corrosive agents such as garden chemicals and de icing salts 3 Abide by all ISO and local regulations for the safe storage and hand...

Page 20: ...iar la esponja del filtro de aire Clean foam filter Limpie la rejilla del supresor de chispas Clean screen of spark arrestor Limpiar la buj a y ajustar la separaci n entre electrodos Clean spark plug...

Page 21: ...21 Manual de usuario User s manual Notas Notes...

Page 22: ...22 Notas Notes...

Page 23: ...23 Manual de usuario User s manual Notas Notes...

Page 24: ...unqualified person URREA HERRAMIENTAS PROFESIONALES S A DE C V garantiza este producto por el termino de 1 a o en sus piezas componentes y mano de obra contra cualquier defecto de fabricaci n a partir...

Reviews: