10
DS1061-015B
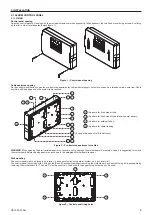
To fix the control panel follow the instructions below:
1.. Place.the.control.panel.and.mark.the.drilling.point.for.the.slot.A.
2. Drill the wall, put a screw anchor and screw in its screw; it must stick out about 1cm.
3.. Hang.the.control.panel.on.the.screw,.place.the.control.panel.in.horizontal.position.and.mark.the.drilling.point.for.slots.B.
4.. Remove.the.control.panel,.drill.and.put.the.remaining.anchor.screws..
5. Hang again the control panel and fix it with the screws, tightening also the screw of hole A. Slots B allows to compensate hole misalignments,
if present, in order to fix the control panel perfectly horizontal.
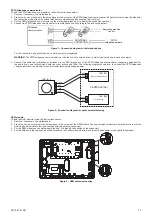
Tamper adjustment
For.a.proper.operation,.the.tamper.switch.in.standby.condition.must.have.the.metal.lever.aligned.with.the.upper.edge.of.its.housing..Misalignments.
caused.by.an.uneven.wall.surface,.if.present,.can.be.compensate.using.the.adjusting.screw.placed.under.the.tamper.
Housing edge
Tamper
Adjusting
screw
Figure 4 – Tamper position in standby condition and adjusting screw position
3.1.2 CONTROL PANEL OPTIONS ADDITION
.
The.optional.expansion.modules.are.connected.on.the.lower.side.of.the.motherboard,.that.can.be.removed.from.the.control.panel.before.any.
operations.
All the operations performed with open control panel must be done by a skilled technical staff and after the whole system has been
unpowered.
Motherboard removal
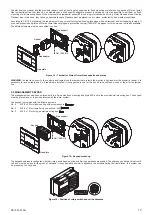
To remove the motherboard, unscrew the 6 screws shown in the figure.
.
Figure 5 – Motherboard fixing screws
To put again the motherboard in the control panel, place it again on its supports and screw in the fixing screws, without forcing, in order not to
damage.the.printed.circuit.
Position and use of expansion connectors for optional cards.
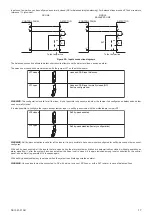
The.expansion.connectors.available.on.the.rear.of.the.motherboard.are.the.following:.
A
C
B
–
CON3 connector used for connection
of 1061/002 PSTN module
–
CON2 connector used for connection
of 1061/458 GSM module
–
CON7 connector used for connection
of 1061/012 speech synthesis module
A
B
C
Ref.1061/458
Ref.1061/012
Ref.1061/002
Figure 6 – Connectors for expansions in motherboard
§

