background image

75 

c.


Select whether to enable alarm input. If 

Alarm Input

 is set to 

On

, the terminal will receive door 

magnet alarms. If it is set to 

Off

, the terminal will not receive security gate alarms. 

(3)


Set whether to send alarm emails when security gate alarms occur. 

(4)


Click 

Save

7.3.6  

Storage 

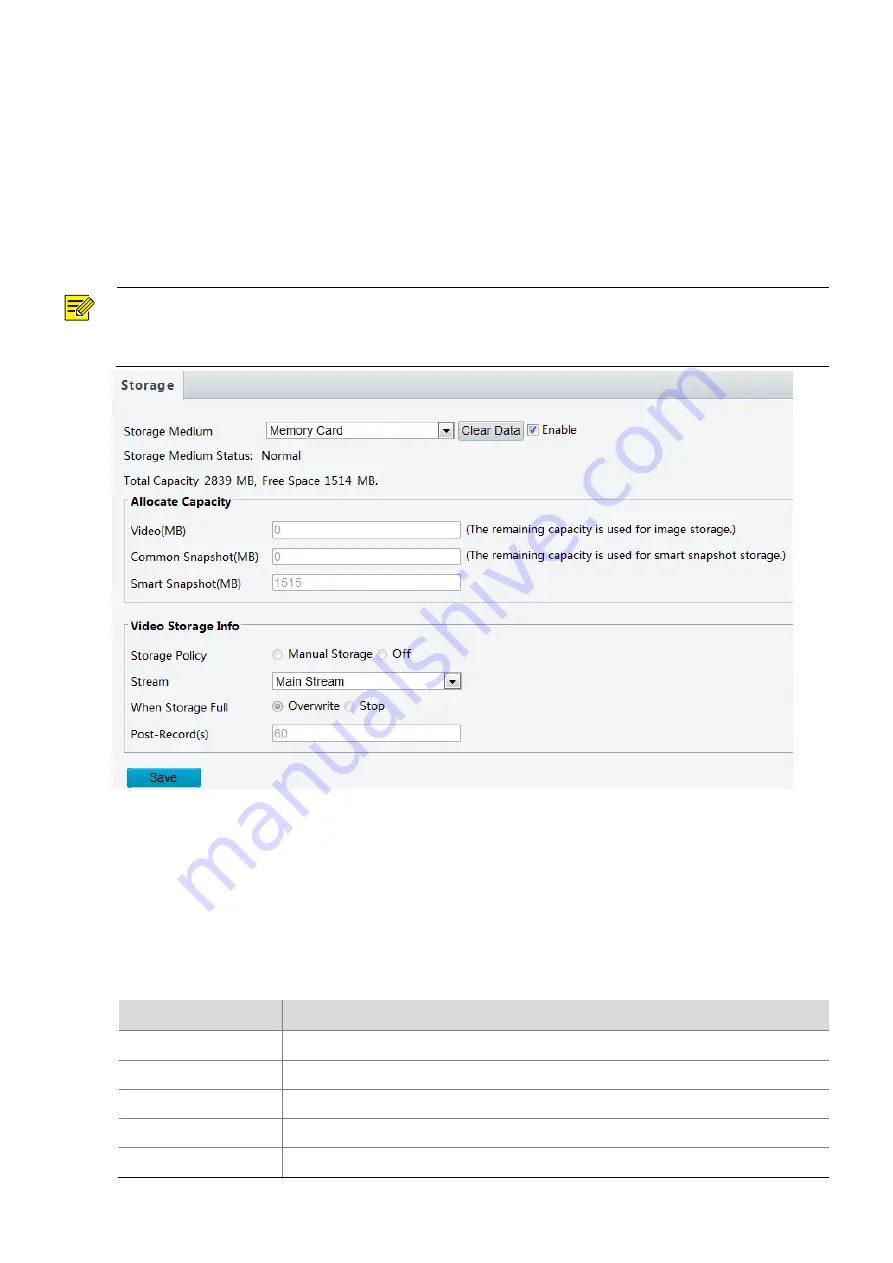
1. Storage 

Click 

Setup > Storage > Storage


NOTE! 


Keep default values on the 

Storage

 interface. Configuration is forbidden. 


Formatting is forbidden. 


2. FTP 

Use FTP to upload images to the FTP server in accordance with the set rules. 

2A. 


Smart 

(1)


Choose 

Setup

 > 

Storage

 > 

FTP 

and then click 

Smart

(2)


Set parameters by referring to the table below 


Server Parameter 

Parameter 

Description 

Server IP 

Address of the FTP server for receiving images. 

Port No 

The default value is 21. Modify the value as needed. 

Username 

Username used to connect the FTP server. 

Password 

Password used to connect the FTP server. 

Direction ID 

Use the default setting. 

Summary of Contents for OET-213H-NB

Page 1: ...Face Recognition Access Control Terminal User ManualⅡ Document Version V1 08 ...

Page 2: ...e to carefully read through and observe safety specifications in this manual Screenshots provided in this document are used as examples only and the UI layout varies with versions This manual applies to multiple models but the models are not completely listed herein Refer to actual products while reading this manual We reserve the right to modify the content in this manual without prior notice or ...

Page 3: ...evice Management Indicates messages For example Hanging Up is displayed on the interface Directs you to go to a multi level menu For example go to Device Management Add Device In this example Add Device is a submenu under Device Management The symbols in the following table may be found in this manual Carefully follow the instructions indicated by the symbols to avoid hazardous situations and use ...

Page 4: ... 5 5 4 User Management 12 5 5 5 Activation Password 15 5 5 6 Admin Password 16 5 5 7 Authentication Scene 16 5 5 8 Volume 18 5 5 9 Device Maintenance 18 5 5 10 Data Management 19 6 Personnel Management 20 6 1 Personnel Information Input 20 6 2 Personnel Deletion 20 7 Web Operations 20 7 1 Login 20 7 1 1 Preparation 20 7 1 2 Logging In to the Web Interface 22 7 2 Photo 24 7 2 1 Photo List Sorting 2...

Page 5: ... Deleting a Photo 25 7 2 8 Exporting and Deleting Photos 26 7 3 Parameter Configuration 26 7 3 1 Common 26 7 3 2 Network 43 7 3 3 Image 44 7 3 4 Intelligent 54 7 3 5 Events 71 7 3 6 Storage 75 7 3 7 Security 77 7 3 8 System 79 8 FAQs 82 ...

Page 6: ...g high performance and high reliability The face recognition technology is perfectly integrated into the access control device which relies on deep learning algorithm to support face authentication to open the door and achieve precise control of human And it can be widely applied to the scenarios of building systems such as smart communities public security parks and other important areas 3 Produc...

Page 7: ...ker 11 Reboot 12 USB2 0 13 Network interface 14 Power input DC 12V 25 15 20 pin interface 16 Tamper proof button OET 523L NB Figure 3 2 Device Structure 1 Light supplement lampx2 2 Camera 1 3 Infrared light supplement lamp 4 Camera 2 5 Display screen 6 Pass through indicator 7 Microphone 8 Loudspeaker 9 WIEGAND_OUT 10 WIEGAND_IN 11 RS232 12 RS485 13 Network interface 14 ALARM_IN 15 IO 1 16 IO 2 ...

Page 8: ...eed to set the activation password which is used to log in to the Activation Config interface NOTE The password must contain at least eight characters including at least two of the following types upper case letters lower case letters digits underscores and hyphens The activation password is consistent with the password for the admin to log in to the Web interface If the activation password is cha...

Page 9: ...tected people Normal Number of people with normal temperature This interface is only displayed when the temperature measurement function is enabled For detailed operation description see Advanced Setting 3 Displays the photo and name of an identified person in the library Refer to Recognition Result Display to enable the face recognition terminal to display one or more registered face pictures Whe...

Page 10: ...es at most For the ad configuration see Ad Mode Figure 5 3 Ad Interface In ad mode the system does not exit the ad mode if a person passes the authentication via face scan or card swiping If a person fails the face scan or taps the screen the system exits the ad mode and the face recognition terminal displays the Main Interface 5 4 Mask Temperature Measurement Interface In response to the current ...

Page 11: ... recommended distance is 1 4cm When the forehead temperature needs to be taken the forehead cannot be covered by fringes hats sunglasses or other objects When the wrist temperature needs to be taken the wrist cannot be covered by sleeves watches bracelets or other objects Such objects if any need to be removed from the forehead or wrist 0 5 to 1 minute before the temperature can be taken The tempe...

Page 12: ...7 Figure 5 4 Normal Temperature and Mask Worn Measure Forehead Temperature Measure Wrist Temperature Figure 5 5 Mask Worn but Abnormal Temperature Measure Forehead Temperature Measure Wrist Temperature ...

Page 13: ... Unworn Measure Forehead Temperature Measure Wrist Temperature 2 Temperature measurement mode The visual intercom face recognition terminal supports pure temperature measurement mode in which the temperature measurement function is enabled but no authentication mode is configured in the face library for details see Face library management In this mode the visual intercom face recognition terminal ...

Page 14: ...detected person is abnormal For the prompt on the GUI and voice prompt see Figure 5 5 3 Mask detection The visual intercom face recognition terminal supports mask detection When a person whose information is stored in the library does not wear a mask an alarm is reported on the GUI and a warning sound is played For those who do not wear masks the terminal determines whether to open the door based ...

Page 15: ...erface If you forget the password contact the local dealer to seek help NOTE The initial activation password is configured on the initial interface If it is changed on the local device or on the Web interface enter the new activation password Figure 5 9 Activation Password Input Interface On the Activation Config interface you can view basic information about the face recognition terminal configur...

Page 16: ...ic Info interface allows you to view the status of the current device in real time so as to rapidly know about the device condition and better maintain the device On the Activation Config interface tap to go to the Basic Info interface Figure 5 11 Basic Info Interface ...

Page 17: ...rameters by referring to the table below Table 5 1 Parameter Description Parameter Description IP Address Enter the IP address of the device The IP address of the device must be unique across the network Subnet Mask Enter the subnet mask of the device Default Gateway Enter the default gateway of the device 3 Tap Save to complete network setting 5 5 4 User Management The face recognition terminal a...

Page 18: ...ion Makeup requirement There should be no cosmetic color that affects the true appearance during collection such as eyebrow makeup and eyelash makeup Background requirement The white blue or other pure color background is acceptable Light requirement Light with appropriate brightness is required during collection Too dark photos too bright photos and light and dark colored face photos should be av...

Page 19: ... photo collection requirements After successful input the person can have the face scanned for access 3 Perform the following operations to collect and input a person s face photo a Follow the prompt on the interface and ask the person to face the camera b When the photo displayed on the GUI meets Face photo collection requirements tap to collect the face snapshot See the figure below is the back ...

Page 20: ...nel information input 5 5 5 Activation Password To change the configured activation password do as follows 1 On the Activation Config interface tap to go to the Activation Password interface Figure 5 16 Activation Password Interface 2 Enter the old password new password and confirm the new password as required ...

Page 21: ... On the Password based Door Opening users can enter an admin password to open the door The admin password is applicable to device managerial personnel such as people in the management center The admin password is disabled by default If you need to enable the admin password tap Yes and enter passwords in Password and Confirm NOTE The password must be a string of eight characters The confirmation pa...

Page 22: ...rature Measurement The face whitelist mode temperature measurement mode are adopted A person whose information is stored in the library is allowed to pass only after the face authentication succeeds and the temperature is normal For the prompt on the GUI see Mask detection and temperature measurement Note This scene can be configured only when the default employee library exists under Face library...

Page 23: ...tap Yes to restart the device Default Tap Default on the displayed Yes interface tap Yes to restore default configuration All parameters expect network setting system time admin password and activation password will be restored default configuration First tap then tap Default on the displayed Yes interface tap Yes to restore factory defaults All parameters are stored factory defaults Upgrade a Cop...

Page 24: ...file to the terminal d The terminal will automatically restart and apply the new library after the import is completed NOTE The newly imported library will overwrite the original library in the device Export library files to a USB flash drive a Plug a USB flash drive with enough free space into the terminal b Click to export the library file to the USB flash drive Export temperature records to a U...

Page 25: ... software You can import personnel information through Guard Station software For detailed operations see the online documentation in the software 6 2 Personnel Deletion 1 Deletion on the Web interface You can delete personnel information on the Web interface of the visual intercom face recognition terminal For detailed operation see Personnel management 2 Deletion using the Guard Station software...

Page 26: ... face recognition terminal is in good condition The PC is installed with Internet Explorer 10 0 or higher Optional The resolution is set to 1440 x 900 2 Add the IP address as a trusted site Figure 7 1 Internet Setting Figure 7 2 Adding the IP Address as a Trusted Site 1 13 1 2 ...

Page 27: ...92 168 0 13 and subnet mask of 255 255 255 0 The Dynamic Host Configuration Protocol DHCP is enabled on the device by default If a DHCP server is used in the network the IP address may be assigned dynamically In this case use the actual IP address for login For operations to be performed when a dynamic IP address is assigned click Here for a reference The steps of logging in to the Web interface I...

Page 28: ...Parameter Plug in Description Remarks Username Password Username and password for logging in to the Web interface At initial login The default username is admin and the default password is 123456 The password for admin to log in to the Web interface is the same as the activation password If the activation password has been changed enter the new password here Enter the username and password based o...

Page 29: ...hoto List Sorting You can click Ascending Order or Descending Order to sort the photo list 7 2 2 Total Capacity Available Capacity The total capacity and the available capacity of the local storage resource are displayed 7 2 3 Photo Naming Rules In the photo list photos are named in a format as shown in the figure below for storage Figure 7 6 Photo Name The naming rule is described as follows ...

Page 30: ...a stranger is scanned the match result shows 0_0_unidentified 7 2 4 Refreshing the Photo Library Click Refresh to refresh the stored content to the latest state 7 2 5 Exporting Records You can export some operation records from the database 7 2 6 Exporting Photos You can export all or some of the photos stored in the face recognition terminal 1 Go to the Photo List interface 2 Select photos to be ...

Page 31: ...ted and deleted 3 Click Export Delete 4 In the deletion confirmation box click OK Figure 7 9 Export and Deletion Operation Interface 5 Select the path for storing the photos and click OK to complete the export and deletion operation 7 3 Parameter Configuration 7 3 1 Common 1 Basic Info Basic Info The Basic Info interface allows you to view the status of the current device in real time so as to rap...

Page 32: ...ternal Device External device interface can view related information of temperature measurement module Choose Setup Common Basic Info and click the External Device tab Figure 7 11 External Device NOTE Only if Fireware Version and Hardware Version information are consistent the temperature measurement function can be used normally 2 Local Settings Set local parameters for your PC ...

Page 33: ...en the network is in good condition Real Time Priority is recommended If delay exists on the network Fluency Priority is recommended If it is required that the live view delay should be lower than the real time priority Ultra low Latency is recommended Protocol Set the protocol used to transmit media streams to be decoded by the PC The options are as follows UDP TCP Audio Encoding Format Audio enc...

Page 34: ...tically Total Capacity GB Total capacity assigned for local recording The value ranges from 10GB to 1024GB You can enter the value based on actual conditions Files Folder Path for storing snapshot photos 3 Click Save to complete the configuration 3 Ethernet Modify communication settings such as the IP address for the face recognition terminal so that the face recognition terminal can communicate w...

Page 35: ...twork through Point to Point over Ethernet PPPoE you need to select PPPoE as the IP obtainment mode Figure 7 15 PPPoE Configuration Interface Table 7 4 Parameter Description Parameter Description Username Enter the username and password provided by your internet Service Provider ISP Password NOTE This function is not supported by some models Please see the actual model for details When Obtain IP A...

Page 36: ...em time of the face recognition terminal to correct time 1 Choose Setup Common Time to go to the Time interface Figure 7 17 Time Configuration Interface Table 7 6 Parameter Description Parameter Description Sync Mode The options are as follows Sync with System Configuration The time is synchronized with the initially configured time of the system Sync with NTP Server The time is synchronized with ...

Page 37: ...er Description Parameter Description DST The options are as follows On Off The following parameters are configurable only when DST is set to On Start Time Set the parameter based on actual conditions End Time Set the parameter based on actual conditions DST Bias The options are as follows 30mins 60mins 90mins 120mins Set the parameter based on actual conditions 3 Click Save to complete the configu...

Page 38: ...server The device number must be unique on the network Note Configuration is required only when Platform Communication Type is set to UV V2 Use the default setting Keepalive interval s A new persistent LAPI connection is required if the length of time that there s no communication between the terminal and the platform exceeds the keepalive interval Note Configuration is required only when Platform...

Page 39: ...nly have the live view permission for the device 6A Adding an ordinary user 1 Log in to the terminal interface as admin 2 Choose Setup Common User to go to the User interface 3 Follow the steps shown in the figure below to add an ordinary user Figure 7 19 Ordinary User Adding Interface 6B Editing an ordinary user The following uses an ordinary user as an example The steps of editing admin are the ...

Page 40: ...ly admin can modify passwords When the name or password of a user is modified if the user has logged in to the system the user will be forced to log out and needs to enter the new name or password for login next time Only admin can delete existing users After a user is deleted the user cannot log in If the user has logged in to the system before deletion the user will be forced to log out The Web ...

Page 41: ...t this option when the face recognition terminal connects to a digital detection module through the RS485 serial port IC Card Mode This option is displayed when the face recognition terminal has a built in card reader Enable QR code reader Enable Security Module The configuration is not supported RS485 Address The configuration is not supported Format Card number reading and storage mode For examp...

Page 42: ...one or zero Wiegand interfaces and the configuration window for the Wiegand input interface is different for the devices Some devices do not support the output through the Wiegand interface In this case the configuration window for the Wiegand output interface will not be displayed The Wiegand interface configuration window is unavailable to OET 213H with a built in IC card reader Figure 7 23 Wieg...

Page 43: ...ignals to door locks through an IO port Pulse Width here refers to one door opening duration When the door opening duration exceeds this time the door magnet will generate an alarm Value range 1 300 s Default value 5s Door button The face recognition terminal can receive the door opening signal from the access control button through an IO port and sends the door opening signal to the door lock The...

Page 44: ... closing time exceeds the value of Door Opening Timeout the door will be locked automatically Off The auto door lock upon closing is disabled and the door closing time is the door opening duration Check Door Magnet Status Before Closing On The door magnet status is checked before closing Off The door magnet status is not checked before closing 3 Click Save to complete the IO port configuration 7D ...

Page 45: ...ff gradually Value range 1 30 min default value 5min Schedule After Energy Saving Illumination is set to On the face recognition terminal applies energy saving illumination within the schedule Energy saving illumination is not performed out of the schedule The value ranges from 00 00 00 to 23 59 59 and the unit can be accurate to seconds NOTE When Energy Saving Illumination is set to On the defaul...

Page 46: ...ws 1 Choose Setup Common Personalization and click the Ad Mode tab 2 Set the ad mode by referring to the table below Figure 7 28 Ad Mode Setting Interface Table 7 14 Parameter Description Parameter Description Ad Mode Select whether to enable the ad mode based on actual conditions Ad Image Play Internal s Set the interval for playing ad images The value is an integer in the range of 1s to 3600s Th...

Page 47: ... Personalization and click the Custom Logo and Prompt tab 2 Set the custom logo and prompt by referring to the table below Figure 7 29 Custom Logo and Prompt Interface Table 7 15 Parameter Description Parameter Description Title Display The title bar is displayed The title content can be set as follows Default Welcome is displayed on the title bar Custom You can define the title content A string o...

Page 48: ...om button configuration 7 3 2 Network 1 Network For the Ethernet configuration interface see Ethernet 2 DNS The configuration is not supported 3 Port The configuration is not supported 4 DDNS The configuration is not supported 5 P2P Add the device to a cloud server to achieve remote management Log in to www star4live com and add the device by scanning the QR code For detailed operations see the on...

Page 49: ... contact the email service provider for the port number TLS SSL When enabled emails will be sent through a secure channel encrypted using TLS or SSL Snapshot Interval s Reserved The configuration is not supported Attach Image When enabled emails will be attached with snapshots Username Sender s email address Password Login password provided by third party email service provider To get the login pa...

Page 50: ... non default scene is met Otherwise the device remains in the default scene When auto switching is not enabled the device remains in the current scene NOTE If Auto Switching is enabled scene settings will be unavailable the device will switch between the set scenes If not the device will stay at the current scene The device will stay at default scenes unless the non default scenes are triggered If...

Page 51: ... 7 16 Parameter Description Item Description Brightness Set the degree of brightness of images Low brightness High brightness Saturation The amount of a hue contained in a color Low saturation High saturation Contrast Set the degree of difference between the blackest pixel and the whitest pixel Low contrast High contrast Sharpness Contrast of boundaries of objects in an image ...

Page 52: ...e motion blur or ghosting in some applications Image Rotation Rotation of the image Normal Flip Vertical Flip Horizontal 180 90 Clockwise 90 Anti clockwise 3 To restore default settings in this area click Default 1C Exposure NOTE This function may vary with models Please see actual Web interface for details The default settings are scene adaptive Use default settings unless modification is necessa...

Page 53: ...ty by setting shutter gain and iris manually Low Motion Blur The device controls the minimum shutter to reduce motion blur in face photos captured in motion Shutter s Shutter is used to control the light that comes into the lens A fast shutter speed is ideal for scenes in quick motion A slow shutter speed is ideal for scenes that change slowly NOTE You can set a shutter speed when Exposure Mode is...

Page 54: ...the default value is 50 A larger Face Brightness value indicates higher image brightness on the device and brighter face snapshot photos Min Duration min This parameter is displayed only when Metering Control is set to Face Metering It refers to the maximum duration that the screen brightness of the device applicable to the previous face can be retained after the face detection of the previous per...

Page 55: ...n images WDR Open Sensitivity Enable the WDR sensitivity NOTE This parameter is available only when WDR is set to Automatic WDR Close Sensitivity Disable the WDR sensitivity NOTE This parameter is available only when WDR is set to Automatic 3 To restore the default settings click Default 1D Smart Illumination 1 Click Setup Image Image and then click Smart Illumination Figure 7 34 Smart Illuminatio...

Page 56: ...nnaturally red or blue in Auto mode please try Auto2 Fine Tune Fine Tune Base on night mode Allow you to adjust the red and blue offset manually Sodium Lamp The camera adjusts red and blue offset automatically according to the light condition the color tends to be red Outdoor Suitable for outdoor environment with a relatively greater color temperature range Locked Lock the current color temperatur...

Page 57: ...displayed on the screen with video images and may include time and other customized contents 1 Click Setup Image OSD 2 Select the position and content of the OSD Position Click the box of an area on the preview screen After the cursor changes to a movable status icon hold down and drag the mouse to select the position Overlay OSD Content The drop down list provides Time Preset and Serial Info You ...

Page 58: ...ew image 2 You can adjust the mask area by dragging or resizing the box On the preview image drag the mask area to the desired location on the image To resize the mask area place the mouse cursor on a border of the box and when the cursor shape changes to drag the border to resize the mask area or place the cursor on a corner of the box and when the cursor shape changes to drag to resize the box D...

Page 59: ...ed area will be detected Max Same Thumbnail Images The configuration is not supported Min Pupillary Distance px Max Pupillary Distance px You can draw the pupillary distances by using the mouse in the live view on the right side of the interface A photo will be collected when the quantity of pupillary distance pixels is within these two preset values The value range is 20 px to 650 px Face Ovelay ...

Page 60: ...when Face Cutout is set to On The value determines the quality of face cutouts A larger value indicates that face cutouts are clearer and vice versa 3 Click Save to complete the configuration 4 Click Start Intelligent Analysis to enable intelligent analysis 2 Check Template A check template supports time range based authentication modes and a maximum of eight time ranges can be set for a day the t...

Page 61: ...authentication in any of the modes Copying time ranges and authentication modes After setting time ranges and authentication modes for Monday if the same time ranges and authentication modes are required for Tuesday to Sunday select the check box in front of Select All to copy them to all days If the same time ranges and authentication modes are required only for some days select specific days and...

Page 62: ...uirements 1 20 characters with upper and lower case English letters digits hyphens and underscores supported Enable Plan Select the check box to enable the arming plan Set the arming time range Click and drag the mouse on the time table to set the arming time range The time accuracy is 1 hour Figure 7 39 Time Table for Dragging the Mouse to Set the Arming Time Range You can also click to go to the...

Page 63: ...xception dates Set an exception date Exception dates must be set based on dates and not time ranges on a day An exception date can be added deleted or modified The prompt non specified time is displayed when the authentication is successful on an exception date Figure 7 41 EnableException Date 3 Click Save to save the added time template Modifying a time template To modify an existing time templat...

Page 64: ...y Choose Setup Intelligent Face Library On the Face Library interface you can add a face library and add people to a face library Figure 7 42 Face Library Interface 4B Face library management Adding a face library NOTE A maximum of 16 face libraries can be set 1 Above the personnel library list click Add 2 On the displayed Add Face Library interface configure face library information by referring ...

Page 65: ...pt is played after the authentication succeeds HMI Prompt A prompt is displayed on the GUI after the authentication succeeds Wiegand Output Data is output through the Wiegand interface after the authentication succeeds Verify Failure Linkage Configuration Light Prompt A light prompt is played after the authentication fails Voice Prompt A voice prompt is played after the authentication fails HMI Pr...

Page 66: ...Add Face Info Interface Table 7 20 Parameter Description Pane Parameter Description Basic Info No It is required Enter the No of a person Requirements 1 15 characters with upper and lower case English letters digits hyphens and underscores supported Name It is required Enter the name of the person CardType1 CardType2 CardNo 1 CardNo 2 Select a card type and then enter the card No The options of th...

Page 67: ...pirationTime Time Template 4 Click OK to complete the adding Importing personnel information in batches 1 Choose Setup Intelligent Face Library and select the face library to which persons are to be added 2 Click Export Template to download an import template to the local device 3 Decompress the template In the import table enter information according to requirements 4 Click Batch Import to upload...

Page 68: ...ersons Persons can be deleted one by one or together Deleting a person 1 Select the check box in the upper left corner of a person to be deleted 2 Click the Delete button as shown in the figure below Figure 7 48 Delete Interface 3 In the displayed deletion confirmation box click OK to complete the deletion Deleting all persons 1 Select the check box in front of Select All X Y ...

Page 69: ...ed confirmation box click OK to complete the deletion Searching for a person You can search for personnel information by No or name Figure 7 50 Search Box 5 Advanced Setting Choose Setup Intelligent Advanced Setting Set parameters by referring to the table below X Y ...

Page 70: ...65 Figure 7 51 Advanced Setting Interface ...

Page 71: ...Private When it is set to Private the face recognition terminal will parse QR code data locally this protocol is applicable when a camera or QR code scanner is used for collection Third Party The configuration is not supported Call Mode The configuration is not supported Record Upload Settings Reporting Type Upload All Upload local authentication records to EZStation in real time Upload Success Re...

Page 72: ...splay a message abnormal temperature on the screen and play this message in audio and the door will not open The default value is Off Authentication Success At Low Temperature On When a temperature below the minimum temperature of the measurement range is detected the terminal will display a message low temperature on the screen and play this message in audio and the door will open Off When a temp...

Page 73: ...ditions Pop up Message When Unexpected Answer Detected After this function is turned on when an unexpected answer is detected the terminal will display a pop up message on the screen please wait for a few seconds to close it The default value is Off Temperature Measurement Timeout Strategy After this function is turned on when a person has the face scanned and remained in the live view but not the...

Page 74: ...the terminal interface after face recognition succeeds 1 Choose Setup Intelligent Recognition Result Display and click the Display Recognition Result tab Figure 7 52 Recognition Result Display Interface 2 Configure recognition result display by referring to the table below Table 7 22 Parameter Description Parameter Description Display Recognition Result Display Image Images The face recognition te...

Page 75: ...s information defined here after face recognition succeeds Temperature Measurement Count Display The face recognition terminal displays the total number of people with temperature taken and the number of people with normal temperature Hide The face recognition terminal does not display the total number of people with temperature taken and the number of people with normal temperature IP Address Dis...

Page 76: ...party alarm input device is normally open you need to select N O here so that the camera can receive alarm information from the third party alarm input device c Select whether to enable Alarm Input If Alarm Input is set to On the terminal will receive alarms from the fire alarm device If it is set to Off the terminal will not receive alarms from the fire alarm device 3 Set actions to be associated...

Page 77: ...nterface 2 Set basic information about tamper alarms 1 Select alarm and set the alarm name 2 Select the alarm type Set Alarm Type to N O or N C based on whether the tamper alarm input is of the normally open or normally closed type 3 Select whether to enable alarm input If Alarm Input is set to On the terminal will receive anti disassembly alarms If it is set to Off the terminal will not receive t...

Page 78: ...ting Tables to Set Arming Time 5 Click Save 3 Door magnet alarms When the face recognition terminal connects to a door magnet it can receive door magnet alarms 1 Choose Setup Events Events and then click Door Magnet Alarm Figure 7 55 Door Magnet Alarm Configuration Interface 2 Set basic information about door magnet alarms a Select alarm and set the alarm name b Select the alarm type Set Alarm Typ...

Page 79: ... the time of each day is defined using four time ranges After setting the plan time for one day you can click Copy and then click Paste on another day to copy the plan time to other days Drawing Arming Time by Using the Mouse Editing Tables to Set Arming Time 5 Click Save 4 Security Gate Alarm When the face recognition terminal connects to a door magnet it can receive security gate alarms 1 Choose...

Page 80: ...he Storage interface Configuration is forbidden Formatting is forbidden 2 FTP Use FTP to upload images to the FTP server in accordance with the set rules 2A Smart 1 Choose Setup Storage FTP and then click Smart 2 Set parameters by referring to the table below Server Parameter Parameter Description Server IP Address of the FTP server for receiving images Port No The default value is 21 Modify the v...

Page 81: ...er Date DD Use date dd to name the folder Time HourMin Use time hhmm to name the folder Time Hour Use hour hh to name the folder Time Min Use minute mm to name the folder Custom Customize a field Choose Custom and then enter the desired content Filename configuration Separator used to connect the configured naming elements The naming elements are described in the table below Parameter Description ...

Page 82: ...S Some interfaces support HTTPS which can secure data transmission 1 Click Setup Security Network Security HTTPS Figure 7 56 HTTPS Setting Interface 2 Select On for HTTPS You may import a custom SSL certificate as needed 3 Click Save Next time you log in enter the address in https IP HTTPS port number format for example https 192 168 1 13 443 to enter secure channel mode If you use the default HTT...

Page 83: ...1 Click Setup Security Network Security ARP Protection Figure 7 58 ARP Protection Setting Interface 2 Select the check box to enable the ARP binding function and set the gateway MAC address 3 Click Save 2D IP Address Filtering Use IP address filtering to allow or forbid access from specified IP address es NOTE This function is not supported by some models Please see the actual model for details 1 ...

Page 84: ...sword is allowed when friendly password is enabled When friendly password is disabled login with a weak password is not allowed and a strong password must be set before login is allowed MAC Authentication the configuration is not supported Figure 7 60 Access Policy Setting Interface 3 Click Save NOTE Enabling friendly password does not affect use If you turn it off and log in with a weak password ...

Page 85: ...an select Enable Auto Restart and set the restart time point Then the device will automatically restart at the time point CAUTION Perform this operation with caution because restarting the system interrupts the ongoing service It is recommended that the automatic restart time point of the device be set to idle time without ongoing services 4C System Configuration Restoring factory defaults When De...

Page 86: ... Browse next to the Exporting field set the destination and then click Export 4 To restore default configurations click Default and then confirm the operation The device will restart and restore the default configurations Clicking Default with the check box selected will completely restore the device to factory default settings 4D Collecting Diagnosis Information Diagnosis information includes log...

Page 87: ...x type uac and then click Change User Account Control Settings c Move the slider to the Never Notify position and then click OK d After UAC is turned off log in again 2 What to do if the installation of ActiveX failed Answer If the installation failed add the IP address of the camera as a trusted site open Internet Option in IE click the Security tab click Trusted sites and then click Sites to add...

Reviews: