41
4.4
LOADING AND FOCUSING THE LASER SYSTEM
Loading materials
The first step to laser engraving is loading the material and focusing the laser beam on the top surface.
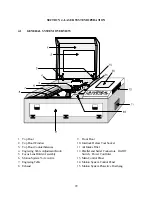
Let’s use a 4 x 6 inch wooden plaque as an example. Open the top door and place the wood on the
engraving table. Rotate the wood so that the longest direction is in the horizontal direction. Slide the
wood into the upper left hand corner of the engraving table against the horizontal and vertical rulers.
Materials larger than 17 x 11.5 inches can be processed provided they fit into the machine and allow all
the doors to be closed properly. Space is provided within the system for material to hang over the right
edge of the engraving table and pieces of up to 30 inches in length can easily be processed. If you have
an application of this type, load the material through the front door of the system. However, all the
doors must be able to close before cutting and engraving. Do not attempt to defeat the interlock system
in order to process materials too large to fit into the system as this could result in exposure to laser
radiation.
To process more than one piece of material at a time, such as in a production application, a template
can be easily made to help in loading the system. To make a template draw a slightly oversized outline
of the material to be processed and duplicate it as many times as will fit into the 11.5 x 17 inch field.
Place a piece of 11.5 x 17 inch material such as paper, acrylic, or cardboard on the engraving table
and cut the outlines into the material. Position the engraving objects within the template outlines. Now
position the graphics on screen so that they are aligned within the template outlines. Finally, print only
the graphics and not the outlines to the laser system. A convenient template has now been made for
quickly loading the system.
Focusing the laser beam
In order to cut and engrave with precision the laser beam in the laser engraving system is focused to a
small spot by the focus lens. This focused beam is 2.5 inches below the lens (for the standard lens
provided with the system).
1.
Turn the laser system on and move the motion system using the arrow keys on the motion system
control panel until the focus lens holder assembly is positioned over the plaque.
2.
Move the engraving table up or down by turning the engraving table adjustment knob until the
base of the focusing tool can be placed on the top surface of the material to be processed and the
flat of the focusing tool can be placed flat against the side of the lens holder as in the diagram
below.
Summary of Contents for ULS-25
Page 3: ...3 APPENDIX E SOFTWARE ANOMALIES E...
Page 14: ...14 Sample Exhaust System Layouts...
Page 62: ...62...
Page 82: ...A APPENDIX A WARRANTY...

