background image

31

User Guide

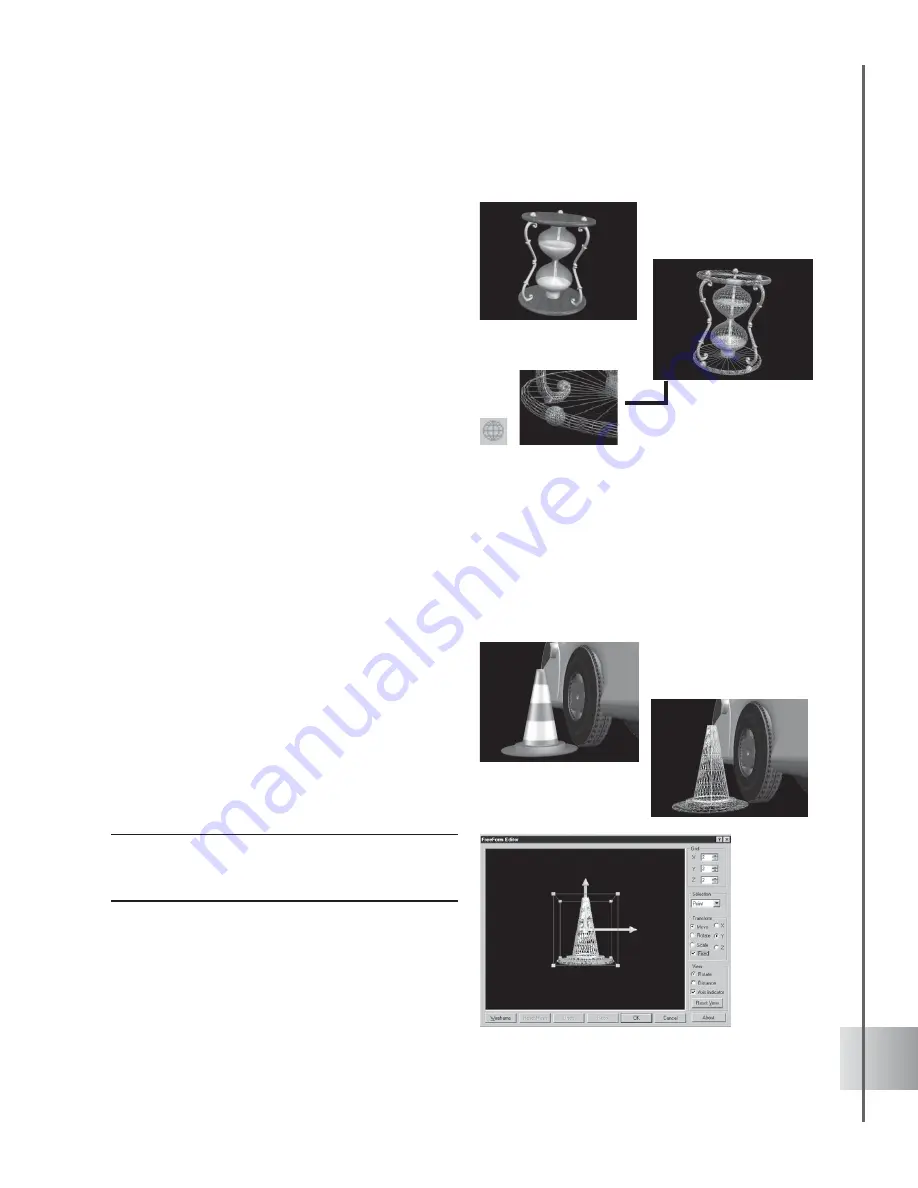
Wireframe display

COOL 3D allows you to display objects as
wireframes.

Wireframe mode renders your objects as
geometric models, displaying them as
structures made up of straight and curved
lines, and giving them an architectural quality.

Objects can also be exported in all the available
formats as wireframes.

The display mode can be toggled from the
Standard Toolbar.

FreeForm

The FreeForm feature allows you to modify the shape of any object by changing the form of its
mesh and create morphing animation. You can choose the transformation type to move selected
control points as well as transform the preview window to operate the tool from any angle.

To use FreeForm:

1

Select an object.

2

Click Object: FreeForm to invoke the
FreeForm Editor dialog box.

3

Set the grid number for each plane (X, Y, or
Z). The values range from 2 to 11.

4

Under Selection, pick control points then
drag them to deform the shape of the object
or pick the type of deformation to apply to
the object (e.g. move, rotate, and scale)
under Transform.

Note:  Should the Rotate option be chosen, the user
should choose an axis (X, Y, or Z) to move the object
toward to.

5

View by opting to click Rotate or Distance.

Summary of Contents for COOL 3D

Page 1: ...User Guide Ulead Systems Inc April 2003 ...

Page 2: ...nc 1999 2001 RealNetworks Inc All rights reserved Macromedia Flash and Macromedia Flash are trademarks or registered trademarks of Macromedia Inc in the United States and internationally All other product names and any registered and unregistered trademarks mentioned are used for identification purposes only and remain the exclusive property of their respective owners 3D Studio File Toolkit Copyri...

Page 3: ...cs and shapes 16 Using the Path Editor 16 Creating basic 3D objects 19 Creating lathe objects 20 Importing 3D models 21 Selecting and grouping objects 22 Using the Object Manager 22 Editing object style 24 Color 24 Texture 25 Transparency 28 Bevel 28 Modifying individual faces of an object 30 Object precision and quality 30 Wireframe display 31 FreeForm 31 3D scene basics 33 Camera 33 Lens type an...

Page 4: ...s 55 Key frames and plug ins 55 Understanding global and key attributes 56 Background effects 56 Gradient Background 57 Magic Texture Background 58 Object Effects 59 Bend 60 Cartoon Shader 61 FreeForm 61 Object Explosion 62 Stylized Outline 63 Twist 64 Text Effects 65 Blast 65 Bump 66 Dance 67 Distort 68 Explosion 69 Jump 70 Path Animation 71 Surface Animation 72 Text Wave 73 Token Skew G 74 Token...

Page 5: ...ural Paint 88 Project output 89 Saving your project 89 Export Video Overlay 89 Export 3D Models 89 Creating video files 90 Creating image files 90 Creating animation for the Web 91 GIF animation 91 Flash animation 93 RealText 3D 93 Main Program 94 Shortcut Keys 94 Path Editor 95 Index 96 ...

Page 6: ...s work with lathe objects do freeform deformation and achieve any 3D titling goal in minutes Create and edit your work like a pro without the hassle All you have to do is click away Video support like nothing else You don t have to edit your video clips outside COOL 3D User friendly and powerful COOL 3D allows you to use video files as scene background or object texture and edit the clips right th...

Page 7: ...f you are a registered user you are entitled to Ulead technical support This can be accessed through Help Ulead on the Web Technical Support or go to our Web site by clicking Ulead Homepage on the Standard Toolbar Installation It s easy to install Ulead COOL 3D Production Studio The Installation Wizard will guide you through the process To install Ulead COOL 3D Production Studio 1 Place the COOL 3...

Page 8: ...Windows desktop or click the icon on the Quick Launch Toolbar Select the COOL 3D icon from the program group on the Windows Start menu Getting updates Keep apace with the latest in COOL 3D news and updates the program automatically detects and notifies you of any new events in the COOL 3D homepage You can also click Ulead Homepage to read about other Ulead news and products ...

Page 9: ... the program s features and plug ins The following section should help you become familiar with the different areas of the COOL 3D environment Toggle between the Animation Toolbar and the Timeline Window EasyPalette file directory Attribute Panel Timeline Window Standard Toolbar Text Toolbar Navigation Toolbar Object Manager Location Toolbar Edit Window EasyPalette Object Toolbar Menu Bar Status B...

Page 10: ...of the selected 3D object Allows you to enter values yourself or displays the changing values of the object as you drag it in the Edit Window Object Toolbar Allows you to place and edit text graphics lathe objects basic 3D geometric shapes and particle effects objects in your project This is where you really begin your project Face Property Toolbar Allows you to choose which side of the object to ...

Page 11: ...pplied to your project See page 12 Timeline Window Enables you to specify key frames and have full control over the timing of multiple object attributes A superb tool in choreographing your entire project Attribute Panel Lets you customize many aspects of your projects including plug in effects Once you understand the available options you have the potential to create projects like a pro Object Ma...

Page 12: ...use Movies 3D Models and Video Frames that you can custom edit to fit your project To create animation using Composition presets 1 Select Movie under Composition in the EasyPalette file directory then drag a thumbnail containing a text object to your current Edit Window or double click it to open in a new EditWindow Getting started Starting a project in COOL 3D is simple The following section take...

Page 13: ...tory provides still and animated objects that you can arrange and modify on the Edit Window to fit your needs in creating your original 3D compositions You can work with a single object to create a simple animated clip or use multiple animated objects which you can easily choreograph to create a more complex composition To create animation using Objects and Object Effects presets 1 Open a new docu...

Page 14: ...r dimensions to allow your computer to render the project at a faster rate When you have exactly what you want increase the dimensions of the project Click Project Dimensions to open the Dimensions dialog box The User defined option lets you customize the dimensions If you have inserted your own image or video as the background click Use Background Image Size to have the dimensions of the project ...

Page 15: ...yle and size as easily as you would in a word processor For information on adding and editing graphic objects see page 16 To insert a text object 1 Click Insert Text on the ObjectToolbar The Insert Text dialog box appears 2 Select a font from the list When searching for a font a ToolTip appears to give you a preview of the font currently highlighted After selecting your font set the script size an...

Page 16: ...t Manager See page 22 Adding and editing 3D graphics and shapes Create outstanding 3D logos and images by customizing graphic objects In COOL 3D importing creating and modifying highly complex models are tasks that are rendered elementary because of its powerful set of modeling tools Using the Path Editor A vector graphic is different from the bitmap graphics that are most widely known for example...

Page 17: ...WMF or Enhanced Metafiles EMF formats that you would want to work on 2 Click Open and the object is placed in the Path Editor dialog box You can also acquire paths from your JPEG or BMP image files and convert them to vector To convert a bitmap graphic object to vector 1 Click Insert Graphics to open the Path Editor dialog box 2 Click Convert to Vector and the Open dialog box will come into view S...

Page 18: ...h by clicking Close Path Notice the path has closed smoothly by default 3 Click Adjust and the nodes will appear Left click while simultaneously pressing Ctrl 4 Click on the nodes you want to select or deselect While holding down Ctrl drag the entire group of nodes the same time 5 When using the mouse drag the pointer and draw a selection box across the nodes Release the button and the nodes will ...

Page 19: ...t Geometric Object drop down arrow on the Object Toolbar and select a 3D shape The object appears in the EditWindow 2 In the Attribute Panel select 3D Shape in Property List and enter values to adjust the attributes of the object 3 Then select presets under Object Styles Object Effects Text Effects Global Effects and other plug ins in the EasyPalette file directory and apply them to your geometric...

Page 20: ...l and render a variety of paths and shapes 3 To start modifying your paths click the Object Tool and Adjust Tool You have the option of rendering your paths or shapes across or beside the Lathe axis according to your desired output of the object Click on X axis or Y axis to change the orientation of the default axis 4 Increase the modification of your paths by choosing from the Open Path or Close ...

Page 21: ... window Otherwise it will be imported in its original size 6 Click Preview to view your selected file The model preview should be shown in the InformationArea 7 ClickOpen You can also export COOL 3D models as Direct X X and 3D Studio 3DS files and work on them in other modeling environments To export a 3D model select File Export 3D Model and select DirectX Model or 3D Studio Model The Open dialog...

Page 22: ...raphic object Multiple text objects Using the Object Manager The more objects you create the more of a challenge it can be to keep track of them The Object Manager makes it easier for you to organize and edit your objects To open it click View Toolbars Manager Object Manager Here are some of the basic functions Select objects When you create a text or graphic object it appears as an individual ite...

Page 23: ...eparate objects again select that subgroup from the list then click Ungroup objects All motions applied to these objects while grouped are retained even after they are ungrouped Delete selected objects or groups simply select the desired object or group of objects and click Delete object s Rename objects Do this by selecting the object in Object Manager and then clicking it again to edit the name ...

Page 24: ...t in COOL 3D The controls are accessed in the EasyPalette file directory under the Object Style category The easiest way to style an object is to use one of the presets in Object Style Material Attributes or Material Gallery all of which combine many attributes Or you can control each attribute individually with extensive options on the Attribute Panel This section shows you how to customize color...

Page 25: ... that is wrapped around the surface of a 3D object You can also create more dynamic compositions by wrapping your object in full motion video COOL 3D allows you to use an AVI or MOV file as texture that will play within the boundaries of the 3D object where it is applied A project with a video background can also contain multiple objects with video textures Imagine the effect of all video clips in...

Page 26: ...e texture to wrap around from the sides going left or right Choose Y or Y if you want the texture to wrap around from top to bottom 5 If you selected Flat mode you can click Fit to width or Fit to height to resample the texture to fit the object s horizontal or vertical dimension You can also use the Fit to height feature for Cylindrical mode Select Keep aspect ratio to maintain the image s propor...

Page 27: ...tributes Video Texture Drag the preset video texture thumbnail from the EasyPalette to the object 2 To use your own video file select Video and click Load texture video file in the Attribute Panel Select the video file that you want to use for your texture MOV or AVI in the Open Video File dialog box 3 Click Duration to set the Mark In Out points on your video audio file 4 Click Info to view prope...

Page 28: ...r a specific value for percentage of transparency The actual transparency level of an object within a subgroup is the combined value of its own transparency and that of its parent group Bevel A bevel refers to the edge of a 3D object You can add depth and character to your text and graphics objects by applying bevel styles You can select from EasyPalette presets or customize your own by selecting ...

Page 29: ...bjects Drag a bevel style to your object in the Edit Window to apply it 3 To customize your bevel style select Bevel in the Property List in the Attribute Panel 4 Change the settings for Extrusion Weight Border Depth or Precision until you get the effect that you want Basic Board Bevel Styles Round Round Chiseled Chiseled Chiseled Round Round Chiseled Chiseled Round ...

Page 30: ...ore setting this Modifying individual faces of an object The great thing about applying texture and color in COOL 3D is that you can apply them to individual faces of your object Click a Bevel Face option on the Face Property Toolbar to select the side of the object to edit Then drag a color or texture from the presets to the Edit Window Try applying different colors and textures to the different ...

Page 31: ...and create morphing animation You can choose the transformation type to move selected control points as well as transform the preview window to operate the tool from any angle To use FreeForm 1 Select an object 2 Click Object FreeForm to invoke the FreeForm Editordialogbox 3 Set the grid number for each plane X Y or Z The values range from 2 to 11 4 Under Selection pick control points then drag th...

Page 32: ... Editor dialog box The values range from 2 to 11 Selection Allows you to use the selection mode to choose control points Point Line X Line Y Line Z Face XZ Face XY and Face YZ To do multiple selection press Ctrl Transform Select the type of transformation move rotate and scale by clicking the option on the right side of the FreeForm Editor dialog box under Transform right below Grid Note When usin...

Page 33: ...d attenuation This is often achieved by adding a soft sheen to distant objects There are various creative and enhancing features that let you experience the excitement or working with 3D objects and space Camera If you want to view different sides of an object without manually rotating it use the Camera View Panel to select different perspectives of the object In COOL 3D the virtual camera roams a...

Page 34: ...o the left to increase the focal length of the camera and simulate a zoom lens This shows a tighter view of a scene but renders clearer details of distant objects Drag the slider to the right to decrease the focal length of the camera and simulate a wide angle lens This shows a wider view of the scene and makes objects look as if they are moving towards you The Distance slider increases and decrea...

Page 35: ...s greatly affect the look of your title Certain colors are generally considered to be warm or cool Greens and yellows for example suggest nature while pastels give a light airy feel COOL 3D makes it easy for you to create color schemes and pick their actual shades and hues Keep in mind that a colorful background can obscure foreground objects In such a case a plain background color might serve you...

Page 36: ...edefined image or apply your own image file by using the Attribute Panel 2 Select Background in the Property List of the Attribute Panel 3 Under Background mode select Image 4 Click Load background image file and select an image file JPG or BMP in the Open dialog box then click Open 5 You can adjust the dimensions of your project to match the size of the image that you are using by clicking Resize...

Page 37: ... directory and drag the video thumbnail to the Edit Window Modify the preset video or apply your own video file by using the Attribute Panel 2 Select Background in the Property List of the Attribute Panel 3 Under Background Mode select Video 4 Click Load Background Image File and select a video file MOV or AVI in the Open Video File dialog box then click Open If you need to view the properties of ...

Page 38: ...in Property List 2 Click Load Audio File to display the Open Audio File dialog box Select the audio file you want to use and click Open Note Click Use audio if you want to use a previously selected audio file in your project If your sound file is too long for your title you can trim it by clicking Duration in the Attribute Panel or Open Audio File dialog box The Duration dialog box is displayed fo...

Page 39: ...e is the offset of the point from the origin along the Y axis and the third on distance away from 0 along the Z axis 3D coordinate systems are imaginary and can represent anything you want When creating a 3D scene keep in mind the proportion of objects with respect to each other You can do this by establishing well your viewpoint or position and orientation COOL 3D then automatically calculates th...

Page 40: ...ted light Adjust Brightness Saturation and Hue by dragging their sliders 4 Select a Mode for the light Directional Shines a direct beam of parallel light rays with a constant strength The light source orientation is based on the angle of rotation around the X and Y axes Point Shines diffused light with variable strength on the object The further the light is from objects the weaker the light appea...

Page 41: ...ode 7 In Attenuation mode set the degree of light reflected from the object with relation to the specified light source distance 0 value means that the distance will not affect the light attenuation Select 1 to set the attenuation according to the distance specified and 2 to set the attenuation in proportion to the square of the specified distance 8 Adjust the distance between the light source and...

Page 42: ... you to work on the objects individually Properties Menu Lists all of the basic properties of the 3D object If you have applied a plug in effect to the object this will be listed as well The Timeline Control just to the right of it shows the timeline and key frames that are related to the property that you have selected from the list Timeline Control Allows you to choreograph your animation with k...

Page 43: ...imelines Many properties of the 3D object such as size position color and any plug in effects have individual timelines that you can edit independently These are listed in the Properties Menu Key frames let you choreograph your animation sequence as you work with the timeline By adding key frames and editing attributes in those key frames you can for instance set your object to move from left to r...

Page 44: ... 5 it is blue and at key frame 10 the object is green When previewing the animation you see the object s color start out at red gradually transform to blue and finally to green Because each property has its own timeline you can control multiple timelines in your animation as shown in the following illustration Not only can you set the timing within each timeline but you can also control the timing...

Page 45: ...ndow functions are listed below View Animation Toolbar Toggles between showing and hiding the Animation Toolbar Modify Frames Displays a drop down menu that enables you to edit the number of frames in the animation sequence Thumbtack Allows you to mark attributes where you assigned key frames You can use these marked properties as reference while you work on other objects in the animation The attr...

Page 46: ...ng on Click anywhere in the Ruler Bar to go to a frame within the specified duration Add Delete Key Frame Lets you add or remove a key frame Each time you add a key frame you can change the attributes or behavior of an object When you remove a key frame all attributes associated with that key frame are also removed This shows the Timeline for an object with changing color position and texture attr...

Page 47: ... frame 2 Onthe LocationToolbar click MoveObject In the Edit Window drag the object to the left side of the window On the Location Toolbar the coordinates change to show the object s position at the first key frame 3 Drag the Timeline Control slider to the last frame of the timeline or type 15 as the current frame number ClickAdd Key Frame to add a key frame 4 Drag the object to the right side of t...

Page 48: ... so that it is at the top and center of the window 5 Click Play and notice how the object now moves in a triangular path 6 Now you have key frames at frames 1 7 and 15 of the animation If you want to change the position of the object at any of these key frames click the key frame on the Timeline Window and drag the object to another position Click Play to view the animation 7 Increase the number o...

Page 49: ...und Just like with foreground objects you can animate your background to create an effect of varied shifting colors The result can be smooth or jerky depending on the mood you want to evoke Arrange an upbeat display of fast changing highly contrasting colors Or work with a single color and by modifying some of its properties come up with a gradually fading monochromatic display To animate your bac...

Page 50: ...lp give you an idea as to what object or text is currently being edited Click View Toolbars Manager Object Manager Or you may use the selection indicator by clicking View Selection Indicator 3 Move the Timeline Control slider to frame 5 Note If you do not want the object to be seen at the start of the presentation move the Timeline Control slider to key frame 1 4 Click Show Hide on the Standard To...

Page 51: ... displays Orientation On the Location Toolbar make sure that all coordinates are set to 0 4 Move the Timeline Control slider to frame 25 or enter 25 as the current frame Click AddKeyFrame 5 Set the X coordinate to 720 then click Play to preview the animation 6 Insert a new object At frame 1 click Move Object Enter 100 for the Y coordinate on the LocationToolbar 7 At frame 1 click Show Hide on the ...

Page 52: ...ition on your desired plane be it X Y or Z for that particular frame Note Displaying the Axis Indicator might give you a better idea on which plane to locate your object Click View Axis Indicator 5 Click Play to preview the animation To animate the position of two objects 1 Insert an object into the project and set the total number of frames to 30 2 Select Position in Properties On the Timeline Co...

Page 53: ...es at frames 10 20 and 30 8 Click Move Object on the LocationToolbar and at frames 1 and 10 set the X and Z coordinates to 350 and 200 respectively At frame 20 set the X coordinate to 0 and do not adjust the Z coordinate At frame 30 set the X and Z coordinates to 100 and 3000 9 Click Play to preview the animation The second object should chase after the first one following the same motion path ...

Page 54: ...ith two timelines To animate position and color in the Timeline Window 1 Insert an object in a blank project with a black background 2 On the Attribute List select Color At frame 1 set the object color to be black 3 Add a key frame at the last frame of the animation Set the color to red 4 Click Play on the Navigation Toolbar to preview the color animation 5 Click Move Object on the Location Toolba...

Page 55: ... effect you want to achieve try applying different presets and see how the attributes change in the Attribute Panel This gives you a better idea of how the variables affect the object Key frames and plug ins Most plug in effects have a special red Control Line that appears on the Timeline Control in the Animation Toolbar and Key Frame Window if in the Timeline mode This is a special feature that l...

Page 56: ... animation If you change this value at frame 5 then this new value will be changed accordingly in all frames of the animation A Key attribute can vary with individual key frames For example Color is a Key attribute because at frame 1 you can have an object be red then at frame 5 you can set the same object to be green and at frame 10 you can make the object change to red again Background effects T...

Page 57: ...eat number settings Hue shift adjusts the hue in the ring palette without changing the saturation and brightness while Ring rotates the color ring changing the first color of the set Enter the degree of turn Repeat number defines the number of times to repeat the ring palette in the pattern 5 Select a Pattern type by clicking on an image in Mode This indicates how your texture would initially appe...

Page 58: ...long the X Y and Z axes Only the XY plane are shown Variation is the Z value that determines which XY plane of the selected background will be displayed The degree of variation is therefore affected by the X and Y values that you set 4 Click the thumbnail of the pattern to use as background 5 Under Texture Cell set the extent by which the pattern is stretched or compressed horizontally or vertical...

Page 59: ...ngs to random numbers To revert the image to its original form click Reset Object Effects The control you have in animating individual objects is one of the things that make COOL 3D remarkable The Object Effects category in the EasyPalette file directory allows you to apply motion cartoon shading bending twisting explosion stylized outlines freeforms and psychedelic presets to your objects You can...

Page 60: ...k Add plug in and select Bend in the Attribute Panel 2 At frame 1 set the Direction of the bend to Y Z and select Asymmetric under Type Set the Level to 100 to completely bend the object and set the Cutting Point to 50 so that the object bends at the center 3 At frame 30 set the Level to 0 This allows the object to unbend 4 Click Rotate Object on the Location Toolbar At frame 1 the rotation coordi...

Page 61: ... text object in the Edit Window Click Add plug in and select Cartoon Shader in the Attribute Panel 2 At frame 1 choose Smooth in Style 3 Set Shadow settings by adjusting the Factor and Luminance values A higher value in Factor increases shadow size while increasing the value in Luminance brightens the object 4 Do the same for the Highlight settings 5 Click Play to preview the animation FreeForm Th...

Page 62: ...effect 1 Insert an object in the Edit Window Click Add plug in and select Object Explosion in the Attribute Panel 2 Set the Movement type to Gravity at frame 1 Set also the Collapse type to All and Level to 90 to disintegrate your object Set Rotate value to 10 3 At frame 30 set the Level to 0 for a complete formation of your object Enter 90 for the Rotate value 4 Click Play to preview the effect N...

Page 63: ...nto visible edges These edges are then rendered as stylized paint strokes Settings 30 frames 15 fps To apply Stylized Outline 1 Insert an object in the Edit Window Click Add plug in and select Stylized Outline in the Attribute Panel 2 At frame 1 choose Brush for Style in the Attribute Panel 3 Specify the outline width by entering 3 in Width This will give you a thin outline The maximum Width value...

Page 64: ...ject in the Edit Window and rotate it slightly on the Y axis Click Add plug in and select Twist in the Attribute Panel 2 At frame 1 select Left only as the twist Type This twists the object starting with its left side Select also Z as the Axis so that the depth of the object is twisted and set the Skew Angle to 0 3 At frame 30 set the Skew Angle to 360 4 On the LocationToolbar click Resize At fram...

Page 65: ...EasyPalette For more advanced users the many variables on the Attribute Panel allow you to control the effect to amazing detail In the following tutorial we ll explode a graphic and have it turn into text Settings 30 frames 15 fps To apply a Blast transition 1 Insert a graphic object in the Edit Window Click Add plug in and select Blast in the Attribute Panel 2 At frame 1 clear the Use Original op...

Page 66: ...g in and select Bump in the Attribute Panel 2 At frame 1 clear the Use Original option in the Attribute Panel Click Text Object Target under Target to insert an object that will replace the original 3 Make sure that the Level is 0 and set the Compress value to 50 4 If the target object appears on the screen set the Initial Position of the target object to 300 or until it disappears off the screen ...

Page 67: ... minimum distance that the letter will fall in order to bounce Specify 100 for Rebound which makes the letters bounce highest 4 Specify 10 as the Tempo for fastest bouncing speed Set the Variation to 0 This means that the letters will start out in their normal stationary position standing up and facing forward 5 At frame 30 of the animation set the Variation to 50 This means that by the last frame...

Page 68: ... a text object in the Edit Window Click Add plug in and select Distort in the Attribute Panel 2 Add a key frame at frame 15 on the Distort timeline 3 At frame 1 select Individual for Action sequence in the Attribute Panel so that each letter is treated as an individual object 4 Select Y Z as the Plane along which the perspective will be distorted Leave all other distortion variables at their defau...

Page 69: ...tmost end point of the Control Line to frame 5 This ensures that the explosion effect will not take place right away 3 At the first frame of the plug in effect frame 5 set the Movement Type to Left in the Attribute Panel Set also the Collapse Type to Ascending Action Sequence to Forward Level to 0 and Rotate value to 30 4 At frame 30 set the Level to 100 for a complete explosion Enter 100 for the ...

Page 70: ... option in the Attribute Panel Click Text object target under Target to insert an object that will replace the original The object above the original changes in the EditWindow 3 Set the Bounce value to 30 If the target object is visible set the Initial Position to about 300 or so that it disappears off the screen 4 Move to frame 30 and set the Level to 100 5 Insert a new object Select None as the ...

Page 71: ...k Add plug in and select Path Animation in the Attribute Panel 2 At frame 1 select Arc as the Path and enter 25 as the value for Speed 3 Set the Ground to 0 default and enter 75 for the Level to start the object at mid throw Enter 40 as the value for the Angle of the arc 4 At frame 30 set the Level to 0 5 Click Play to preview the Arc animation The object should be thrown in from the right of the ...

Page 72: ...el Set the Path to V Line to make the object travel vertically then set the Wrap Style to Mesh to mold the object to the surface of the sphere 3 Enter 10 for all Size coordinates so that the text is wrapped around a small sphere Set the Level to 0 4 At frame 25 enter 10 for all Size coordinates and enter 200 as the Level so that the object travels twice around the sphere s surface 5 At frame 30 se...

Page 73: ...eting a wave 4 Set Length at 5 A higher setting creates a more expansive wave where characters move more closely in tandem together A lower setting creates a more compact wave where characters move more disjointedly in relation to each other 5 Adjust also the following attributes Scaling To focal point from which the characters are expanded and compacted X Y Z Scale The dimensions of the character...

Page 74: ...t the Level to 0 in the Attribute Panel Select also Backward as the Action sequence Set the Acceleration to Oscillate 4 Enter 30 as the Overlap value Choose Front LB as the Skew Center to fix a point from which letters skew 5 These are the planes along which objects can be skewed Under Y X Plane enter 1000 and leave all the others at 0 6 At frame 25 set the Level to 100 7 Next animate the position...

Page 75: ...in the Attribute Panel 3 Add a key frame at frame 15 4 At frame 1 set the Level to 0 in the Attribute Panel Select also Random for the Action sequence 5 Under Acceleration select Normal Set the Overlap to 50 which makes each object begin moving after each previous object has completed half of its motion Select Center as the Scaling Center 6 Specify how large and in which direction your objects gro...

Page 76: ...t in the Edit Window Click Add plug in and select Token Move G in the Attribute Panel 2 At frame 1 set the Level of the animation to 0 in the Attribute Panel Set also Action sequence to Forward Acceleration to None and Overlap to 30 Select the To Origin option to make individual characters return to their original positions upon completing the specified action 3 Set the coordinates for position To...

Page 77: ...proximately 45 2 Click Add plug in and select Token Move G in the Attribute Panel 3 At frame 1 set the Level of the animation to 0 in the Attribute Panel Set also the Action to Forward and Acceleration to None 4 Set the Overlap to 90 so that the individual letters move almost immediately one after the other Under Rotation Center select Front LT the front left top of each character 5 For the axis a...

Page 78: ...enits smoke COOL 3D can simulate this perfectly Versatile and easy to use COOL 3D s attribute settings allow you to control the motion and strength of emission For this tutorial we will make thin smoke come out of an image Settings 10 frames 6 fps To create thin smoke 1 For this example select a house image or a cigarette in the EasyPalette 2 Click the Particle Effects down arrow on the Object Too...

Page 79: ...ive it depth 3 To start simulating fire click the Particle Effects down arrow on the Object Toolbar and select Fire 4 Click Texture in the Attribute Panel and select an image file to apply your own texture to the particles 5 Set the Max density to 100 and the Emitting rate to 90 6 Under Color life set the colors of the particle from Intial to End by using the color boxes The combination of colors ...

Page 80: ...particles from Initial to End by editing the values in the spin boxes 10 Life allows you to control the lifetime of the particle 11 Select Collision detection and adjust the behavior of the bouncing particles in the spin box 12 Click Play to preview your project Notice the varying radiance reflected on the walls giving a touch of realism to the intensity of the fire Note To reverse the particle li...

Page 81: ...ext 3 Click the Particle Effects down arrow on the Object Toolbar and select Snow 4 Set the Max density to 999 and the Emitting rate to 500 in the Attribute Panel This will control the number of particles you would want to appear per frame 5 Select Sphere as the initial source of emission for your particle under Emitter type 6 Control the size of your particles under Size life Set Initial size to ...

Page 82: ...ut the color of the bubbles 2 Click the Particle Effects down arrow on the ObjectToolbar and select Bubble 3 In the Attribute Panel set the Max density and Emitting rate to 100 4 Under Dragging force set the X axis at 50 Y axis at 60 and Z axis at 50 This will make the bubbles move upward diagonally towards the right hand corner of your screen yet spreading outward as they go 5 Retain the rest of ...

Page 83: ... Fire plug in In this tutorial learn how to make a basic fire effect Settings 30 frames 15 fps To burn an object 1 Insert a graphic object in the Edit Window Click Add plug in and select Fire in the Attribute Panel 2 At frame 1 set the Strength to 10 and the Amplitude to 10 in the Attribute Panel 3 Set also the Direction to 90 to make the flames go straight up and enter 2 for the Soft Edge value 4...

Page 84: ...ke a bright colored title against a dark background in the EditWindow Click Add plug in and select Glow in the Attribute Panel 2 At frame 1 set the Width of the glow to 2 in the Attribute Panel Set also the Transparency to 0 and the Soft Edge to 6 Select a bright Color for the glow 3 Add key frames at frames 5 15 and 20 These should all have the same attributes as those in frame 1 4 Add key frame ...

Page 85: ...he Attribute Panel Opacity The extent to which the background can be seen through the lightning bolt Length The percentage of the length of the lightning bolt to be shown Width The overall width of the lightning bolt 3 Click Edit Path to tweak the outline of the lightning bolt Increase the number of segments for greater variance then move the green nodes around to adjust the overall shape Use the ...

Page 86: ...rk background in the EditWindow Click Add plug in and select Motion Blur in the Attribute Panel 2 At frame 1 set the X coordinate to 600 on the Location Toolbar The Y and Z values should be 0 At frames 12 and 18 change the X coordinate to 0 At frame 30 change the X coordinate to 1000 3 In the Attribute Panel select Continuous as the Type and set the Path to Straight 4 Set Density to 5 and Length t...

Page 87: ...inst a dark background in the EditWindow Click Add plug inand select Shadow in the Attribute Panel 2 Click MoveObject on theLocationToolbar 3 At frame 1 the X Y and Z coordinates should remain 0 At frame 30 enter 270 for the Y coordinate or enter any other value that makes the object move off the screen 4 At frame 1 enter 5 for X Offset and Y Offset on the Attribute Panel Enter 3 for SoftEdge 5 At...

Page 88: ...bject in the Edit Window Click Add plug in and select Natural Paint in the Attribute Panel 5 Set the specifications of your effect in the Attribute Panel In Type specify the material or painting technique to be applied on your project Set a value in Level A higher level produces a more vivid effect and makes your object looks abstract or stylized For Watercolor type select Large to generate long s...

Page 89: ...tion Export Video Overlay Using Alpha Channels is one of the most effective ways of creating transparent overlays An alpha channel allows you to block out an entire image except the 3D object A TGA file supports Alpha channel transparency Click File Export Video Overlay TGA to launch a dialog box where you can save your project as TGA file which you can use as a video overlay Click File Export Vid...

Page 90: ... frame size and frame type AVI Lets you specify options particular to the selected video codec such as quality number of key frames and data rate Select Preview to set compression ratio and view the video using the frame size specified in the General tab Select Advanced to display the Advanced Options dialog box This contains options to optimize the playback of the video file based on the intended...

Page 91: ...control how much is actually changed Creating animation for the Web Ulead COOL 3D lets you output your animated projects in formats appropriate for viewing on Web pages GIF SWF and RealText 3D If used wisely these can be a good way to attract the attention of Internet surfers or simply to enliven your Web pages GIF animation Many animations that you see on the Web are animated GIFs Ulead COOL 3D p...

Page 92: ...mations saved in JPEG GIF and PNG formats Clicking Optimize opens the GIF Animation Option dialog box where you can select other options Preview after saving Gives you a preview of the animation in your default browser after saving Create global palette Builds a global palette based on the colors of all of the images in the animation combined Doing this can reduce size although it may not produce ...

Page 93: ...ort to Macromedia Flash SWF with JPEG to open the Save as Macromedia Flash SWF File dialog box with JPEG options RealText 3D You can output your animations in the RealText 3D file format r3t This new format stores your animation while maintaining small file sizes thus making it optimal for display on a Web page To output an animation in this format use the File Export To RealText 3D Once you ve sa...

Page 94: ...b o n a s e t s a P e t e l e D t i d E l r t C l e D t c e j b o d e t c e l e s e h t s e t e l e D t x e T t r e s n I t c e j b O 3 F s w o d n i W m o r f t x e t s t r e s n i d n a x o b g o l a i d t x e T t r e s n I e h t s n e p O d r a o b p i l C t i d E t c e j b O t c e j b O 4 F d e t c e l e s e h t f o t x e t e h t g n i n i a t n o c x o b g o l a i d t x e T t r e s n I e h t ...

Page 95: ...t c e j b o e h t f o s e c a f k c a b e h t s t c e l e S n o i t a m i n a p o t S c s E e c n e u q e s n o i t a m i n a t n e r r u c e h t g n i y a l p s p o t S p l e H 1 F s m e t i u n e m r o f s c i p o t p l e H o i d u t S D 3 l o o C d a e l U e h t s y a l p s i D e v i t i s n e S t x e t n o C p l e H t f i h S 1 F e h t n i s e r u t a e f e h t f o e n o y n a g n i k c i l c ...

Page 96: ... Export 3D Model 21 Import 3D Model 21 3D scene basics 33 A Adjust 18 Advance timeline mode 45 Alpha Channels 89 Amplitude 57 59 Animating with multiple attributes 54 Animation basics 42 Animating background 49 Animating color 49 Animating position 52 Showing and hiding objects 50 Animation for the Web 91 Flash animation 93 GIF animation 91 RealText 3D 93 Animation Toolbar 10 42 Add Delete Key Fra...

Page 97: ... FreeForm editor 31 Frequency 59 G Geometric Object 19 Insert Geometric Object 19 Geometric perspective 33 GIF 90 GIF animation 91 Global attribute 56 Global Effects 83 Fire 83 Glow 84 Lightning 85 Motion Blur 86 Natural Paint 88 Shadow 87 Glow 84 Gradient Background 57 H Help Technical Support 7 Hue Shift 57 59 I Image Background 36 Image Texture 25 Cylindrical 26 Emboss 27 Fit to height 26 Flat ...

Page 98: ...5 Motion Blur 86 MOV 90 N Natural Paint 88 Navigation Toolbar 10 nodes Add Node 18 Remove Node 18 Number of frames 43 O Object Effects 59 Bend 60 Blast 65 Cartoon 61 Stylized Outline 63 Twist 64 Object Manager 11 22 Delete 23 Enable Disable objects 24 Group multiple objects 23 Lock Unlock objects 24 Pivot Setting 23 Rename objects 23 Select objects 22 Ungroup objects 23 Object Toolbar 10 Objects 1...

Page 99: ...71 Shadow 87 Smoke 78 Snow 81 Stylized Outline 63 Surface Animation 72 Text Wave Animation 73 Token Move G 76 Token Rotate G 77 Token Size G 75 Token Skew G 74 Twist 64 Precision Quality 30 presets Background 35 Camera 34 Composition presets 12 Objects presets 13 Properties Menu 42 R RealText 3D 93 Ring 57 RM 90 Ruler Bar 46 running Ulead COOL 3D 8 S Saving 89 Scene Camera 33 Color Background 35 C...

Page 100: ...Key Frame Window 46 Modify Frames 45 Ruler Bar 46 Thumbtack 45 View Animation Toolbar 45 Token Move G 76 Token Rotate G 77 Token Size G 75 Token Skew G 74 toolbars Animation Toolbar 10 Attribute Toolbar 11 Face Property Toolbar 10 Location Toolbar 10 Navigation Toolbar 10 Object Toolbar 10 Standard Toolbar 10 Text Toolbar 10 Transparency 28 Turbulence 58 Twist 64 U Ulead homepage 7 updates 8 Use B...

Reviews: