12
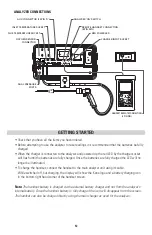
ANALYZER CONNECTIONS
GETTING STARTED
• Check that you have all the items you have ordered.
• Before attempting to use the analyzer to take readings it is recommended that the batteries be fully
charged.
• When the charger is connected to the analyzer and powered up the red LED by the charger socket
will flash until the batteries are fully charged. Once the batteries are fully charged the LED will no
longer be illuminated.
• To charge the handset; connect the handset to the main analyzer unit using its cable.
While switched off, but charging, the display will show the Kane logo and a battery charging icon
in the bottom right hand corner of the handset screen.
Note:
The handset battery is charged via the external battery charger and not from the analyzer’s
internal battery. Once the handset battery is fully charged the icon will disappear from the screen.
The handset can also be charged directly using the main charger as used for the analyzer.
BATTERY
ENCLOSURE
DUAL PRESSURE
PORTS
HANDSET REMOTE CONNECTION
(8 PIN DIN)
PRINTER UNIT
PRESSURE PRESSURE
WATER
TRAP
OXYGEN SENSOR
CONNECTOR
FLUE TEMPERATURE SOCKET
INLET TEMPERATURE SOCKET
AUX CONNECTOR (25 PIN ‘D’)
CHARGER INPUT SOCKET
RED POWER LED
REMOTE HANDSET CONNECTION
(8 PIN DIN)
ANALYSER ‘ON’ SWITCH
Summary of Contents for K9206
Page 29: ...29 ...

