26
REMOVING CAUGHT LABEL, cont'd.
Remove Caught Label
from Printhead, cont'd.
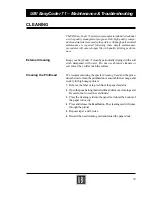
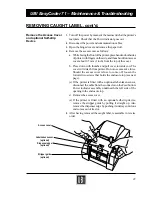
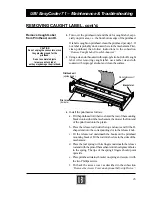
2.
Turn over the printhead unit and check for caught label, espe-
cially on print area, i.e., the front bottom edge of the printhead.
If label is caught on printhead, clean the printhead per step 3. If
not, label is probably stuck somewhere in the mechanism. First,
clean printhead, then follow instructions in the subsection
“Remove Caught Label from Mechanism”.
3.
Using a clean cloth soaked with isopropyl alcohol, rub off caught
label. After removing caught label, use another clean cloth
soaked with isopropyl alcohol and clean the surface.
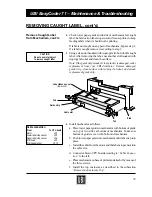
4.
Install the printhead as follows:
a. Tilt the printhead to fit the two slots at the rear of the mounting
bracket onto stubs in the mechanism, then lower the front end
of the print head onto the platen.
b. Place the release rod inside the top enclosure and fit the D-
shaped end into the corresponding slot in the release knob.
c. Fit the release rod underneath the hooks on the printhead
mounting bracket. Fit the rod into the slots in the sides of the
mechanism.
d. Place the leaf spring with its fingers underneath the release
rod and with the pins of the mechanism in the alignment holes
in the spring. The tips of the spring's fingers should point
upwards.
e. Place printhead retainer bracket on spring and secure it with
the two Phillips screws.
f. Put back the access cover as described in the subsection
“Remove the Access Cover and optional Self-strip Device”.
Print area
(delicate)
Printhead unit
(upside down)
Do not disconnect!
CAUTION
Do not unplug the connectors, since
they provide ground for the
printhead.
Do not use metal objects
to remove a stuck label
as they may damage the printhead.
UBI EasyCoder 71 – Maintenance & Troubleshooting
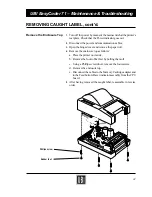
Bracket slot

