10
PAPER LOAD, cont'd.
Self-strip Model
(option)
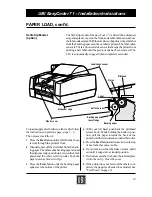
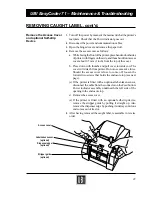
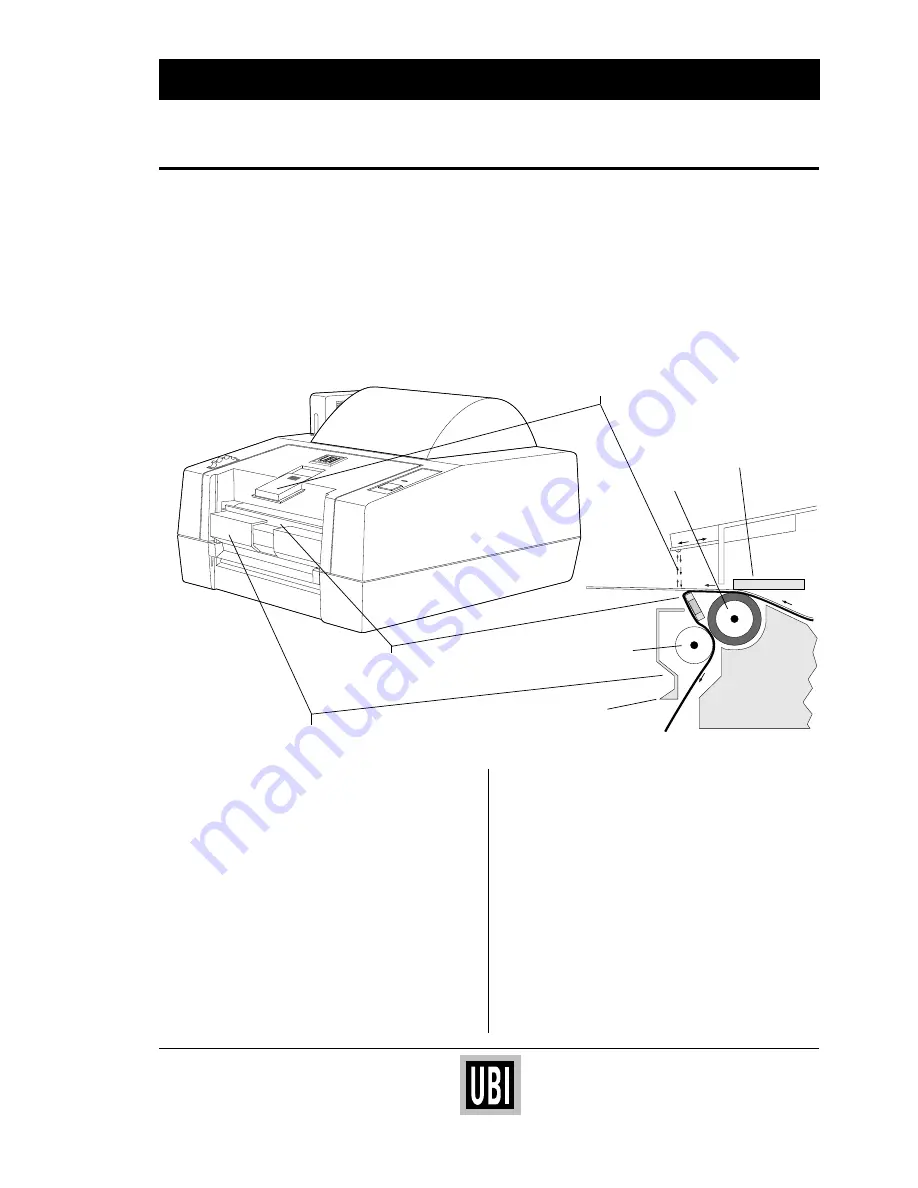
The Self-strip model of the EasyCoder 71 is fitted with a dispenser
edge and a plastic cover on the front, and a label-taken sensor above
the label outfeed area. With these features, the printer strips the label
from the backing paper each time a label is printed. The label-taken
sensor (LTS) is a photo-electric sensor that keeps the printer from
printing a new label until the previous one has been removed. The
LTS is automatically engaged when completely extended.
Easy
Coder
71
Power
Feed
Label-taken sensor
Plastic cover
UBI EasyCoder 71 – Installation Instructions
Printhead
Platen
Label
Backing paper
Backing paper
tear-off edge
4.
With your left hand, push back the printhead
release knob. While holding the knob in posi-
tion, pull the paper towards the back of the
printer until there is no slack around either roller.
5.
Press the Feed button and release it when the top
of next label becomes visible.
6.
If you want to use the label-taken sensor, pull it
out until it snaps into extended position.
7.
Rewind excess label web onto the roll and place
it into the cavity. Close the cover.
8.
If the printer does not feed out the labels com-
pletely, the paper feed needs to be adjusted. See
“Test Mode” on page 11.
To load a supply of self-adhesive labels, first follow
the instructions on previous page, steps 1 – 6.
Then proceed as follows:
1.
Press the Feed button until a full label has been
fed out through the printer's front.
2.
Manually peel off the first label from the back-
ing paper . Then thread the backing paper around
the dispenser edge and down between the black
platen and the white self strip roller. Push the
paper down as far as it will go.
3.
Press the Feed button until the backing paper
appears at the bottom of the printer.
Self strip roller
Dispenser edge


