23
REMOVING CAUGHT LABEL, cont'd.
1.
Turn off the power by means of the mains switch at the printer's
rear plate. Check that the Power indicator goes out.
2.
Disconnect the power and communication cables.
3.
Open the hinged cover and remove the paper roll.
4.
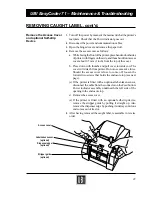
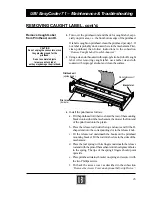
Remove the access cover as follows:
a. While facing the front of the printer, place hands on both sides
of printer with fingers on the side, and thumbs on front access
cover about 2.5 mm (1 inch) from the top of the cover.
b. Press down with thumbs and pull cover towards you. The
cover will detach from printer. Do not use excessive force.
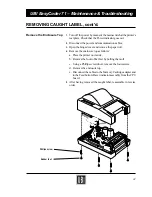
Should the access cover refuse to come off, loosen the
forward two screws that holds the enclosure top (see next
page).
(c) If the printer is fitted with an optional label-taken sensor,
disconnect the cable from the connector on the Feed button/
Power indicator assembly underneath the left side of the
opening in the enclosure top.
d. Remove the access cover.
(e) If the printer is fitted with an optional self-strip device,
remove the stripper guide by pulling it straight up. Also
remove the dispenser edge by pushing it sideways until one
end comes out of its slot.
5.
After having removed the caught label, reassemble in reverse
order.
Remove the Access Cover
and optional Self-strip
Device
Dispenser edge
(optional)
Stripper guide
(optional)
Access cover
Label-taken sensor
(optional)
UBI EasyCoder 71 – Maintenance & Troubleshooting

