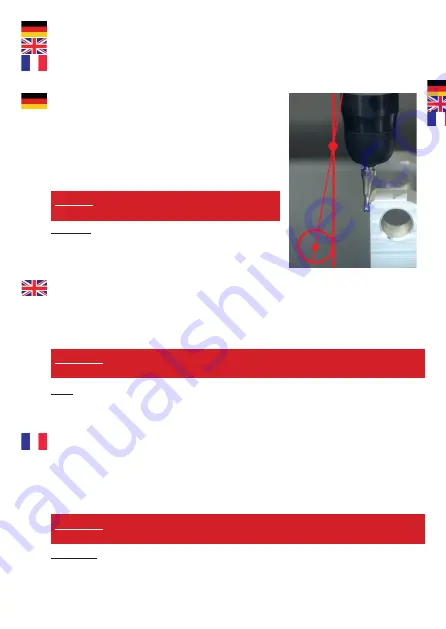
Antasten radial
Radial probing
Den Taster in die Spindel einsetzen. Kühlmittelzufuhr
und Spindel abschalten.
Bitte exakt senkrecht zum Werkstück antasten, sonst
könnten Messfehler entstehen.
Mit dem Taster vorsichtig der Werkstückkante nähern,
bis sich der große Zeiger zu bewegen beginnt. Dann
so lange weiter tasten bis beide Zeiger (klein und
groß) exakt „0“ anzeigen.
In dieser Position steht die Spindelachse exakt über
der Werkstückkante.
Hinweis:
Ein Überfahren der Werkstückkante um bis zu
1,5 mm (kleiner Zeiger im roten Bereich) ist problemlos.
Nach 1,5 mm kommen mechanische Endanschläge, wel-
che den Tasteinsatz zum Bruch an der Sollbruchstelle
führen, um den 3D-Taster zu schützen.
Insert the 3D-Tester into the spindle. Cut-off the coolant supply and turn off the spindle.
Please make sure that probing is exactly perpendicular. Otherwise, measurement failures
may occur.
Move the 3D-Tester carefully to the edge of the work piece until the large indicator
starts moving. Continue until both indicators (large and small) show exactly „0“.
In this position, the symmetry axis of the spindle is exactly positioned to the work
piece edge.
1.
2.
3.
4.
Note:
It is not a problem to overpass the edge of the work piece up to 1.5 mm (small pointer in
the red area). After 1.5 mm, there are mechanical limit stops which lead to the probe tip
halting at the predetermined breaking point to protect the 3D-Tester.
Palpage radial
Incorporer le palpeur dans la broche. Mettre l’approvisionnement en fl uide de refroi-
dissement et la broche hors marche.
Veuillez s’il vous plaît veiller à une position verticale exacte à l’outil afi n de contre-
carrer les erreurs de mesure.
Approcher prudemment le bord de l’outil avec le palpeur jusqu’à ce que la grande
aiguille commence à se déplacer. Avancer ensuite en tâtonnant jusqu’à ce que les deux
aiguilles (petite et grande) se trouve exactement sur la position « 0 ».
Dans cette position, l’axe de la broche se trouve exactement sur le bord de l‘outil.
1.
2.
3.
4.
Indication:
Un passage de 1,5 mm du bord de l’outil (petite aiguille dans la zone rouge) n’est pas pro-
blématique. Des coups fi naux mécaniques apparaissent après 1,5 mm, ces derniers peuvent
provoquer une coupure au point de choc prévisionnel afi n de protéger le palpeur 3D.
1.
2.
3.
4.
4.
WICHTIG:
Korrekte Messungen ertasten Sie nur in
Tastrichtung vorwärts! (rückwärts = Umkehrfehler)
IMPORTANT:
correct measurements are only possible by probing forwards!
(backwards = reverse fault)
IMPORTANT:
Vous seulement recevrez des mesures correctes si vous avancez en tâtonnant
en avant! (en arrière = erreur inverse)


