background image

46

Chapter 5


Setup Your Network via TP-Link Aginet App

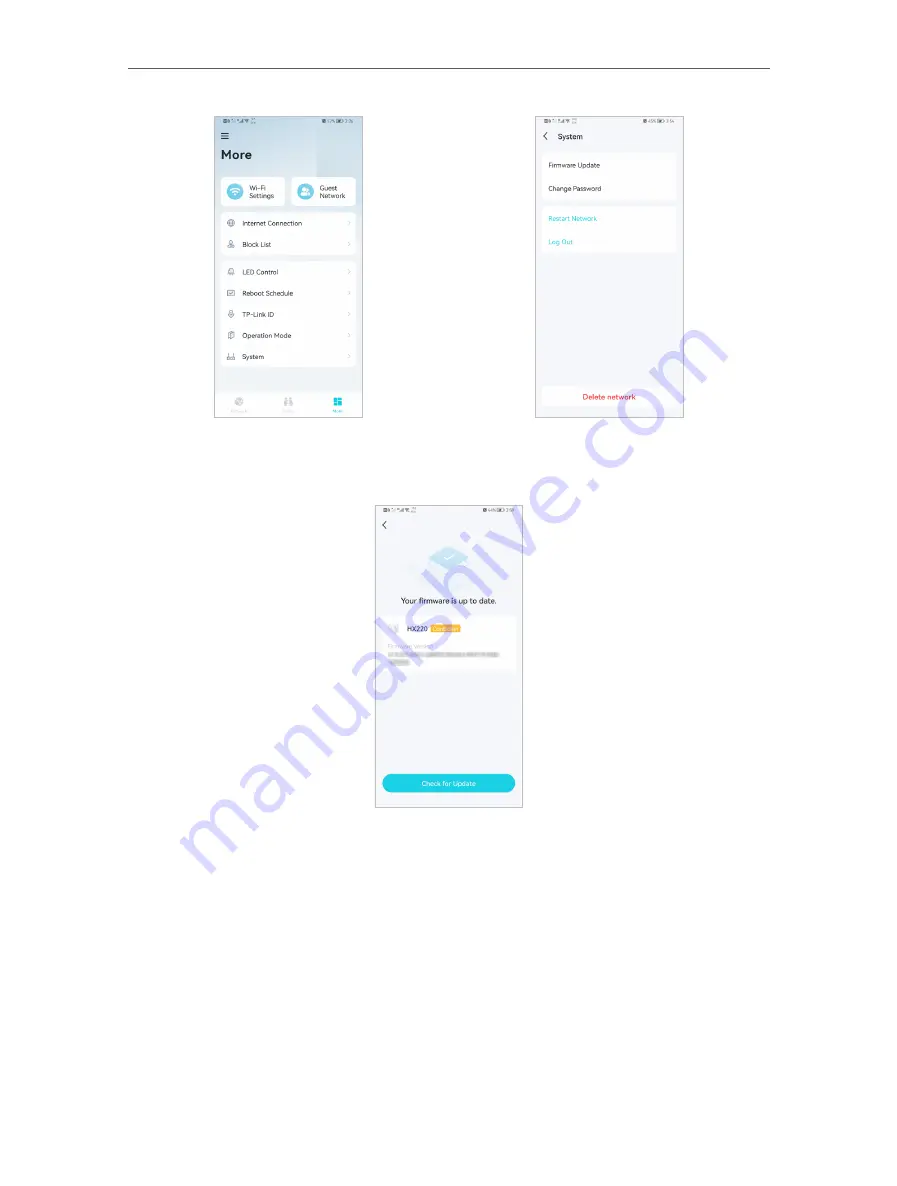
2.  Download and install the firmware (if any) and follow app instructions to update your 

router to the latest version.

5  14   Advanced Features

Additional features are available under the Advanced menu. You can control mesh 

device’s LED, enable reboot schedule, bind your TP-Link ID, change the operation 

mode, configure system settings.

1.  In 

More

, Tap 

LED Control

.

Summary of Contents for EC220-F5

Page 1: ...2022 TP Link 1910020935 REV1 0 0 User Guide BBA Routers...

Page 2: ...nk Aginet App 15 4 3 Manually Set Up Your Internet Connection 16 4 4 Set Up the Router as an Access Point 18 4 5 Set Up an IPv6 Internet Connection 19 4 6 IPv6 Tunnel 23 Chapter 5 Setup Your Network v...

Page 3: ...Wireless Settings 62 6 6 3 View Wireless Information 65 6 7 Schedule Your Wireless Function 66 6 8 Use WPS for Wireless Connection 67 Chapter 7 Multi SSID 70 Chapter 8 TP Link Cloud Service 72 8 1 Reg...

Page 4: ...Controls 102 Chapter 14 Quality of Service 107 Chapter 15 Network Security 112 15 1 Firewall DoS Protection 113 15 2 Service Filtering 114 15 3 Access Control 115 15 4 IP MAC Binding 117 15 5 IPv6 Fir...

Page 5: ...t 145 17 7 3 Remote Management 146 17 7 4 HTTP Referer Head Check 147 17 7 5 ICMP Ping 147 17 7 6 Session ID 148 17 8 System Log 148 17 9 CWMP Settings 150 17 10 SNMP Settings 151 17 11 Monitor the In...

Page 6: ...orresponding page For example Advanced Wireless WDS means the WDS function page is under the Wireless menu that is located in the Advanced tab Note Ignoring this type of note might result in a malfunc...

Page 7: ...ng rated performance location connection quality and client condition Use of Wi Fi 6 802 11ax and features including OFDMA MU MIMO 1024 QAM and HT160 require clients to also support the corresponding...

Page 8: ...Chapter 1 Get to Know About Your Router This chapter introduces what the router can do and shows its appearance It chapter contains the following sections Product Overview Appearance...

Page 9: ...d efficiency It s also backwards compatible with 802 11a b g n ac Moreover it is simple and convenient to set up and use the TP Link router due to its intuitive web interface and the powerful Aginet a...

Page 10: ...less band is disabled 5GHz Wireless On The 5GHz wireless band is enabled Off The 5GHz wireless band is disabled Internet Green On Internet service is available Orange On The router s WAN port is conne...

Page 11: ...m or an Ethernet jack LAN Ports 1 2 3 For connecting your PC or other wired devices to the router USB Port For connecting to a USB storage device WPS Wi Fi Button Press the button for 1 second and imm...

Page 12: ...Chapter 2 Connect the Hardware This chapter contains the following sections Position Your Router Connect Your Router...

Page 13: ...orizontal surface such as on a shelf or desktop The device also can be mounted on the wall as shown in the following figure NOTE Note The diameter of the screw head 4 5mm D 6 75mm and the distance of...

Page 14: ...wer On Note Note If the 2 4GHz LED and 5GHz LED are off press and hold the WPS Wi Fi button on the back for more than 2 seconds Both the LEDs should turn solid on 5 Connect your computer to the router...

Page 15: ...st USB network cards can be connected to your router through this method Note WPS is not supported by iOS devices The WPS function cannot be configured if the wireless function of the router is disabl...

Page 16: ...Chapter 3 Log In to Your Router...

Page 17: ...icrosoft Internet Explorer Mozilla Firefox or Apple Safari Follow the steps below to log in to your router 1 Set up the TCP IP Protocol in Obtain an IP address automatically mode on your computer 2 Vi...

Page 18: ...lt in automates many of the steps and verifies that those steps have been successfully completed Furthermore you can also set up an IPv6 connection if your ISP provides IPv6 service It contains the fo...

Page 19: ...192 168 0 1 and log in with the password you set for the router 2 Follow the step by step instructions to complete Quick Setup configuration or go to Quick Setup for configuration to connect your rout...

Page 20: ...ick Setup Via TP Link Aginet App The Aginet app runs on iOS and Android devices such as smartphones and tablets 1 Launch the Apple App Store or Google Play store and search TP Link Aginet or simply sc...

Page 21: ...ollow the instructions on the page to continue the configuration Parameters on the figures are just used for demonstration Note Since different connection types require different cables and connection...

Page 22: ...ion provided by your ISP Different parameters are needed according to the Secondary Connection you have chosen 5 If you choose PPTP enter the username and password and choose the Secondary Connection...

Page 23: ...168 0 1 and log in with your TP Link ID or the password you set for the router 2 Go to Advanced Operation Mode select Access Point and click Save The router will reboot and switch to Access Point mod...

Page 24: ...i net or http 192 168 0 1 and log in with your TP Link ID or the password you set for the router 2 Go to Advanced Network Internet 3 Click Add and enable IPv6 and select the internet connection type p...

Page 25: ...20 Chapter 4 Set Up Internet Connection 2 Dynamic IP SLAAC DHCPv6 AUTO Passthrough Click Advanced to input further information if your ISP requires Click OK...

Page 26: ...21 Chapter 4 Set Up Internet Connection 3 PPPOE SLAAC DHCPv6 AUTO Passthrouth Click Advanced to input further information if your ISP requires Click OK...

Page 27: ...ports Go to Advanced Network LAN Settings Fill in Site Prefix Type provided by your ISP and click Save 6 Click Advanced Status to check whether you have successfully set up an IPv6 connection Tips Vi...

Page 28: ...t http tplinkwifi net or http 192 168 0 1 and log in with your TP Link ID or the password you set for the router 2 Go to Advanced Network Internet 3 Click Add and enable IPv6 and Click Advanced to vie...

Page 29: ...6rd Fill in blanks and click OK Select this tunneling mechanism if your ISP uses 6rd deployment for assigning address 3 6to4 Fill in blanks and click OK Select this tunneling mechanism if your ISP us...

Page 30: ...25 Chapter 4 Set Up Internet Connection...

Page 31: ...esh device via TP Link Aginet app as well as regulatory information Features available in Aginet app may vary by model and software version Aginet app availability may also vary by region or ISP All i...

Page 32: ...to download the Aginet app Install the app on your Android or iOS smartphone or tablet OR 2 Log in or sign up with TP Link ID Open the Aginet app Use your TP Link ID to log in If you don t have a TP L...

Page 33: ...ocation for this router If its location is not listed you can create a new one by choosing Custom This will be the name of your router 5 Set up internet connection Select the internet connection type...

Page 34: ...P Link Aginet App 6 Create your Wi Fi network Set a network name and a password These will be the name and password you use to connect your routers to Wi Fi 7 Connect to your Wi Fi network Connect you...

Page 35: ...lso Add Agent to expand the Wi Fi coverage 5 2 Dashboard After you successfully set up your mesh network you will see the dashboard of the Aginet app Here you can get an overview of the network status...

Page 36: ...31 Chapter 5 Setup Your Network via TP Link Aginet App 2 Tap to create family profiles 3 Tap for more features...

Page 37: ...re Mesh Devices After creating a mesh network you can add more mesh devices to the network to expand the Wi Fi coverage and manage them easily on your Aginet app 1 In Network tap Add Agent Then select...

Page 38: ...Status In Network you can check the working status online offline of all the mesh devices check the details speed mesh device s IP address MAC address connected clients of each mesh device change the...

Page 39: ...34 Chapter 5 Setup Your Network via TP Link Aginet App 2 Tap a mesh device to check more details 3 Check download upload speed of the mesh device...

Page 40: ...35 Chapter 5 Setup Your Network via TP Link Aginet App 4 Tap and change or customize the location name of the mesh device 5 Check the clients connected to the mesh device...

Page 41: ...running performance easily in the Aginet app Follow the steps below Note Rebooting your mesh device will keep the current settings on it Removing your mesh device will reset it to factory default set...

Page 42: ...and hold the Reset button for at least 5 second to reset it 5 6 Manage Connected Devices In Network you can mange your connected devices easily such as changing the device name and type 1 Tap a connec...

Page 43: ...ly from the Aginet app with one account You can also help familyorfriendsmanagetheirnetworkswithyourAginetapp Twomethodsareprovided as below to create a new network Method 1 Create a new network from...

Page 44: ...llow app instructions to complete the setup 5 8 Parental Controls Parental Controls helps you set time limits and filter content to flexibly control your kids when they re online 1 In Family tap Creat...

Page 45: ...ime and share the network easily with family and friends 1 In More Tap Wi Fi Settings 2 Manage main network e g change your main network s Wi Fi name and password hide the network from Wi Fi list etc...

Page 46: ...TP Link Aginet App 5 10 Guest Network You can create and share a separate network for guests to guarantee the security and privacy of your main network 1 In More Tap Guest Network 2 Set a Wi Fi name...

Page 47: ...ork via TP Link Aginet App 5 11 Internet Connection In Internet Connection You can modify WAN settings IPv4 IPv6 enable MAC Clone mode 1 In More Tap Internet Connection 2 View IPv4 details or change t...

Page 48: ...43 Chapter 5 Setup Your Network via TP Link Aginet App 3 Enable IPv6 to set up an IPv6 internet connection...

Page 49: ...Clone as needed Tip For more about MAC Clone refer to https www tp link com support faq 2925 5 12 Block List Add devices to the block list to prevent the devices from accessing your network ensuring t...

Page 50: ...pgrade Your Router TP Link is dedicated to improving product features and providing a better customer experience An up to date firmware provides better and more stable network performance Always updat...

Page 51: ...ollow app instructions to update your router to the latest version 5 14 Advanced Features Additional features are available under the Advanced menu You can control mesh device s LED enable reboot sche...

Page 52: ...pter 5 Setup Your Network via TP Link Aginet App 2 Toggle off LED to turn off the light on mesh device Configure the LED Off Time to turn off the LED light at bedtime only 3 Enable Reboot Schedule as...

Page 53: ...48 Chapter 5 Setup Your Network via TP Link Aginet App 4 Bind your TP Link ID 5 Change the Operation Mode as needed...

Page 54: ...49 Chapter 5 Setup Your Network via TP Link Aginet App...

Page 55: ...e basic configuration of the router using the web management page It contains the following sections Configure LAN Settings Configure IPv6 LAN Settings Set Up a Dynamic DNS Service Account Create Stat...

Page 56: ...h the password you set for the router 2 Go to Advanced Network LAN Settings page and select IPv4 3 Enter a new IP Address appropriate to your needs 4 Select the Subnet Mask from the drop down list The...

Page 57: ...ss Lease Time is the amount of time in which a DHCP client can lease its current dynamic IP address assigned by the router After the dynamic IP address expires the user will be automatically assigned...

Page 58: ...nkwifi net or http 192 168 0 1 and log in with the password you set for the router 2 Go to Advanced Network LAN Settings page and select IPv4 3 Scroll down to the Address Reservation section and click...

Page 59: ...unless required by your ISP Otherwise you may not be able to access the IPv6 network For more information about RDNSS and ULA Prefix contact our technical support 2 Keep Site Prefix Type as the defau...

Page 60: ...ISPs Internet service providers assign a dynamic IP address to the router and you can use this IP address to access your router remotely However the IP address can change any time and you don t know w...

Page 61: ...a from one point to another will always follow the same path regardless of other considerations Normal internet usage does not require this setting to be configured Visit multiple networks and multipl...

Page 62: ...e different LAN IP addresses on the same subnet Disable Router B s DHCP function 6 Visit http tplinkwifi net or http 192 168 0 1 and log in with the password you set for the Router A 2 Go to Advanced...

Page 63: ...nation network is a single IP so here we enter 255 255 255 255 Gateway The IP address of the gateway device to which the data packets will be sent This IP address must be on the same subnet with the r...

Page 64: ...P settings MD5 Authentication Enable MD5 Authentication to enhance the rip RA packets security MD5 Key ID 0 Setting the MD5 Key ID 0 value MD5 Key ID 1 Setting the MD5 Key ID 1 value Interface The WAN...

Page 65: ...he Enable check boxes In this case all the wireless settings will be invalid To change the wireless network name SSID and wireless password 1 Go to Basic Wireless 2 Enter a new SSID 32 characters at m...

Page 66: ...11ac and 802 11ax wireless stations can connect to the router Channel Select the channel you want to use from the drop down list This field determines which operating frequency will be used It is not...

Page 67: ...hose who want more network controls You can follow the instructions below to configure your router 1 Visit http tplinkwifi net or http 192 168 0 1 and log in with the password you set for your router...

Page 68: ...ure that allows you to confine and restrict all wireless devices on your network from interacting with each other but still able to access the internet Air time fairness Select this checkbox to enable...

Page 69: ...nd security settings to ensure network security and privacy according to your situation 1 Visit http tplinkwifi net or http 192 168 0 1 and log in with the password you set for your router 2 Go to Adv...

Page 70: ...and Ping select the Allow Guests to See Each Other check box If you want to allow the clients in your Multi SSID network to access your router s USB storage sharing via methods such as Network Neighb...

Page 71: ...anviewthedetailedinformationofthewirelessclients includingitsconnection type and security option as well as the packets transmitted Tips You can also see the wireless details by clicking the wireless...

Page 72: ...wireless network is disabled 3 The wireless network will be automatically turned on after the time period you set 6 8 Use WPS for Wireless Connection You can use WPS Wi Fi Protected Setup to add a ne...

Page 73: ...ter flashes for about 2 minutes during the WPS process 6 When the WPS LED is on the client device has successfully connected to the router Method 3 Enter the router s PIN on your client device Use thi...

Page 74: ...ction of the router is disabled Please make sure the wireless function is enabled before configuring WPS Method 4 Enter the client device s PIN on the router 1 Visit http tplinkwifi net and log in wit...

Page 75: ...access for your visitors without disclosing your main network When you have guests in your house apartment or workplace you can create a multi SSID wireless network for them In addition you can custom...

Page 76: ...an create three multi SSID wireless networks at most 2 Enter a new Network Name SSID or use the default name this field is case sensitive Don t select Hide SSID unless you want your guests to manually...

Page 77: ...ll notify you when an important firmware upgrade is available Surely you can also manage multiple TP Link Cloud devices with a single TP Link ID This chapter introduces how to register a new TP Link I...

Page 78: ...the User TP Link IDs Once you have registered a TP Link ID on the web management page you can only register another TP Link ID via the Aginet APP Please refer to Manage the Router via the TP Link Agin...

Page 79: ...ssword 2 Enter the current password then a new password twice And click Save 8 3 Manage the User TP Link IDs The TP Link ID used to log in to the router for the first time will be automatically bound...

Page 80: ...Link Cloud and focus on the Bound Accounts section 3 Click enter another TP Link ID as needed and click Save Note If you need another TP Link ID please register a new one via the Aginet app Refer to M...

Page 81: ...d log in with your TP Link ID Note If you don t have a TP Link ID create one first 3 Connect your device to the router s wireless network 4 GobacktotheAginetapp selectthemodelofyourrouterandloginwitht...

Page 82: ...o share files and media from the USB storage devices over your home network locally or remotely through the internet The router supports USB external flash drives and hard drives It contains the follo...

Page 83: ...ke sure its file system is FAT32 exFat NTFS or HFS Before you physically disconnect a USB device from the router safely remove it to avoid data damage Go to Advanced USB USB Storage Device and click R...

Page 84: ...and a password to deny anonymous access to the USB disks you should select the Registered User radio box To learn how to set up an account for the access refer to To Set Up Authentication for Data Sec...

Page 85: ...r ISP assigns a private WAN IP address such as 192 168 x x or 10 x x x you cannot use this feature because private addresses are not routed on the internet Follow the steps below to configure remote a...

Page 86: ...network files management Tips Click Set Up a Dynamic DNS Service Account to learn how to set up a domain name for you router 9 1 3 Customize the Access Settings By default all the network clients can...

Page 87: ...o that network clients will be required to enter username and password when accessing the USB storage device 1 In the Sharing Account section enable Use New Account 2 Modify the access account The use...

Page 88: ...ing password for USB access 2 Due to Windows credential mechanism you might be unable to access the USB disk after changing Authentication settings Please log out from the Windows and try to access ag...

Page 89: ...omputer Go to Computer Network then click the Media Server Name Model number share by default in the Media Devices section Note Here we take Windows 7 as an example Tablet Use a third party DLNA suppo...

Page 90: ...3G 4G as a backup solution for Internet access 4 Tick the checkbox to set the Dial Number APN Username and Password manually Note The following Advanced settings will only display if you enable 3G 4G...

Page 91: ...Chapter 10 EasyMesh with Seamless Roaming This chapter introduces the TP Link EasyMesh feature It contains the following sections Set Up a EasyMesh Network Manage Devices in the EasyMesh Network...

Page 92: ...assword access control settings and more Seamless Roaming Devices automatically switch between your controller and agents as you move through your home for the fastest possible speeds Easy Setup and M...

Page 93: ...e agent will be listed on the controller s Mesh page Note To check full list of TP Link EasyMesh devices visit https www tp link com 3 If you have set up the agent to join the EasyMesh network it will...

Page 94: ...yMesh network you can manage all mesh devices and connected clients on your router s web page To view mesh devices and connected clients in the network 1 Visit http tplinkwifi net or http 192 168 0 1...

Page 95: ...and log in with your TP Link ID or the password you set for the router 2 Go to Basic Network Map 3 Click the Mesh device s IP Address to redirect to the web management page of this device and view det...

Page 96: ...your main network When you have guests in your house apartment or workplace you can create a guest network for them In addition you can customize guest network options to ensure network security and...

Page 97: ...s 3 Select the Security type and customize your own password If No security is selected no password is needed to access your guest network 4 Click Save Now your guests can access your guest network us...

Page 98: ...to see each other Tick this checkbox if you want to allow the wireless clients on your guest network to communicate with each other via methods such as network neighbors and Ping 4 Click Save Now you...

Page 99: ...ng feature the router can penetrate the isolation of NAT and allows devices on the internet to initiatively communicate with devices on the local network thus realizing some special functions The TP L...

Page 100: ...ity ALG 12 2 Set Up Public Services on The Local Network by Virtual Servers Virtual Servers are used to set up public services on the local network A virtual server is defined as an external port and...

Page 101: ...er in the External Port and Internal Port fields If the service is not listed enter the External Port number e g 21 or a range of ports e g 21 25 Leave the Internal Port blank if it is the same as the...

Page 102: ...2 3 Open Ports Dynamically by Port Triggering Port Triggering can specify a triggering port and its corresponding external ports When a host on the local network initiates a connection to the triggeri...

Page 103: ...k View Existing Applications and select the desired application The Triggering Port Triggering Protocol and External Port will be automatically filled in The following picture takes application MSN Ga...

Page 104: ...ou are not clear about which ports to open in some special applications such as IP camera and database software you can set the PC to be a DMZ host Note When DMZ is enabled the DMZ host is totally exp...

Page 105: ...er to peer connections real time communication such as VoIP or telephone conference or remote assistance etc Tips UPnP is enabled by default in this router Only the application supporting UPnP protoco...

Page 106: ...101 Chapter 12 NAT Forwarding 2 Go to Advanced NAT Forwarding UPnP and toggle on or off according to your needs...

Page 107: ...Chapter 13 Parental Controls This function allows you to block inappropriate explicit and malicious websites and control access to specified websites at specified time...

Page 108: ...PM to 22 00 10 PM on the weekdays and not other time 1 Visit http tplinkwifi net or http 192 168 0 1 and log in with the password you set for the router 2 Go to Basic Parental Controls or Advanced Pa...

Page 109: ...r click Add a New Keyword to add a filter keyword for example Facebook or URL 6 Enable Time Limits for Mon to Fri and Sat Sun then set the daily internet time allowed Enable BedTime on School Nights S...

Page 110: ...the family member then click the Insights icon 2 On the Top 5 Visits page select a day of the last 7 days to check the time spent online and top visited websites You can block the websites if needed 3...

Page 111: ...106 Chapter 13 Parental Controls To pause or resume internet access of a family member Find the profile of the family member then click the Pause Play icon...

Page 112: ...Chapter 14 Quality of Service This function allows you to specify the priority of traffic and minimizes the impact of network congestion...

Page 113: ...nd traditional IP data To configure QoS on the routers you should set parameters on the transmission queues for different types of wireless traffic In normal use we recommend that you keep the default...

Page 114: ...r 14 Quality of Service 5 Optional Enable IPTV QoS then set the priority and reserved bandwidth of IPTV traffic 6 Optional Click Advanced and arrange the sliders to set the bandwidth percentage of eac...

Page 115: ...ke the settings effective To set up QoS for a specific device 1 Visit http tplinkwifi net or http 192 168 88 1 and log in with the password you set for the router 2 Go to Advanced QoS 3 In the QoS Rul...

Page 116: ...111 Chapter 14 Quality of Service 4 In the QoS Rule window click scan and click to choose a device then click OK to add it to the rule...

Page 117: ...ou can block or allow specific client devices to access your wireless network using MAC Filtering or using Access Control for wired and wireless networks or you can prevent ARP spoofing and ARP attack...

Page 118: ...ction 1 Visit http tplinkwifi net or http 192 168 0 1 and log in with the password you set for the router 2 Go to Advanced Security Firewall DoS Protection 3 Enable DoS Protection 4 Set the protection...

Page 119: ...layed in the Blocked DoS Host List 15 2 Service Filtering With Service Filtering you can prevent certain users from accessing the specified service and even block internet access completely 1 Visit ht...

Page 120: ...e Note If you want to disable an entry click the icon 15 3 Access Control Access Control is used to block or allow specific client devices to access your network via wired or wireless based on a list...

Page 121: ...Save 2 Select the device s to be blocked in the Online Devices table or click the Add under the Devices in Blacklist and enter the Device Name and MAC Address manually 3 Click Block above the Online D...

Page 122: ...IP MAC Binding namely ARP Address Resolution Protocol Binding is used to bind a network device s IP address to its MAC address This will prevent ARP spoofing and other ARP attacks by denying network...

Page 123: ...in the ARP List 2 Click Bind to add to the Binding List To bind the unconnected device 1 Click Add in the Binding List section 2 Enter the MAC address and IP address that you want to bind 3 Select th...

Page 124: ...168 0 1 and log in with the password you set for the router 2 Go to Advanced Security IPv6 Firewall 3 Click Add 4 Select an interface name from the drop down list Interface names are names of the int...

Page 125: ...field 7 Select a protocol for the service from the drop down list 8 Select Enable This Entry 9 Click OK Tips If you want to disable this entry click the Bulb icon If the local host device hosts more t...

Page 126: ...pany intranet PPTP VPN is easy to use with the built in VPN software of computers and mobile devices but it is vulnerable and may be blocked by some ISPs L2TP IPSec VPN is more secure but slower than...

Page 127: ...r Note Before you enable VPN Server we recommend you configure Dynamic DNS Service recommended or assign a static IP address for router s WAN port and synchronize your System Time with internet The fi...

Page 128: ...rd party app from Google Play or Apple App Store 2 After the installation copy the file exported from your router to the OpenVPN client utility s config folder for example C Program Files OpenVPN conf...

Page 129: ...ateaPPTPVPNconnection Theofficialsupportedplatforms include Windows Mac OSX Linux iOS and Android 7 Launch the PPTP VPN program add a new connection and enter the domain name of the registered DDNS se...

Page 130: ...125 Chapter 16 VPN Server Client 3 Select Connect to a workplace and click Next 4 Select Use my Internet connection VPN...

Page 131: ...r Client 5 Enter the internet IP address of the router for example 218 18 1 73 in the Internet address field Click Next 6 Enter the User name and Password you have set for the PPTP VPN server on your...

Page 132: ...ver Client 7 Click Connect Now when the VPN connection is ready to use 16 3 Use IPSec VPN to Access Your Home Network IPSec VPN Server is used to create a IPSec VPN connection for remote devices to ac...

Page 133: ...n Your Router 1 Visit http tplinkwifi net or http 192 168 0 1 and log in with your TP Link ID or the password you set for the router 2 Go to Advanced VPN IPSec VPN and enable Dead Peer Detection Note...

Page 134: ...g to the following explanation We recommend that you keep the default settings If you want to change these settings make sure that both VPN server endpoints use the same Encryption Algorithm Integrity...

Page 135: ...IPSec VPN Connection on Your Remote Device The remote device can use the Windows or Mac OS built in IPSec software or a third party IPSec software to connect to IPSec Server Here we use the Windows bu...

Page 136: ...131 Chapter 16 VPN Server Client 3 Select Connect to a workplace and click Next 4 Select Use my Internet connection VPN...

Page 137: ...of the router for example 218 18 1 73 in the Internet address field and select the checkbox Don t connect now just set it up so I can connect later Click Next 6 Enter the User name and Password you ha...

Page 138: ...133 Chapter 16 VPN Server Client 7 Click Close when the VPN connection is ready to use 8 Go to Network and Sharing Center and click Change adapter settings...

Page 139: ...34 Chapter 16 VPN Server Client 9 Find the VPN connection you created then double click it 10 Enter the User name and Password you have set for the IPSec VPN server on your router and click Properties...

Page 140: ...Layer 2 Tunneling Protocol with IPsec L2TP IPSec and click Advanced settings 12 Select Use preshared key for authentication and enter the IPSec Pre Shared Key you have set for the IPSec VPN server on...

Page 141: ...plays the clients that are currently connected to the OpenVPN servers PPTP VPN servers and IPSec VPN hosted on the router 1 Visit http tplinkwifi net or http 192 168 0 1 and log in with your TP Link I...

Page 142: ...er s network This chapter contains the following sections Set System Time Control the LED Test Internet Connectivity Update the Firmware Back Up and Restore Configuration Settings Reboot the Router Ad...

Page 143: ...e password you set for the router 2 Go to Advanced System Tools Time Settings page 3 Configure the system time using the following methods Get from PC Click this button if you want to use the current...

Page 144: ...Mode 4 Specify the LED off time and the LED will be off during this period every day 5 Click SAVE 17 3 Test Internet Connectivity Diagnostics function is used to test the connectivity between the rout...

Page 145: ...ested host and measure the round trip time Traceroute is used to display the route path your router has passed to reach the tested host and measure transit delays of packets across an internet Protoco...

Page 146: ...efore upgrading the firmware 3 DO NOT turn off the router during the firmware upgrade Follow the steps below to upgrade the firmware online 1 Click Check for Upgrades 2 If a new firmware is displayed...

Page 147: ...the current settings and reset the router to its default factory settings 1 Visit http tplinkwifi net or http 192 168 0 1 and log in with the password you set for the router 2 Go to Advanced System T...

Page 148: ...t the Router The Reboot feature cleans the cache to enhance the running performance of the router You can reboot the router manually or set it to reboot regularly 1 Visit http tplinkwifi net or http 1...

Page 149: ...iguration with the file system will reboot automatically Note The Auto Reboot feature takes effect based on the router s system time Please make sure you have already set up the time of the router 17...

Page 150: ...ver a more secure way HTTPS Follow the steps below to allow only the specific device to manage the router via the local management over HTTPS 1 Visit http tplinkwifi net or http 192 168 0 1 and log in...

Page 151: ...es are not routed on the internet Follow the steps below to allow remote devices to manage the router over HTTPS 1 Visit http tplinkwifi net or http 192 168 0 1 and log in with the password you set fo...

Page 152: ...Check HTTP referer header check function can protect your networks against CSRF attacks This function is enabled by default You can disable this function if needed 1 Visit http tplinkwifi net or http...

Page 153: ...rvers when the device is powered off or the network disconnect accidentally 1 Visit http tplinkwifi net or http 192 168 0 1 and log in with the password you set for the router 2 Go to Advanced System...

Page 154: ...Save Locally Select this option to cache the system log to the router s local memory select the minimum level of system log to be saved from the drop down list The logs will be shown in the table in...

Page 155: ...or http 192 168 0 1 and log in with the password you set for the router 2 Go to Advanced System Tools CWMP Settings page CWMP Enable or disable the CWMP CPE WAN Management Protocol function Inform Ena...

Page 156: ...d server address and port Click Save to make the settings effective 17 10 SNMP Settings SNMP Simple Network Management Protocol is widely used in network management for network monitoring It allows ma...

Page 157: ...anges System Name Displays the administratively assigned name for this managed device System Description Displays the textual description of the managed device This value should include the full name...

Page 158: ...Enable Traffic Statistics to enable traffic statistics function you can view the total number of packets and bytes received and transmitted by the router within the selected Statistics Interval This f...

Page 159: ...Mirroring 4 Select a LAN port to mirror network packets of the WAN port 5 Set a Timeout duration after which Port Mirroring will disable automatically If you set Timeout to 0 seconds Port Mirroring wi...

Page 160: ...factory default settings and then visit http tplinkwifi net to create a new login password Note You ll need to reconfigure the router to surf the internet once the router is reset and please mark down...

Page 161: ...156 4 Click LAN settings and deselect the following three options and click OK 5 Go to Advanced Restore advanced settings click OK to save the settings...

Page 162: ...even though the configuration is finished 1 Visit http tplinkwifi net and log in with your TP Link ID or the password you set for the router 2 Go to Advanced Network Status to check internet status If...

Page 163: ...nd check the internet access Reset the router to factory default settings and reconfigure the router Upgrade the firmware of the router Check the TCP IP settings on the particular device if all other...

Page 164: ...MAC address to the router The MAC addresses of a computer in wired connection and wireless connection are different Modify the LAN IP address of the router Note Most TP Link routers use 192 168 0 1 1...

Page 165: ...3 Go to Advanced Network Internet 4 Select your Internet Connection Type and fill in other parameters 5 Click Save 6 Restart the modem and the router again Please upgrade the firmware of the router I...

Page 166: ...n the Services list on the right side 5 Right click Wireless Zero Configuration and then select Properties 6 Change Startup type to Automatic click on Start button and make sure the Service status is...

Page 167: ...r wireless router Note Wireless Password Network Security Key is case sensitive Windows unable to connect to XXXX Can not join this network Taking longer than usual to connect to this network Check th...

Page 168: ...t interference will not occur in a particular installation If this equipment does cause harmful interference to radio or television reception which can be determined by turning the equipment off and o...

Page 169: ...uthorized change is made in the equipment and the equipment is properly maintained and operated Issue Date 2022 09 06 FCC compliance information statement Product Name I T E Power Supply Model Number...

Page 170: ...device may not cause harmful interference 2 This device must accept any interference received including interference that may cause undesired operation Any changes or modifications not expressly appr...

Page 171: ...Hz is only for indoor use to reduce the potential for harmful interference to co channel mobile satellite systems DFS Dynamic Frequency Selection products that operate in the bands 5250 5350 MHz 5470...

Page 172: ...Notice AX3000 Gigabit Wi Fi 6 Router Equipment name Archer AX3000 Pro Type designation Type nit Restricted substances and its chemical symbols Lead Pb Mercury Hg Cadmium Cd Hexavalent chromium Cr 6 Po...

Page 173: ...Use only power supplies which are provided by manufacturer and in the original packing of this product If you have any questions please don t hesitate to contact us This product uses radios and other...

Page 174: ...mbol for Waste electrical and electronic equipment WEEE This means that this product must be handled pursuant to European directive 2012 19 EU in order to be recycled or dismantled to minimize its imp...

Reviews: