


28
2
4
1
3
TIMER REC SET
DATE
23 MON
11:30
--:--
3
START
END
CH
SELECT :
SET
:
EXIT
: MENU
SP
SPEED
OFF
PDC
23 MON
13:00
1
LP
OK : ENTER
14:30
TIMER REC SET
DATE
START
END
CH
SELECT :
SET
:
EXIT
: MENU
SPEED
OFF
PDC
--:--
--:--
------
--
--:--
--:--
--
------
--:--
--:--
--
------
--:--
--:--
--
------
--:--
--:--
------
--
--:--
--:--
------
--
--:--
--:--
------
--
--:--
--:--
------
--
/ ENTER
SELECT :
EXIT : MENU
-
-
-
-
-
-
-
-
Timer recording
Timer recording can be programmed
on the TV-screen with the remote con-
trol. The built-in timer allows automatic
unattended recording of up to 8 pro-
grams within 1 month.
Notes:
• In the event of a power failure, the data
of the automatic recording will be main-
tained in the built-in memory for about
30 minutes. Also, the clock will continue
to run for this period of time. Thereafter
the data will be deleted. When the
power resumes, the time display will
change to “--:--” and the timer setting
will have to be set.
• Not all TV Stations transmit PDC signal
all of the time, therefore it is advisable
to check before setting PDC to ON, if
you do set PDC to ON and no signal is
received your recording might not take
place at all. To check PDC status,
change to the channel on your DVD/
VCR you wish to record from, if the
word "PDC" appears on the screen for
a few seconds then that channel is
broadcasting PDC and you can set the
feature to ON.
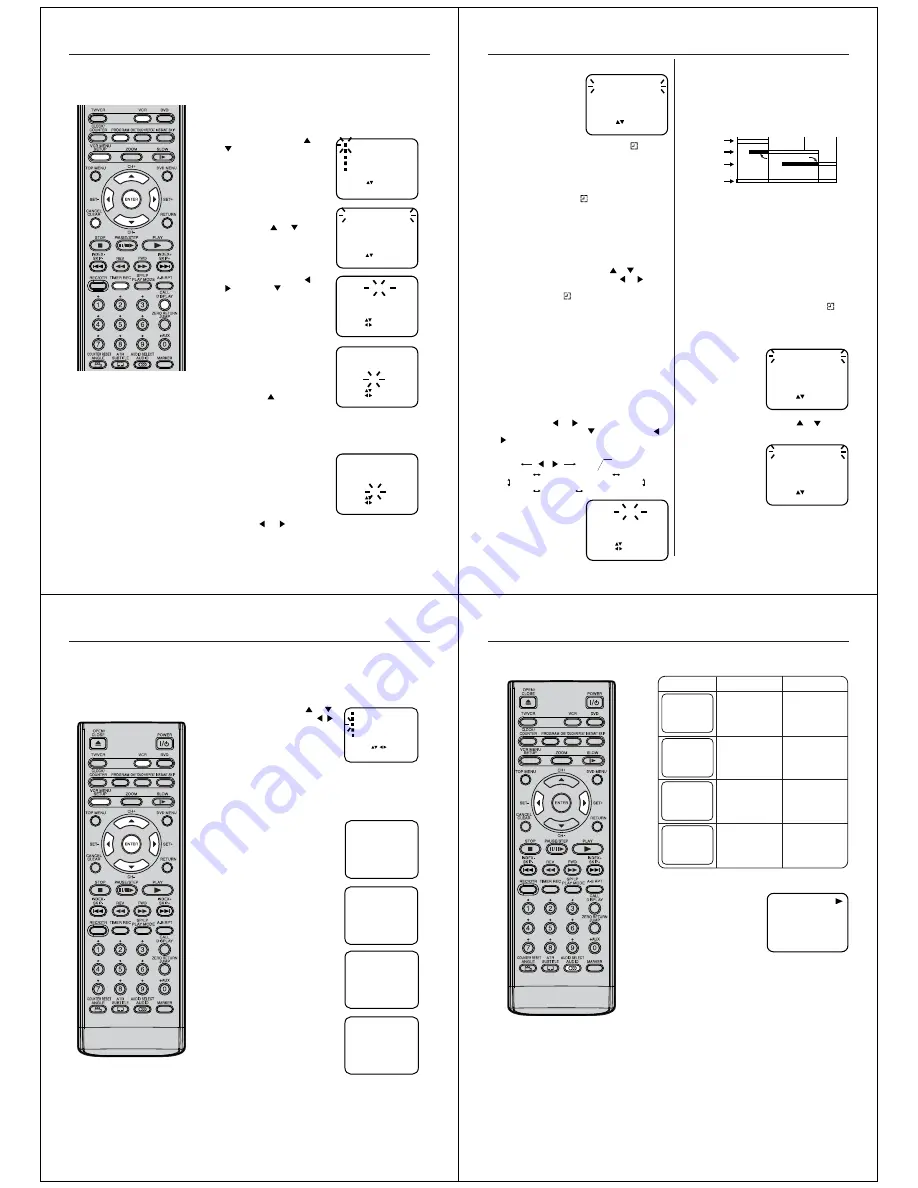
Preparation
• Turn ON the TV and set to the AV input mode.
• Press
VCR
to select the VCR mode. (The VCR indicator will light.)
• Load a video cassette with the erase prevention tab intact. Make
sure with
CALL
that the time and date are correct.(see page 26).
Example:
Timer recording for channel 1, 13:00 to 14:30 with Tape
speed LP on timer program number 1.
Press
VCR MENU
. Press
or
to select TIMER REC SET.
Then press
ENTER
.
Each line stands for one pro-
gram of the 8 memories. Select
one line with
or
. Then
press
ENTER
.
Set the desired
date
with
or
. Then press
to accept it.
Set the
Starting time (13:00)
,
ending time (14:30)
,
channel
(1)
and
Tape speed (LP)
in the
same way as the step
3
.
• In case of an erroneous
input, press
to go back to
previous step and enter
again.
TIMER REC SET
AUTO REPEAT
CH TUNING
SYSTEM SETUP
SELECT :
ENTER : ENTER
[OFF]
[AUTO]
MENU
EXIT
:
NICAM
To record with the PDC (Programme Delivery
Control) system
The PDC system starts recording
when it picks up a special signal
transmitted by the broadcaster
with the TV programme – even if
the TV programme starts early,
late or runs on longer than
scheduled. In step 4, press
▼
repeatedly until PDC OFF flashes,
then press
or
to display "ON" for recording with PDC.
23 MON
13:00
1
LP
OK : ENTER
14:30
TIMER REC SET
DATE
START
END
CH
SELECT :
SET
:
EXIT
: MENU
SPEED
ON
PDC
29
Timer recording
5
--:--
--:--
------
--
13:00
14:30
1
23 MON
--:--
--:--
------
--
--:--
--:--
------
--
--:--
--:--
------
--
--:--
--:--
------
--
------ --:-- --:-- --
------ --:-- --:-- --
-
-
-
-
-
LP
-
-
SELECT :
EXIT : MENU
/ ENTER
1
2
4
3
TIMER REC SET
DATE
WKL-WED
11:30
- - : - -
2
START
END
CH
SELECT :
SET :
EXIT : MENU
SP
SPEED
OFF
PDC
--:--
--:--
------
--
--:--
--:--
------
--
--:--
--:--
------
--
--:--
--:--
------
--
--:--
--:--
------
--
25 WED 12:15
13:00
4
23 MON 13:00
14:30
1
-
-
-
-
-
LP
SP
SELECT :
/ ENTER
--:--
--:--
------
-- -
EXIT : MENU
--:--
--:--
------
--
17:30 18:00 7
15 TUE
--:--
--:--
------
--
--:--
--:--
------
--
--:--
--:--
------
--
--:--
--:--
------
--
25 WED 12:15 13:00 4
23 MON 13:00 14:30 1
--
--
-
SP
LP
SP
SELECT :
CLEAR : CANCEL EXIT : MENU
/ ENTER
6
Press
ENTER
to accept them.
To enter other pro-
grams, repeat steps
2
through
5
.
•
To return to the
normal screen,
press
VCR MENU
twice.
MON-SAT = everyday from
Monday to Saturday
WKL-SAT = each Saturday
Press
TIMER REC
. The clock symbol (
) will
appear on the display and the DVD/VCR stands by
for recording. At the same time, VCR mode will
change to DVD mode automatically. You can use
DVD even if the VCR is in the Timer recording mode.
If you do not use the DVD, turn the power off.
• If the clock symbol (
) blinks on the display in
spite of the pressing of
TIMER REC
, the cassette
may not have been loaded yet. (see page 19)
• If the cassette is ejected in spite of the pressing
of
TIMER REC
, the erase prevention tab of the
cassette may have been removed. (see page 19)
Notes:
• In case of the timer recording from the scart socket,
proceed as follows: In step
4
, press
or
repeatedly
until the "CH" line blinks. Then press
or
repeat-
edly until “AV1” or “AV2” or “AV3” appears.
• If the clock symbol (
) blinks when the timer recording
ended, the TV program has not been completely
recorded because of an insufficient tape supply. Press
TIMER REC
to cancel the timer program or press
EJECT
on the DVD/VCR to remove the cassette tape.
• During timer recording standby mode, the VCR mode
cannot be selected. To use the VCR, press
TIMER
REC
at first, then press
VCR
to change to VCR mode.
Press
TIMER REC
again to set the VCR into timer
recording standby mode.
Timer Recording Special Case
Weekly (e.g. WKL-TUE: each Tuesday) or daily (e.g.
MON-SAT: Monday to Saturday) Timer recording
Follow the procedure for timer recording on page 28. At
picture
3
, press
or
repeatedly until the desired
setting appears. Then press
. When you press
or
repeatedly, the indicator at DATE will change as
follows, in case today is Friday.
In case of Timer programs-overlapping
Do not overlap timer programs as portions of the
conflicting programs will be lost. The first recording
time has priority over the next recording time as
shown in the diagram below.
Notes:
• The daily/weekly recording can be made continuously
until the recording is cancelled or the tape reaches the
end.
• During timer recording, the automatic rewinding mecha-
nism does not function.
Confirmation / Cancellation of the Timer
Recording
If the Timer has been activated, press
TIMER REC
to deactivate the Timer. The clock symbol (
) will
disappear. Then press
VCR
to change to VCR
mode.
Press
PROGRAM
. All the 8 Timer memories will
appear.
To cancel Timer program:
Press
or
to select
the written line. Then press
CANCEL
. This line is
now cancelled.
Press
VCR MENU
(or
PROGRAM
) repeatedly until
the TV-picture appears.
One month later
minus one day
SUN-SAT 25 FRI ..... 24 SUN WKL-FRI
MON-SAT MON-FRI WKL-THU.....WKL-SAT
8 : 00
11 : 00
9 : 00
10 : 00
Program 1
Program 2
Program 3
Prog.1
Deleted Parts
Non Recorded Portion Parts
Prog.2
Prog.3
Recording
Control Settings
If you set up many timer recording programs at the
same start time, the priority will be the top program in
the timer recording list.
30
NICAM OFF
NICAM M1/2
NICAM M1
NICAM ST
1
Stereo recording and playback
This DVD/VCR is capable of recording
sound in Hi-Fi system. The recording
will be performed automatically.
NICAM STEREO broadcasts are
recorded in its original sound system
regardless of the setting. If you wish
to record NICAM programmes, select
NICAM “AUTO” as follows.
Note:
When listening to a stereo broadcast or
playing back a Hi-Fi tape recorded in
stereo, you have to connect the DVD/
VCR with the stereo audio system or the
stereo TV.
Preparation:
• Turn ON the TV and set to the video input mode.
• Press
VCR
to select the VCR mode. (The VCR indicator will light.)
NICAM stereo sound reception:
Press
VCR MENU
repeatedly until the TV picture appears.
NICAM programmes are divided into 4 types as shown
below.
NICAM STEREO broadcast
“NICAM ST” illuminates when a NICAM
STEREO broadcast signal is received.
NICAM MONO A broadcast
“NICAM M1” illuminates when a NICAM
MONO A broadcast signal is received.
NICAM MONO A B broadcast
“NICAM M1/2” illuminates when a NICAM
MONO A and MONO B broadcast signal is
received.
NICAM OFF
It will be displayed for the NICAM signal
when the “NICAM [OFF]” is selected in
menu screen.
TIMER REC SET
AUTO REPEAT
CH TUNING
SYSTEM SETUP
SELECT :
ENTER : ENTER
[OFF]
[AUTO]
MENU
EXIT
:
NICAM
/
2
Press
VCR MENU
. Press
or
to select NICAM. Then press
/
or
ENTER
to select [AUTO].
31
Stereo recording and playback
Playback
Use
AUDIO SELECT
to select under stereo/mono or bilingual
playback. See the table below for more information.
Bilingual playback
performed as follows:
On-screen indications
(for 4 sec.)
Stereo playback
performed in:
Simultaneously
both languages
from Hi-Fi track
(Mixed sounds)
Original sound
track (Sub sound)
One language
dubbing
(Main sound)
One language
dubbing
(Main sound)
Stereo
Mono
Right channel
signal output from
both loudspeakers
Left channel signal
output from both
loudspeakers
Note:
When playing Hi-Fi cassette tapes re-
corded on another VCR, the sound out-
put may be distorted. This is normal and
no indication of a unit malfunction. Try to
minimize sound distortions by using
SET +/–
or change to MONO by pressing
AUDIO SELECT
.
L CH
R CH
MONO
STEREO
HiFi signal indication
It displays for approx. 4 seconds
when playing HiFi video cassette
tapes.
HI-FI


