background image

8

SCART-socket
(for VCR/DECODER) (L2)
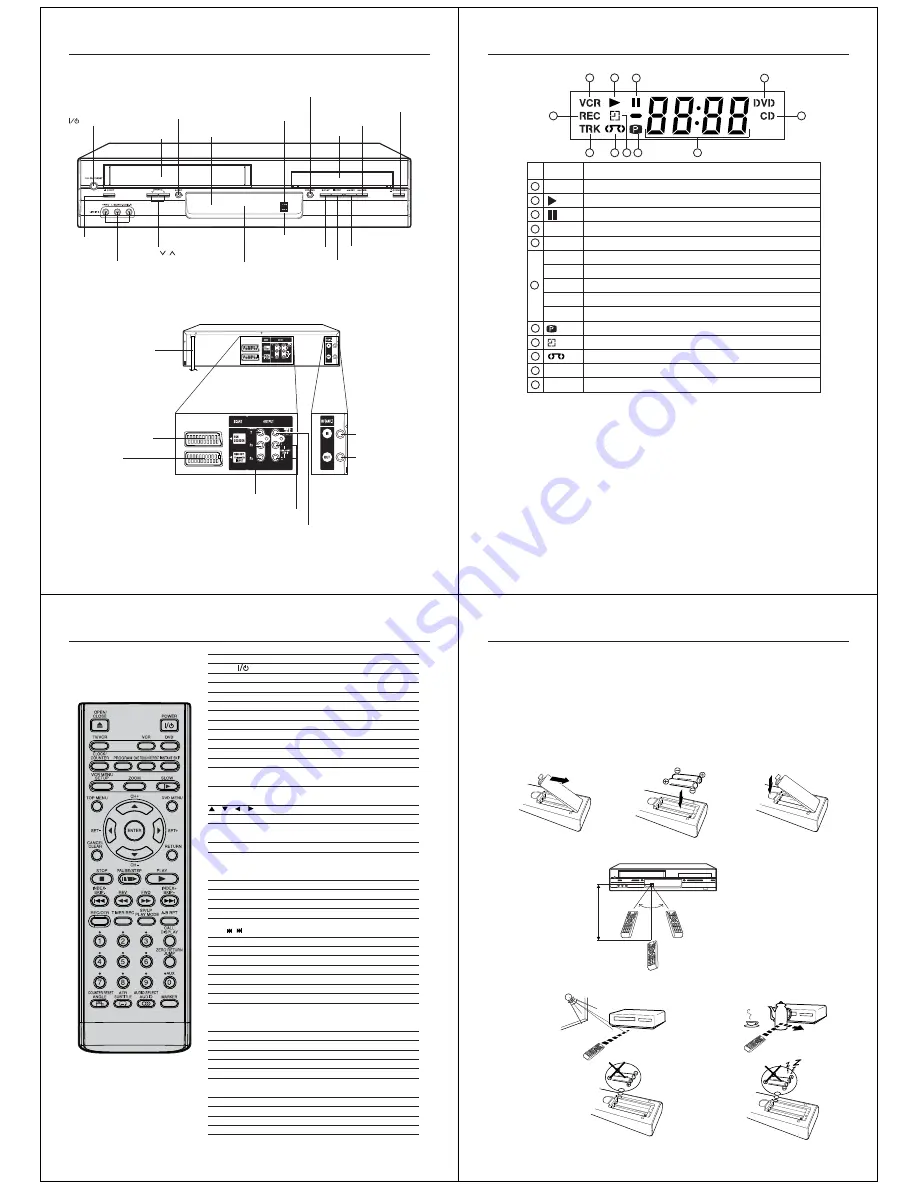
Parts and functions

Front

Rear

AC mains lead

COAXIAL DIGITAL AUDIO OUT jack

RF IN jack

AUDIO (L/R) OUT jacks

RF OUT jack

SCART-socket
(for RGB OUT,
Composite IN/OUT) (L1)

COMPONENT VIDEO OUT(Y/P

B

/P

R

) jacks

 ON/STANDBY button

AUDIO (L/R)/VIDEO IN
(LINE IN 3) jacks

EJECT
button

Disc tray

Display window

REC button

CHANNEL

/

 buttons

OPEN/CLOSE button

Remote sensor

VCR mode indicator

DVD mode indicator

Cassette loading slot

VCR/DVD mode selector button

STOP button

PLAY button

REV button

FWD button

9

No.

Display

VCR mode of TV/VCR switch

Display

VCR

DVD

CD

10 : 00

01 : 00

2

L1/L2/L3

TRK

CH 2

Playback (lights) / Auto resume (flashes)

Still picture

DVD disc is inserted.

VCD/CD is inserted.

Clock display (colon[ : ] flashes)

Counter display by hour/minute at VCR/DVD / by minute/second at CD

Track number display for CD

TV channel position display

External input display

Timer recording display

Video tape is in the unit

Track display for CD

Normal recording display (flashes during One-touch Timer Recording - OTR)

Note:

Some discs may not playback correctly, or chapter number, playback time, etc. may not be displayed.

Display window

1

2

3

4

5

6

8

9

10

11

1

2

3

8

9

10

11

4

6

5

Description

REC

7

Progressive indicator

7

10

OPEN/CLOSE

Open or Close the disc tray

33

POWER

Power on/off

16

TV/VCR

Switch to TV only at Scart connection

26

VCR

Select to operate VCR

16

DVD

Select to operate DVD

33

CLOCK/COUNTER Change the front Display mode

23

PROGRAM

Confirmation of Timer-Recording

29

ONE TOUCH REPEAT Skip back about 10 seconds of DVD/VCD/CD playback 35
INSTANT SKIP

Skip the unwanted short material of a tape

21

VCR MENU/SETUP Display menu of setup

16,49

ZOOM

Zoom

36

SLOW

Slow motion playback

21,35

TOP MENU

Select title of a DVD disc/
View JPEG files in a file browser

40,45

DVD MENU

Select menu of a DVD disc/
View JPEG files in a thumbnail list

40,45

 / 

/

 / 

Cursor buttons

17

CH +/–

Select channel of the VCR

25

ENTER

Enter information in the menu
Select option in the menu

16,29

SET –/+

Manual tracking

21

CANCEL/CLEAR

Delete Timer program

29

Skip channel/Cancel input data in the setting
mode

15,36,37

RETURN

Exit setup menu

49,54

STOP

Stop

20,33

PAUSE/STEP

Still picture/Recording pause on/off

21,25,34,35

PLAY

Playback

20,33

INDEX –/+

Search for the INDEX mark of a tape

24

SKIP

/

Skip chapter/track to forward or reverse direction 35

REV

Rewind/Review playback

20,21,35

FWD

Fast Forward/Forward search playback 20,21,35

REC/OTR

Recording/OTR

25,27

TIMER REC

Timer recording On/Off

27,29

SP/LP

Sets the tape speed for recording

25

PLAY MODE

Select playback mode

38,39

A-B RPT

Repeat playback between A and B (DVD/VCD/CD) 38

0-9

Direct channel selection of TV

15,25

Input setting

36

Enter a security code

52,53

CALL/DISPLAY

Display VCR or DVD operation status

23,26,42

ZERO RETURN

Stop the tape when the counter reaches 00:00 23

JUMP

Jump to desired scene

36

AUX

Scart Input or AV-Front input

13,32

COUNTER RESET Reset the counter to 00:00

23

ANGLE

Change playback angle of a DVD disc

40

Rotate JPEG CD image

45

ATR

Auto tracking

21

SUBTITLE

Set Subtitle of a DVD disc

42

AUDIO SELECT

Switches sound between mono and stereo

31

AUDIO

Change soundtrack language of DVD

41

MARKER

Mark/Resume from the desired scenes
(DVD/VCD)

37

Page

Remote control

11

Remote control

1

2

3

Replace the compartment
cover.

Install two "R03/AAA" batteries
(supplied), paying attention to the
polarity diagram in the battery
compartment.

Open the battery compart-
ment cover in the direction of
the arrow.

How to install the batteries

Use

micro batteries type UM-4

 (

R03/AAA-Size

).

These batteries are offered as carbon / zinc-type or as alkaline-type. You may use both, but do not mix types. The
alkaline type lasts longer compared to the carbon / zinc type but is more expensive.

Note:

Flat, weak batteries will leak. 

Corrosive

 electrolyte will 

damage

 the remote control.

Leak proof batteries will not leak immediately when they are flat. As long as the remote control is still working,
there is no danger of leakage. To prevent damage, remove the batteries if you do not use the remote control
for a long period of time.

Damage because of leakage is not covered by the guarantee.

Distance of Remote
Control Operation

Effective angle:
approx. 60°

approx.

7m

Point the remote
control directly at the
remote sensor.

If bright sunlight
directly beams
onto the unit
front.

If an obstacle is
placed between the
unit and the remote
control.

The remote control will not work properly in the following cases:

If the batteries have not
been installed according to
their polarities.

If the batteries are
weak.

Summary of Contents for SD-38VBKB

Page 1: ...IONS SOME DOS AND DON TS ON THE SAFE USE OF EQUIPMENT This equipment has been designed and manufactured to meet international safety standards but like any electrical equipment care must be taken if you are to obtain the best results and safety is to be assured DO read the operating instructions before you attempt to use the equipment DO ensure that all electrical connections including the mains p...

Page 2: ...olby and the double D symbol are trademarks of Dolby Laboratories DTS and DTS Digital Out are registered trademarks of DTS Inc DivX DivX Certified and associated logos are trademarks of DivX Inc and are used under license Playback side DVD video disc Title 1 Title 2 Chapter 1 Chapter 2 Chapter 1 Chapter 2 Chapter 3 Track 1 Track 2 Track 3 Track 4 Track 5 Video CD Audio CD 6 DIGITAL VIDEO About thi...

Page 3: ...ecording pause on off 21 25 34 35 PLAY Playback 20 33 INDEX Search for the INDEX mark of a tape 24 SKIP Skip chapter track to forward or reverse direction 35 REV Rewind Review playback 20 21 35 FWD Fast Forward Forward search playback 20 21 35 REC OTR Recording OTR 25 27 TIMER REC Timer recording On Off 27 29 SP LP Sets the tape speed for recording 25 PLAY MODE Select playback mode 38 39 A B RPT R...

Page 4: ...th less flicker INTERLACED outputs inputs Some TVs or monitors are equipped with component video inputs Connecting to these inputs allows you to enjoy the highest quality DVD picture playback Connecting to an audio system and TV equipped with component video inputs Note In connecting to TV s that are not capable of reproducing a progressively scanned video signal using the component sockets do not...

Page 5: ...ght Saving Time once you set AUTO TIME to ON Press VCR MENU repeatedly until the TV picture appears on the screen 6 Press or to select AUTO TIME ON or OFF The VCR automatically corrects the clock setting every hour once you set AUTO TIME to ON 18 The Auto setup function see page 15 memorizes all broadcasts to the suit able CH positions However some broadcasts may not be memorized due to weak signa...

Page 6: ...ck During picture search mode there will be noise bars which are caused by the system The Special Playback will automati cally change to normal playback after approx 5 minutes to protect the video tape against excessive wear For example 1 press 30 seconds of tape 2 press 60 seconds of tape 3 press 90 seconds of tape Instant skip Press INSTANT SKIP during playback The DVD VCR will search forward th...

Page 7: ...P Press this button again if you want to resume the recording Attention A safety circuit turns the pause mode off automatically after 5 minutes and the DVD VCR will stop the recording mode 00 00 00 LP 26 VCR Recording a TV Program 1 2 3 VCR indicator lights VCR indicator goes off VCR indicator lights You can record a program using the TV receiver of the DVD VCR and at the same time watch another p...

Page 8: ...REC to cancel the timer program or press EJECT on the DVD VCR to remove the cassette tape During timer recording standby mode the VCR mode cannot be selected To use the VCR press TIMER REC at first then press VCR to change to VCR mode Press TIMER REC again to set the VCR into timer recording standby mode Timer Recording Special Case Weekly e g WKL TUE each Tuesday or daily e g MON SAT Monday to Sa...

Page 9: ... TV screen according to the type of loaded disc In this case check your disc again see pages 6 and 52 Some discs may take a minute or so to start playback When you set a single faced disc label downwards i e the wrong way up and press OPEN CLOSE or PLAY on the unit Reading will appear on the display for a few minutes and then Incorrect Disc will continue to be displayed Some discs may not work the...

Page 10: ...ayback is activated You may not be able to set A B Repeat during certain scenes of the DVD A B Repeat does not work with an interactive DVD MP3 JPEG In case of Video CD with PBC A B Repeat is prohibited To resume normal playback Press A B RPT again Off appears on the screen Play Mode Repeat Off Notes Some discs may not work with the repeat operation In case of Video CD with PBC Repeat function is ...

Page 11: ... play back until the desired language is selected 2 To turn off the PBC VCD see page 6 Press to select Mode then press ENTER repeatedly until Off appear 1Press PLAY MODE in the stop mode 2 Press PLAY MODE again to clear the screen 3 Follow the above steps 1 2 then press ENTER repeatedly until PBC appear To turn on the PBC 1 5 Eng Off 1 2 3 Play Mode Repeat Off Program Playback Mode Off With press ...

Page 12: ... appears Slide show playback The slide show enables you to view pictures files one after another automatically Preparation Set JPEG Interval setting to 5 Seconds 10 Sec onds or 15 Seconds see page 51 1 When PLAY is pressed after the file browser displayed playback begins automatically starting from the first file In this case if the first file is a JPEG file the first JPEG file is played back If t...

Page 13: ...ow playback To select On or Off for Screen Saver function To select On or Off for Night Mode To select On or Off for QSound To select a digital output sound format corresponding to your system connection To select a preferred parental level for the parental setting To change the password To select a preferred video output signal of RGB Component or Progressive To display your 8 character registrat...

Page 14: ...Each setup will be retained in the memory even if you turn the power off Set the new password 1 Press C or D to select Password then press ENTER Enter Current Password screen will appear 2 Press Number buttons 0 9 to input the current password If the password has not been set yet after you purchase this unit it is 0000 3 Then press ENTER Enter New Password screen will appear Press Number buttons 0...

Page 15: ...n display Set Display to On 50 51 No surround sound The setup does not match your stereo system The unit or remote operation key is not functioning Turn off the unit and unplug the AC mains lead for several minutes then replug it 14 Playback does not start when the title is selected Check the Parental control setting Audio soundtrack and or subtitle language is not changed when you playback a DVD ...

Reviews: