


44
Press
/
to select file.
• In case the current directory includes more than 8
files, press
or
to scroll in the file list.
• To see contents in folder, select the folder and
then press
ENTER
. To return to the parent
directory, select “
Go Up ...” then press
ENTER
.
• When
PLAY
is pressed after the file browser
displayed, playback begins automatically starting
from the first file. In this case, if the first file is an
MP3 file, only MP3 files are played back in order.
If the first file is a JPEG file, the first JPEG file is
played back. If the first file is a DivX
®
file, the first
DivX
®
file is played back. If there is no file at a
root directry, playback does not begin
automatically.
MP3 CD and Audio CD playback
Notes:
• In case of Audio CD, the function of A-B Repeat can
be used. See “A-B Repeat playback” (see page 38).
• During MP3/JPEG Playback, you cannot use JUMP
and A-B Repeat functions.
• You can use Repeat (Track or All), Random and
Program playback for MP3/JPEG/DivX
®
CD Playback
(see “Repeat and program playback using file
browser” on pages 47 and 48 ).
Place an Audio CD or a disc on which MP3
files have been recorded onto the disc tray.
1
A file browser screen will appear on the
screen.
2
3
Press ENTER.
The selected file starts playing back.
4
Press STOP to end playback.
• The unit records the stopped point. “
” appears on
the screen. Press
PLAY
to resume playback (from
the scene point).
• If you press
STOP
again or unload the disc, the unit
will clear the stopped point.
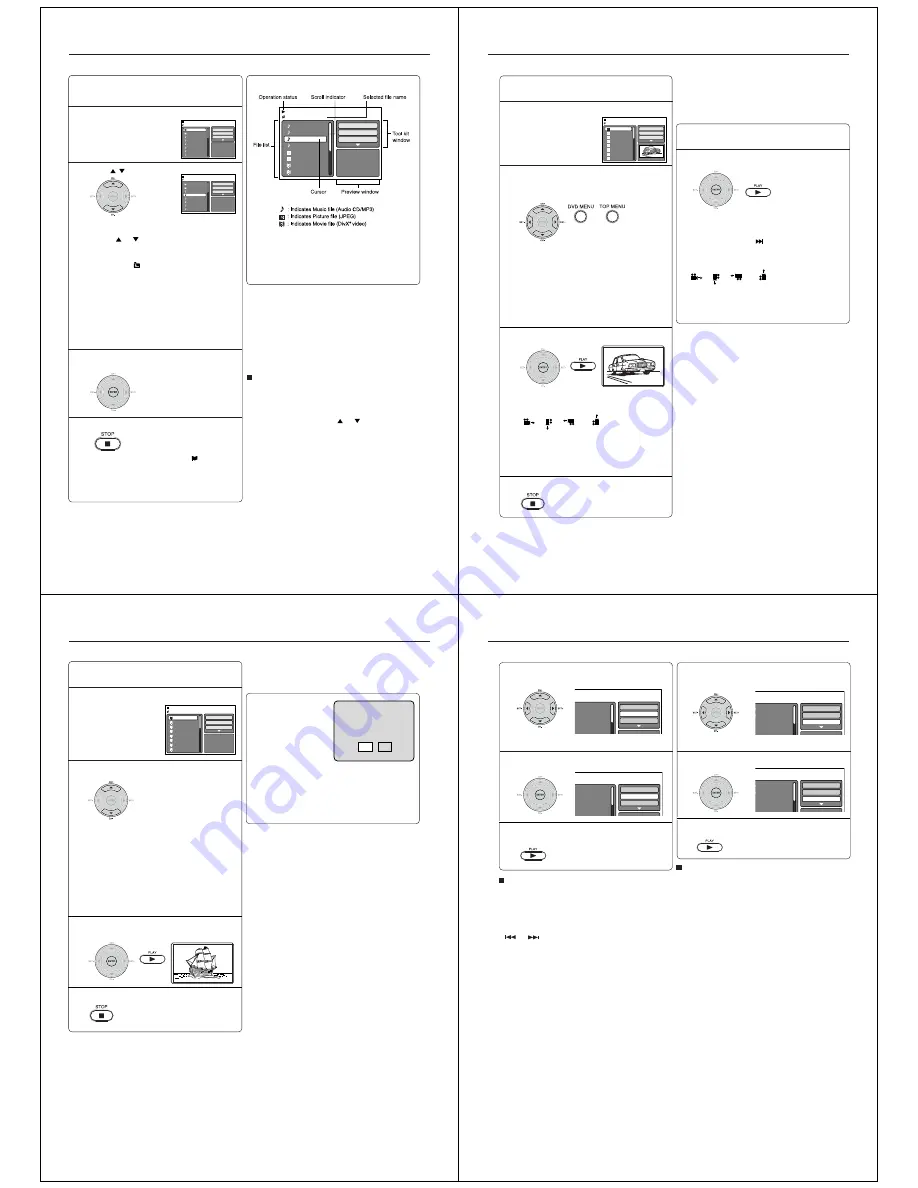
About file browser
Notes:
• In the case of a CD containing a mixture of
MP3,JPEG and DivX
®
files, the files are played
back by selecting them from the file browser.
• MP3 or file on the Kodak Picture CD is not
recognized on this unit.
Folder-1
Folder-2
MP3-1
MP3-2
MP3-3
MP3-4
MP3-3
MP3-6
JPEG Preview
Select Files
Repeat
:Off
Mode
:Off
Folder-1
Folder-2
MP3-1
MP3-2
MP3-3
MP3-4
MP3-3
MP3-6
/MP3-2.MP3
JPEG Preview
Select Files
Repeat
:Off
Mode
:Off
5
MP3-5
MP3-6
MP3-7
MP3-8
Picture-1
Picture-2
Movie-1
Movie-2
Music Playing
Select Files
Repeat
:Off
Mode
:Off
/Folder-1/MP3-7.MP3
3/15 00:00:00
Select Files
The file type to make it display in the file browser can
be chosen.
1. Press
B
or
A
to select “Select Files” at right column
in the file browser.
2. Press
ENTER
, then press
or
to select file type
from the list (Music, Picture or Movie).
3. Press
ENTER
to add/remove check mark. Checked
file type will be displayed in the file browser.
4. Press
RETURN
to save the setting.
MP3/JPEG/DivX
®
and Audio CD operation
45
Place a disc on which JPEG files have been
recorded onto the disc tray.
1
A file browser screen will appear on the
screen.
2
Press
C
/
D
to select the file.
To display a thumbnail list, press
DVD MENU
.
Press
B
/
A
/
C
/
D
to select the desired file.
(To return to the file browser, press
TOP MENU
.)
3
Press ENTER or PLAY. The selected picture
appears on the screen.
Rotating an image
You can rotate an image by 90 degrees.
Press
ANGLE
during playback of the image.
“
”, “
”, “
” or “
” appears on the
screen.
Zooming an image
Zoom function also can be used in viewing
JPEG files. Press
ZOOM
(see “Zooming (DVD/
VCD)” on page 36)
Press STOP to end playback.
The file browser appears on the
screen. If you want to watch the
other file, repeat steps 3 ~ 4.
5
JPEG CD playback
Select your desired starting file for the slide
show at step 3 on the left.
2
Press ENTER or PLAY to start slide show from
the selected file.
• If you press
PAUSE/STEP
during the slide show,
the slide show stops temporary. “
4
” appears briefly
on the screen.
Press
PLAY
or
SKIP
again to resume the slide
show.
• If the picture appears upside down or sideways,
press
ANGLE
repeatedly until it’s right side up.
“
”, “
”, “
” or “
” appears on the screen.
• When the slide show playback finished, the file list
appears.
• To stop the slide show, press
STOP
.
The file list appears.
Slide show playback
The slide show enables you to view pictures (files) one
after another automatically.
Preparation:
Set “JPEG Interval” setting to “5 Seconds”, “10 Sec-
onds” or “15 Seconds” (see page 51).
1
• When
PLAY
is pressed after the file browser
displayed, playback begins automatically
starting from the first file. In this case, if the
first file is a JPEG file, the first JPEG file is
played back. If the first file is a DivX
®
file, the
first DivX
®
file is played back. If the first file is
an MP3 file, only MP3 files are played back
in order. If there is no file at a root directory,
playback does not begin automatically.
4
MP3/JPEG/DivX
®
and Audio CD operation
Picture-01
Picture-02
Picture-03
Picture-04
Picture-05
Picture-06
Picture-07
Picture-08
JPEG Preview
Select Files
Repeat
:Off
Mode
:Off
W: 2048 H: 1536
/Picture-01.JPG
Notes:
• During JPEG playback, you cannot use Jump and
A-B Repeat functions.
• When an image exceeds 5760 x 3840 pixels, the
entire image (preview window or thumbnail list) may
not be displayed on a screen.
• It may have a longer interval due to a size of data.
46
Place a disc on which DivX
®
files have been
recorded onto the disc tray.
1
A file browser screen will appear on the
screen.
2
Press
C
/
D
to select file.
3
Press ENTER or PLAY. The selected DivX
®
movie will be played back on the screen.
Press STOP to end playback.
The file browser appears on the
screen. If you want to watch the
other file, repeat steps 3 ~ 4.
5
• When
PLAY
has been pressed after the file
browser displayed, playback begins auto-
matically starting from the first file. In this
case, if the first file is a JPEG file, the first
JPEG file is played back. If the first file is a
DivX
®
file, the first DivX
®
file is played back. If
the first file is an MP3 file, only MP3 files are
played back in order. If there is no file at a
root directory, playback does not begin
automatically.
4
DivX
®
CD playback
Playing DivX
®
VOD content
DivX
®
VOD content is protected by DRM (Digital Rights
Management) system. This restricts playback of
content to specific registered devices.
If the incorrect DRM file
is loaded, “Authorization
Error This player is not
authorized to play this
video.” will appear on the
screen.
When you attempt to play
DivX
®
VOD, the number
of plays is limited and the right message will appear
on the screen. If you wish to play it, select “Yes”.
• If the number of plays goes over the limit, then
“Rental Expired” will be displayed. In this case, the
file will not be played.
View DivX (R) VOD Rental
This rental has 5 views left.
Do you want to use one
of your 5 views now?
No
Yes
Movie-01
Movie-02
Movie-03
Movie-04
Movie-05
Movie-06
Movie-07
Movie-08
Select Files
Repeat
:Off
Mode
:Off
/Movie-01.DIVX
JPEG Preview
Note:
In order to play DivX
®
VOD content on this unit, you
first need to register the unit with registration code. See
page 53.
MP3/JPEG/DivX
®
and Audio CD operation
Note:
This unit cannot playback DivX
®
file with WMA sound.
47
Folder-1
Folder-2
MP3-1
MP3-2
MP3-3
Select Files
Repeat
:Off
Mode
:Off
Folder-1
Folder-2
MP3-1
MP3-2
MP3-3
Select Files
Repeat
:Off
Mode
:Off
Folder-1
Folder-2
MP3-1
MP3-2
MP3 3
Select Files
Repeat
:Track
Mode
:Off
Folder-1
Folder-2
MP3-1
MP3-2
MP3-3
Select Files
Repeat
:Off
Mode
:Random
Repeat and program playback using file browser
Repeat playback (CD)
In the file browser, press
B
/
A
/
C
/
D
to select
“Repeat” in stop mode.
Press ENTER repeatedly to select “Track”
or “All”.
Press PLAY.
The unit automatically starts repeat
playback after finishing the current
track.
Random playback (CD)
To resume normal playback
Select Repeat : “Off” in step 2.
In the file browser, press
B
/
A
/
C
/
D
to select
“Mode” in stop mode.
Press ENTER to select “Random”.
Press PLAY.
The Random playback will start.
To resume normal playback
Select Mode : “Off” in step 2.
Notes:
• The repeat or random function is cancelled when you
open the disc tray or turn the power off.
• Track repeat function is cancelled whenever
SKIP
or
is pressed.
1
2
3
1
2
3