


48
Folder-1
Folder-2
MP3-1
MP3-2
MP3-3
MP3-4
MP3-5
MP3-6
JPEG Preview
Edit Mode
Program View
Add To Program
In the file browser, press
B
/
A
/
C
/
D
to select
“Edit Mode”, then press ENTER.
When “Edit Mode” is in black
colour, you can mark the files
which you want to add into
Program list.
Press
B
/
A
/
C
/
D
to select the file you want to
add into the program list.
Press
ENTER
. Selected file was
marked.
Repeat this procedure to select
the other files.
Press
B
/
A
/
C
/
D
to select “Add To Program”.
Then press ENTER. All marked files are
added into the program list.
• When you finish storing the files
you want into the Program list,
select “Edit Mode” again and
press
ENTER
to release edit
mode.
Folder-1
Folder-2
MP3-1
MP3-2
MP3 3
Repeat
:Off
Mode
:Off
Edit Mode
Folder-1
Folder-2
MP3-1
MP3-2
MP3-3
MP3-4
MP3 5
JPEG Preview
Repeat
:Off
Mode
:Off
Edit Mode
Folder-1
Folder-2
MP3-1
MP3-2
MP3-3
MP3-4
MP3-5
JPEG Preview
Edit Mode
Program View
Add To Program
Program playback (CD)
Press
C
/
D
to select “Program View”, then
press ENTER. Program View shows only the
programed files that you have added at step
2.
Browser View
In the Program View, press PLAY. The files
start to playback in programmed order that
were added by you.
To remove file from program list in stop mode
In the Edit Mode, switch to Program View.
Select the files you want to remove in stop mode,
then press
ENTER
. Select “Clear Program” and
press
ENTER
.
Marked file is removed from program list.
1
2
3
4
5
MP3-1
MP3-2
MP3-3
MP3-4
JPEG Preview
Edit Mode
Browser View
Clear Program
Program View
Repeat and program playback using file browser
Note:
The program function is cancelled when you eject the
disc or turn the power off.
49
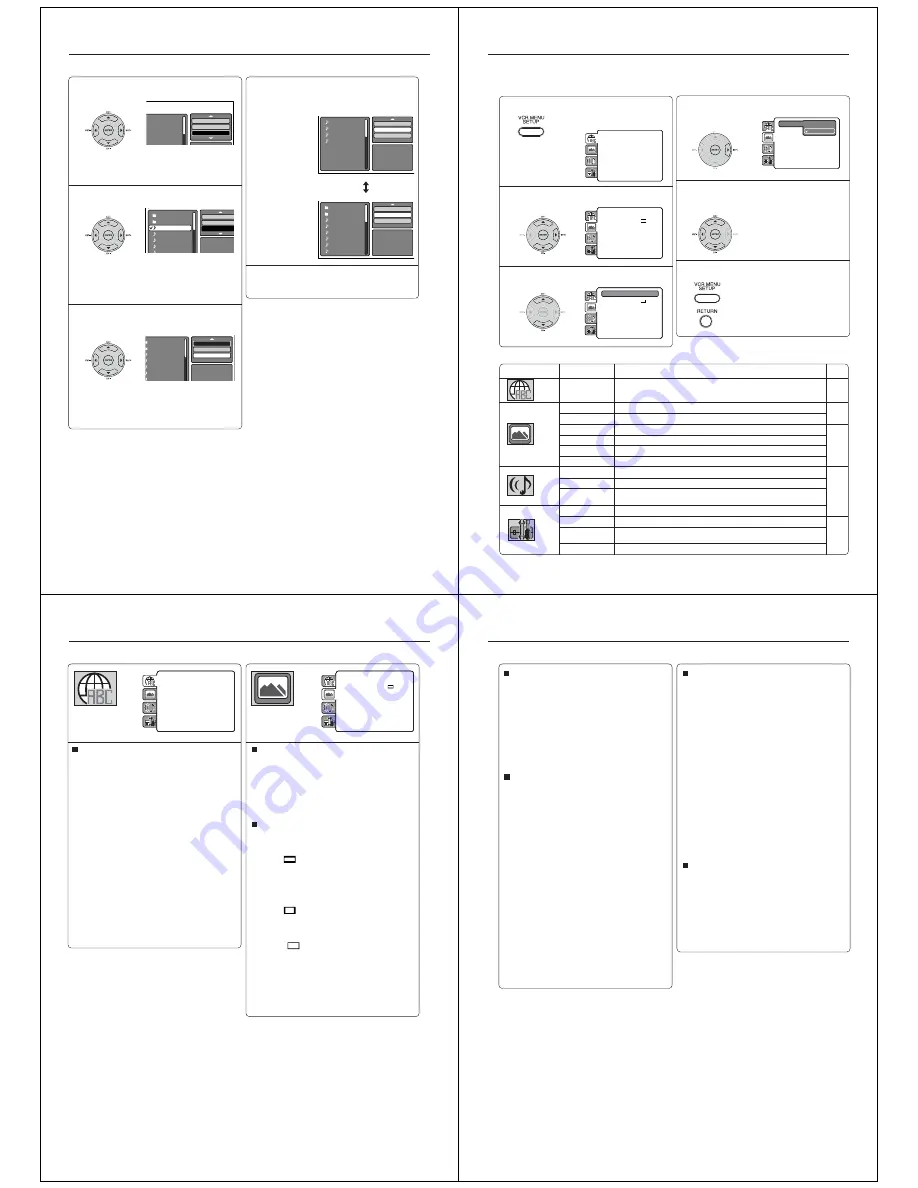
Press SETUP in stop mode.
The following on-screen display
appears.
1
2
3
To clear SETUP screen, press SETUP or
RETURN.
6
Customizing the function settings
Press
C
or
D
to select the desired section,
then press
A
or ENTER.
First option will be highlighted. Press
C
or
D
to select the desired option.
4
Then press
A
or ENTER. The selectable
settings will appear.
Parental
: Off
Set Password
Output
: Interlace
DivX(R) VOD
DRC
: Off
QSound
: On
E.B.L.
: Off
TV Screen
: 4:3
Display
: On
Picture Mode
: Auto
JPEG Interval
: 5 Seconds
Screen Saver
: On
Menu
: English
Subtitle
: English
Audio
: English
Parental
: Off
Set Password
Output
: Interlace
DivX(R) VOD
DRC
: Off
QSound
: On
Menu
: English
Subtitle
: English
Audio
: English
E.B.L.
Off
TV Screen
On
Display
: On
Picture Mode
: Auto
JPEG Interval
: Off
Screen Saver
: On
• Repeat steps 3 and 5 to change
other option.
• To select another section, go
back to step 2 by pressing
B
repeatedly.
5
Change the selection using
C
or
D
, by referring
to the corresponding pages 50 ~ 53.
Press ENTER to save the setting.
Parental
: Off
Set Password
Output
: Interlace
DivX(R) VOD
DRC
: Off
QSound
: On
Menu
: English
Subtitle
: English
Audio
: English
E.B.L.
: On
TV Screen
: 4:3
Display
: On
Picture Mode
: Auto
JPEG Interval
: Off
Screen Saver
: On
Parental
: Off
Set Password
Output
: Interlace
DivX(R) VOD
DRC
: Off
QSound
: On
Menu
: English
Subtitle
: English
Audio
: English
E.B.L.
: On
TV Screen
: 4:3
Display
: On
Picture Mode
: Auto
JPEG Interval
: Off
Screen Saver
: On
You can change the default settings to customize performance to your preference.
Setting procedure
Setting details
Section
Option
Menu
Subtitle
Audio
E.B.L.
TV Screen
Display
Picture Mode
JPEG Interval
Screen Saver
Night Mode
QSound
Digital Out
Parental
Password
Output
DivX(R) VOD
Details
To select the language of “Menu”, “Subtitle” and “Audio” if more than
one languages are available on the disc.
To select On or Off for E.B.L. (Enhanced Black Level).
To select a picture size according to the aspect ratio of your TV.
To turn On or Off the operational status display on the screen.
To select a preferred picture mode from “Video”, “Film” or “Auto”.
To select a preferred setting for the slide show playback.
To select On or Off for Screen Saver function.
To select On or Off for Night Mode.
To select On or Off for QSound.
To select a digital output sound format corresponding to your system
connection.
To select a preferred parental level for the parental setting.
To change the password.
To select a preferred video output signal of “RGB”, “Component” or
“Progressive”.
To display your 8-character registration code.
Page
50
50
51
52
53
50
Setting details
Menu, Subtitle, Audio
You can select the language of “Menu”, “Subtitle” and
“Audio” if more than one language is recorded onto the
disc.
English, Francais, Espanol, Deutsch, Italiano:
The selected language will be heard or seen.
Other:
Other languages can be selected (see “Language
code list” on page 55).
Off (Subtitle):
Subtitles do not appear.
Original (Audio):
The unit will select the first priority language of
each disc.
Notes:
• If the selected language is not recorded on the disc, the
first-priority language is selected.
• If you want to change the OSD language, you can perform
it by VCR MENU (see page 16).
E.B.L.
To select the black level of playback pictures, set your
preference and monitor’s ability.
On:
Enhanced grey scale (0 IRE cut off)
Off:
Standard grey scale (7.5 IRE cut off)
TV Screen
You have the following screen sizes to choose from:
4:3
(Letter box):
Select this mode when connecting to a conven-
tional TV. When playing back a wide screen-DVD
disc, it displays the wide picture with black bands
at the top and bottom of screen.
4:3
(Pan scan):
It displays the wide picture on the whole screen
with left and right edges automatically cut off.
16:9
(Wide):
Select this mode when connecting to a wide-
screen TV. A wide screen picture is displayed full
size.
Customizing the function settings
Parental
: Off
Set Password
Output
: Interlace
DivX(R) VOD
DRC
: Off
QSound
: On
E.B.L.
: Off
TV Screen
: 4:3
Display
: On
Picture Mode
: Auto
JPEG Interval
: 5 Seconds
Screen Saver
: On
Menu
: English
Subtitle
: English
Audio
: English
Parental
: Off
Set Password
Output
: Interlace
DivX(R) VOD
DRC
: Off
QSound
: On
Menu
: English
Subtitle
: English
Audio
: English
E.B.L.
: On
TV Screen
: 4:3
Display
: On
Picture Mode
: Auto
JPEG Interval
: Off
Screen Saver
: On
Note:
If the DVD disc is not formatted in the pan & scan style, it
displays 4:3 style.
51
JPEG Interval
You can continuously playback all JPEG files
automatically.
After the selection below, the disc will start playback on
JPEG files which have been recorded.
Off:
Plays back one file at a time.
5 Seconds:
Plays back images in the form of a slide show at
5 second intervals.
10 Seconds:
Plays back images in the form of a slide show at
10 second intervals.
15 Seconds:
Plays back images in the form of a slide show at
15 second intervals.
Picture Mode
There are two types of source content in pictures
recorded in DVD video discs: film content (pictures
recorded from films at 24 frames per second) and
video content (video signals recorded at 30 frames per
second). Make this selection according to the type of
content being viewed.
Auto:
Select this selection normally.
The DVD player automatically detects
source content, film or video of
playback source, and converts that
signal in an appropriate method.
Film:
The DVD player converts film content
pictures appropriately. Suitable for
playback of film content pictures.
Video:
The DVD player filters video signal,
and converts it appropriately.
Suitable for playback of video content
pictures.
Note:
Depending on the disc, pictures may be cut off or
doubled. In this case, select “Video”.
Display
On screen display can be switched on or off when you
press any buttons.
On:
On screen displays appear when you press
the buttons (factory setting).
Off:
On screen displays do not appear when you
press any buttons.
Screen Saver
The screen saver operates when you leave the unit in
DVD stop mode for approx. five minutes.
The DVD VIDEO logo moves randomly on the screen.
On:
Screen Saver function is made effective.
Off:
Screen Saver function is invalidated.
Customizing the function settings