


52
Parental control setting
Some discs are specified as not suitable for children.
Such discs can be limited not to playback with the unit.
1) Press
C
or
D
to select “Parental”, then press
ENTER.
“Enter Password” screen will appear.
2) Press “0000” using
Number buttons (0–9)
.
(Please note, this is pre-setting password of this
unit). Then press
ENTER
. The parental level list
will appear.
•
Level Off
: The parental control setting does not
function.
•
Level 8
:
Virtually all DVD software can be
played back.
•
Level 1
:
DVD software for adults cannot be
played back.
3) Press
C
or
D
to select from the level 1 to level 8.
The limitation will be more severe as the level
number is lower. Then press
ENTER
.
4) Press
OPEN/CLOSE
to activate Parental control
setting.
Notes:
• Depending on the discs, the unit cannot limit
playback.
• Some discs may not be encoded with specific
rating level information though its disc jacket says
“adult.” For those discs, the age restriction will not
work.
• The password is required every time when you
change the parental level.
• If you input a wrong number, press
CLEAR
.
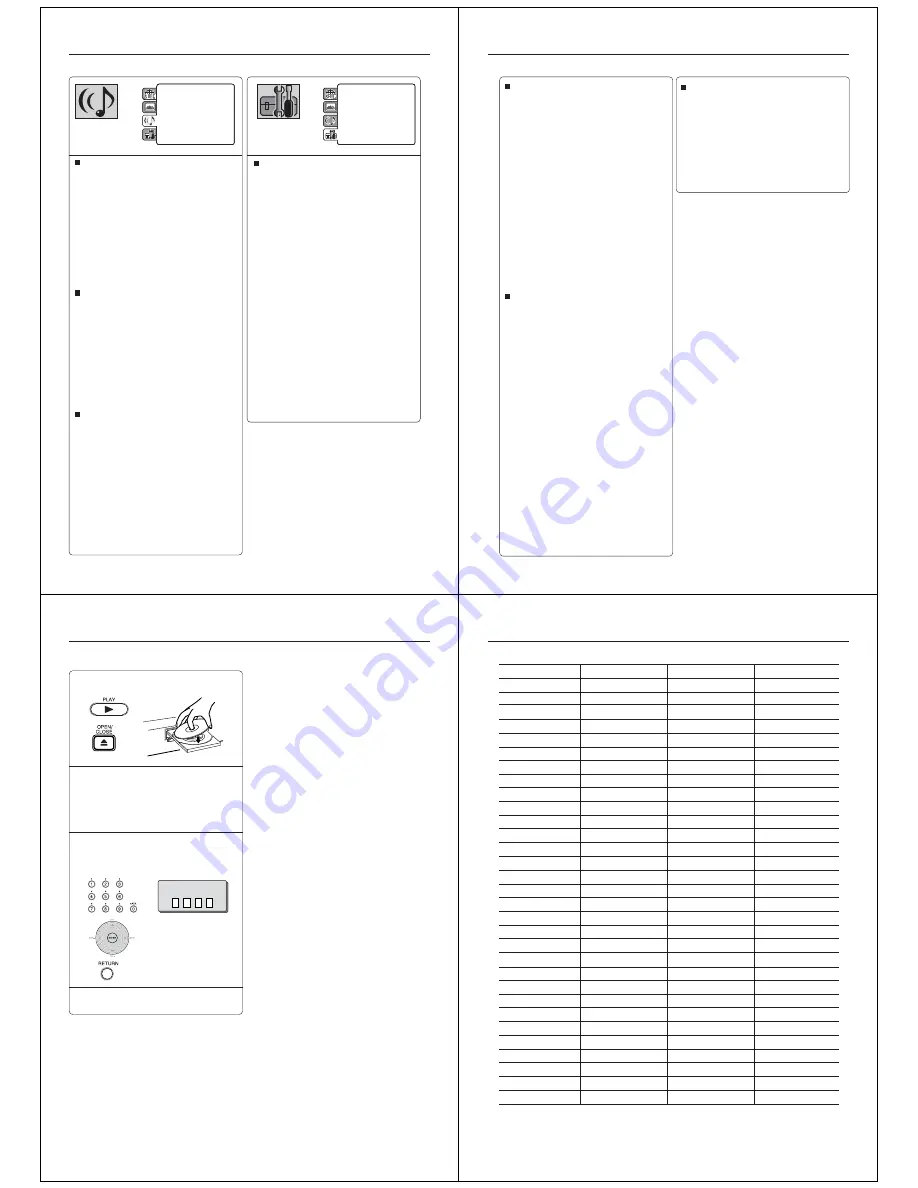
Customizing the function settings
QSound
This DVD player is equipped with “QSound”. It can
produce the effect of being in a cinema or a concert hall.
Off:
The QSound is disengaged.
On:
The QSound operates.
Off:
It plays back at the recording level on the
disc.
On:
Loud sound such as explosion is toned
down slightly when played back. This is
suitable when it is connected to a stereo.
Notes:
•
This function works only when the disc recorded with
Dolby Digital is played back.
•
The level of Night Mode may differ depending on DVD
video disc.
Night Mode
Night Mode enables you to control the dynamic range so
as to achieve a suitable sound for your equipment.
Notes:
• The QSound setting can also be changed with
AUDIO
on the remote control (see page 41).
• This function works only when the disc recorded with
Dolby Digital is played back.
• When this function works, the volume might change.
• When the voice is distorted, turn off QSound.
Parental
: Off
Set Password
Output
: Interlace
DivX(R) VOD
Menu
: English
Subtitle
: English
Audio
: English
E.B.L.
: Off
TV Screen
: 4:3
Display
: On
Picture Mode
: Auto
JPEG Interval
: 5 Seconds
Screen Saver
: On
Night Mode
: Off
QSound
: Off
Digital Out
: PCM
DRC
: Off
QSound
: On
Menu
: English
Subtitle
: English
Audio
: English
E.B.L.
: Off
TV Screen
: 4:3
Display
: On
Picture Mode
: Auto
JPEG Interval
: 5 Seconds
Screen Saver
: On
Parental
: Off
Password
: Change
Output
: RGB
DivX(R) VOD
: Display
Setting details
Digital Out
You can select the digital output sound format
corresponding to your system connection.
PCM:
Change Dolby Digital to PCM for the output.
Select when connected to a 2 channel digital
stereo amplifier.
Bitstream:
Disc audio bitstream data will be output.
Off:
There is no sound output from DIGITAL AUDIO
OUT jack.
Note:
Even if you select “Bitstream”, MPEG Audio will be
output in PCM format.
53
Output
You can select the video output signal of the DVD
video player to the TV from “RGB”, “Component” or
“Progressive”.
RGB:
Select when connecting to a composite TV.
Component:
Select when connecting to a TV equipped
with component video inputs but progressive
scan is not compatible.
Progressive:
Select when connecting to a TV equipped
with component video inputs and progressive
scan compatible.
Warning:
Once “Progressive” is selected when connecting to a
TV progressive scan incompatible, no image will be
seen on the video display.
In this case, you must reset the unit by pressing
STOP
on the front panel for five seconds. The video output
will be restored to “RGB” setting, and a picture will
once again be seen on a conventional analogue
display.
Notes:
• Some discs may not be played back with the progressive
scanning mode correctly because of the disc characteris-
tics or recording condition.
• Once Progressive scan on, RGB output is disabled.
Note:
If each setup (pages 50 ~ 53) has been completed, the unit
can always work under the same condition (especially with
DVD discs).
Each setup will be retained in the memory even if you turn
the power off.
Set the new password
1) Press
C
or
D
to select “Password”, then press
ENTER
. “Enter Current Password” screen will
appear.
2) Press
Number buttons (0–9)
to input the current
password (If the password has not been set yet
after you purchase this unit, it is “0000”).
3) Then press
ENTER
. “Enter New Password” screen
will appear. Press
Number buttons (0–9)
to input
the new password.
4) Press
ENTER
. Now your new password has been
set. Be sure to remember this number!
If you forget the password.
1) Press
OPEN/CLOSE
to open the disc tray.
2) Remove the disc.
3) Press
OPEN/CLOSE
again to close the disc tray.
“No Disc” appears on the screen.
4) While holding
7
down on the remote control and at
the same time press
STOP
on the front panel.
“Password Clear” appears on the screen. Now the
password has been returned to the initial value
(“0000”).
DivX(R) VOD
In order to play DivX
®
VOD (Video On Demand)
content on this unit, you first need to register the unit
with your DivX
®
VOD content provider. You do this by
generating a DivX
®
VOD registration code, which you
submit to your provider.
Press
C
or
D
to select “DivX(R) VOD”. Then press
ENTER
. Your 8-character registration code is
displayed. Make a note of the code as you will need
it when you register with a DivX
®
VOD provider.
Then press
ENTER
.
Customizing the function settings
54
Temporary cancel the rating level by DVD disc
Load a DVD disc and press PLAY or OPEN/
CLOSE on the unit (see page 33).
Note:
This temporary cancellation of rating level will be kept
until the disc is ejected.
When the disc is ejected, the original rating level will
be set again automatically.
1
Playback will commence if the entered
password was correct.
2
4
If the DVD disc has been designed to
temporarily cancel the Rating level, the
screen which follows the “Reading” screen
will change, depending on which disc is
played. If you select “YES” with the ENTER
key, password input screen will then
appear.
Enter the password with Number buttons (0–
9). Then press ENTER.
3
Enter Password
To exit from the entry, press
RETURN
.
Depending on the DVD disc, the disc may try to temporarily cancel the rating level that you have set.
It is up to you to decide whether to cancel the rating level or not.
55
Language code list
Abkhazian
1112
Fiji
1620
Lingala
2224
Singhalese
2919
Afar
1111
Finnish
1619
Lithuanian
2230
Slovak
2921
Afrikaans
1116
French
1628
Macedonian
2321
Slovenian
2922
Albanian
2927
Frisian
1635
Malagasy
2317
Somali
2925
Amharic
1123
Galician
1722
Malay
2329
Spanish
1529
Arabic
1128
Georgian
2111
Malayalam
2322
Sundanese
2931
Armenian
1835
German
1415
Maltese
2330
Swahili
2933
Assamese
1129
Greek
1522
Maori
2319
Swedish
2932
Aymara
1135
Greenlandic
2122
Marathi
2328
Tagalog
3022
Azerbaijani
1136
Guarani
1724
Moldavian
2325
Tajik
3017
Bashkir
1211
Gujarati
1731
Mongolian
2324
Tamil
3011
Basque
1531
Hausa
1811
Nauru
2411
Tatar
3030
Bengali; Bangla 1224
Hebrew
1933
Nepali
2415
Telugu
3015
Bhutani
1436
Hindi
1819
Norwegian
2425
Thai
3018
Bihari
1218
Hungarian
1831
Oriya
2528
Tibetan
1225
Breton
1228
Icelandic
1929
Panjabi
2611
Tigrinya
3019
Bulgarian
1217
Indonesian
1924
Pashto, Pushto 2629
Tonga
3025
Burmese
2335
Interlingua
1911
Persian
1611
Turkish
3028
Byelorussian
1215
Irish
1711
Polish
2622
Turkmen
3021
Cambodian
2123
Italian
1930
Portuguese
2630
Twi
3033
Catalan
1311
Japanese
2011
Quechua
2731
Ukrainian
3121
Chinese
3618
Javanese
2033
Rhaeto-Romance 2823
Urdu
3128
Corsican
1325
Kannada
2124
Romanian
2825
Uzbek
3136
Croatian
1828
Kashmiri
2129
Russian
2831
Vietnamese
3219
Czech
1329
Kazakh
2121
Samoan
2923
Volapük
3225
Danish
1411
Kirghiz
2135
Sanskrit
2911
Welsh
1335
Dutch
2422
Korean
2125
Scots Gaelic
1714
Wolof
3325
English
1524
Kurdish
2131
Serbian
2928
Xhosa
3418
Esperanto
1525
Laothian
2225
Serbo-Croatian 2918
Yiddish
2019
Estonian
1530
Latin
2211
Shona
2924
Yoruba
3525
Faroese
1625
Latvian, Lettish 2232
Sindhi
2914
Zulu
3631
Language Name Code
Language Name Code
Language Name Code
Language Name Code
Enter the appropriate code number for the initial settings “Menu”, “Subtitle” and/or “Audio” (see page 50).