background image

20

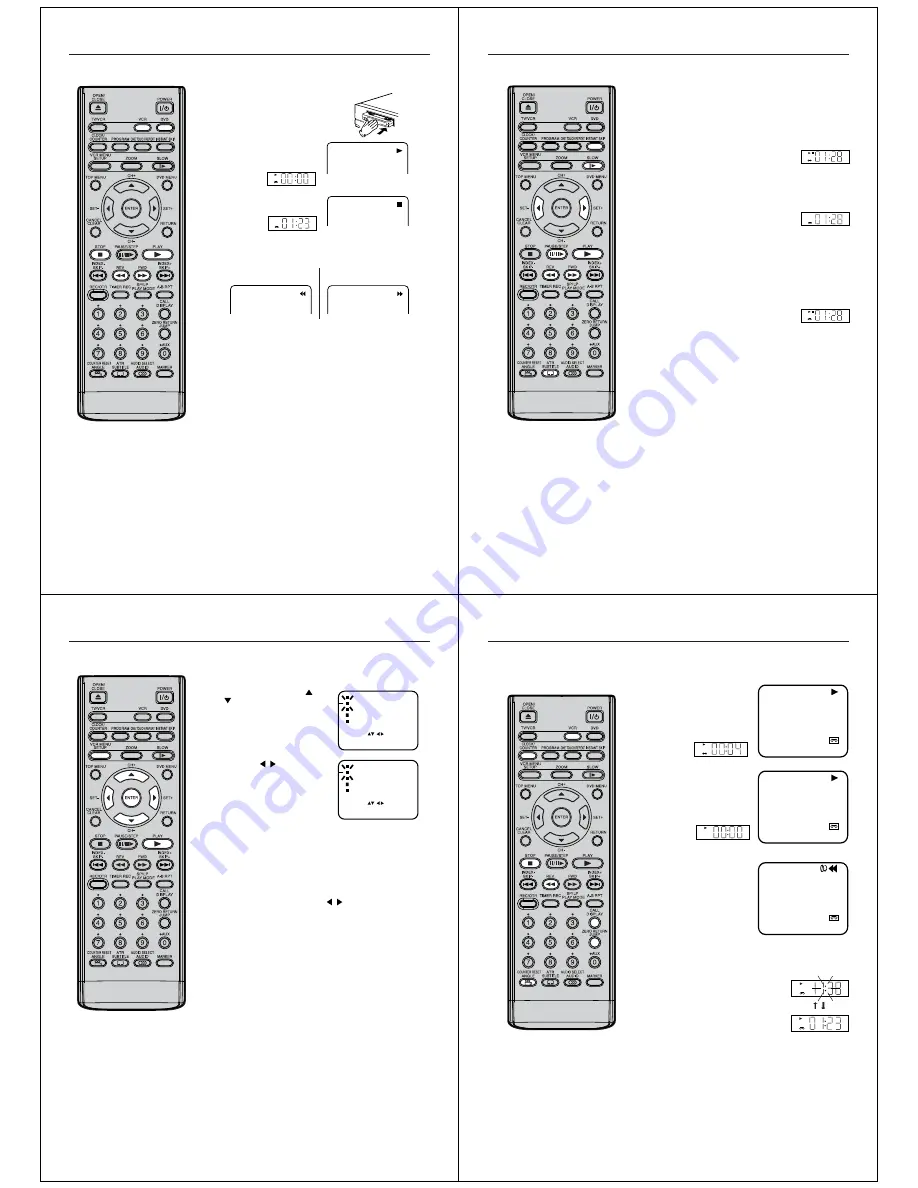
To rewind the tape or forward it rapidly

To stop playback

1

2

Notes:

• This VCR selects the playback tape

speed SP or LP automatically.

• The cassette tape and DVD disc can

be played back simultaneously. If you
press

VCR

 or 

DVD

, the tape playback

and DVD playback alternate with each
other on the screen.

VCR

VCR

Cassette tape playback

Preparation:

• Turn ON the TV and set to the AV input mode.
• Press 

VCR

 to select the VCR mode. (The VCR indicator will light.)

Load a pre-recorded tape
(When loading a cassette tape
without the erase prevention
tab, playback will start auto-
matically).

To start playback

Press

PLAY

.

Playback will start.

To rewind the tape:

Press

REV

.

To forward the tape:

Press

FWD

.

NTSC video cassette playback

When using a pre-recorded NTSC video cassette tape, the connected
TV must operate with a 60 Hz vertical frequency. Otherwise, the on-
screen picture will be affected by vertical rolling. Even if your VCR is
capable of processing NTSC video signals, the picture may be
shortened vertically (appearance of black bars at the top and at the
bottom of the TV screen). The dubbing of a NTSC video cassette tape
to a standard PAL VCR is impossible.

 Press 

STOP

.

Stop the playback or recording with 

STOP

.

Forward/Reverse picture search mode

When the tape is being wound, you can switch to picture search mode
(see page 21). To do this, press 

REV

 or 

FWD

 and hold it down. The

unit will resume the tape winding as soon as the button is released.

To stop the tape-winding, press 

STOP

. To switch to playback directly

(without

STOP

), press 

PLAY

.

21

Special playback

VCR

VCR

Picture Search
Reverse picture search function

Press

REV

 once or twice during the playback.

To resume normal playback: Press 

PLAY

.

Forward picture search function

Press

FWD

 once or twice during the playback.

To resume normal playback: Press 

PLAY

.

Still Picture

Press

PAUSE/STEP

during playback.

To resume normal playback: Press 

PLAY

.

Slow Motion

During playback, press 

SLOW

.

You can change the slow speed by pressing 

SLOW

several times.

To resume normal playback: Press 

PLAY

.

Slow tracking and vertical lock adjustment

If noise bars appear in the picture during slow motion, press 

SET

+

 or 

 to reduce the noise bars.

If the still picture jitters excessively, press 

SET +

 or 

 to stabilize

the still picture.

Frame by Frame picture

During playback, press 

PAUSE/STEP

repeatedly: The picture

advances frame by frame.
To resume normal playback: Press 

PLAY

.

Adjusting tracking condition
Automatic tracking adjustment

Whenever you insert a tape and start playback, automatic tracking
starts working and continuously analyzes the signal to enable
optimum picture quality during playback.

Manual tracking adjustment

If automatic tracking cannot eliminate noises well during
playback, press 

SET + 

or

SET – 

to eliminate the noises. “MANUAL

TR.” will appear. Press it briefly for a fine adjustment, or press and
hold for a coarse adjustment.

To return to automatic tracking, press 

ATR

.

Notes:

• The audio output is muted during spe-

cial playback.

• During picture search mode, there will

be noise bars which are caused by the
system.

• The Special Playback will automati-

cally change to normal playback after
approx. 5 minutes to protect the video
tape against excessive wear.

For example : 1 press: 30 seconds of tape

2 press: 60 seconds of tape
3 press: 90 seconds of tape

Instant skip

Press

INSTANT SKIP

 during playback. The DVD/VCR will search

forward through approximately 30 seconds of the tape (e.g. unwanted
commercial time) for each press of 

INSTANT SKIP

 (maximum six

presses) and then resume normal playback.

VCR

22

1

4

3

2

Repeat playback

Note:

If the unit is turned off or starts recording,
the repeat mode is cancelled.

Normal repeat playback

The entire video tape will be played until its end. The tape will then
automatically rewind to the beginning and the playback will be re-
peated.

Then press

/

or

ENTER

to se-

lect [ON] or [OFF].
If [ON] is selected, the playback
will be repeated endlessly.

Press

VCR MENU 

repeatedly until the menu screen is

cleared.

To start the playback, press 

PLAY

.

The playback will be repeated endlessly.

TIMER REC SET

AUTO REPEAT

CH TUNING

SYSTEM SETUP

SELECT :

ENTER : ENTER

[OFF]

[AUTO]

MENU

EXIT

:

NICAM

/

TIMER REC SET

AUTO REPEAT

CH TUNING

SYSTEM SETUP

SELECT :

ENTER : ENTER

[ ON]

MENU

EXIT

:

/

[AUTO]

NICAM

To cancel normal repeat mode

:

Follow the above step 

2

, then press 

/

or

ENTER

 to select the

[OFF] position.
Press

VCR MENU

 repeatedly to return to the TV screen.

Press

VCR MENU

. Press 

 or

 to select AUTO REPEAT.

23

VCR

8+4

VCR

VCR

Counter display

2

1

3

12:00  SUN

00:04:38 SP

12:00  SUN

00:00:00 SP

ZERO RETURN function
This function makes tape-rewinding
stop at the counter 00:00:00 position
automatically.

Notes:

• When you load a video cassette, the

display indication changes to "00:00".

• The counter display does not function

on non-recorded (blank) sections of the
tape. When you rewind, fast forward or
play tapes through blank sections, the
counter display stops.

Preparation

• Turn ON the TV and set to the video input mode.
• Press 

VCR

 to select the VCR mode. (The VCR indicator will light.)

Press

CALL

.

The counter display shows the
tape running time during play-
back or recording.
The Recorder will indicate REC
during recording.

Press

COUNTER RESET 

at

the desired tape position. The
counter display will be reset to
the “00:00:00” position (e.g.
the beginning of recording).

Press

STOP

when playback or

recording is finished.
Press

ZERO RETURN

.

The tape will be rewinded or fast
forwarded and automatically
stop at the “00:00:00” position.

The CLOCK/COUNTER button

Press

CLOCK/COUNTER

 during the playback. The clock and tape

counter alternate with each other on the display.

Note:

You can set the tape counter to 00:00:00 with 

COUNTER RESET

anytime. Therefore, the counter display can also indicate 00:00:00,
even when the tape counter does not reach its beginning yet. Even
if the tape counter indicates 00:00:00, it can be rewound. If 

the tape

was

rewound over the point of 00:00:00, the minus mark

in the counter display. Although the tape counter seems to forward
when you press 

REV

, the tape is in fact being rewound. When the

tape reaches the beginning, the tape-rewinding stops
automatically.

CH 2

12:00 SUN

00:36:25 SP

Summary of Contents for SD-38VBKB

Page 1: ...IONS SOME DOS AND DON TS ON THE SAFE USE OF EQUIPMENT This equipment has been designed and manufactured to meet international safety standards but like any electrical equipment care must be taken if you are to obtain the best results and safety is to be assured DO read the operating instructions before you attempt to use the equipment DO ensure that all electrical connections including the mains p...

Page 2: ...olby and the double D symbol are trademarks of Dolby Laboratories DTS and DTS Digital Out are registered trademarks of DTS Inc DivX DivX Certified and associated logos are trademarks of DivX Inc and are used under license Playback side DVD video disc Title 1 Title 2 Chapter 1 Chapter 2 Chapter 1 Chapter 2 Chapter 3 Track 1 Track 2 Track 3 Track 4 Track 5 Video CD Audio CD 6 DIGITAL VIDEO About thi...

Page 3: ...ecording pause on off 21 25 34 35 PLAY Playback 20 33 INDEX Search for the INDEX mark of a tape 24 SKIP Skip chapter track to forward or reverse direction 35 REV Rewind Review playback 20 21 35 FWD Fast Forward Forward search playback 20 21 35 REC OTR Recording OTR 25 27 TIMER REC Timer recording On Off 27 29 SP LP Sets the tape speed for recording 25 PLAY MODE Select playback mode 38 39 A B RPT R...

Page 4: ...th less flicker INTERLACED outputs inputs Some TVs or monitors are equipped with component video inputs Connecting to these inputs allows you to enjoy the highest quality DVD picture playback Connecting to an audio system and TV equipped with component video inputs Note In connecting to TV s that are not capable of reproducing a progressively scanned video signal using the component sockets do not...

Page 5: ...ght Saving Time once you set AUTO TIME to ON Press VCR MENU repeatedly until the TV picture appears on the screen 6 Press or to select AUTO TIME ON or OFF The VCR automatically corrects the clock setting every hour once you set AUTO TIME to ON 18 The Auto setup function see page 15 memorizes all broadcasts to the suit able CH positions However some broadcasts may not be memorized due to weak signa...

Page 6: ...ck During picture search mode there will be noise bars which are caused by the system The Special Playback will automati cally change to normal playback after approx 5 minutes to protect the video tape against excessive wear For example 1 press 30 seconds of tape 2 press 60 seconds of tape 3 press 90 seconds of tape Instant skip Press INSTANT SKIP during playback The DVD VCR will search forward th...

Page 7: ...P Press this button again if you want to resume the recording Attention A safety circuit turns the pause mode off automatically after 5 minutes and the DVD VCR will stop the recording mode 00 00 00 LP 26 VCR Recording a TV Program 1 2 3 VCR indicator lights VCR indicator goes off VCR indicator lights You can record a program using the TV receiver of the DVD VCR and at the same time watch another p...

Page 8: ...REC to cancel the timer program or press EJECT on the DVD VCR to remove the cassette tape During timer recording standby mode the VCR mode cannot be selected To use the VCR press TIMER REC at first then press VCR to change to VCR mode Press TIMER REC again to set the VCR into timer recording standby mode Timer Recording Special Case Weekly e g WKL TUE each Tuesday or daily e g MON SAT Monday to Sa...

Page 9: ... TV screen according to the type of loaded disc In this case check your disc again see pages 6 and 52 Some discs may take a minute or so to start playback When you set a single faced disc label downwards i e the wrong way up and press OPEN CLOSE or PLAY on the unit Reading will appear on the display for a few minutes and then Incorrect Disc will continue to be displayed Some discs may not work the...

Page 10: ...ayback is activated You may not be able to set A B Repeat during certain scenes of the DVD A B Repeat does not work with an interactive DVD MP3 JPEG In case of Video CD with PBC A B Repeat is prohibited To resume normal playback Press A B RPT again Off appears on the screen Play Mode Repeat Off Notes Some discs may not work with the repeat operation In case of Video CD with PBC Repeat function is ...

Page 11: ... play back until the desired language is selected 2 To turn off the PBC VCD see page 6 Press to select Mode then press ENTER repeatedly until Off appear 1Press PLAY MODE in the stop mode 2 Press PLAY MODE again to clear the screen 3 Follow the above steps 1 2 then press ENTER repeatedly until PBC appear To turn on the PBC 1 5 Eng Off 1 2 3 Play Mode Repeat Off Program Playback Mode Off With press ...

Page 12: ... appears Slide show playback The slide show enables you to view pictures files one after another automatically Preparation Set JPEG Interval setting to 5 Seconds 10 Sec onds or 15 Seconds see page 51 1 When PLAY is pressed after the file browser displayed playback begins automatically starting from the first file In this case if the first file is a JPEG file the first JPEG file is played back If t...

Page 13: ...ow playback To select On or Off for Screen Saver function To select On or Off for Night Mode To select On or Off for QSound To select a digital output sound format corresponding to your system connection To select a preferred parental level for the parental setting To change the password To select a preferred video output signal of RGB Component or Progressive To display your 8 character registrat...

Page 14: ...Each setup will be retained in the memory even if you turn the power off Set the new password 1 Press C or D to select Password then press ENTER Enter Current Password screen will appear 2 Press Number buttons 0 9 to input the current password If the password has not been set yet after you purchase this unit it is 0000 3 Then press ENTER Enter New Password screen will appear Press Number buttons 0...

Page 15: ...n display Set Display to On 50 51 No surround sound The setup does not match your stereo system The unit or remote operation key is not functioning Turn off the unit and unplug the AC mains lead for several minutes then replug it 14 Playback does not start when the title is selected Check the Parental control setting Audio soundtrack and or subtitle language is not changed when you playback a DVD ...

Reviews: