


24
2
1
2
1
CH 2
INDEX
REC
VCR
REC
VCR
+3
INDEX NO. (up to 9)
or is displayed
Whenever a recording is begun, an
invisible index mark is recorded on
the tape. These index marks are all
identical, and each mark means: "Here
starts a new recording". Every DVD/
VCR equipped with the Video Index
Search System (VISS) can locate
these marks at the beginning of any
recording.
Notes:
• When you record an INDEX mark at
the very beginning of the tape, the mark
may not be found.
• During INDEX search, the tape may
stop and begin to play at a slightly
different location.
• INDEX may not function properly with
old or worn out video tapes.
• INDEX marks may not be found if it is
extremely close to the point where the
search began.
• In recording, if you stop recording tem-
porarily, the INDEX mark is not re-
corded on the tape.
Start playback and wait until the
end of the TV commercial is
reached, then press
STOP
.
Press
REC/OTR
once. When the “INDEX” on-screen indication
goes off,
STOP
may be pressed. This short recording process
will be sufficient to set an index mark.
This will result in about 10 seconds of the TV commercials to be
overwritten by another recording. Due to the system, the end of
this recording will be followed by a recording gap (noise signal)
of approx. 5 seconds.
Recording several Index marks
Due to the system, only one index mark will be recorded at the
beginning of a recording. If you intend to set several index marks
during a single recording, follow the procedure below:
Video Index Search System
Example:
Indexing of TV commercials.
At the point of the recording
where an index mark is to be
set, press
PAUSE/STEP
. The
unit will switch to the recording
pause mode.
Press
CH +/–
repeatedly to
switch back to the original TV
program.
Press
PAUSE/STEP
to
resume recording.
Index Search
Press
INDEX +
or
–
during stop or
playback mode.
For Succeeding programs:
Press
INDEX +
.
For Preceding programs:
Press
INDEX –
.
(Additional press increases the IN-
DEX NO. up to 9.)
When the
INDEX +
or
–
is pressed,
the unit starts searching the INDEX
NO. selected and finds the portion,
then playback starts automatically.
To stop the Index Search, press
STOP
.
25
REC
VCR
VCR
REC
VCR
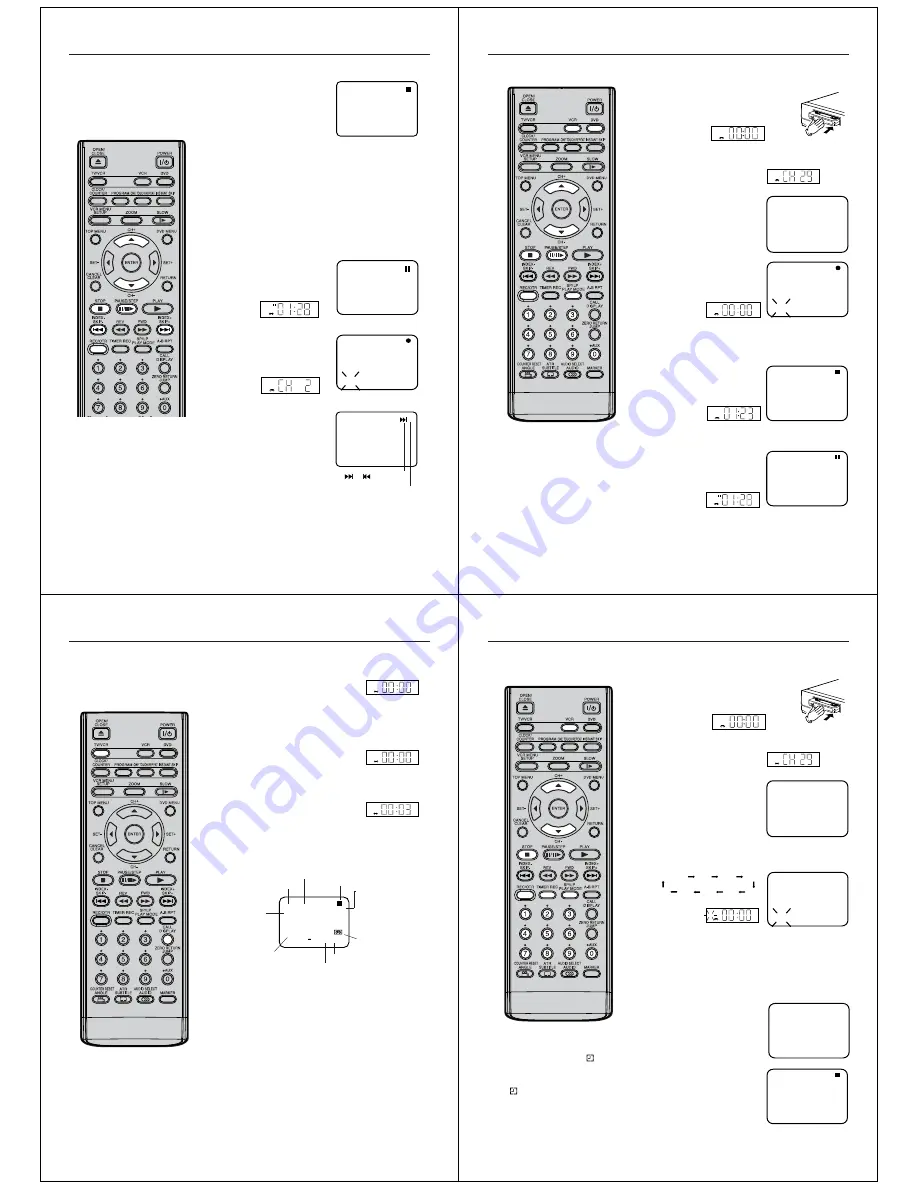
Recording a TV program
4
1
2
3
CH 29
INDEX
8+4
VCR
Notes:
• Since the DVD/VCR has a built-in TV
tuner, the TV set may be turned off
when recording. The TV set may only
be used to check for accurate program
adjustments or to monitor recordings.
• If you wish to watch the DVD playback
during the recording on VCR, press
DVD
to change to DVD mode and per-
form the DVD playback (see page 33).
Preparation
• Turn ON the TV and set to the AV input mode.
• Press
VCR
to select the VCR mode. (The VCR indicator will
light.)
Load a blank cassette tape with the erase
prevention tab intact. (The DVD/VCR will auto-
matically turn on.)
Select the program(e.g.29) you want to record with
CH +/–
or
Number buttons (0-9)
.
1~9 : e.g. 5 = press “
5
”
10~80 : e.g. 29 = press “
2
” and “
9
”.
If a recording in Long Play mode is
intended, press
SP/LP
to display
“LP”.
Press
REC/OTR
to start recording.
If the erase prevention tab is removed, the tape will eject when
REC/
OTR
is pressed for recording. (see page 19)
To Stop Recording
Press
STOP
.
To Stop Recording Temporarily
To stop a recording for a short
period of time, press
PAUSE/
STEP
. Press this button again if
you want to resume the recording.
Attention:
A safety circuit turns the pause mode off automatically after 5
minutes, and the DVD/VCR will stop the recording mode.
00:00:00 LP
26
VCR
Recording a TV Program
1
2
3
“VCR” indicator lights.
“VCR” indicator goes off.
“VCR” indicator lights.
You can record a program using the
TV receiver of the DVD/VCR and at the
same time watch another program on
the TV set using its receiver. As the
DVD/VCR automatically switches the
TV set the following points should be
observed:
Auto Rewind Feature
The DVD/VCR will automatically rewind
when the tape has ended (except during
OTR and TIMER REC). It will also eject
the cassette tape.
Press
TV/VCR
until “VCR” appears on the display. Select the
program on the DVD/VCR you want to record. This program can
be watched on the screen and recorded by the DVD/VCR.
While the VCR is recording, press
TV/VCR
until the “VCR”
indicator on the display goes off. The TV set now displays the
program of its built-in receiving module. Select the TV channel
you want to watch on the TV set. Although the TV set now shows
another program, the DVD/VCR will continue recording the
previously selected program.
Using
TV/VCR
you can switch the TV screen between the DVD/
VCR picture and the TV picture. If the “VCR” indicator is lit on the
display, you will watch the DVD/VCR picture. This will not affect
on the recording.
To Display VCR operation Status
Press
CALL
. The clock, the day of the week and more information
will be indicated.
To cancel the indicating:
Press
CALL
until all indicators disappear.
REC
4-+
8+4
CH 80
23:59 MON
01:36:58 SP
L CH
HI-FI
Deck-status
here: Stop
Time
Day of the week
Indication for
Hi-Fi-playback
or stereo-
reception
(displayed
only for
approx. 4
seconds.)
Program
number or
Scart input
(AV1,AV2 or
AV3)
Indication for the selected
playback sound (e.g.: L CH
= Left Channel) (displayed
only for approx. 4 seconds.)
Tape speed
Cassette inside the
unit
Real time counter
27
One-touch Timer Recording (OTR)
3
4
OTR 1 : 30
CH 29
“REC” will keep blinking on the display.
VCR
1
2
8+4
CH 29
OTR 0:30
INDEX
REC
VCR
The one-touch timer recording feature
provides a simple and convenient way
to make a timed recording.
Note:
If the tape supply has not sufficed for OTR
recording, the clock symbol (
) will blink
at the tape-end and then VCR mode will
change to DVD mode.
In this case, press
TIMER REC
to cancel
the
blink or press
EJECT
on the DVD/
VCR to remove the cassette tape.
Preparation
• Turn ON the TV and set to the AV input mode.
• Press
VCR
to select the VCR mode. (The VCR indicator will
light.)
Load a blank cassette tape with the erase
prevention tab intact. (The DVD/VCR will
automatically turn on.)
Select the program(e.g.29) you want to record with
CH +/–
or
number buttons
.
1~9 : e.g. 5 = press “
5
”
10~80 : e.g. 29 = press “
2
” and “
9
”.
If a recording in Long Play mode
is intended, press
SP/LP
to dis-
play "LP".
Press
REC/OTR
twice. The recording will start and stop after 30
minutes. Each additional press of
REC/OTR
will increase the
recording time to a maximum of 6 hours .
If
REC/OTR
is pressed once during the recording, the remain-
ing time appears on the screen. When pressed again, the re-
cording time is extended to the nearest 30-minute or 1-hour
interval.
To Extend the Recording Time
Press
REC/OTR
repeatedly until the
desired time appears on the screen.
To stop the OTR
Press
STOP
.
00:00:00 LP
2:00
5:00
4:00
3:00
1:30
Recording
0:30
1:00
6:00


