


40
Press
C
C
C
C
C
/
D
D
D
D
D
/
B
B
B
B
B
/
A
A
A
A
A
to select the desired title.
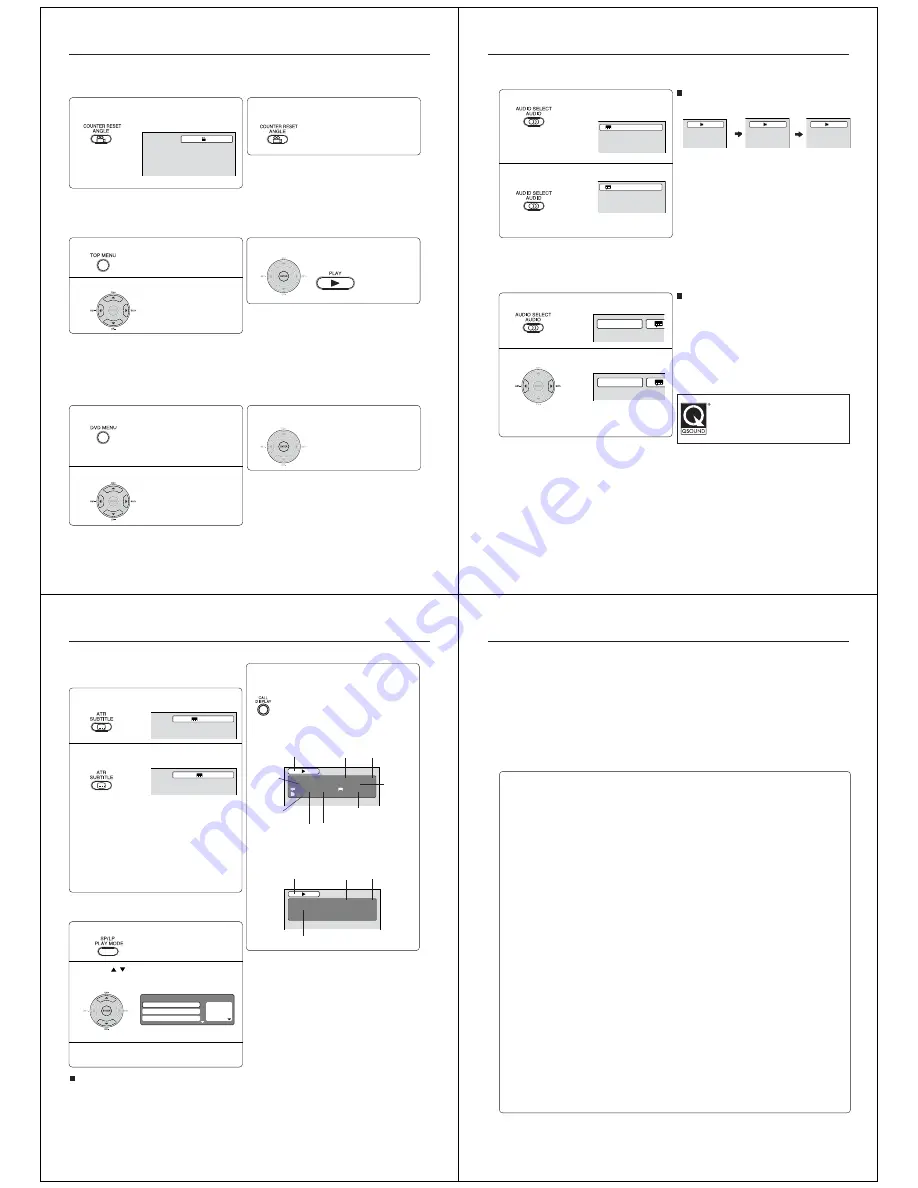
Changing angles/Title selection/DVD menu
Press ANGLE during playback.
The current angle will appear.
1
Press ANGLE repeatedly until the desired
angle is selected.
2
Note:
Depending on the DVD, you may not be able to change
the angles even if multi-angles are recorded on the
DVD.
1
Press ENTER or PLAY.
The playback of the selected title will
start.
3
Note:
Depending on the DVD, you may not be able to select
the title. Depending on the DVD, a “title menu” may
simply be called a “menu” or “title” in the instructions
supplied with the disc.
2
Press
C
C
C
C
C
/
D
D
D
D
D
/
B
B
B
B
B
/
A
A
A
A
A
to select the desired item.
1
Press ENTER.
The menu continues to another
screen. Repeat steps 2 and 3 to
set the item completely.
3
2
Press TOP MENU during playback.
Title menu appears on the screen.
Press DVD MENU during playback.
The DVD menu appears on the
screen.
• Press
DVD MENU
again to resume
playback at the scene when you
pressed
DVD MENU
.
Note:
Depending on the DVD, you may not be able to
resume playback from the scene point when you press
DVD MENU
.
1/2
Changing angles (DVD)
When playing back a disc recorded with multi-angle facility, you can change the angle that you are viewing the
scene from.
Title selection (DVD)
Two or more titles are recorded on some discs. If the title menu is recorded on the disc, you can select the
desired title.
DVD menu (DVD)
Some DVDs allow you to select the disc contents using the menu.
When you playback these DVDs, you can select the subtitle language and soundtrack language, etc.
using the menu.
41
Changing soundtrack language (DVD/VCD)
You can select the language when you play a multilingual disc.
1
2
Press AUDIO during playback.
The current soundtrack language
will appear.
Changing soundtrack language/Setting surround sound
Notes:
• If the desired language is not heard after pressing
the button several times, the language is not
recorded on the disc.
• The selected soundtrack language is cancelled when
you open the disc tray. The initial default language or
available language will be heard if the disc is played
back again.
• If you select DTS in playing DTS-encoded disc, no
sound will be heard.
In case of Video CD playback
Audio type changes as follows each time you press
AUDIO
.
Press AUDIO repeatedly until the desired lan-
guage is selected.
• The on screen display will disappear after a few
seconds.
Press
B
or
A
to select “On”.
• The on screen display will disappear after a few
seconds.
1
Setting surround sound (DVD)
This DVD player is equipped with a “QSound”. It can produce the effect of being in a cinema or a concert hall.
2
To cancel Surround mode
:
Follow steps 1~2 on the left, then press
B
or
A
to select
the “Off” position.
Notes:
• The “QSound” is effective only for the sound of disc.
• The QSound setting can also be changed in the
function setting (see page 52).
• This function works only when the disc recorded with
Dolby Digital is played back.
• When this function works, the volume might change.
• When the voice is distorted, turn off QSound.
Press AUDIO during playback.
Manufactured under license from QSound Labs,
Inc. U.S. patent Nos. 5,105,462, 5,208,860 and
5,440,638 and various foreign counterpart.
Copyright QSound Labs, Inc. 1998-2002.
QSound
®
is a trademark of QSound Labs, Inc.
All rights reserved.
1/2 Eng Dolby Digital
2/2 Fre Dolby Digital
QSound Off
QSound On
LR
L
R
42
Subtitles/To turn off the PBC/Disc status
To turn off the subtitle, press SUBTITLE
until “Off” appears.
• The on screen display will disappear after a few
seconds.
1
Notes:
• Depending on the DVD, you may not be able to
change subtitles, or to turn subtitles on or off.
• While playing a DVD, the subtitle may change
when you open or close the disc tray.
• In some cases, a selected subtitle language may
not be changed immediately.
Subtitles (DVD)
When playing back a disc recorded with subtitles, you
can select the subtitle language or turn the subtitle off.
Press SUBTITLE repeatedly during play-
back until the desired language is selected.
2
To turn off the PBC (VCD)
(see page 6)
Press
/
to select “Mode”, then press
ENTER repeatedly until “Off” appear.
1
Press PLAY MODE in the stop mode.
2
Press PLAY MODE again to clear the screen.
3
Follow the above steps 1~2, then press
ENTER
repeatedly until “PBC” appear.
To turn on the PBC
1/5 Eng
Off
1
— — —
2
— — —
3
— — —
Play Mode
Repeat
: Off
Program Playback
Mode
: Off
With press of DISPLAY, the status of the disc will
appear on the screen.
To cancel the display, press DISPLAY again.
Disc status (DVD/VCD)
CHAPTER
NO.
DVD
00:15:25 01:41:39
Title 1/3
Chapter 2/24
1/1 Eng Dolby Digital
1/2 Eng
1/1
ELAPSED
TIME
ANGLE NO.
DISC OPERATION
TITLE NO.
TOTAL
TIME
AUDIO LANGUAGE
A KIND OF AUDIO
SUBTITLE LANGUAGE
VCD
00:08:32 00:51:03
Track 3/15
DISC OPERATION
TRACK NO.
ELAPSED
TIME
TOTAL
TIME
[Video CD]
[DVD]
43
MP3/JPEG/DivX
®
and Audio CD operation
Limitations on MP3/JPEG/DivX
®
CD playback
• MP3/JPEG/DivX
®
CD is the disc that is standardized by ISO9660, its file name must include 3-digits
extension letters, “.mp3”, “.jpg”, “.div”, “.divx”, “.avi”.
• MP3/JPEG/DivX
®
CD must be corresponded to the ISO standardized files.
• This unit can read 2000 files per directory. If one disc has more than 2000 files, it reads up to 2000 files,
the remaining files will be omitted.
• MP3/JPEG/DivX
®
CDs cannot be used for the purpose of recording.
• If the CD has both audio tracks and MP3/JPEG/DivX
®
files, only audio tracks are played.
• It may take more than one minute for this unit to read MP3/JPEG/DivX
®
files depending on its structure.
• Music recorded by “Joliet Recording Specification” can be played back, the file name is displayed (within
15 letters) on the screen. Long file names will be condensed.
• The music files recorded by “Hierarchical File System” (HFS) cannot be played.
Limitations on display
• The maximum number for display is 15 letters.
Available letters for display are the following:
capital or small alphabets of A through Z, numbers of 0 through 9, and _ (under score).
• Other letters than those above are replaced in hyphen.
To playback MP3/JPEG/DivX
®
CD in the recorded order
1. Use MP3/JPEG/DivX
®
software that records data alphabetically or numerically.
2. Name each file including two-digit or three-digit number (ex. “01” “02” or “001” “002”).
3. Refrain from making too many sub-folders.
CAUTION:
• Some MP3/JPEG/DivX
®
CDs cannot be played back depending on the recording conditions.
• The CD-R/RW that has no music data or non MP3/JPEG/DivX
®
files cannot be played back.
Standard, sampling frequency and the bit rate:
MP3
MPEG-1 Audio
32kHz, 44.1kHz, 48kHz
32kbps ~ 320kbps (constant bit rate or variable bit rate)
The recommend recording setting for a high-quality sound is 44.1kHz of sampling frequency and 128kbps
of constant bit rate.
DivX
®
video
DivX
®
version: DivX
® 3, 4, 5, and 6 (specifically 3.1.1, 4.1.2, 5.0.2, 5.0.5, 5.1.1, 5.2.1, 6.0 at Home
Theater profile).
Audio format: MPEG1 Layer2 (MP2), MPEG1 Layer3 (MP3)
Sampling frequencies: 32kHz, 44.1kHz, 48kHz
Bit rate: 32kbps ~ 320kbps
Resolution: Max 720 x 576 (at 25fps), Max 720 x 480 (at 30fps)
This player can play back the MP3/JPEG/DivX
®
-data which has been recorded on CD-R or CD-RW. Audio CD
also can be played back. To produce the MP3/JPEG/DivX
®
-data, you need a Windows-PC with CD-RW drive
and a MP3/JPEG/DivX
®
-encoding Software (not supplied). The Apple-HFS-System cannot be played.
Note:
This unit requires discs/recordings to meet certain technical standards in order to achieve optimal playback quality.
Pre-recorded DVDs are automatically set to these standards. There are many different types of recordable disc
formats (including CD-R containing MP3 files). Given the fact that technology in this area is still maturing,
Toshiba cannot guarantee that all genre of recordable discs will produce optimal playback quality. The technical
criteria set out in this owner’s manual are meant as a guide only.
Please be advised that you must obtain permission from the applicable copyright owners to download
copyrighted content, including music files, in any format, including the MP3 format, prior to the downloading thereof.
Toshiba has no right to grant and does not grant permission to download any copyrighted content.
MP3/JPEG/DivX
®
CD data information