


56
SYMPTOMS
POSSIBLE SOLUTIONS
• Make sure the AC mains lead is plugged in.
• Try another AC outlet.
• Power is off, check fuse or circuit breaker.
• Unplug unit, then plug it back in.
• Select the DVD or VCR mode before operating.
DVD/VCR does not operate.
Problems and troubleshooting
Use the following check list for troubleshooting when you have problems with your unit.
Be sure all connections are properly made when using with other units.
DVD/VCR
PAGE
–
–
–
–
16,33
The remote control does not
function.
• Aim the remote control at the remote sensor.
• Operate within approx. 7 meters or reduce the light in the room.
• Clear the path of the beam.
• The batteries are weak. Replace the batteries.
• Check the batteries are inserted correctly.
11
DVD
No picture.
• Aerial connection is not correct or aerial cable is disconnected.
• The video channel is not in the correct position or the TV is not
set to the video channel.
• Check the unit is connected correctly.
• The video input selector of the TV is not set to VIDEO. Set to
VIDEO (or equivalent).
• Channel is set to the external mode.
No sound.
• Check the unit is connected correctly.
• Check the input selector of the amplifier is set properly.
• The unit is in the Special playback mode.
12
15
12~14
–
–
12~14
–
21,35
• Select proper language in the menu options.
Display is not shown in your
language.
50
Playback doesn’t start.
• No disc is inserted.
• The disc may be dirty. Clean up the disc.
• The unit cannot play DVD-ROMs, etc.
Stopping playback, slow-motion
play, repeat play, or memory play,
etc. cannot be performed.
• Some discs may not do some of the functions.
33
5
6
–
Noise bars on screen.
• Tracking adjustment beyond range of automatic tracking circuit.
Try Manual tracking adjustment.
• Video heads are dirty.
• The tape is worn or damaged.
VCR
• The erase prevention tab of the video cassette is broken off.
• The unit is in the external input mode.
TV recording does not work.
19
Timer recording does not work.
• The time is not set correctly.
• The recording start/end time is not set correctly.
• The TIMER REC has not been pressed ( is not lit).
17
28
29
21
57
–
57
No subtitle.
• Some discs have no subtitles.
• Subtitles are cleared. Press
SUBTITLE
.
Angle cannot be changed.
• Multi-angles are not recorded on the DVD disc.
• The function is prohibited with the unit or the disc.
“ ” appears on the screen.
–
42
40
35
SYMPTOMS
POSSIBLE SOLUTIONS
PAGE
Problems and troubleshooting/
Video head cleaning
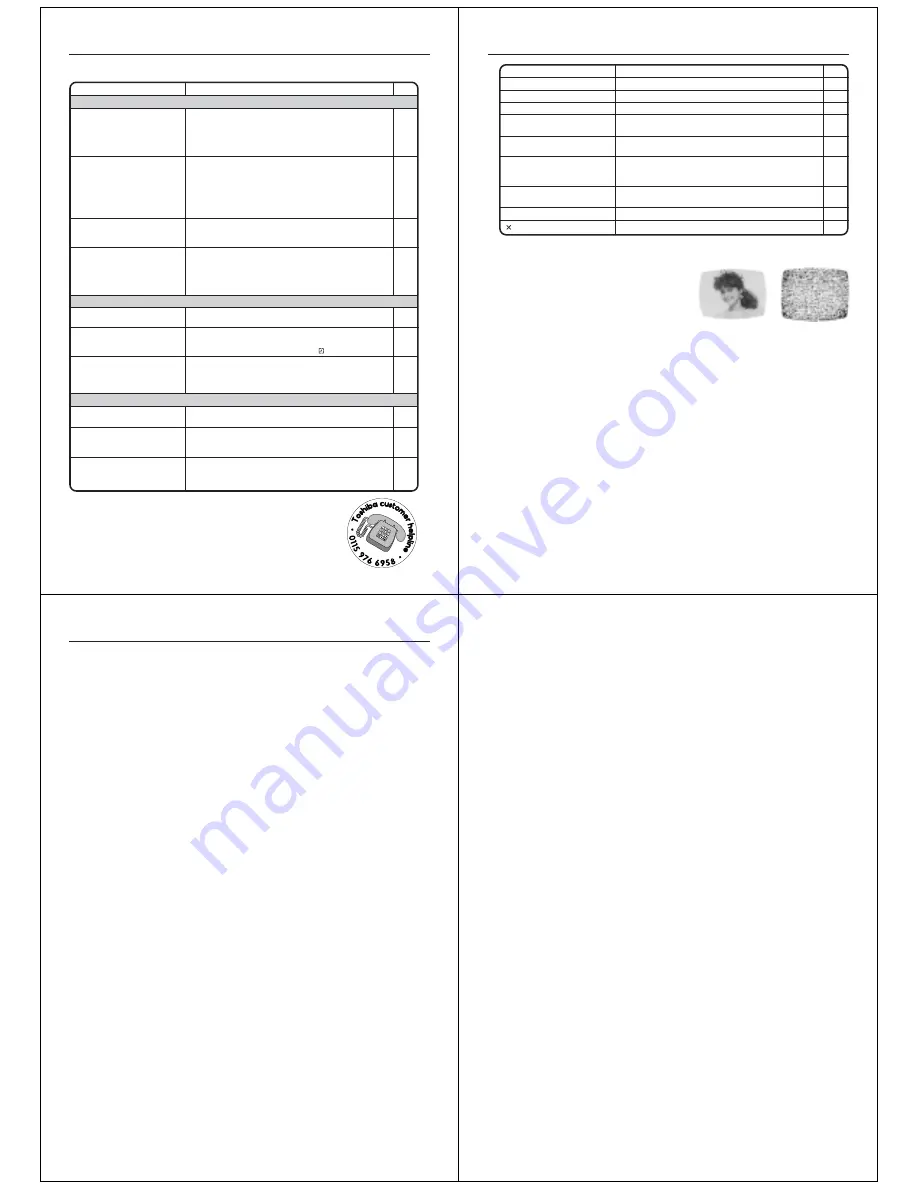
Good Picture
Snowy Picture
No 4:3 (16:9) picture.
• The setup does not match your TV.
No on-screen display.
• Set Display to On.
50
51
No surround sound.
• The setup does not match your stereo system.
The unit or remote operation key
is not functioning.
• Turn off the unit and unplug the AC mains lead for several
minutes, then replug it.
14
Playback does not start when the
title is selected.
• Check the Parental control setting.
Audio soundtrack and/or subtitle
language is not changed when
you playback a DVD.
• Multilingual language is not recorded on the DVD disc.
16
52
50
Video head clogging
The video heads are the means by which the DVD/VCR
reads the picture from the tape during playback. In the
unlikely event that the heads become dirty enough to be
clogged, no picture will be played back. This can easily be
determined if, during playback of a known good tape, there
is good sound, but no picture (picture is extremely snowy).
If this is the case, have the DVD/VCR checked by qualified
service personnel.
Video head cleaning
NOTES:
• DO NOT ATTEMPT TO CLEAN THE VIDEO HEADS OR SERVICE THE UNIT BY REMOVING THE
REAR COVER.
• Video heads may eventually wear out and should be replaced when they fail to produce clear pictures.
• To help prevent video head clogging, use only good quality VHS tapes. Discard worn out tapes.
58
GENERAL
Power supply:
Power consumption:
Weight:
Dimensions:
Input Level:
Output Level:
Hi-Fi Frequency Response:
Hi-Fi Dynamic Range:
VCR section
Video system:
Video Head:
Audio Track:
Channel coverage:
FWD/REV Time at 25˚C:
DVD section
Signal system:
Applicable disc:
Audio characteristics
Frequency response:
S/N Ratio:
Harmonic distortion:
Wow and flutter:
Output:
Pickup:
ACCESSORIES:
AC 230V 50Hz
Operation: 21W
Stand by: 5W
3.6 kg
Width : 430.6 mm
Height : 89.7 mm
Depth : 254.7 mm
SCART-socket:
VIDEO: 1 Vp-p, 75
Ω
AUDIO: –3.8 dBm, 50 k
Ω
Audio IN jack:
–3.8 dBm, 50 k
Ω
Video IN jack:
1 Vp-p, 75
Ω
SCART-socket:
VIDEO: 1 Vp-p, 75
Ω
AUDIO: –3.8 dBm, 1 k
Ω
Audio OUT jack: –3.8 dBm, 1 k
Ω
20Hz to 20kHz
More than 75dB
PAL
4 Rotary Heads
Hi-Fi Sound - 2 Tracks / MONO Sound - 1 Track
IreE2-E12, X-Z+2, S1-S41, E21-E69
Approx. 1minute and 48 seconds (with E-180 Cassette Tape)
PAL, NTSC
DVD (12cm, 8cm), CD (12cm, 8cm)
DVD: 4Hz - 22KHz
CD: 4Hz - 20KHz
85dB
0.06%
Below Measurable Level
Audio :
(RCA) –12dB, 1 k
Ω
Digital Audio : 0.5Vp-p, 75
Ω
Component video:
Y
:
1 Vp-p, 75
Ω
P
R
:
0.7 Vp-p, 75
Ω
P
B
:
0.7 Vp-p, 75
Ω
CD :
Wavelength: 775 - 805 nm
Maximum output power: 0.5 mW
DVD : Wavelength: 640 - 660 nm
Maximum output power: 1.0 mW
Remote control x 1
75
Ω
Coaxial Cable x 1
Battery (UM-4) x 2
Specifications
• This model complies with the above specifications.
• Design and specifications are subject to change without notice.
• This model may not be compatible with feature and/or specifications that may be added in the future.
59


