background image

1-1

1

2

3

4

5

6

7

8

9

10

11

12

6-1

6. TROUBLESHOOTING

Graphic symbols for indicating the state of the copier appear on the touch panel.
When any graphic symbol flashes, rectify the problem referring to “When Graphic
Symbols Flash on the Touch Panel” in the Operator’s Manual for Copying Functions.


When the following messages appear .............................................................. 6-2


Transmission trouble ........................................................................................ 6-3


Reception trouble ............................................................................................. 6-4

#06-01_Troubleshooting.p65

9/30/00, 1:44 PM

1

Summary of Contents for e-STUDIO35

Page 1: ......

Page 2: ...fied as soon as possible also you will be advised of your right to file a complaint with the FCC if you believe it is necessary The telephone company may make changes in its facilities equipment operations or procedures that could affect the operation of the equipment If this happens the telephone company will provide advance notice in order for you to make the necessary modifications in order to ...

Page 3: ...e interface The termi nation on an interface may consist of any combination of devices subject only to the requirement that the sum of the Ringer Equivalence Numbers of all the devices does not exceed 5 The telecommunication line cable of minimum No 26 AWG wire must be used AVIS L étiquette d lndustrie Canada identifie le matériel homologué Cette étiquette certifie que le matériel est conforme aux...

Page 4: ...e ment of the product by Telecom nor does it provide any sort of warranty Above all it provides no assurance that any item will work correctly in all respects with another item of Telepermitted equipment of a different make or model nor does it imply that any is compatible with all of Telecom s network services This equipment is not capable under all operating conditions of correct operation at th...

Page 5: ... precautions according to the following three levels of warning Before reading this Operator s Manual you should fully understand the meaning and importance of these signal words Warning lndicates a potentially hazardous situation which if not avoided could result in death serious injury or serious damage or fire in the equipment or surrounding assets Caution Indicates a potentially hazardous situ...

Page 6: ...g of reports High resolution U FINE Mode Detailed technical drawings fine text and photographs can be sent clearly at a resolution of 8 lines mm x 15 4 lines mm Multi address Transmission You can send the same original to up to 1000 remote FAXes in a single operation by direct dialing or by specifying remote FAXes using the phone book or groups Sleep Mode Pressing the power key the weekly timer an...

Page 7: ...hone book entry 2 13 Group entry 2 14 Multi address transmission 2 15 Searching by ID number 2 16 Searching by spelling 2 17 6 Sending originals 2 18 Memory TX 2 18 Direct TX 2 19 Other transmissions 2 20 7 Canceling transmissions 2 22 8 Checking transmission results 2 25 Checking communication status on the touch panel 2 25 Checking transmission results by printing TX reports 2 27 Checking transm...

Page 8: ...ous functions 5 16 Setting the initial transmission mode home position 5 16 Setting the reception mode 5 17 Setting at the 2nd line board optional installation 5 19 Setting recovery transmission 5 22 Setting the authorization code 5 23 4 Setting reception and printing 5 24 Relationship between original and copy paper 5 24 Setting RX printing 5 27 Setting duplex printing 5 28 Setting the alternatio...

Page 9: ...tch ON unless you suspend the facsimile function If you turn OFF the power switch or when the power has failed FAX is not available The stored originals in the memory might be deleted completely Memorized contents such as time and phone and address book will not be deleted Remote FAX and time specified for delayed communication or polling reception might be deleted If the memorized original data a...

Page 10: ... 9 10 11 12 1 1 1 DESCRIPTION OF THE DIGITAL COPIER 1 Description of the digital copier and the optional equipment 1 2 Main components 1 2 Optional equipment 1 3 Control panel 1 4 Touch panel 1 6 Connecting the cables 1 7 ...

Page 11: ...iginal Cover The reversing automatic document feeder is standard equipment when the facsimile function is installed Original Glass Automatic Duplexer Bypass Guide Original Scale Control Panel Inner Tray Main Power Switch Front Cover Cassettes Operator s Manual Pocket Back side Touch Panel Contrast Adjustment Knob Back of the control panel ...

Page 12: ...hiba continuously A paper feed pedestal can be also installed instead Consult your service technician for detail Finisher Hole punching unit Key copy counter This optional equipment cannot be used for the facsimile function Key Copy Counter Reversing Automatic Document Feeder Large Capacity Feeder Finisher Hole Punching Unit When the optional finisher is attached Even when the finisher is attached...

Page 13: ...printer function DATA LED ERROR LED DATA LED lights when the copier received the data ERROR LED lights when communication error occurs COPY key Press this key to select the copy function FAX key Press this key to select the fax function MEMORY RX LED This LED lights when memory contains a received original standing by to be printed MAIN POWER LED This LED shows the AC power supply status When the ...

Page 14: ...modes are cleared to default settings CLEAR STOP key Use this key to cancel the selected remote FAX etc JOB STATUS key Press this key to see the job list to delete or move jobs to confirm the job status to make a cassette setting or to display the counter Graphic symbols flash when there is no paper in the cassette the wrong cassette size is set the finisher is full the holder for the hole punched...

Page 15: ...sages in addition to resolution and the number of the specified remote FAX Message area Touch keys area Function setting area Index keys Touch keys Area The various function items shown here are touch key select able Press any key lightly with you finger Index keys Used for switching between the phone book advanced settings and job status menu Function setting area This is where you select or set ...

Page 16: ...phone to a telephone connector in parallel Before you connect the cables ensure that the power switch is at the OFF position LINE2 TEL LINE1 Connect the telephone line when the 2nd line board is installed Connect the external telephone not available for the European version Connect the telephone line ...

Page 17: ...1 2 3 4 5 6 7 8 9 10 11 12 1 8 DESCRIPTION OF THE DIGITAL COPIER ...

Page 18: ...ct entry specifying by digital keys 2 12 Phone book entry 2 13 Group entry 2 14 Multi address transmission 2 15 Searching by ID number 2 16 Searching by spelling 2 17 6 Sending originals 2 18 Memory TX 2 18 Direct TX 2 19 Other transmissions 2 20 7 Canceling transmissions 2 22 8 Checking transmission results 2 25 Checking communication status on the touch panel 2 25 Checking transmission results b...

Page 19: ... and the original will be sent as it is being scanned This mode is useful if you want to confirm the other party who you are sending to or when you want to send a FAX urgently Originals are not stored in the memory and you can specify only one remote FAX at a time On hook Dialing You can make a telephone call and send originals without picking up the handset When the line is connected to the remot...

Page 20: ...not having the same polling number by appending the document with a password Chain Dial Communication When using the FAX communication network you can combine two or more dialing operations by phone book and direct entry input and send information such as service codes one after another BatchTransmission You can have the copier automatically send two or more reserved jobs for one remote FAX at a t...

Page 21: ...he Copier with Department Codes With the use of department codes access codes you can re strict FAX users as well as manage output volumes made by individual groups or departments of your company Registering changing and canceling a department code Operator s Manual for Copying Functions 1 If the following message is displayed on the touch panel Enter Department Code key in the registered departme...

Page 22: ...atic Document Feeder Types of Original Sheets Three dimensional objects Books Plain paper thermal paper for word processor or fax original with filing holes 2 3 and 4 holes 13 34lb 50 127g m2 1 sided original 13 28lb 50 105g m2 2 sided original Original Size Letter format LD LG LT LT R ST ST R COMP A B format A3 A4 A4 R A5 A5 R B4 B5 B5 R FOLIO Letter format LD LG LT LT R ST R COMP A B format A3 A...

Page 23: ...iginals can also be sent at one transmis sion When LD LG LT R ST COMP A3 A4 R A5 B4 B5 or FOLIO originals are placed as shown in the figure on the right the pre entered sender s information is printed at the position shown shaded in the figure and sent to the remote FAX Entering the terminal ID Page 5 11 When LT ST R A4 A5 R or B5 R originals are placed as shown in the figure on the right the pre ...

Page 24: ...originals 3 Taped pasted or clipped cut out originals 6 Damp originals 7 OHP film originals Also the following originals should be handled carefully 1 Folded or curled originals should be smoothed out before being used 2 Only originals with the same width can be set at a time Do not mix originals with different widths 3 Originals two of which when pinched between two fingers cannot be moved or ori...

Page 25: ...size originals are rotated 90 so that they are sent as LT R A4 R originals If a mixture of LD and LG A3 and A4 or B4 and B5 origi nals are placed they are sent at their original sizes When LD LG LT R COMP A3 B4 A4 R B5 and FOLIO originals are placed as shown in the figure on the right the pre entered sender s information is printed at the position shown shaded in the figure and sent to the remote ...

Page 26: ...ZE The original is scanned at the preset size regardless of its actual size Use this mode when you are using non standard size paper or you want to limit the area of the original to be sent When originals are placed in the reversing automatic document feeder they are scanned in the AUTO mode You can specify the size only when the original is placed on the original glass ECM ECM Error Correction Mo...

Page 27: ...Specify the remote FAX and press the START key 1 Place the original Page 2 6 2 Press the PHONE BOOK key to display the phone book menu then the OPTION key 4 SETTING THE TRANSMISSION CONDITIONS Cont Tip When one remote FAX is specified by the phone book Page 2 13 if the OPTION is selected the contents of the phone book setting will be reflected to the OPTION The settings of the TX type ECM quality ...

Page 28: ...osure and original 7 Press the START key If there is another original to scan repeat steps 5 to 7 of this procedure If this is the final sheet press the NO key Setting the Scanning Conditions for Each Page Book Transmission When you want to send multi page originals by placing them on the original glass you can change the following scanning conditions among the transmission conditions settings for...

Page 29: ...ACE key Each press of this key deletes the values that you are entering one by one Tip When you are dialing to an outside line via a PBX it may take a little while to be connected after dialing an 0 causing a transmission error In this case press the MONITOR PAUSE key after the 0 to enter a pause This automatically enters a three second pause before the number is dialed which reduces transmis sion...

Page 30: ...n the right in the touch panel 2 Press the key for the remote FAX that you want to send to You can search for remote FAXes by ID number and by spell ing Searching by ID number Page 2 16 Searching by spelling Page 2 17 Phone book entry refers to the method for specifying remote FAX numbers by pressing the remote FAX keys which have previously been entered It is convenient if frequently used destina...

Page 31: ...iginals to You can search for groups by ID number and by spelling Searching by ID number Page 2 16 Searching by spelling Page 2 17 The remote FAXes in the group can be confirmed in the group number information Page 5 37 5 SPECIFYING THE REMOTE FAX Cont Group Entry Group entry refers to the method for specifying remote FAX numbers by pressing the group key which has previously been entered It is co...

Page 32: ...00 destinations You can set multi address transmission only by the memory TX mode Memory TX 2 18 1 Place the original Page 2 6 2 Set the transmission conditions Page 2 10 3 Specify the remote FAXes To continuously enter remote FAX numbers after having specified them by means of the digital keys press the MULTI key then enter the next one To continuously enter remote FAX numbers after having specif...

Page 33: ...ge 1 to 400 3 Press the key for the remote FAX that you want to send to One screen can show eight destinations To view destinations not displayed on the screen press the PRE or NEXT key to switch the screen Tip To continue searching by ID number press the SEARCH ID key To continue searching by spelling page 2 17 press the SEARCH LETTER key When selecting the remote FAXes entered in the phone book ...

Page 34: ...estinations To view destinations not displayed on the screen press the PRE or NEXT key to switch the screen Tip To continue searching by spelling press the SEARCH LETTER key To continue searching by ID number page 2 16 press the SEARCH ID key When selecting the remote FAXes entered in the phone book and group pressing a letter key displays the remote FAXes whose names start with the letter on the ...

Page 35: ...mation can no longer be stored in the memory if it becomes full midway during scanning In this case reduce the number of originals you are sending or try sending in the direct TX mode Page 2 19 If an original is placed on the original glass the scanning conditions can be changed for each page Page 2 11 6 SENDING ORIGINALS Memory TX 1 Place the original Page 2 6 2 Set the transmission conditions Pa...

Page 36: ...to scan all pages If an original is placed on the original glass the scanning conditions can be changed for each page Page 2 11 Memory TX is set as the initial setting Changing the initial setting to direct TX Page 5 16 DirectTX by Optional Setting 1 Place the original Page 2 6 2 Press the PHONE BOOK key to display the phone book menu then the OPTION key 3 Press the DIRECT TX key set the other tra...

Page 37: ... if you make a mistake when dialing the remote FAX number press the MONITOR PAUSE key to cut the line press the MONITOR PAUSE key again and redial 5 When you hear the answer tone short high pitched tone output from the built in speaker after the con nection is made with the remote FAX press the START key On hookTransmission 1 Place the original Page 2 6 2 Set the transmission conditions Page 2 10 ...

Page 38: ... FAX number Specifying by digital keys Page 2 12 Specifying by phone book Page 2 13 Tip Each press of a digital key dials a number So if you make a mistake when dialing the remote FAX number put the handset down to cut the line pick up the handset again and redial 5 When you hear the answer tone short high pitched tone output from the handset after the connection is made with the remote FAX press ...

Page 39: ...smissions during Scanning 1 Press the CLEAR STOP key while the original is being scanned Scanning storing into memory is paused 2 To cancel the job during the scanning pause press the FUNCTION CLEAR key To resume scanning press the START key If you do nothing for about 45 seconds after the pause of the transmission the transmission that is currently being scanned is cleared from the memory PRINTER...

Page 40: ...on 1 Press the JOB STATUS key to display the job status menu then press the COMM RESERVATION key 2 Select the file that is currently being transmitted Check that the status column indicates L1 transmitting by the line 1 or L2 transmitting by the line 2 3 Press the JOB CANCEL key 4 Press the YES key if you want to cancel the job or press the NO key if you do not want to ...

Page 41: ...T key If you do not do anything for about 15 seconds after the pause of the transmission the direct TX mode might be cleared Tip Even if you cancel transmission in the direct TX mode the part of the original that was being sent before transmission was canceled is sent to the remote FAX PRINTER NETWORK COPY FAX 1 1 2 3 4 5 6 7 8 9 0 JOBSTATUS START CLEAR STOP FUNCTION CLEAR INTERRUPT MAIN POWER POW...

Page 42: ... standby files can also be canceled Page 2 22 1 Press the JOB STATUS key to display the job status menu then the desired key Pressing the COMM RESERVATION key displays the current communication reservation status the RECOV ERY TX key the current recovery transmission standing by status and the REVIEW TX REPORT key the current transmission results One screen displays the details for the latest four...

Page 43: ...NEXT key to switch the screen Each of the screens for the RESERVATION displays 100 reserved transmissions and the one currently transmitting Each screen for the RECOVERY TX displays 100 recovery transmissions Total of reserved transmissions and recov ery transmissions is 100 Each screen for the REVIEWTX REPORT displays 40 trans mission results Files are displayed in order from the newest file onwa...

Page 44: ...n job you want to confirm to check the transmission results Sample of the journal Page 5 34 1 Press the JOB STATUS key to display the job sta tus menu then the REVIEW TX REPORT key 2 Select the desired transmission result 3 Press the START key Checking Transmission Results by Printing TX Reports ...

Page 45: ... output when 40 or 120 commu nications have been performed Sample of the journal Page 5 34 Changing the number of communications output on the journal 40 120 communications Page 5 32 1 Press the SETTINGS key to display the settings menu then the LISTS key 2 Press the TRANSMISSION JOURNAL key 3 Press the START key 8 CHECKING TRANSMISSION RESULTS Cont Checking Transmission Results by Printing a List...

Page 46: ...tatus 1 Press the SETTINGS key to display the settings menu then the LISTS key 2 Press the RESERVATION key 3 Press the START key To cancel printing of the lists midway press the CLEAR STOP key and then the FUNCTION CLEAR key Checking Reserved Transmissions by Printing Lists Reservation List Sample of the reservation list Page 5 35 ...

Page 47: ...1 2 3 4 5 6 7 8 9 10 11 12 2 30 SENDING A FAX BASIC ...

Page 48: ...d transmission 3 4 4 Sending two sided originals two sided scanning 3 5 5 Quality transmission 3 6 6 Mailbox ITU T compatible transmission 3 7 Setting up and deleting a mailbox in the mailbox hub 3 8 Confidential Bulletin board Multi address relay mail 3 13 7 Polling communications transmission 3 17 Polling transmission 3 17 8 Chain dial communication 3 18 ...

Page 49: ...polling RX as well 1 Place the original Page 2 6 2 Set the transmission conditions Page 2 10 3 Press the ADVANCED key to display the advanced menu and press the DELAYEDTX RESERVE key 4 Enter the day and time hours minutes using the digital keys Press the and keys to move the cursor Enter the time using the 24 hour clock system To correct the entry press the CLEAR STOP key then input the numbers ag...

Page 50: ...remote FAXes Specifying by digital keys Page 2 12 Specifying by phone book Page 2 13 4 Prees the START key Priority TX allows you to execute a transmission before other reserved transmissions including redial standby You can dial by digital keys directly or phone book Priority reservation is good for single transmissions only 2 PRIORITY TRANSMISSION ...

Page 51: ...tering Programs Page 5 14 1 Place the original Page 2 6 2 Press the SETTINGS key to display the settings menu then the PROGRAM key 3 Press the desired program key Up to 8 programs can be displayed on one screen To see the others press the PRE or NEXT key to switch the screen 4 Press the SET key 5 Specify the remote FAXes Specifying by digital keys Page 2 12 Specifying by phone book Page 2 13 Speci...

Page 52: ... set ting This function can be used only when you send originals by memory TX 1 Place the original Page 2 6 2 Set the transmission conditions Page 2 10 3 Press the ADVANCED key to display the advanced menu then the TWO SIDED SCAN key If the key for the desired function is not shown press the Next key to switch the screen 4 Press the SET key 5 Specify the remote FAXes Specifying by digital keys Pag...

Page 53: ...is set to ON in the phone book menu the new setting is valid for only one transmis sion In the Quality TX originals are sent at a speed lower than normal Specifying QualityTX in the Phone Book Menu Press the Quality TX ON key in the OPTION of the phone book menu Page 2 10 Specifying QualityTX in the Settings Menu Set the quality TX in the PHONE BOOK ENTRY of the TELPHONE NUMBERS function in the se...

Page 54: ...emote FAX registered in the mailbox After calling up the transmission result list will be sent to the specified remote FAX It is also possible to set up a password requirement Mailbox conditions Sending and storage of documents to a mailbox hub and retrieval of documents from a mailbox hub is possible on an ITU T compliant facsimile Only ITU T compliant facsimiles can be used as Mailbox hubs This ...

Page 55: ...ENTIAL or BULLETIN BD key and then the BOX SETUP key 3 Press the SET key 4 Press the BOX NUMBER key to display the next screen enter the box number s max 20 digits then press the SET key If you want to set up a password press the PASSWORD key to display the next screen enter the password max 20 digits then press the SET key The password is indicated with s 5 Make sure that the registration details...

Page 56: ...t to register the destination to which the multi address relay mail transmission is to be replied If you press the NO key the relay box setting up proce dure is completed and the box will be opened 5 Specify the destination to which the multi address relay mail transmission result is to be replied by phone book or the digital keys Only one remote FAX can receive the transmission result To correct ...

Page 57: ...ter the box number s max 20 digits then press the SET key When the password is specified press the PASSWORD key to display the next screen enter the password max 20 digits then press the SET key You can also delete the mailbox with the authorization code Page 5 23 5 Press the SET key If the entered box number is incorrect the message No entry is displayed If an incorrect password is entered the me...

Page 58: ...e password max 20 digits then press the SET key 5 Press the SET key If the entered box number is incorrect the message No entry is displayed If an incorrect password is entered the message Invalid number is displayed Enter the correct box number or password 6 The selected remote FAX is highlighted Correct the remote FAX Remote FAXes can be added by phone book and group To cancel the remote FAX pre...

Page 59: ...he box will be opened 9 Specify the destination to which the multi address relay mail transmission result is to be replied by phone book or digital keys Only one remote FAX can receive the transmission result To change it delete it and then specify the new destination 10Make sure that the registration details are correct and press the SET key The box will be opened 6 MAILBOX ITU T COMPATIBLE TRANS...

Page 60: ...reen 4 Press the CONFIDENTIAL or BULLETIN BD key then the INPUT key 5 Press the SET key 6 Press the BOX NUMBER key to display the next screen enter the box number max 20 digits then press the SET key When the password is specified press the PASSWORD key to display the next screen enter the password max 20 digits then press the SET key 7 Press the SET key If the entered box number is incorrect the ...

Page 61: ... key then the TRANSMIT key 5 Press the SET key 6 Press the BOX NUMBER key to display the next screen enter the box number s max 20 digits then press the SET key When the password is specified press the PASSWORD key to display the next screen enter the password max 20 digits then press the SET key 7 Press the SET key 8 Specify the remote FAXes Specifying by digital keys Page 2 12 Specifying by phon...

Page 62: ...s the CONFIDENTIAL or BULLETIN BD key then the PRINT key 3 Press the SET key 4 Press the BOX NUMBER key to display the next screen enter the box number s max 20 digits then press the SET key When the password is specified press the PASSWORD key to display the next screen enter the password max 20 digits then press the SET key 5 Press the START key If the entered box number is incorrect the message...

Page 63: ...BER key to display the next screen enter the box number s max 20 digits then press the SET key When the password is specified press the PASSWORD key to display the next screen enter the password max 20 digits then press the SET key You can also delete the document with the authorization code Page 5 23 5 Press the SET key If the entered box number is incorrect the message No entry is displayed If a...

Page 64: ...s sion was carried out Polled originals are cleared once they are sent by a polling request Retrieval of originals by remote FAXes not having the same polling number can be inhibited by appending the originals with a password and the receiver s telephone number information at the FAX sending the originals Polled communication appended with a password can be sent and received only on Toshiba FAXes ...

Page 65: ...ion network 8 CHAIN DIAL COMMUNICATION 1 Press the ADVANCED key to display the advanced menu then the CHAIN DIAL COMM key If the key for the desired function is not shown press the Next key to switch the screen 2 Specify the remote FAX to be dialed at first by the phone book or using the digital keys 3 Specify the remote FAX to be dialed next by the phone book or using the digital keys 4 Press the...

Page 66: ...te hub 4 6 5 Polling communications reception 4 7 Polling reception 4 7 Cassette exclusively for FAX Cassettes can be set for FAX only Operator s Manual for Copying Functions 1 Be fore Making Copies on page 1 11 If a cassette is set for FAX only the paper set in this cassette is used when the copier receives a FAX The paper that can be set in the cassette for FAX is LD LG LT LT R A3 A4 A4 R and B4...

Page 67: ...inals in the memory even if some trouble e g a paper jam or no more paper in the digital copier occurs during reception and prevents the originals from being printed Mailbox Reception You can retrieve documents from mailbox hubs confidential bulletin board that support the ITU T F code functions Polling RX You can ask the remote FAX for polling transmission and receive the original that is stored ...

Page 68: ...L key to select the reception mode then the SET key 2 RECEPTION SETTINGS There are two reception modes auto reception and manual reception AUTO reception Set this mode when the line is being used exclusively by the FAX The FAX automatically receives incoming originals MANUAL reception Set this mode when the FAX is connected to a line used as the telephone line only ...

Page 69: ...n Services 1 Pick up the handset of an external telephone and specify the FAX information service number 2 When the line is connected to the service you will hear a pre recorded announcement Following the instructions in the announcement enter the num bers as necessary When the telephone line is a dial pulse line the service cannot be used as it is Press the key before you enter the service codes ...

Page 70: ...opier has run out of paper During a paper jam When the digital copier has run out of toner 1 When incoming originals are received in the memory the MEMORY RX LED on the control panel lights 2 Eliminate the trouble When the trouble is eliminated the originals that are re ceived in the memory are automatically output When originals received in the memory have finished being output the MEMORY RX LED ...

Page 71: ... next screen enter the password max 20 digits then press the SET key 5 Press the SET key 6 Specify the remote FAX Specifying by digital keys Page 2 12 Specifying by phone book Page 2 13 Specifying by group Page 2 14 Specifying by multi address transmission Page 2 15 7 Press the START key The mailbox will be retrieved and the document will be re ceived Mailbox allows storage and retrieval of docume...

Page 72: ...receiving originals from two or more remote FAXes in a single operation Direct by digital keys phone book and group entry can be combined Polled originals are cleared once they are sent by a polling request Retrieval of originals by remote FAXes not having the same polling number can be inhibited by appending the originals with a pass word at the FAX sending the originals Polled originals appended...

Page 73: ...1 2 3 4 5 6 7 8 9 10 11 12 4 8 RECEIVING A FAX ...

Page 74: ... initial transmission mode home position 5 16 Setting the reception mode 5 17 Setting at the 2nd line board optional installation 5 19 Setting recovery transmission 5 22 Setting the authorization code 5 23 4 Setting reception and printing 5 24 Relationship between original and copy paper 5 24 Setting RX printing 5 27 Setting duplex printing 5 28 Setting the alternation 5 29 5 RDC password setting ...

Page 75: ...phone book screen TEL Number of remote FAX Enter the TEL FAX number max 128 digits of the remote FAX 2nd TEL Number The call is routed to the sub number max 128 digits when the main line is busy SUB SEP PWD SUB SEP and PWD can be registered to each remote FAX you are enter ing SUB SEP PWD Page 5 4 Quality TX Set whether or not to specify Quality TX to each of the remote FAX numbers you are enterin...

Page 76: ...r s Manual for Copying Func tions 5 Press the TEL NUMBER key enter the FAX num ber using the digital keys and press the SET key Press the 2ndTEL NO key enter the FAX number using the digital keys and press the SET key Enter the 2nd TEL number if necessary 128 digits can be entered in the TEL NUMBER and the 2nd TEL NO at maximum 6 Press the SET key to finish the registration Press the NEXT key if y...

Page 77: ...formation PWD password Password Up to 20 digits of information can be stored for each of these sub addresses When you send documents you can specify a sub address or password compatible with ITU T International Telecommuni cations Union Telecommunications standards To use this function the remote FAX must be a model capable of setting an ITU T compatible sub address or password For details contact...

Page 78: ...r NEXT key to switch between the ID number screens until the desired remote FAX is found You cannot specify non assigned ID numbers 4 Press the key of the item to be corrected and cor rect the setting Press the PRE or NEXT key to switch between the screens and modify all the items to be corrected 5 Press the SET key The screen returns to the phone book modify menu Tip You cannot correct nor delete...

Page 79: ... reserved Deleting Phone Book Entries 1 Press the SETTINGS key to display the settings menu then the TELEPHONE NUMBERS key 2 Press the PHONE BOOK MODIFY key 3 Press the ID number to be deleted Press the PRE or NEXT key to switch between the ID number screens until the desired remote FAX is found You cannot specify non assigned ID numbers 4 Press the DELETE key 1 ENTERING THE REMOTE FAX NUMBERS Con...

Page 80: ...AME key and enter the name of the group in the letter entry screen 5 Press the SET key If you have already entered numbers into a phone book you can combine them as a group Up to 50 groups can be registered You can enter the following items ID number Enter a number within the range 01 to 50 This number can be used to find a remote FAX number by ID number Group name Enter a name comprising up to 20...

Page 81: ...roup entry Page 2 17 are not available You can search by ID numbers or letters 7 When you have finished specifying the remote FAX press the SET key to complete the setting The screen returns to the group no entry menu If you continue entering into the group go back to step 3 If you complete the setting press the FUNCTION CLEAR key on the control panel or the CANCEL key The registered items can be ...

Page 82: ...the SET key 5 The selected remote FAXes becomes highlighted Correct the items To add a remote FAX to a group press the key of the re mote FAX to highlight it To delete a remote FAX from a group press a highlighted key to turn it off 6 When you have finished correcting the settings press the SET key The screen returns to the group menu Tip You cannot correct nor delete groups whose transmission is ...

Page 83: ...y to switch between the ID number screens until the desired remote FAX is found You cannot specify non assigned ID numbers 4 Press the DELETE key 5 If it is OK to delete them press the YES key The screen returns to the group menu Tip You cannot correct nor delete groups whose transmission is reserved 1 ENTERING THE REMOTE FAX NUMBERS Cont Entering into Groups Cont ...

Page 84: ...or such business other entity or individual In order to program this information into your fax machine you should complete the setup procedures listed for station ID number and name on pages 5 12 to 5 14 in this manual Example of how Sender s Information is Printed on Originals Received by the Remote FAX Tip Sender s information is printed about 5 mm from the top edge of the transmitted original E...

Page 85: ...SETTINGS key to display the settings menu then the INITIAL SETUP key 2 Press the TERMINAL ID key 3 Press the ID NAME key and enter the ID name in the letter entry screen up to 20 characters When you have finished entering the letters press the SET key Entering letters Operator s Manual for Copying Func tions 4 Press the FAX NUMBER key ...

Page 86: ...nter the terminal number using the digital keys When you have finished entering the terminal num ber press the SET key 7 Specify the LINE 2 NUMBER in the same way in specifying the FAX NUMBER steps 4 6 The line 2 number can be set when the optional 2nd line board is installed 8 Check the settings If they are correct press the SET key to complete entry To change the settings press the ID NAME FAX N...

Page 87: ...en the PROGRAM key You can enter frequently used functions and destinations into the program keys and call up these combinations whenever they are needed Each combination is referred to as a program You can enter up to 24 programs Once you have entered a program it cannot be canceled You can however enter overwrite programs into the same program key again 3 Press the desired key to enter the progr...

Page 88: ...ave finished entering the program name press the SET key The screen returns to the settings menu Press the FUNCTION CLEAR key on the control panel to complete the setting Tip The registered items can be confirmed in the program informa tion Page 5 36 ...

Page 89: ...TTINGS key to display the settings menu then the HOME POSITION key 2 Press the desired key for each item The screens on the right shows the default setting Press the NEXT or PRE key to switch between the screens as required 3 Press the SET key 3 SETTING VARIOUS FUNCTIONS Setting the Initial Transmission Mode Home Position THE TELEPHONE CONSUMER PROTECTION ACT The Telephone Consumer Protection Act ...

Page 90: ...ted It can be heard when all originals have finished being printed out Reception mode AUTO MANUAL Page 4 3 Dial type Line1 Line2 DP MF not available for the European version There are two types of telephone lines dial pulse lines DP and multifrequency lines MF Change the telephone line settings to match the type of the line you are using for example when you first install the copier or when you ch...

Page 91: ...lume you can adjust the ringer tone volume when original printing has been completed To adjust the volumes press the and keys Press ing the key raises the volume while pressing the key lowers it When a tone is set to 0 it does not sound 4 Press the SET key The registered items can be confirmed in the function list Page 5 38 Note There is no second screen to display the dial types for the European ...

Page 92: ...ows transmission during reception reception during transmis sion and simultaneous two communications of transmission reception When the 2nd line is used the following function setting and registration are required Entering terminal ID Page 5 12 Dial type setting line 2 setting 3 Select either of the dial type line 2 setting from among the DP and MF keys Press the NEXT or PRE key to switch between ...

Page 93: ... installed its operation can be selected from the following Transmission Reception Both transmission and reception are available all the time Reception only 24 hours The 2nd line is always standing by for reception Reception only timer Only reception is available during the specified period of time Even during reception only the specified line performs trans mission if any line has been specified ...

Page 94: ...andby for the reception all the time 4Press the SET key Using the 2nd line for reception only during the speci fied period 4Press the RX ONLY TIMER key Enter the START time and END time using the digital keys Pressing the or key moves the cursor Time is displayed in the 24 hour system 5Press the SET key ...

Page 95: ...eens 2Change the document holding time with the 1H or 24H key and press the SET key The document holding time can be changed by 1 hour This function allows the operator to select and retransmit a document held in the memory after the initially specified number of redial attempts have failed 3 SETTING VARIOUS FUNCTIONS Cont Setting Recovery Transmission 2 Select the file you want to retransmit and ...

Page 96: ...and press the SET key New codes cannot be entered at first time Proceed to step 3 3 Press the NEW CODE key enter the new code and press the SET key 4 Press the SET key The new code is registered if the current code is correct Setting the Authorization Code An authorization code can be set in this copier in addition to the password for each open mailbox The authorization code could delete any box M...

Page 97: ... the same length it is printed at its original size When the incoming original is larger than the paper printing area it is printed according to the following priority Initial setting Discard printing ON Reduction printing ON 1 Originals are output on larger size paper 2 When originals are at most 10mm larger than the printing area the part of the originals that extends the paper print ing area is...

Page 98: ...ved original 2 Paper of the same size but with a different orientation to the received original 3 Paper of the same orientation but larger than the received original 1 2 3 4 Size of Original being Received Priority American Sizes Ledger Ledger Ledger Ledger Ledger Legal Legal Legal Letter Letter Letter Letter Letter Letter Letter Statement Statement COMP COMP COMP Ledger 5 6 Letter Letter Letter R...

Page 99: ...ng and discard printing settings For details contact your service technician 1 2 3 4 A3 A3 A3 A3 A3 B4 B4 B4 A4 A4 A4 A4 A4 A4 FOLID Size of Original being Received Priority A4 A5 A5 FOLID 5 6 FOLIO A4 A3 B4 A4 A4 A3 B4 FOLIO Reduced to 75 Reduced to 75 4 SETTING RECEPTION AND PRINTING Cont Relationship between Original and Copy Paper Cont ...

Page 100: ...RD setting contact your service technician RX Reduction Printing ON OFF ON initial setting If the received original is longer than the recording paper it will be vertically reduced to 90 to fit on the installed recording paper OFF The received original is printed on two sheets of paper if its length exceeds the paper printing area Cassettes can be set for received FAX printing only Page 1 11 in th...

Page 101: ...nals are printed so that they can be bound in the widthwise direction Received ST A5 or B5 sized originals are printed so that they can be bound in the lengthwise direction This printer setting sets whether or not to print received originals on both sides of the paper loaded in the copier Two sided printing is possible only for the same size of the received originals When the copier runs out of pa...

Page 102: ...y for LT A4 sized paper Set the LT and LT R or A4 and A4 R cassettes When the copier runs out of paper during alternate printing the rest of the document is printed on the remaining paper 1 Press the SETTINGS key to display the settings menu then the PRINTER key 2 Press the ON key of the ALTERNATION then the SET key The registered items can be confirmed in the function list Page 5 38 ...

Page 103: ...security password for RDC communication For details of RDC communication consult your service technician 1 Press the SETTINGS key to display the settings menu the NEXT key then the RDC PASSWORD key 2 Press the PASSWORD key 3 Enter the RDC password using the digital keys and press the SET key ...

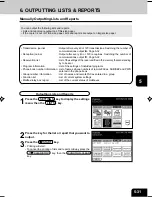
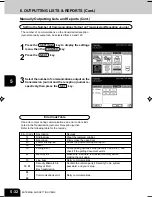
Page 104: ...ttings of the reserved files in the memory that are standing by to be sent Program information List of the settings of individual programs Phone book number information List of names phone numbers of remote FAXes SUB SEP and PWD entered in the phone book Group number information List of names and remote FAXes entered in a group Function list List of current system settings Mailbox relay box report...

Page 105: ...rd and your setup Box transmission B0 Communications error Retry communications E8 Error CodeTable If an error occurs during communications an error code is indi cated in the Transmission journal or Reception journal Refer to the following table for the remedy Setting the Number of Communications Output onTransmission Reception Journal The number of communications on the transmission reception jou...

Page 106: ...he number of communications output Page 5 32 Memory transmission report Output when memory TX fails Reduced document is attached 1 2 Multi transmission report After multi address transmission has ended this report is output to show the results of transmission in two separate reports one for terminals to which the original was sent successfully and one for terminals to which transmission failed Pol...

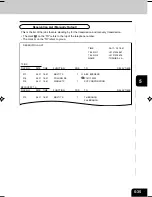
Page 107: ...emote FAX numbers Output information for the last 40 or 120 communications can be confirmed Switching the number of communications output Page 5 32 The mark on the TO is appended when the 2nd TEL NUMBER is used for transmission The mark on the MODE is appended when the 2nd line is used If any errors occur during transmission the error code is displayed after the STATUS NG Page 5 32 Reception Journ...

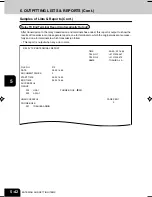
Page 108: ...refers to group Reservation List Manually Output RESERVATION LIST TIME 09 11 00 18 41 TEL NO 1 2131234567 TEL NO 2 2131235678 NAME TOSHIBA L A TX RX FILE NO DATE TIME FUNCTION PGS TO DELAY TIME 017 09 11 18 41 MULTI TX 1 G ABC EXPRESS 018 09 11 18 41 POLLING RX 2141112222 019 09 11 18 41 SINGLE TX 1 XYZ CORPORATION RECOVERY TX FILE NO DATE TIME FUNCTION PGS TO DELAY TIME 013 09 11 18 01 MULTI TX 1...

Page 109: ... NAME TOSHIBA L A PROGRAM NUMBER 01 PROGRAM NAME GROUP 1 RESOLUTION U FINE MODE TEXT PHOTO EXPOSURE 5 TX TYPE MEMORY TX ORIGINAL B5 ECM OFF QUALITY TX ON LINE SELECT LINE2 POLLING STATUS OFF PASSWORD TEL NUMBER DELAY COMM 07 07 07 ITU MAILBOX TYPE BULLETIN B D ITU MAILBOX MODE TRANSMIT ITU MAILBOX NUMBER 111222333 ITU MAILBOX PWD PRIORITY RESERVE OFF TWO SIDED SCAN ON PHONE BOOK 001 002 004 005 00...

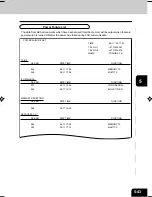
Page 110: ... remote FAXes entered in the group Group Number Information Manually Output PHONE BOOK NUMBER INFORMATION TIME 09 11 00 17 55 TEL NO 1 2131234567 TEL NO 2 2131235678 NAME TOSHIBA L A NO NAME TEL NUMBER QUALITY TX TX TYPE LINE ECM ATT 001 SALES DEPT 1234567890 ON DIRECT LINE1 OFF 15 002 ABC Co 9876543210 OFF MEMORY OFF ON 15 GROUP NUMBER INFORMATION TIME 09 11 00 17 55 TEL NO 1 2131234567 TEL NO 2 ...

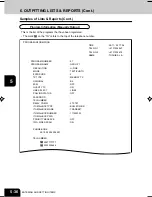
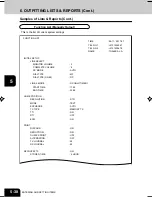
Page 111: ...SETUP LINE SELECT MONITOR VOLUME 3 COMPLETE VOLUME 4 RX MODE AUTO DIAL TYPE MF DIAL TYPE LINE2 DP LINE 2 MDOE RX ONLY TIMER START TIME 11 22 END TIME 23 55 HOME POSITION RESOLUTION STD MODE TEXT EXPOSURE AUTO TX TYPE MEMORY TX TTI ON RTI OFF ECM ON PRINT DISCARD ON REDUCTION ON DUPLEX PRINT OFF ALTERNATION OFF TX JOURNAL 40 RX JOURNAL 40 RECOVERY TX ON STORED TIME 6HOUR 6 OUTPITTING LISTS REPORTS ...

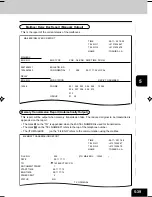
Page 112: ...n using the mailbox MemoryTransmission Report Automatically Output MAILBOX RELAY BOX REPORT TIME 09 11 00 18 00 TEL NO 1 2131234567 TEL NO 2 2131235678 NAME TOSHIBA L A MAILBOX BOX NO BOX TYPE PGS FILE NO DATE TIME FROM 0987654321 BULLETIN B D 1234567890 CONFIDENTIAL 1 008 09 11 17 24 LOCAL RELAY BOX NO END STATION REPLY TO NUMBER 12345 PHONE 001 002 003 004 005 12345 006 007 008 009 010 013 GROUP...

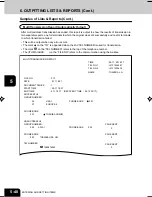
Page 113: ...e top of the telephone number The ITU MAILBOX on the FILE NO refers to the communication using the mailbox MultiTransmission Report Automatically Output MULTI TRANSMISSION REPORT TIME 09 11 00 18 17 TEL NO 1 2131234567 TEL NO 2 2131235678 NAME TOSHIBA L A FILE NO 013 DATE 9 11 18 01 DOCUMENT PAGES 1 START TIME 09 11 18 01 END TIME 9 11 18 17 RECOVERY TIME 09 12 00 17 SUCCESSFUL GROUP NUMBER 05 USA...

Page 114: ...e mailbox Polling Report Automatically Output This report is output when the original is received in the confidential bulletin board or relay mailbox Mailbox Reception Report Automatically Output POLLING REPORT TIME 09 11 00 18 18 TEL NO 1 2131234567 TEL NO 2 2131235678 NAME TOSHIBA L A FILE NO 014 DATE 09 11 18 02 START TIME 09 11 18 17 END TIME 09 11 18 18 SUCCESSFUL PHONE BOOK 001 TOSHIBA ADMIN...

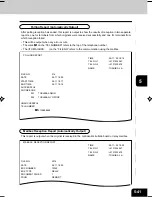
Page 115: ...inals to which transmission failed This report is output when any error occurs RelayTX EndTerminal Report Automatically Output RELAY TX END TERMINAL REPORT TIME 09 20 00 14 46 TEL NO 1 2131234567 TEL NO 2 2131235678 NAME TOSHIBA L A FILE NO 013 DATE 09 20 14 45 DOCUMENT PAGES 3 START TIME 09 20 14 45 END TIME 09 20 14 46 SUCCESSFUL GROUP 002 USA 1 PHONE BOOK 001 005 ASIA 1 UNSUCCESSFUL PHONE BO0K ...

Page 116: ...e List POWER FAILURE LIST TIME 09 11 00 17 53 TEL NO 1 2131234567 TEL NO 2 2131235678 NAME TOSHIBA L A TX RX FILE NO DATE TIME FUNCTION 044 09 11 17 04 MEMORY TX 045 09 11 17 06 MULTI TX ITU MAILBOX FILE NO DATE TIME FUNCTION 001 09 11 19 05 CONFIDENTIAL 002 09 11 19 10 BULLETIN B D MEMORY RECEPTION FILE NO DATE TIME FUNCTION 029 09 11 16 38 RECOVERY TX FILE NO DATE TIME FUNCTION 049 09 11 17 09 M...

Page 117: ...1 2 3 4 5 6 7 8 9 10 11 12 5 44 ENTERING AND SETTING ITEMS ...

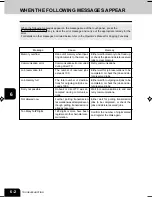
Page 118: ...state of the copier appear on the touch panel When any graphic symbol flashes rectify the problem referring to When Graphic Symbols Flash on the Touch Panel in the Operator s Manual for Copying Functions When the following messages appear 6 2 Transmission trouble 6 3 Reception trouble 6 4 ...

Page 119: ...stered in the chain dial com munication Either wait for memory to be freed up or check the jobs and delete reserved jobs to clear memory Retry communications Either wait for job reservations to be completed or check the jobs and de lete reserved jobs Either wait for outgoing call jobs to be completed or check the jobs and de lete reserved jobs Wait for communications to end and retry communication...

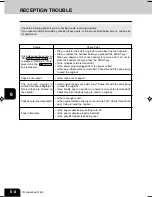
Page 120: ...original holder extended Have you placed more than the maximum number of originals that can be placed at one time 13 22lb or 50 80g m2 100 originals or stacked height of originals 16mm or less Does the original that you are sending match the conditions of the original that is available for sending Have you pushed in the originals too hard Is the original holder extended Is the original placed faci...
Page 121: ...tion error at the remote FAX Check this with the party trying to send the original Is there enough toner Is the original placed correctly on the remote FAX Check this with the party trying to send the original Is the paper cassette size setting correct Is the paper cassette properly inserted Is the specified paper type being use Trouble Originals cannot be sent even if the MONITOR PAUSE key is pre...

Page 122: ...1 2 3 4 5 6 7 8 9 10 11 12 7 1 7 SPECIFICATIONS Using the telephone 7 2 Main specifications 7 3 ...

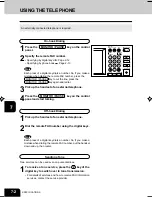
Page 123: ...on the control panel and start talking Off hook Dialing 1 Pick up the handset of an external telephone 2 Dial the remote FAX number using the digital keys Note Each press of a digital key dials a number So if you make a mistake when dialing the remote FAX number put the handset down and up then redial Sending aTone Tone services can be used even on pulse dial lines 1 To receive a tone service pres...

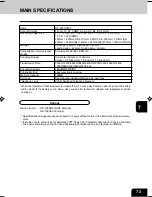
Page 124: ...2400 bps Encoding Systems JBIG MMR MR MH Printing Method Laser electronic copying Memory Capacity 360MB Unit Type Desktop type transmitting receiving dual type Telephone Lines Public Switched Telephone Network Specifications and appearance are subject to change without notice in the interest of product improve ment If trouble occurs call service for assistance Page 7 29 in Operator s Manual for Co...

Reviews: