background image

5 CHANGING EQUIPMENT’S SETTINGS

172    Service Notification

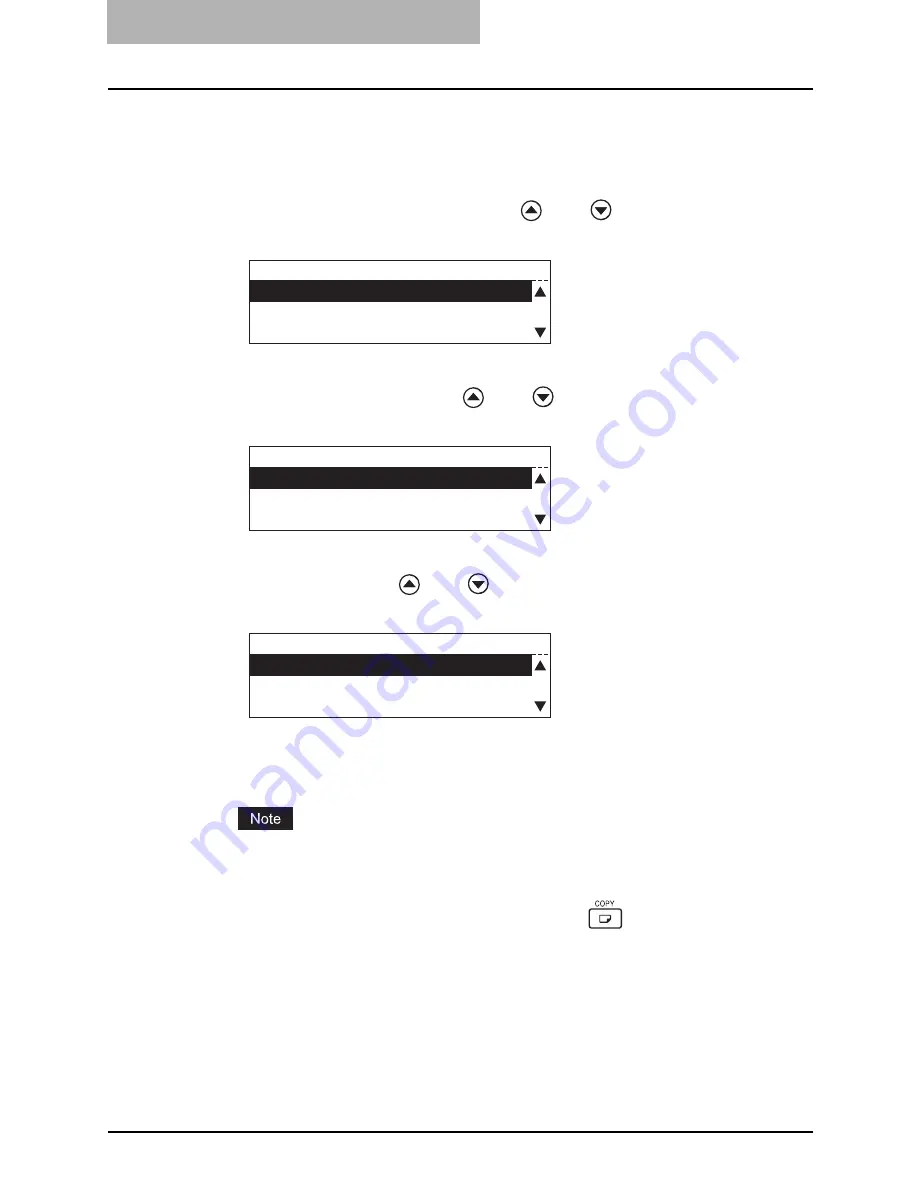
Sending an Email

The status of this equipment will be notified a specified address by Email. Before starting this 
operation, make sure that the Email address or the customer information is correctly registered.

1

Select “E-MAIL SETTINGS” with 

 and 

 buttons, and then 

press the [ENTER] button.

2

Select “SEND NOW” with 

 and 

 buttons, and then press the 

[ENTER] button.

3

Select “YES” with 

 and 

 buttons, and then press the [ENTER] 

button.

When the Email has been sent and completed correctly, “Operation completed” appears 
for approx. 2 seconds and then the screen returns to the previous menu. If “NO” is 
selected, the operation is canceled and then the screen returns to the previous menu.

If an Email sending error occurs, “E-mail error” appears for approx. 2 seconds and then 
the screen returns to the previous menu. In this case, contact your service technician or 
service representative.

4

Press the [USER FUNCTIONS] button or 

 (copy mode) button.

The screen returns to the “copy mode” main screen.

SERVICE NOTIFICATION

01.E-MAIL SETTINGS

02.CUSTOMER INFORMATION

E-MAIL SETTINGS

01.SEND NOW

02.E-MAIL ADDRESS 1

03.E-MAIL ADDRESS 2

SEND NOW

01.YES

02.NO

Summary of Contents for e-studio182

Page 1: ...MULTIFUNCTIONAL DIGITAL SYSTEMS Operator s Manual for Copying Functions ...

Page 2: ......

Page 3: ... the operation of this equipment This operator s manual describes the following y How to use this equipment y How to inspect and carry out maintenance on this equipment y How to remedy mechanical and copying problems Be sure to read this manual before using this equipment Keep this manual handy and retain it for future reference ...

Page 4: ...S Department of Health and Human Services DHHS Radiation Performance Standard according to the Radiation Control Health and Safety Act of 1968 including amendments Protective housing and external covers completely confine the laser beam light emitted inside the multi functional digital systems The laser beam cannot escape from the machine during any phase of user operation Regulations implemented ...

Page 5: ...rding the printing functions such as the GA 1191 accessories necessary environmental conditions and outline of network connections as well as troubleshooting Be sure to read this before using the printing functions Network Administration Guide for Printing Functions PDF file This manual describes the operation necessary for configuring a network and using the print ing functions such as connecting...

Page 6: ...onnec tions as well as troubleshooting Be sure to read this before using the scanning functions Network Administration Guide for Scanning Functions PDF file This manual describes the operation necessary for configuring a network and using the scan ning functions such as connecting to a network and setting components Setup Guide for Scanning Functions PDF file This manual consists of the following ...

Page 7: ... original is placed in a landscape direction e g LT size original on the original glass Paper or originals of LD or LG size can only be placed in a landscape direction therefore R is not added to these sizes Indicates a potentially hazardous situation which if not avoided could result in death serious injury or serious damage or fire in the equipment or sur rounding assets Indicates a potentially ...

Page 8: ...n the US and other countries y Adobe Adobe Acrobat Adobe Reader Adobe Acrobat Reader and PostScript are trade marks of Adobe Systems Incorporated y Other company or product names shown in this manual may be a brand name or a trade mark of each company 2009 2011 TOSHIBA TEC CORPORATION All rights reserved Under the copyright laws this manual cannot be reproduced in any form without prior written pe...

Page 9: ...Recommended paper 38 Placing paper in drawers 39 Placing paper in the drawers of Paper Feed Pedestal optional 43 Preparation 3 Registering Size of Paper Placed 47 Registering standard size LD LT LT R LG ST R 47 Registering other standard sizes 48 Chapter 2 HOW TO MAKE COPIES Placing Originals 52 Acceptable originals 52 Placing originals on the original glass 53 Placing booklet type originals such ...

Page 10: ...el 77 Chapter 4 ADVANCED COPYING FUNCTIONS Copy Menu 80 Operating in copy menu 80 Copy function list 81 Copying in Same Page Order as Originals Sort Copying 82 Sorting Alternately One Set by One ALTERNATION 83 Sorting in Magazine Type Arrangement MAGAZINE SORT 84 Shifting Paper to Make Margin IMAGE SHIFT 86 Erasing Shadow on Edge EDGE ERASE 88 Copying on Both Sides DUPLEX 90 Copying on one side 91...

Page 11: ...Setting 122 Paper Size Setting 123 Walkup Screen Setting 125 Timer Setting 127 Time of automatic function clear 127 Time of automatic low power mode 128 Time of automatic sleep mode super sleep mode 130 Energy Saving Mode Setting 132 Weekly Timer Setting 134 Volume Adjustment 137 Touch Key Tone Setting 139 Department Code 141 Setting department codes 141 Changing department names or codes 145 Dele...

Page 12: ...nal Upper Automatic Document Feeder optional Upper 184 Paper jams on bypass tray 186 Paper jams within Automatic Duplexing Unit optional 186 Paper jam behind transfer unit 187 Paper jams within fuser unit 188 Paper jams within Paper Feed Unit optional 189 Paper jams within Paper Feed Pedestal optional 190 Replacing Toner Cartridge 192 Before Calling Service Technician 199 General operation 199 Ton...

Page 13: ...nation Matrix 217 Combination Matrix 1 2 217 Combination Matrix 2 2 218 List Print Format 219 Department code list 219 Function list 219 Supply notice list 220 Mailbox list 220 Configuration page list 221 NIC status page list 221 Menu list 222 INDEX 223 ...

Page 14: ...12 CONTENTS ...

Page 15: ...TOSHIBA Quality Is Second to None 13 TOSHIBA Quality Is Second to None Co packed toner cartridge The toner cartridge illustrated below is co packed with the equipment ...

Page 16: ...ng to the characteristics of the toner to be used and enables you to print images of an optimal quality If you are using a toner cartridge other than the one we recommend the equipment may not be able to detect whether it is installed or not Therefore even if the toner cartridge is correctly installed the error message Toner not recognized appears on the LCD screen and printing may not be performe...

Page 17: ...mum performance Toner Optimum Image Quality TOSHIBA toner is manufactured using ultra fine quality materials under precisely controlled con ditions to ensure that your TOSHIBA equipment will continually generate sharp high quality images Cost Advantage Genuine TOSHIBA toner provides value Only the proper amount of toner is used during the reproduction process thereby enabling the machine to contin...

Page 18: ... water pipe or any other object not suit able for grounding y Plug the power cable securely into the outlet If it is not plugged in properly it could heat up and cause a fire or give you an electric shock y Do not damage break or attempt to repair the power cable The following things should not be done to the power cable Twisting it Bending it Pulling it Placing anything on it Making it hot Situat...

Page 19: ...he power is not turned off you could get an electric shock Other points y The socket outlet shall be installed near the equipment and shall be easily accessible y Make sure that there is enough space around the system to facilitate changing of parts maintenance and clearing paper jams If there is insufficient space some operations such as bypass feeding will become difficult and the equipment coul...

Page 20: ...it has been moved be sure to turn them in the opposite direction and lower them to fix it back in place y Lock the casters to fix the Desk The Desk optional has casters underneath Before moving the Desk raise the caster lock to release it After moving the Desk be sure to lower the lock to fix it in place Do not install the equipment by yourself or try to move it once it has been installed This cou...

Page 21: ...poses during that time If an insulation failure occurs this could cause a fire or give you an electric shock Caution y Do not place heavy objects 9 lb or more on the original glass and do not press on it with force Breaking the glass could cause personal injury y Do not place heavy objects 9 lb or more on the equipment If the objects fall off this could cause injury y Be careful not to let your fi...

Page 22: ...cautions Position of Certification label etc Certification label Identification label Warning label Warning for high temperature areas fuser unit Warning for high temperature areas ventilation holes Explanatory label ...

Page 23: ...ng the floor This could cause a fire and give you an electric shock Caution y Always keep the plug and outlet clean Prevent them from accumulating dust and dirt This could cause a fire and give you an electric shock due to the heat released by electric leak age Other points y Do not use such solvents as thinner or alcohol when cleaning the surface of the equipment This could warp the shape of the ...

Page 24: ...ician if there is any difficulty in breathing or other signs of distress y Skin Contact Wash with soap and water Wash clothing before reuse If irritation occurs or is persis tent seek medical attention y Eye Contact Immediately flush eyes with plenty of water for at least 15 minutes If irritation persists call a physician y Ingestion Dilute stomach contents with several glasses of water ...

Page 25: ...issions events or accidents beyond the rea sonable control of TOSHIBA TEC CORPORATION including without limitation acts of God war riot civil commotion malicious or deliberate damage fire flood or storm natural calamity earthquakes abnormal voltage or other disasters c additions modifications disassembly transportation or repairs by any person other than service technicians authorized by TOSHIBA T...

Page 26: ...s the ENERGY STAR Program requirements check if the corresponding logo is on the product If you have any questions contact your service representative Energy saving features Energy saving features are provided in this product in order to reduce power consumption when it is not being used Low power mode The equipment automatically enters this mode when a specified period of time 1 has passed since ...

Page 27: ...ntrol panel 30 Copy mode main screen 33 Preparation 1 Turning Power ON 34 Turning power ON 34 Saving energy when not in use Energy saving mode 35 Preparation 2 Placing Copy Paper 37 Acceptable media types 37 Recommended paper 38 Placing paper in drawers 39 Placing paper in the drawers of Paper Feed Pedestal optional 43 Preparation 3 Registering Size of Paper Placed 47 Registering standard size LD ...

Page 28: ... of sheets can be placed may vary depending on the media type of the originals 2 sided origi nals can be scanned with the Reversing Automatic Document Feeder MR 3023 P 56 Placing originals on Reversing Automatic Document Feeder optional Automatic Document Feeder optional P 180 Paper Jams 3 Operator s Manual pocket Back side Keep the Operator s Manual in this 4 Side cover 5 Automatic Duplexing Unit...

Page 29: ...to add one more drawer to the equipment Moreover the Drawer Module MY 1028 9 can add another drawer to it In one drawer the maximum 550 sheets of plain paper 20 lb bond can be placed at once 11 Paper Feed Unit optional MY 1027 Use this to add one more drawer to the equipment A maximum of 250 sheets of plain paper can be placed in one go 12 Drawer Maximum 250 sheets of plain paper can be placed in ...

Page 30: ...ling Open this when you make a large amount of copies on a larger size of paper e g LD LG 7 AC IN terminal Use this to connect the co packed power cable and the equipment 8 USB terminal 4 pin With this terminal the equipment can be connected to your PC using a commercially avail able USB cable y Use a USB2 0 Hi Speed certified cable USB cable supporting the USB2 0 Hi Speed mode 480 Mbps of transfe...

Page 31: ...nnected with a USB cable 1 2 1 The Fax Kit GD 1221 optional is necessary 2 This is not available in equipment in which the Network Printer Kit GA 1191 optional is installed Platen Cover KA 1650PC External Keyboard GJ 1160 Fax Kit GD 1221NA Paper Feed Unit MY 1027 Paper Feed Pedestal KD 1022 Desk MH 1640 Reversing Automatic Document Feeder MR 3023 Automatic Document Feeder MR 2020 Network Printer K...

Page 32: ...ed size copying see the following page P 70 Copying Different Sizes in One Go MIXED SIZE COPYING 3 ENERGY SAVER button Use this to let the equipment enter into the energy saving mode when the equipment is not used For the details of the energy saving mode see the following page P 35 Saving energy when not in use Energy saving mode 4 INTERRUPT button Use this to interrupt the copy job in process an...

Page 33: ...a 11 Function switching buttons Use them to switch functions among copying printing scanning and Fax To utilize the scanning functions the Scanner Upgrade Kit optional is required To utilize the Fax functions the Fax Kit optional is required 12 FUNCTION CLEAR button lamp This lamp blinks when copying is finished Use this button to clear the set copy functions 13 Contrast adjustment volume Use this...

Page 34: ...ensity of copy image The AUTO lamp below the automatic copy density mode button is lit when the density is being automatically adjusted For the details of density adjustment see the following page P 77 Adjusting Density Level 23 DRAWER button lamps Use this button to select a drawer or the bypass tray to be used as a paper source The lamp of the paper source currently selected is lit The lamp blin...

Page 35: ...this equipment or error messages 2 Copy quantity 3 Reproduction ratio 4 Selecting button display This area displays operation corresponding to each selecting button ZOOM Use this to specify the reproduction ratio manually P 75 Specifying reproduction ratio manually Custom mode Use this to recall the copying function registered as a custom function You can quickly recall functions frequently used b...

Page 36: ... appears on the LCD screen to show you the current sta tus However this function cannot be accessed while Please wait is being displayed approx 15 seconds 2 The LCD screen below is shown if the equipment is managed under the department code function Key in the department code Key in a 5 digit department code and then press the ENTER button Then the equipment is ready for copying If the department ...

Page 37: ...er the sleep mode or the super sleep mode is enabled The enabled mode and the time until the mode is entered Auto sleep time can be changed P 132 Energy Saving Mode Setting y When the Network Printer Kit GA 1191 optional is installed the super sleep mode is dis abled y There is another one called the low power mode Since the time until the low power mode is entered Auto low power time and the time...

Page 38: ...he Weekly Timer reaches the time for the power to be turned ON y When Fax data are received y When the Platen Cover optional or the Automatic Document Feeder Reversing Automatic Document Feeder optional is raised y When originals are placed on the Automatic Document Feeder Reversing Automatic Docu ment Feeder optional Super sleep mode y When the ENERGY SAVER button on the control panel is pressed ...

Page 39: ...not mix various paper sizes in one drawer Abbreviations for LT format sizes LT Letter LD Ledger LG Legal ST Statement COMP Computer Feeder Media type Paper size Maximum sheet capacity 1 Drawers of the equip ment and Paper Feed Unit optional Plain paper 17 20 lb Bond LT format LD LG LT LT R COMP 13 LG A B format A3 A4 A4 R B4 B5 B5 R FOLIO 250 sheets 17 lb Bond 250 sheets 20 lb Bond Drawers of the ...

Page 40: ...s extremely smooth or rough Do not use the types of paper listed below since they may cause an equipment malfunction y Paper whose surface is specially treated y Paper once printed with other copiers or printers Storing paper Observe the following cautions when storing copy paper y Wrap copy paper in its wrapping paper to prevent it from gathering dust y Do not expose copy paper to direct sunlight...

Page 41: ...r in the drawer For the acceptable paper see the following page P 37 Acceptable media types 1 Turn the power of the equipment ON 2 Pull out the drawer carefully Pull out the drawer until it comes to a stop 3 Press down the paper plate Press it down until you hear a click sound and it is no longer lifted up ...

Page 42: ...and then reinstall the guide at the position of the desired paper size The paper size is indicated on the bottom inner surface of the drawer 5 While pushing the green knob of the side guides fully widen the gap between them Widen the gap with both hands 6 Place paper in the drawer A ...

Page 43: ...it in the drawer otherwise multiple feeding could occur Be careful that the paper does not cut your fingers y Place the paper face up You may tell its face by the note on its wrapping paper 7 Adjust the side guides to the desired paper size Be sure that a gap of approx 0 02 less than 0 04 in total is left between the paper and each side guide shown as A in the picture If the gap is inappropriate t...

Page 44: ...he paper into the equipment Be sure that the size is registered correctly or it could cause a paper jam For the registration of paper size see the following page P 47 Preparation 3 Registering Size of Paper Placed Be sure to register the paper size when you have changed the paper size in the drawer as well as when you place paper in the corresponding drawer for the first time The registration menu...

Page 45: ...optional For the acceptable paper see the following page P 37 Acceptable media types 1 Pull out the drawer carefully Pull out the drawer until it comes to a stop 2 Pull out the trailing guide while pushing its lower part to the direc tion of the arrow Then reinstall the guide at the position of the desired paper size The paper size is indicated on the bottom inner surface of the drawer ...

Page 46: ...lace paper in the drawer y The maximum number of sheets that can be placed at one time is 550 20 lb Bond Be sure that the stack height of paper is not higher than the line indicated at the inner side of the guide P 37 Acceptable media types y Fan the paper well before placing it in the drawer otherwise multiple feeding could occur Be careful that the paper does not cut your fingers y Place the pap...

Page 47: ...ox 0 02 less than 0 04 in total is left between the paper and each side guide shown as A in the picture If the gap is inappropriate this could cause a paper misfeed 7 Push the left side of the side guide lock to lock it 8 Change the paper size indicator to match the size of paper placed A ...

Page 48: ...e is registered correctly or it could cause a paper jam For the registration of paper size see the following page P 47 Preparation 3 Registering Size of Paper Placed Be sure to register the paper size when you have changed the paper size in the drawer as well as when you place paper in the corresponding drawer for the first time The registration menu for the paper size can be displayed automatical...

Page 49: ...red on the user functions mode main screen P 123 Paper Size Setting y The registration menu for the paper size can be displayed automatically whenever the drawer is closed This is useful when paper in the drawer is often replaced P 165 Pop Up Display Setting Registering standard size LD LT LT R LG ST R In this section LT size is registered in the drawer of the equipment as an example 1 Press and h...

Page 50: ...n to its normal status 4 Press the ENTER button The paper size has been registered Registering other standard sizes When standard size paper other than LD LT LT R LG or ST R is placed register this size as OTHER size In this section A4 size is registered in the drawer of the equipment as an example 1 Press and hold the COPY and DRAWER buttons simultaneously for more than two seconds The LCD screen...

Page 51: ...lit 4 Press the selecting button B or C to select the size of the paper placed in the drawer This can also be done with the or button e g Setting A4 size 5 Press the ENTER button The LCD screen shows as follows 6 Press the ENTER button The paper size has been registered as OTHER size and the equipment will return to its normal status Select paper size A4 R A3 A4 Select paper size 1 100 NONSORT ZOO...

Page 52: ......

Page 53: ...riginals such as books or catalogs 54 Using Reversing Automatic Document Feeder optional Automatic Document Feeder optional 55 Placing originals on Reversing Automatic Document Feeder optional Automatic Document Feeder optional 56 Making Copies 57 Stopping Resuming copying 59 Interrupting copying and making another copy Interrupt copy 60 Using Bypass Tray 61 Bypass copying 62 ...

Page 54: ...pes may not be used 7 ST size originals must be placed in a landscape direction Maximum number of originals scanned in one go Up to 250 original sheets can be scanned at one time When the number of sheets to be scanned exceeds 250 or the built in memory in the equipment becomes full during the scanning of the copy job scanning stops and Count over or Memory is full appears on the LCD screen To cop...

Page 55: ...aten Cover optional or the Reversing Automatic Docu ment Feeder optional Automatic Document Feeder optional Raise the Platen Cover optional or the Reversing Automatic Document Feeder optional Automatic Document Feeder optional 60 degrees or more from the equip ment to detect the original size 2 Place the original face down on the original glass and align it against the left rear corner of the glas...

Page 56: ...ic Docu ment Feeder optional Automatic Document Feeder optional 2 Open the desired page of the original and place it face down Align it against the left rear corner of the glass 3 Lower the Platen Cover optional or the Reversing Automatic Doc ument Feeder optional Automatic Document Feeder optional carefully y Do not try to lower the Platen Cover optional or the Reversing Automatic Document Feeder...

Page 57: ... Feeder optional Automatic Document Feeder optional Do not use the following types of original since such types may cause a paper jam or damage to the equipment y Extremely wrinkled folded or curled ones y Ones with carbon paper y Taped pasted or cut out ones y Clipped or stapled ones y Ones with holes or tears y Damp ones y Overhead transparencies or tracing paper y Coating paper e g coated with ...

Page 58: ...e original length y The top sheet of the originals will be scanned first y The total sheets of originals placed must not exceed 100 13 3 to 20 lb or the stack height of the originals must not exceed 0 62 regardless of their sizes When placing a large amount of originals with a long width Pull out the original stopper so that the exiting originals will not fall When replacing this stopper lift it s...

Page 59: ...cing originals on Reversing Automatic Document Feeder optional Automatic Document Feeder optional P 53 Placing originals on the original glass P 54 Placing booklet type originals such as books or catalogs 3 Key in the desired number of copies copy quantity when you copy more than one set e g 5 sets If you want to correct the copy quantity keyed in press the CLEAR STOP button and then key in the co...

Page 60: ...when approx 250 sheets of paper have been continuously exited The LCD screen shows as follows Remove the paper from the receiving tray and then press the START button Copying resumes Press the CLEAR STOP button to end the copy job Memory clear appears on the LCD screen Select YES and then press the START or ENTER button When the paper has run out When the paper in the drawer has run out during cop...

Page 61: ...ws Or Press the selecting button C or and buttons and select YES to end the copy job Then press the START or ENTER button 2 Press the selecting button C to select NO to resume the copy job This can also be done with the or button Then press the START or ENTER button The LCD screen shows as follows 3 Press the START button Memory clear YES NO Cancel job YES NO Press START to resume 3 100 NONSORT ZO...

Page 62: ... is pressed during scanning the INTERRUPT lamp blinks and then the lamp will be fully lit after the scanning has finished 2 Replace the original with a new one 3 Select the copy modes as required and then press the START button Interrupt copying starts 4 After you have finished interrupt copying press the INTERRUPT button Ready to resume job appears and then the copying status returns to the one b...

Page 63: ...d paper is used See the following page for the TOSHIBA recommended paper P 38 Recommended paper 2 The paper of 13 to 16 lb Bond can be used if it is set on the bypass tray one by one 3 Automatic duplex copying is not available 4 Be sure to use the overhead transparencies that TOSHIBA recommends When transparencies other than the TOSHIBA recommended ones are used this could cause an equipment malfu...

Page 64: ...sheets of plain paper 17 to 20 lb Bond can be set In this case make sure that the height of the paper stack does not exceed the indicators of the side guides If paper other than plain is used set it one sheet at a time y Fan the stack of paper well before placing it on the bypass tray y Do not push the paper forcibly into the entrance of the bypass feeder This could cause a paper misfeed When you ...

Page 65: ...e Press the selecting button C to select paper type This can also be done with the or button Then press the ENTER button e g Thick paper 21 to 28 lb Bond You can select the media type from the following four THICK PAPER 1 Thick paper 21 to 28 lb Bond THICK PAPER 2 Thick paper 29 lb Bond to 90 lb Index sticker labels TRANSPARENCY Overhead transparencies PLAIN Plain paper 17 to 20 lb Bond tracing pa...

Page 66: ... projection When the paper on the bypass tray has run out during copying copying continues with the paper of the same size in the drawer as the one on the bypass tray If the size of the paper on the bypass tray has not been registered in advance however copying stops In this case add paper to the bypass tray and press the START button to resume copy ing When bypass copying has finished If the pape...

Page 67: ... Default settings 66 Confirming set functions 66 Paper Selection 67 Automatic paper selection APS 67 Manual paper selection 68 Copying Different Sizes in One Go MIXED SIZE COPYING 70 Zooming In Out Copy Image 72 Automatic magnification selection AMS 72 Specifying both the sizes of the original and the copy paper 74 Specifying reproduction ratio manually 75 Selecting Image Mode 76 Adjusting Density...

Page 68: ...GING EQUIPMENT S SETTINGS Confirming set functions Press the SETTINGS button to confirm the set functions The current settings and functions set appear on the LCD screen Press the selecting button B or C to display all the settings so that the display will be switched to the next one This can also be done with the or button After you finished the confirma tion press the SETTINGS button again Item ...

Page 69: ...ase the APS cannot be used such as when originals are non standard sizes or overhead transparen cies Automatic paper selection APS When you place a standard size original the equipment detects its size and automatically selects copy paper of the same size as the original The following sizes of originals are available LD LG LT LT R COMP ST R The COMP size paper can be used only when the mixed size ...

Page 70: ...l paper selection Select the paper size with this method when you use the following originals whose sizes may not be detected correctly with automatic paper selection y Highly transparent ones e g overhead transparencies tracing paper y Wholly dark ones or ones with dark borders y Non standard size e g newspapers magazines In this method if the desired size of copy paper is not placed in the drawe...

Page 71: ...lection 69 3 Press the DRAWER button several times until the lamp of the desired drawer is lit e g Selecting the drawer of the equipment 4 Select the other copy modes as required and then press the START button ...

Page 72: ...abled Place paper in the drawer 2 Place originals on the Reversing Automatic Document Feeder optional 3 Press the MIXED SIZE button The mixed size copying mode is set and the MIXED SIZE lamp is lit The equipment is switched to the automatic paper selection mode and the APS lamp is lit When copying in the automatic paper selection mode step 4 is not necessary In this case proceed to step 5 In the a...

Page 73: ...lecting the drawer of the equipment 5 Select the other copy modes as required and then press the START button Copying starts When Change direction ORG appears The originals are not placed in a correct direction Press the ENTER button to exit the original Then place it by rotating 90 degrees and resume copying When the copying has finished press the FUNCTION CLEAR button ...

Page 74: ...erhead transparencies Specifying reproduction ratio manually Specify the reproduction ratio manually from 25 to 200 The reproduction ratio can be set in the horizontal and vertical direction separately In this case select XY zoom function in the copy menu P 109 Changing Sizes in Horizontal and Vertical Directions XY ZOOM Automatic magnification selection AMS Specify the copy paper size to be used ...

Page 75: ...button until the AMS lamp is lit The reproduction ratio on the copy mode main screen will be changed to AMS 4 Place the original 5 Select the other copy modes as required and then press the START button Copying is performed with the most suitable reproduction ratio for the specified paper size When Change direction ORG appears The direction of the original placed is not correct Press the ENTER but...

Page 76: ...on several times until the lamp of the desired paper size is lit e g Selecting LT for copy paper y You can select the desired paper size with the DRAWER button in the same proce dure y When standard size paper other than LD LT LT R LG or ST R is placed register this size as OTHER size in advance P 48 Registering other standard sizes The most appropriate reproduction ratio for both the sizes of the...

Page 77: ...nging The reproduction ratio can be set from 25 to 200 Press the selecting button A to return it to 100 5 Press the ENTER button The reproduction ratio is set 6 Press the COPY button several times until the lamp of the desired paper size is lit e g Selecting LT for copy paper y You can select the desired paper size with the DRAWER button in the same proce dure y When standard size paper other than...

Page 78: ...d photographs mixed PHOTO Originals with photographs TEXT Originals with text only or with text and fine illustrations only TEXT PHOTO is set by default at the installation of the equipment 1 Place paper in the drawer 2 Place the original 3 Press the original mode button until the lamp of the desired mode is lit e g Original with photographs 4 Select the other copy modes as required and then press...

Page 79: ...ensity mode in the following procedure 1 Place paper in the drawer 2 Place the original 3 Press the density adjustment buttons light or dark to adjust the density to the desired level The density level can be set within 7 stages One press of each button increases or decreases the density level by one stage When you keep pressing either of them the density level also keeps changing 4 Select the oth...

Page 80: ......

Page 81: ...n Magazine Type Arrangement MAGAZINE SORT 84 Shifting Paper to Make Margin IMAGE SHIFT 86 Erasing Shadow on Edge EDGE ERASE 88 Copying on Both Sides DUPLEX 90 Copying Right and Left Pages Separately DUAL PAGE 97 Printing Page Number Date and Time ANNOTATION 99 Changing Copy Setting on Each Job JOB BUILD 101 Copying 2 or 4 Pages into 1 Page 2IN1 4IN1 103 Copying Both Sides of Card into 1 Page ID CA...

Page 82: ...cting the XY zoom function using the selecting buttons A B and C is explained as an example 1 Select the column in which the desired function is located with the selecting buttons A B and C e g Press the selecting button C to select XY ZOOM 2 Press the same selecting button for several times until you select the desired function 3 Press the ENTER button The function setting screen appears Perform ...

Page 83: ...originals and copy paper are 1 sided or 2 sided 1 1 SIMPLEX 1 sided original to 1 sided copy 1 2 DUPLEX 1 sided original to 2 sided copy 2 2 DUPLEX 2 sided original to 2 sided copy 2 1 SPLIT 2 sided original to 1 sided copy BOOK 2 Booklet type original to 2 sided copy DUAL PAGE P 97 Makes copies of the double page spread of a booklet The right and left pages are copied separately The book margin w...

Page 84: ...ng Automatic Document Feeder optional this function is automatically set In this case proceed to step 5 3 Select FINISHING in the copy menu and then press the ENTER button 4 Select SORT and then press the ENTER button The sort copying is set 5 Select the other copy modes as required and then press the START button Copied and sorted in 2 sets Copied in 2 sets without being sorted 1 2 3 1 2 3 1 2 3 ...

Page 85: ...r drawer in a portrait direction in advance LT size is available for this function 1 Place paper in the drawer 2 Place the original 3 Key in the desired number of copies 4 Select FINISHING in the copy menu and then press the ENTER button 5 Select ALTERNATION and then press the ENTER button The alternation is set 6 Select the other copy modes as required and then press the START button PAPER TYPE J...

Page 86: ...ble for this function y The Automatic Duplexing Unit optional is required y This function cannot be used together with the image shift P 86 Shifting Paper to Make Margin IMAGE SHIFT 1 Place paper in the drawer 2 Place the original 3 Select FINISHING in the copy menu and then press the ENTER button 4 Select MAGAZINE SORT and then press the ENTER button or button 10 3 8 5 1 2 3 12 12 1 PAPER TYPE JO...

Page 87: ...he duplex copying mode most suited to the original and then press the ENTER button 1 2 When originals are 1 sided 2 2 When originals are 2 sided The magazine sort is set 6 Select the other copy modes as required and then press the START button MAGAZINE SORT 1 2 2 2 ...

Page 88: ...used together with the magazine sort P 84 Sorting in Magazine Type Arrangement MAGAZINE SORT 1 Place paper in the drawer 2 Place the original 3 Select IMAGE SHIFT in the copy menu and then press the ENTER button 4 Select whether you make a margin on the right or left side of the paper and then press the ENTER button or button LEFT MARGIN The margin will be made on the left RIGHT MARGIN The margin ...

Page 89: ...5 Specify the margin width and then press the ENTER button The margin width can be set between 4 mm and 15 mm 0 16 and 0 59 The image shift is set 6 Select the other copy modes as required and then press the START button RIGHT MARGIN 7mm 4mm 15mm ...

Page 90: ...y on the edge of paper with this function y Only standard size originals are available y When you place paper on the bypass tray register the size of the paper into the equipment in advance 1 Place paper in the drawer 2 Place the original 3 Select EDGE ERASE in the copy menu and then press the ENTER button 4 Select ON and then press the ENTER button or button PAPER TYPE JOB BUILD EDGE ERASE ANNOTA...

Page 91: ...Specify the margin width and then press the ENTER button The margin width can be set between 4 mm and 15 mm 0 16 and 0 59 The edge erase is set 6 Select the other copy modes as required and then press the START button EDGE ERASE 7mm 4mm 15mm ...

Page 92: ...ther originals and paper are 1 sided or 2 sided individually You can make copies of 1 sided originals into the both sides of paper so that you can save paper Also you can copy a book into the both sides of paper so that you can make another book 1 1 SIMPLEX P 91 2 1 SPLIT P 91 1 2 DUPLEX P 92 2 2 DUPLEX P 92 ...

Page 93: ...e one side of paper 1 Place paper in the drawer 2 Place the original 3 Select DUPLEX in the copy menu and then press the ENTER button 4 Select the duplex copying mode and then press the ENTER but ton 1 1 SIMPLEX 1 sided original to 1 sided copy 2 1 SPLIT 2 sided original to 1 sided copy The mode of duplex copying is set 12 13 15 13 15 13 12 13 13 PAPER TYPE JOB BUILD EDGE ERASE ANNOTATION IMAGE SH...

Page 94: ...You can press the START button instead of selecting YES When all the originals have been scanned Select NO and then press the ENTER button Copying on both sides You can copy 1 sided or 2 sided originals on the both side of paper 1 Place paper in the drawer Use plain paper 17 to 20 lb Bond 2 Place the original 3 Select DUPLEX in the copy menu and then press the ENTER button Next original YES NO PAP...

Page 95: ...ode of duplex copying is set 6 Select the other copy modes as required and then press the START button Copying starts 7 Place the next original if you are using the original glass select YES and then press the ENTER button Repeat this procedure until all the originals are scanned You can press the START button instead of selecting YES When all the originals have been scanned Select NO and then pre...

Page 96: ...Place paper in the drawer y Use plain paper 17 to 20 lb Bond y LT size is available 2 Press the DRAWER button to select the paper source to use 3 Select DUPLEX in the copy menu and then press the ENTER button 4 Select BOOK 2 and then press the ENTER button or but ton PAPER TYPE JOB BUILD EDGE ERASE ANNOTATION IMAGE SHIFT DUAL PAGE FINISHING DUPLEX JOB MEMORY XY ZOOM ID CARD 2IN1 4IN1 DUPLEX 2 1 SP...

Page 97: ...ss the ENTER button or button Select among RIGHT RIGHT RIGHT LEFT LEFT LEFT and LEFT RIGHT e g Copy begins with page 2 and ends with page 6 LEFT LEFT 6 Specify the margin width and then press the ENTER button The margin width can be set between 8 mm and 30 mm 0 31 and 1 18 The mode of duplex copying is set BOOK 2 RIGHT LEFT RIGHT RIGHT LEFT LEFT 2 3 6 7 BOOK MARGIN 15mm 8mm 30mm ...

Page 98: ...8 Open the next page and place the original select YES and then press the ENTER button Repeat this procedure until the last page to be copied is left You can press the START button instead of selecting YES When copying the last page If the last page is 1 sided select YES SINGLE and then press the ENTER button If it is 2 sided select YES and then press the ENTER button When all the originals have b...

Page 99: ...sides of paper You do not need to move the original on the original glass y LT size is available for this function y When you place paper on the bypass tray register the size of the paper into the equipment in advance 1 Place paper in the drawer 2 Place an original Do not place heavy objects 9 lb or more and do not press on it with force Breaking the glass could injure you 3 Select DUAL PAGE in th...

Page 100: ...1 18 The dual page is set 6 Select the other copy modes as required and then press the START button Copying starts 7 Place the original again after turning a page select YES and then press the ENTER button Repeat this procedure until all the origi nals are scanned You can press the START button instead of selecting YES When all the pages are scanned Select NO and then press the ENTER button DUAL P...

Page 101: ...oth optional is different from that when the original glass is used 1 Place paper in the drawer 2 Place the original 3 Select ANNOTATION in the copy menu and then press the ENTER button APR 10 2006 09 30AM P 001 APR 10 2006 09 30AM P 001 When the original is placed on the Reversing Automatic Document Feeder Automatic Document Feeder both optional When the original is placed on the original glass P...

Page 102: ...NOTATION 4 Select the item to print and then press the ENTER button PAGE NUMBER Page numbers Page Date Time Page numbers date and time The annotation is set 5 Select the other copy modes as required and then press the START button ANNOTATION PAGE NUMBER Page Date Time OFF ...

Page 103: ... can be changed for each job Some functions cannot be used together with this function or may have some restrictions When the following functions are set for the first job they are also set for the rest Paper size selection Finishing modes Image shift Functions not available Mixed size copying APS Copying booklet on both sides BOOK 2 Specifying reproduction ratio manually XY zoom Magazine sort Dua...

Page 104: ...r copy modes as required and then press the START button Scanning starts When the scanning is finished the LCD screen shows as follows 7 Place the next job Repeat steps 6 and 7 until all the jobs are scanned 8 When all the originals have been scanned select End job build and then press the ENTER button Copying starts JOB BUILD ON OFF 1 AMS SORT ZOOM FINISHING EDIT READY JOB BUILD JOB BUILD Scan ne...

Page 105: ...Automatic Duplexing Unit optional is used maximum 8 pages can be copied in 1 sheet using its both sides 2IN1 4IN1 2IN1 DUPLEX a Side 1 b Side 2 y When a copy is turned with the line as a pivot originals are printed on Side 2 back face as shown 4IN1 DUPLEX a Side 1 b Side 2 y When a copy is turned with the line as a pivot originals are printed on Side 2 back face as shown a b a b a b a b ...

Page 106: ...1 page of copy 4IN1 4 pages of originals to 1 page of copy 4 Select the duplex copying mode and then press the ENTER but ton When you select a mode other than 1 1 SIMPLEX the button can be used instead of the ENTER button 1 1 SIMPLEX 1 sided original to 1 sided copy 1 2 DUPLEX 1 sided original to 2 sided copy 2 2 DUPLEX 2 sided original to 2 sided copy 2 1 SPLIT 2 sided original to 1 sided copy PA...

Page 107: ...e and then press the ENTER button BOOK TYPE Open to left TABLET TYPE Open to top When 1 1 SIMPLEX is selected in step 4 this procedure is not necessary The 2IN1 4IN1 is set 6 Select the other copy modes as required and then press the START button DUPLEX BOOK TYPE TABLET TYPE ...

Page 108: ... cards 1 Place paper in the drawer LT and LT R sizes are available 2 Select ID CARD in the copy menu and then press the ENTER button 3 Select ON and then press the ENTER button The ID card function is set 4 Raise the Platen Cover optional or the Reversing Automatic Docu ment Feeder optional Automatic Document Feeder optional Front side Back side PAPER TYPE JOB BUILD EDGE ERASE ANNOTATION IMAGE SHI...

Page 109: ...tomatic Document Feeder optional carefully 7 Select the other copy modes as required and then press the START button The scanning of its top side starts The LCD screen shows as follows 8 Raise the Platen Cover optional or the Reversing Automatic Docu ment Feeder optional Automatic Document Feeder optional 9 Turn over the card and place it on the original glass again Align and push it to the left r...

Page 110: ... FUNCTIONS 108 Copying Both Sides of Card into 1 Page ID CARD 10 Lower the Platen Cover optional or the Reversing Automatic Doc ument Feeder optional Automatic Document Feeder optional carefully 11 Press the START button ...

Page 111: ... desired reproduc tion ratio One press of each button increases or decreases the reproduction ratio by 1 When you keep pressing either or them the reproduction ratio also keeps changing The reproduction ratio can be set from 25 to 200 The direction can be switched with the selecting button A X Y 5 Press the ENTER button The reproduction ratios are set 6 Press the CANCEL button The screen returns t...

Page 112: ... paper size is lit e g Selecting LT for copy paper y You can select the desired paper size with the DRAWER button in the same proce dure y When standard size paper other than LD LT LT R LG or ST R is placed register this size as OTHER size in advance P 48 Registering other standard sizes 8 Select the other copy modes as required and then press the START button ...

Page 113: ...ift Edge erase Paper type Duplex Dual page Annotation Job build 2IN1 4IN1 XY zoom Registering combination of functions 1 Set all functions you want to register e g Reproduction ratio 85 copy qty 20 density automatic density mode paper size LT R 2 Select JOB MEMORY in the copy menu and then press the ENTER button 3 Select MEMORY and then press the ENTER button or but ton MEMORY RECALL Reproduction ...

Page 114: ...ed to the memory When you select a memory number already registered the memory content will be overwritten The combination of the functions has been registered Recalling combination of functions 1 Select JOB MEMORY in the copy menu and then press the ENTER button 2 Select RECALL and then press the ENTER button or button MEMORY MEMORY3 MEMORY2 MEMORY4 PAPER TYPE JOB BUILD EDGE ERASE ANNOTATION IMAG...

Page 115: ...ess the ENTER button e g Selecting MEMORY4 A memory to which the combination of functions has already been registered has a mark on the left end of the memory name The combination of the functions is recalled 4 Select the other copy modes as required and then press the START button RECALL MEMORY3 MEMORY2 MEMORY4 ...

Page 116: ......

Page 117: ...per Size Setting 123 Walkup Screen Setting 125 Timer Setting 127 Time of automatic function clear 127 Time of automatic low power mode 128 Time of automatic sleep mode super sleep mode 130 Energy Saving Mode Setting 132 Weekly Timer Setting 134 Volume Adjustment 137 Touch Key Tone Setting 139 Department Code 141 Setting department codes 141 Changing department names or codes 145 Deleting departmen...

Page 118: ...stment 161 Finishing Mode 163 Pop Up Display Setting 165 Various List Printing 167 Menu List Printing 169 ROM Version Display 170 Service Notification 171 Sending an Email 172 Setting Email addresses 173 Setting the customer information 174 ...

Page 119: ...pied or printed The total number of sheets is displayed on the top right corner of the user functions mode main screen The total number of sheets cannot be reset Checking the menu structure The menu of this equipment can be printed as a list See the page below for details P 169 Menu List Printing Menu items not described in this manual This operator s manual explains the general settings and the s...

Page 120: ... one go Examples of the menu operation are shown below 1 At the head of items 1 or 2 digit numbers are attached Instead of pressing the and ENTER button keying in this number selects and performs the item directly Returning to the copy mode main screen Press the USER FUNCTIONS button or copy mode button The screen returns to the copy mode main screen ENTER button Digital keys CLEAR STOP button but...

Page 121: ...isplayed 2 Select INITIAL SETUP with and buttons and then press the ENTER button 3 Select DATE TIME with and buttons and then press the ENTER button 4 Select SETTING with and buttons and then press the ENTER button USER FUNCTIONS 1216 01 DEFAULT SETTINGS 02 LISTS 03 INITIAL SETUP INITIAL SETUP 01 DATE TIME 02 LANGUAGE 03 DRAWER SET POP UP DATE TIME 01 SETTING 02 TIME FORMAT 03 DATE FORMAT ...

Page 122: ... set press the or button to switch the a m p m 8 After all the items have finished being entered press the ENTER button The time is set and the screen returns to the menu in step 4 9 Press the USER FUNCTIONS button or copy mode button The screen returns to the copy mode main screen SETTING 2009 04 10 SUN 09 45 AM YYYY MM DD DAY HH MM SETTING 2009 04 10 MON 09 45 AM YYYY MM DD DAY HH MM SETTING 200...

Page 123: ...te display format e g April 10 2009 YYYY MM DD 2009 04 10 MM DD YYYY 04 10 2009 DD MM YYYY 10 04 2009 YY MM DD 09 04 10 MM DD YY 04 10 09 DD MM YY 10 04 09 Month format Select the month display NUMERIC Display the month using the numbers NAME Display the month using letters of alphabet E g Jan Feb etc DATE TIME 01 SETTING 02 TIME FORMAT 03 DATE FORMAT TIME FORMAT 1 24 HOUR 2 12 HOUR DATE FORMAT 1 ...

Page 124: ...ENTER button 4 Select the display language with the and buttons and then press the ENTER button The following languages can be selected English French Italian German Spanish Russian Polish Dutch Danish Norwegian Swedish Finnish The display language is set and the screen returns to the menu in step 3 5 Press the USER FUNCTIONS button or copy mode button The screen returns to the copy mode main scre...

Page 125: ...played 2 Select DEFAULT SETTINGS with and buttons and then press the ENTER button 3 Select GENERAL SETTING with and buttons and then press the ENTER button 4 Select DRAWER SIZE with and buttons and then press the ENTER button USER FUNCTIONS 1216 01 DEFAULT SETTINGS 02 LISTS 03 INITIAL SETUP DEFAULT SETTINGS 01 GENERAL SETTING 02 COPY SETUP 03 FAX SETUP GENERAL SETTING 01 DRAWER SIZE 02 WALKUP SCRE...

Page 126: ... that can be set are as follows LD LG LT LT R ST R A3 A4 A4 R B4 B5 B5 R A5 R FOLIO COMP 13 LG You can set only DRAWER 3 DRAWER 4 and BYPASS for the ST R and A5 R size paper The paper size is set and the screen returns to the menu in step 5 7 Press the USER FUNCTIONS button or copy mode button The screen returns to the copy mode main screen DRAWER SIZE 01 DRAWER 1 02 DRAWER 2 03 DRAWER 3 Select pa...

Page 127: ...on The user functions mode main screen is displayed 2 Select DEFAULT SETTINGS with and buttons and then press the ENTER button 3 Select GENERAL SETTING with and buttons and then press the ENTER button 4 Select WALKUP SCREEN with and buttons and then press the ENTER button USER FUNCTIONS 1216 01 DEFAULT SETTINGS 02 LISTS 03 INITIAL SETUP DEFAULT SETTINGS 01 GENERAL SETTING 02 COPY SETUP 03 FAX SETU...

Page 128: ...optional is installed y SCAN is displayed only when the Scanner Upgrade Kit optional is installed The walkup screen is set and the screen returns to the menu in step 4 6 Press the USER FUNCTIONS button or copy mode button The screen returns to the copy mode main screen After the mode has been changed and the time of the automatic function clear has passed the setting becomes enabled WALKUP SCREEN ...

Page 129: ... power mode and sleep mode super sleep mode see the following page P 24 Energy saving features Time of automatic function clear 1 Press the USER FUNCTIONS button The user functions mode main screen is displayed 2 Select DEFAULT SETTINGS with and buttons and then press the ENTER button 3 Select GENERAL SETTING with and buttons and then press the ENTER button USER FUNCTIONS 1216 01 DEFAULT SETTINGS ...

Page 130: ...d 15 30 45 60 75 90 105 120 135 150 180 210 240 270 300 The time of the automatic function clear is set and the screen returns to the menu in step 5 7 Press the USER FUNCTIONS button or copy mode button The screen returns to the copy mode main screen Time of automatic low power mode 1 Press the USER FUNCTIONS button The user functions mode main screen is displayed GENERAL SETTING 01 DRAWER SIZE 02...

Page 131: ...lect TIMERS with and buttons and then press the ENTER button 5 Select AUTO POWER SAVE with and buttons and then press the ENTER button USER FUNCTIONS 1216 01 DEFAULT SETTINGS 02 LISTS 03 INITIAL SETUP DEFAULT SETTINGS 01 GENERAL SETTING 02 COPY SETUP 03 FAX SETUP GENERAL SETTING 01 DRAWER SIZE 02 WALKUP SCREEN 03 TIMERS TIMERS 1 AUTO CLEAR 2 AUTO POWER SAVE 3 AUTO SLEEP ...

Page 132: ...atic low power mode is set and the screen returns to the menu in step 5 7 Press the USER FUNCTIONS button or copy mode button The screen returns to the copy mode main screen Time of automatic sleep mode super sleep mode 1 Press the USER FUNCTIONS button The user functions mode main screen is displayed 2 Select DEFAULT SETTINGS with and buttons and then press the ENTER button TIMERS AUTO POWER 240M...

Page 133: ...imes are as follows Unit minute 1 3 5 10 15 20 25 30 35 40 45 50 55 60 70 80 90 100 110 120 150 180 210 240 The time of the automatic sleep mode super sleep mode is set and the screen returns to the menu in step 5 7 Press the USER FUNCTIONS button or copy mode button The screen returns to the copy mode main screen DEFAULT SETTINGS 01 GENERAL SETTING 02 COPY SETUP 03 FAX SETUP GENERAL SETTING 01 DR...

Page 134: ...s displayed 2 Select DEFAULT SETTINGS with and buttons and then press the ENTER button 3 Select GENERAL SETTING with and buttons and then press the ENTER button 4 Select ENERGY SAVING MODE with and buttons and then press the ENTER button USER FUNCTIONS 1216 01 DEFAULT SETTINGS 02 LISTS 03 INITIAL SETUP DEFAULT SETTINGS 01 GENERAL SETTING 02 COPY SETUP 03 FAX SETUP GENERAL SETTING 02 DEPARTMENT COD...

Page 135: ...reen y When the Network Printer Kit GA 1191 optional is installed only the sleep mode is enabled The menu of this setting is not displayed y If the Weekly Timer is set the equipment enters into the sleep mode when the timer reaches the time for the power to be turned OFF though the super sleep mode is enabled y When a Fax is received and transferred by the P3fax of Unimessage P3 enable the sleep m...

Page 136: ...status at the time when the weekly timer is set to turn the power ON In this case make the equipment in the ready status by following the pro cedure below Press the ENERGY SAVER button Open the Platen Cover optional or Reversing Automatic Document Feeder optional Automatic Document Feeder optional Connect the equipment to a PC with a USB cable y If the power of the equipment is turned OFF the week...

Page 137: ...sired day of the week with the and buttons and then press the ENTER button 7 Key in the time to turn the power ON and then press the ENTER button e g 10 30 1 0 3 0 If 12 hour display is set press the or button to switch the a m p m DEFAULT SETTINGS 01 GENERAL SETTING 02 COPY SETUP 03 FAX SETUP GENERAL SETTING 02 WALKUP SCREEN 03 TIMERS 04 WEEKLY TIMER WEEKLY TIMER 1 OFF 2 ON WEEKLY TIMER 1 SUNDAY ...

Page 138: ...to 8 10 When all the setting is completed select COMPLETE and then press the ENTER button The weekly timer is set and the screen returns to the menu in step 4 11 Press the USER FUNCTIONS button or copy mode button The screen returns to the copy mode main screen Clearing the weekly timer Select OFF in step 5 The time settings remain even if the weekly timer is cleared They become valid when the wee...

Page 139: ... Tone Setting 1 Press the USER FUNCTIONS button The user functions mode main screen is displayed 2 Select DEFAULT SETTINGS with and buttons and then press the ENTER button 3 Select GENERAL SETTING with and buttons and then press the ENTER button 4 Select SPEAKER VOLUME with and buttons and then press the ENTER button USER FUNCTIONS 1216 01 DEFAULT SETTINGS 02 LISTS 03 INITIAL SETUP DEFAULT SETTING...

Page 140: ...elected 6 Adjust the volume with the and buttons and then press the ENTER button The volume can be adjusted in eight levels from 0 no sound to 7 max The volume is set and the screen returns to the menu in step 5 7 Adjust the other volumes as required by following steps 5 and 6 8 Press the USER FUNCTIONS button or copy mode button The screen returns to the copy mode main screen SPEAKER VOLUME 1 ALA...

Page 141: ...lume Adjustment 1 Press the USER FUNCTIONS button The user functions mode main screen is displayed 2 Select DEFAULT SETTINGS with and buttons and then press the ENTER button 3 Select GENERAL SETTING with and buttons and then press the ENTER button 4 Select TOUCH KEY TONE with and buttons and then press the ENTER button USER FUNCTIONS 1216 01 DEFAULT SETTINGS 02 LISTS 03 INITIAL SETUP DEFAULT SETTI...

Page 142: ...one Setting 5 Select ON or OFF with and buttons and then press the ENTER button The screen returns to the menu in step 4 6 Press the USER FUNCTIONS button or copy mode button The screen returns to the copy mode main screen TOUCH KEY TONE 1 OFF 2 ON ...

Page 143: ...tment code is displayed before you use this equipment Thus the unauthorized use of this equipment is prevented P 34 Turning power ON Setting department codes 1 Press the USER FUNCTIONS button The user functions mode main screen is displayed 2 Select DEFAULT SETTINGS with and buttons and then press the ENTER button 3 Select GENERAL SETTING with and buttons and then press the ENTER button USER FUNCT...

Page 144: ...me or when the department management is already enabled YES in step 5 is already selected y If NEW is selected the master code and department code which have been set by that time will be deleted If you use the master code and department code already registered select RECOVER OLD DATA Then set a master code administrator s code If the External Keyboard optional is installed proceed to step 7 If no...

Page 145: ...on y Enter 5 digits for the master code Entered digits are displayed as asterisks y Do not forget this master code because it is required for setting or deleting each department code The master code is now registered on the department number 01 Then set a department code 9 Register a department code Key in the desired department number and then press the ENTER button Select the desired department ...

Page 146: ...anual which comes with the Fax Kit or Scanner Upgrade Kit both optional 11 Key in the department code and then press the ENTER button y Enter 5 digits for the department code Entered digits are displayed as asterisks y Department codes already registered cannot be keyed in The screen returns to the one in step 9 12 Register the other department codes as required following steps from 9 to 11 13 Pre...

Page 147: ...on The user functions mode main screen is displayed 2 Select DEFAULT SETTINGS with and buttons and then press the ENTER button 3 Select GENERAL SETTING with and buttons and then press the ENTER button 4 Select DEPARTMENT CODE with and buttons and then press the ENTER button USER FUNCTIONS 1216 01 DEFAULT SETTINGS 02 LISTS 03 INITIAL SETUP DEFAULT SETTINGS 01 GENERAL SETTING 02 COPY SETUP 03 FAX SE...

Page 148: ...the ENTER button The screen below is displayed for approx 2 seconds 7 Select MODIFY with and buttons and then press the ENTER button If the External Keyboard optional is installed proceed to step 8 If not proceed to step 9 DEPARTMENT CODE 1 YES 2 NO DEPARTMENT CODE ENTER DEPARTMENT NUMBER 1 99 2 DEPARTMENT CODE DEPARTMENT NUMBER Already assigned 02 DEPARTMENT CODE 1 DELETE 2 MODIFY 3 RETAIN ...

Page 149: ...ich comes with the Fax Kit or Scanner Upgrade Kit both optional 9 Key in a new department code and then press the ENTER button y Enter 5 digits for the department code Entered digits are displayed as asterisks y Department codes already registered cannot be entered The setting has been changed and the screen returns to the one in step 6 10 Change the other department codes as required following st...

Page 150: ...ONS button The user functions mode main screen is displayed 2 Select DEFAULT SETTINGS with and buttons and then press the ENTER button 3 Select GENERAL SETTING with and buttons and then press the ENTER button 4 Select DEPARTMENT CODE with and buttons and then press the ENTER button USER FUNCTIONS 1216 01 DEFAULT SETTINGS 02 LISTS 03 INITIAL SETUP DEFAULT SETTINGS 01 GENERAL SETTING 02 COPY SETUP 0...

Page 151: ...codes cannot be deleted but only department codes can be deleted The department code is now deleted and the screen returns to the one in step 6 8 Delete the other department codes as required following steps 6 and 7 9 Press the USER FUNCTIONS button or copy mode button The screen returns to the copy mode main screen DEPARTMENT CODE 1 YES 2 NO DEPARTMENT CODE ENTER DEPARTMENT NUMBER 1 99 2 DEPARTME...

Page 152: ...s the USER FUNCTIONS button The user functions mode main screen is displayed 2 Select DEFAULT SETTINGS with and buttons and then press the ENTER button 3 Select GENERAL SETTING with and buttons and then press the ENTER button 4 Select DEPARTMENT CODE with and buttons and then press the ENTER button USER FUNCTIONS 1216 01 DEFAULT SETTINGS 02 LISTS 03 INITIAL SETUP DEFAULT SETTINGS 01 GENERAL SETTIN...

Page 153: ...d buttons and then press the ENTER button The screen below is displayed for approx 2 seconds The counter value is now cleared and the screen returns to the one in step 6 8 Clear the other counter values as required following steps 6 and 7 9 Press the USER FUNCTIONS button or copy mode button The screen returns to the copy mode main screen DEPARTMENT CODE 1 YES 2 NO DEPARTMENT CODE ENTER DEPARTMENT...

Page 154: ...nt code entry screen and then proceed to the following steps 1 Press the USER FUNCTIONS button The user functions mode main screen is displayed 2 Select LISTS with and buttons and then press the ENTER button 3 Select DEPARTMENT CODE with and buttons and then press the ENTER button The department code list is printed out See the list example in the following page P 219 Department code list 4 Press ...

Page 155: ...splayed 2 Select DEFAULT SETTINGS with and buttons and then press the ENTER button 3 Select GENERAL SETTING with and buttons and then press the ENTER button 4 Select DEPARTMENT CODE with and buttons and then press the ENTER button USER FUNCTIONS 1216 01 DEFAULT SETTINGS 02 LISTS 03 INITIAL SETUP DEFAULT SETTINGS 01 GENERAL SETTING 02 COPY SETUP 03 FAX SETUP GENERAL SETTING 04 WEEKLY TIMER 05 SPEAK...

Page 156: ... S SETTINGS 154 Department Code 5 Select NO with and buttons and then press the ENTER button 6 Press the USER FUNCTIONS button or copy mode button The screen returns to the copy mode main screen DEPARTMENT CODE 1 YES 2 NO ...

Page 157: ... USER FUNCTIONS button The user functions mode main screen is displayed 2 Select DEFAULT SETTINGS with and buttons and then press the ENTER button 3 Select COPY SETUP with and buttons and then press the ENTER button 4 Select MENU CUSTOMIZE with and buttons and then press the ENTER button USER FUNCTIONS 1216 01 DEFAULT SETTINGS 02 LISTS 03 INITIAL SETUP DEFAULT SETTINGS 01 GENERAL SETTING 02 COPY S...

Page 158: ...ing modes Duplex 2IN1 4IN1 Image shift Dual page and ID card The item of the menu customize is set and the screen returns to the menu in step 4 6 Press the USER FUNCTIONS button or copy mode button The screen returns to the copy mode main screen After the FUNCTION CLEAR button is pressed or the time of the automatic function clear has passed the setting becomes enabled MENU CUSTOMIZE 4 IMAGE SHIFT...

Page 159: ...screen is displayed 2 Select DEFAULT SETTINGS with and buttons and then press the ENTER button 3 Select COPY SETUP with and buttons and then press the ENTER button 4 Select APS AMS with and buttons and then press the ENTER button USER FUNCTIONS 1216 01 DEFAULT SETTINGS 02 LISTS 03 INITIAL SETUP DEFAULT SETTINGS 01 GENERAL SETTING 02 COPY SETUP 03 FAX SETUP COPY SETUP 01 MENU CUSTOMIZE 02 APS AMS 0...

Page 160: ...Magnification Selection is initially selected NO No initial selection The initial selection is set and the screen returns to the menu in step 4 6 Press the USER FUNCTIONS button or copy mode button The screen returns to the copy mode main screen After the FUNCTION CLEAR button is pressed or the time of the automatic function clear has passed the setting becomes enabled APS AMS 1 APS 2 AMS 3 NO ...

Page 161: ... SETTINGS with and buttons and then press the ENTER button 3 Select COPY SETUP with and buttons and then press the ENTER button 4 Select IMAGE MODE with and buttons and then press the ENTER button USER FUNCTIONS 1216 01 DEFAULT SETTINGS 02 LISTS 03 INITIAL SETUP DEFAULT SETTINGS 01 GENERAL SETTING 02 COPY SETUP 03 FAX SETUP COPY SETUP 01 MENU CUSTOMIZE 02 APS AMS 03 IMAGE MODE ...

Page 162: ... photogravure TEXT Originals with text or text and line art only The image mode is set and the screen returns to the menu in step 4 6 Press the USER FUNCTIONS button or copy mode button The screen returns to the copy mode main screen After the FUNCTION CLEAR button is pressed or the time of the automatic function clear has passed the setting becomes enabled IMAGE MODE 1 TEXT PHOTO 2 PHOTO 3 TEXT ...

Page 163: ...yed 2 Select DEFAULT SETTINGS with and buttons and then press the ENTER button 3 Select COPY SETUP with and buttons and then press the ENTER button 4 Select LIGHT DARK with and buttons and then press the ENTER button USER FUNCTIONS 1216 01 DEFAULT SETTINGS 02 LISTS 03 INITIAL SETUP DEFAULT SETTINGS 01 GENERAL SETTING 02 COPY SETUP 03 FAX SETUP COPY SETUP 02 APS AMS 03 IMAGE MODE 04 LIGHT DARK ...

Page 164: ...de is set and the screen returns to the menu in step 4 Proceed to step 7 When you select MANUAL proceed to step 6 6 Select the density with the and buttons and then press the ENTER button The density can be set in seven levels from LIGHT3 Lighter to DARK3 Darker 7 Press the USER FUNCTIONS button or copy mode button The screen returns to the copy mode main screen After the FUNCTION CLEAR button is ...

Page 165: ...ct DEFAULT SETTINGS with and buttons and then press the ENTER button 3 Select COPY SETUP with and buttons and then press the ENTER button 4 Select FINISHING with and buttons and then press the ENTER button USER FUNCTIONS 1216 01 DEFAULT SETTINGS 02 LISTS 03 INITIAL SETUP DEFAULT SETTINGS 01 GENERAL SETTING 02 COPY SETUP 03 FAX SETUP COPY SETUP 03 IMAGE MODE 04 LIGHT DARK 05 FINISHING ...

Page 166: ...N SORT ALTERNATION and MAGAZINE SORT The initial finishing mode is set and the screen returns to the menu in step 4 6 Press the USER FUNCTIONS button or copy mode button The screen returns to the copy mode main screen After the FUNCTION CLEAR button is pressed or the time of the automatic function clear has passed the setting becomes enabled FINISHING 2 NON SORT 3 ALTERNATION 4 MAGAZINE SORT ...

Page 167: ...ain screen is displayed 2 Select INITIAL SETUP with and buttons and then press the ENTER button 3 Select DRAWER SET POP UP with and buttons and then press the ENTER button 4 Select ON or OFF with and buttons and then press the ENTER button The screen returns to the menu in step 3 5 Press the USER FUNCTIONS button or copy mode button The screen returns to the copy mode main screen USER FUNCTIONS 12...

Page 168: ...viously set select YES If not select NO If you select NO the operation is completed If you select YES proceed to step 2 2 Select the size of the paper which has been placed with and buttons and then press the ENTER button The paper size is registered If more than one drawer is closed at the same time the size of the paper set in the drawer that was closed first is applicable to the registration Se...

Page 169: ...n of the equipment ITU MAILBOX The box numbers and attributes of the mail boxes which have been registered and the registration date time of the originals CONFIGURATION PAGE The setting status of the Network Printer Kit optional NIC STATUS PAGE The NIC Network Interface Card information of the Network Printer Kit optional 1 Press the USER FUNCTIONS button The user functions mode main screen is dis...

Page 170: ...lled y ITU MAILBOX is displayed only when the Fax Kit optional is installed y CONFIGURATION PAGE and NIC STATUS PAGE are displayed only when the Network Printer Kit optional is installed The list is printed See the following page for the printing example of each list P 219 List Print Format 4 Press the USER FUNCTIONS button or copy mode button The screen returns to the copy mode main screen LISTS ...

Page 171: ...mode main screen is displayed 2 Select MENU LIST with and buttons and then press the ENTER button The menu list is printed See the following page for the example of the menu list P 219 List Print Format 3 Press the USER FUNCTIONS button or copy mode button The screen returns to the copy mode main screen USER FUNCTIONS 1216 02 LISTS 03 INITIAL SETUP 04 MENU LIST ...

Page 172: ...TIONS button The user functions mode main screen is displayed 2 Select MACHINE REVISIONS with and buttons and then press the ENTER button The product version of the equipment is displayed 3 Press the USER FUNCTIONS button or copy mode button The screen returns to the copy mode main screen USER FUNCTIONS 1216 04 MENU LIST 05 TEST MODE 06 MACHINE REVISIONS ...

Page 173: ...Upgrade Kit GA 1201 optional so that an Email can be sent and received in this equipment 1 Press the USER FUNCTIONS button The user functions mode main screen is displayed 2 Select INITIAL SETUP with and buttons and then press the ENTER button 3 Select SERVICE NOTIFICATION with and buttons and then press the ENTER button The SERVICE NOTIFICATION screen is displayed The procedures for each operatio...

Page 174: ...il has been sent and completed correctly Operation completed appears for approx 2 seconds and then the screen returns to the previous menu If NO is selected the operation is canceled and then the screen returns to the previous menu If an Email sending error occurs E mail error appears for approx 2 seconds and then the screen returns to the previous menu In this case contact your service technician...

Page 175: ...nd then press the ENTER button DELETE This deletes the registered Email address and then returns to the previous menu MODIFY This modifies the registered Email address Continue the subsequent opera tion RETAIN This cancels the selection and then returns to the previous menu 3 Enter the Email address and then press the ENTER button For how to enter Email address see the manual which comes with the ...

Page 176: ...which the customer information has been already registered is selected Already assigned appears for approx 2 seconds and the selecting menu is displayed Select the desired item with and buttons and then press the ENTER button DELETE This deletes the registered customer information and then returns to the previ ous menu MODIFY This modifies the registered customer information Continue the subsequen...

Page 177: ...ted item and then press the ENTER button For how to enter Email address see the manual which comes with the Scanner Upgrade Kit GA 1201 optional 4 Press the USER FUNCTIONS button or copy mode button The screen returns to the copy mode main screen CUSTOMER NAME USER 01 ENTER NAME MAX50 ...

Page 178: ......

Page 179: ...wer Automatic Document Feeder optional Lower 182 Paper jams within Reversing Automatic Document Feeder optional Upper Automatic Document Feeder optional Upper 184 Paper jams on bypass tray 186 Paper jams within Automatic Duplexing Unit optional 186 Paper jam behind transfer unit 187 Paper jams within fuser unit 188 Paper jams within Paper Feed Unit optional 189 Paper jams within Paper Feed Pedesta...

Page 180: ... technician is needed Contact your service representative Give the service technician the error code consisting of letters and numbers that appears in the upper right area of the dis play Never attempt to repair disassemble or modify the equipment by yourself This could cause an electric shock a fire or serious injury Contact your service representative when the equipment is in an abnormal conditi...

Page 181: ... code entering screen is not correct Enter the correct department code If you do not know the department code contact your administrator Memory is full The built in memory of the equipment has become full Select Print on the LCD screen to copy the data scanned so far Select Cancel job to delete all the data scanned so far Clear paper output tray PRESS START KEY Approx 250 sheets of paper have cont...

Page 182: ...the equipment the procedure to remove the jammed paper appears on the display Press the and buttons to scroll up and down the procedure Message Position of Paper Jam Doc feed misfeed Inside of the optional Reversing Automatic Document Feeder Automatic Document Feeder P 182 P 184 Bypass misfeed Bypass tray P 186 Duplexer misfeed Inside of the optional Automatic Duplexing Unit P 186 Copier misfeed I...

Page 183: ...is no gap between the side guides and the paper in the drawer or the gap is too wide y The stack height of the paper is exceeding the indicators in the drawer When releasing jammed paper Observe the following precautions when you release jammed paper Do not tear jammed paper Pull out jammed paper carefully with both hands trying not to tear it If you release it forcibly the jammed paper will be to...

Page 184: ...c Document Feeder optional Lower Automatic Document Feeder optional Lower 1 Open the Reversing Automatic Document Feeder Automatic Docu ment Feeder 2 Open the reverse cover and remove the original 3 Close the Reversing Automatic Document Feeder Automatic Doc ument Feeder ...

Page 185: ...Paper Jams 183 4 Raise the lever and open the upper cover 5 Raise the original feeder tray and remove the original under the tray 6 Lower the original feeder tray 7 Close the upper cover ...

Page 186: ...Paper Jams Paper jams within Reversing Automatic Document Feeder optional Upper Automatic Document Feeder optional Upper 1 Raise the lever and open the upper cover 2 Remove the original 3 Turn the dial to remove the original ...

Page 187: ...Paper Jams 185 4 Open the transport guide 5 Raise the guide plate under the transport guide and remove the original under the guide plate 6 Close the transport guide 7 Close the upper cover ...

Page 188: ...eding area Check if any paper is jammed under the transport guide behind the transfer unit P 187 Paper jam behind transfer unit Paper jams within Automatic Duplexing Unit optional Be careful not to let your fingers be caught between the equipment and the side cover This could injure you 1 Open the side cover 2 Release the jammed paper 3 Close the side cover ...

Page 189: ...ght between the equipment and the side cover This could injure you 1 Open the side cover 2 Pull the transfer unit toward you carefully to lay it down while hold ing up the green lever 3 Release the jammed paper Be sure not to touch the photoconductive drum when releasing the jammed paper ...

Page 190: ...e careful not to let your fingers be caught between the equipment and the side cover This could injure you y Do not touch the fuser unit or the metal part around the unit This could cause burns or injury to your hands if you touch the inside of the equipment 1 Open the side cover and then lay down the transfer unit Then press down the two fuser pressure release levers green until they come to a st...

Page 191: ...per Be sure not to touch the photoconductive drum when releasing the jammed paper 4 Return the transport guide to its original position and then close the transfer unit and the side cover Paper jams within Paper Feed Unit optional 1 Open the side cover and check if any paper is jammed behind the transfer unit P 187 Paper jam behind transfer unit Pulling it up Pulling it down ...

Page 192: ... 2 Open the paper feed cover of the unit 3 Release the jammed paper 4 Close the paper feed cover of the unit 5 Close the side cover Paper jams within Paper Feed Pedestal optional 1 Open the paper feed cover of the Paper Feed Pedestal ...

Page 193: ...Paper Jams 191 2 Remove the jammed paper 3 Close the paper feed cover of the Paper Feed Pedestal ...

Page 194: ...oner cartridge appears on the display Press the and buttons to scroll up and down the procedure Never attempt to incinerate toner cartridges y Before inserting a new toner cartridge check the product name of the cartridge If you can see T 1810 this cartridge is usable y Dispose of used toner cartridges in accordance with local regulations y Do not touch the parts on the circuit board mounted on th...

Page 195: ...on This function controls image quality according to the characteris tics of the toner to be used and enables you to print images of an optimal quality If you are using a toner cartridge other than the one we recommend the equipment may not be able to detect whether it is installed or not Therefore even if the toner cartridge is correctly installed the error message Toner not recognized appears on...

Page 196: ...idge 1 Open the front cover 2 Hold down the green lever The toner cartridge is slightly pushed out 3 Pull out the toner cartridge Never attempt to incinerate toner cartridges Dispose of used toner cartridges in accordance with local regulations ...

Page 197: ...rtridge 195 4 Shake the new toner cartridge strongly with the label surface down to loosen the toner inside 5 Remove the protective sheet from the end of the cartridge 6 Pull out the seal in the direction of the arrow 10 ...

Page 198: ...ound 8 Clean the charger Hold the cleaning knob of the charger and pull it out toward you carefully until it comes to a stop Then reinsert it in its original position carefully Repeat this procedure two or three times Check if the cleaning knob is fully inserted after cleaning After the toner cartridge has been replaced be sure to clean the transfer charger wire fol lowing the procedure below in o...

Page 199: ...r Cartridge 197 9 Open the side cover 10 Pull the transfer unit toward you carefully to lay it down while hold ing up the green lever 11 Remove the transfer charger cleaner from the front pocket of the transfer unit ...

Page 200: ...nt wall and then check if the cleaner pad has contacted with the transfer charger wire 3 Clean the wire from its front end to the other end in two reciprocating motions 4 Remove the cleaner from the front end of the transfer charger after cleaning 13 Return the transfer charger cleaner into the cleaner pocket and then close the transfer unit 14 Close the side cover 15 Close the front cover The equ...

Page 201: ...ow power mode after a specified time has passed since its last use Copying is enabled Sleep mode appears on the display The equipment is in the sleep mode The equipment enters into the sleep mode after a specified time has passed since its last use For how to cancel this mode see the following page P 35 Saving energy when not in use Energy saving mode The LCD screen is dim The equipment is in the ...

Page 202: ...ax transmis sion reception cannot be per formed from a PC connected with a USB cable The operation on the left is performed in the super sleep mode Turn the power of the equipment OFF and then back ON and perform it again If this equipment is connected to your PC with a USB cable change the setting so that it does not enter the super sleep mode P 132 Energy Saving Mode Setting Phenomenon Usual cau...

Page 203: ...urs Paper is clinging to each other Fan the paper well and place it again Phenomenon Usual cause Countermeasure The density of the copy image is light Toner has run out Toner empty appears on the display when toner has run out Replace the toner cartridge if the message appears P 192 Replacing Toner Cartridge The copy density is set lighter Make the density darker if you use the manual copy density...

Page 204: ...wire is dirty Clean the transfer charger wire P 208 Cleaning transfer charger The copy image is partially missing The size or direction of the copy paper and the original or the reproduction ratio is not set properly Use copy paper of the same size as the original or set the reproduction ratio suit able to the copy paper size The margin for binding is too wide Adjust the image shift value again P ...

Page 205: ...ervice Technician 203 The copy image has white streaks in a horizontal direc tion The transfer charger wire is dirty Clean the transfer charger wire P 208 Cleaning transfer charger Phenomenon Usual cause Countermeasure ...

Page 206: ......

Page 207: ... MAINTENANCE AND INSPECTION This chapter describes how to clean this equipment to ensure you get the best possible copy performance Daily Inspection 206 Cleaning charger 207 Cleaning transfer charger 208 ...

Page 208: ...Scanning area Wipe with a sheet of soft dry cloth or soft cloth dampened in water and squeezed tightly Do not use alcohol or solvent 2 Original glass 3 Guides 4 Platen sheet Clean in the following procedure according to the level of staining Wipe with a soft dry cloth Wipe with a soft cloth dampened in water and squeezed tightly Wipe with a soft cloth dampened in alcohol and squeezed tightly and t...

Page 209: ...ng the procedure below 1 Open the front cover 2 Clean the charger Hold the cleaning knob of the charger and pull it out toward you carefully until it comes to a stop Then reinsert it in its original position carefully Repeat this procedure two or three times Check if the cleaning knob is fully inserted after cleaning 3 Close the front cover ...

Page 210: ...y appear on copied images or the density of the whole image may be lowered Clean the transfer charger wire following the procedure below Be careful not to let your fingers be caught between the equipment and the side cover This could injure you 1 Open the side cover 2 Pull the transfer unit toward you carefully to lay it down while hold ing up the green lever ...

Page 211: ...end of the transfer charger 2 Push the cleaner onto the front wall and then check if the cleaner pad has contacted with the transfer charger wire 3 Clean the wire from its front end to the other end in two reciprocating motions 4 Remove the cleaner from the front end of the transfer charger after cleaning 5 Return the transfer charger cleaner into the cleaner pocket and then close the transfer uni...

Page 212: ......

Page 213: ...s copying speed 213 Specifications of Options 214 Packing List 216 Copying Function Combination Matrix 217 Combination Matrix 1 2 217 Combination Matrix 2 2 218 List Print Format 219 Department code list 219 Mailbox list 220 Menu list 222 Function list 219 Supply notice list 220 ...

Page 214: ...pass 17 20 lb Bond for continuous feed 13 lb Bond 90 lb Index for single feed 17 20 lb Bond When the Automatic Duplexing Unit is used Warm up time Approx 25 seconds First copy time LT portrait Approx 7 7 seconds e STUDIO182 212 Approx 7 5 seconds e STUDIO242 Continuous copy speed See P 213 Continuous copying speed Multiple copying Up to 999 copies digital key entry Excluded image width Copy Leadin...

Page 215: ... of the specifications above y The bypass copying speed is as listed above when specifying the paper size y This specification varies depending on the copying conditions and the environment Paper size Feeder e STUDIO182 e STUDIO212 e STUDIO242 LT A4 B5 Drawer of the equip ment 18 21 24 Drawer of other than the equipment 16 20 23 Bypass tray 16 20 23 LT R A4 R B5 R Drawer 15 5 14 1 15 5 14 1 17 5 1...

Page 216: ...er consumption 33 W max Model name MR 2020 Copy sides 1 side Number of originals LT 100 originals 13 3 20 lb Bond or 0 63 or less in height more than 20 lb Bond Feeding speed 1 79 7 17 Acceptable originals LD LG LT LT R ST R COMP A3 A4 A4 R A5 R B4 B5 B5 R FOLIO ST and A5 size are not acceptable Paper weight 13 3 33 8 lb Power source Power supplied from the equipment Dimensions 22 6 W x 20 8 D x 5...

Page 217: ...per size LD LG LT LT R ST R COMP A3 A4 A4 R A5 R B4 B5 B5 R FOLIO ST A5 and non standard size are not acceptable Paper weight 17 20 lb Bond Maximum capacity 550 sheets 20 lb Dimensions 24 5 W x 25 9 D x 14 4 H Weight Approx 57 3 lb Model name MY 1028 Acceptable paper size LD LG LT LT R ST R COMP A3 A4 A4 R A5 R B4 B5 B5 R FOLIO ST A5 and non standard size are not acceptable Paper weight 17 20 lb B...

Page 218: ...SPECIFICATIONS AND OPTIONS 216 Packing List Packing List Packing list Operator s Manual Power cable Operator s Manual pocket Set up report Warranty sheet CD ROM 2 pcs TOSHIBA Viewer V2 User Documentation ...

Page 219: ...es No No No Yes Yes Yes Yes Yes Yes No No Yes No No No Yes Yes Yes No No No No No No Yes No No Yes Yes Yes No ʊ ʊ ʊ ʊ No Yes Yes Yes No Yes Yes Yes Yes Yes Yes Yes No No No Yes Yes No Yes Yes Yes No ʊ ʊ ʊ ʊ No No Yes Yes No Yes Yes Yes No ʊ ʊ ʊ ʊ 2 Yes Yes 3 3 Yes No Yes Yes Yes Yes Yes Yes Yes Yes Yes Yes Yes Yes Yes Yes Yes Yes Yes Yes Yes 1 Even when Non sort has been set Sort is automatically ...

Page 220: ...No Yes Yes Yes Yes Yes Yes Yes Yes Yes Yes Yes No Yes Yes Yes Yes Yes Yes Yes Yes Yes Yes Yes Yes Yes Yes Yes No No Yes No No Yes Yes No No Yes No No Yes Yes No No Yes No No Yes Yes No No No No No Yes Yes No No No No Yes Yes No No No No Yes Yes No No No No No Yes No No No No No Yes No No No No No Yes Yes Yes 2 2 3 Yes Yes Yes Yes Yes Yes Yes 1 Even when Non sort has been set Sort is automatically ...

Page 221: ... SCREEN TIMERS AUTO CLEAR AUTO POWER SAVE AUTO SLEEP WEEKLY TIMER SPEAKER VOLUME ALARM VOLUME KEY TOUCH VOLUME RINGER VOLUME MONITOR VOLUME COPY SETUP MENU CUSTOMIZE APS AMS IMAGE MODE LIGHT DARK FINISHING FAX SETUP LINE MONITOR 112MB LT COPY 45SEC 15MIN 15MIN OFF 0 1 4 4 FINISHING APS TEXT PHOTO AUTO NON SORT OFF OFF ON OFF OFF OFF OFF ON ON OFF OFF OFF TX RX ON ON ERROR ON ERROR IMAGE ON ERROR I...

Page 222: ...NUMBER XXX XXX XXXX e STUDIO 182 212 242 Series PAGE TIME TEL NUMBER NAME 001 OCT 02 2009 09 30AM XXX XXX XXXX XXXXXXXXXX BOX NBR TYPE PGS FILE NBR DATE TIME FROM XXXXXXXXXXXXXXXXXXXX XXXXXXXXXXXXXXXXXXXX XXXXXXXXXXXXXXXXXXXX XXXXXXXXXXXXXXXXXXXX CONFIDENTIAL BOX CONFIDENTIAL BOX BULLETIN BOARD BULLETIN BOARD MAILBOX RELAY BOX REPORT MAILBOX RELAY X X X X XX XX XX XX XX XX XX XX XX XX XX XX XX XX ...

Page 223: ...O SENSE DISABLE XXXXXXXXXXXX ENABLE 0 0 0 0 0 0 0 0 Unit Serial No XXXXXXXX Network Address XX XX XX XX XX XX Network Topology Ethernet Connector RJ45 Network Speed auto default Novell Network Information enabled Print Server Name XXXXXXXXXXXX Password Defined Search Root not defined D i r e c t o r y S e r v i c e s Tr e e n o t d e f i n e d D i r e c t o r y S e r v i c e C o n t e x t n o t d ...

Page 224: ...NOTICE 01 REMOTE ACCESS 02 DOWNLOAD FIRMWARE 03 RDC PASSWORD 04 SUPPLY NOTICE 01 MANUAL OUTPUT 02 AUTOMATIC JOURNAL 02 COMMUNICATION REPORT 01 TX REPORT 02 MEMORY TX REPORT 03 MULTI ADD REPORT 04 MULTIPOLL REPORT 05 RELAY ORIGINATOR REPORT 06 RELAY STATION REPORT 07 RELAY END REPORT 03 RECEPTION LIST 01 LOCAL MAILBOX LIST 02 REMOTE MAILBOX LIST 03 RELAY RECEPTION LIST 01 MENU CUSTOMIZE 02 APS AMS ...

Page 225: ...nu 80 Copy mode main screen 33 Copy quantity 33 57 Copying function combination matrix 217 Custom mode setting 33 D Daily inspection 206 DATA lamp 32 Date and time 119 Date and time display 121 Date format 121 Default settings 66 Density adjustment 161 Density adjustment buttons lamps 32 Density level 77 Department code 34 141 Description of each component 26 Digital keys 31 Disclaimer notice 23 D...

Page 226: ... 123 PAPER TYPE 81 Paper types not acceptable 38 Placing copy paper 37 Placing originals 52 56 Placing paper in the drawers 39 43 Platen Cover 26 Platen sheet 28 Pop up display setting 165 Power switch 28 34 Precautions for Reversing Automatic Document Feeder optional Automatic Document Feeder optional 55 R Receiving tray 28 Recommended paper 38 Recommended toner cartridge 14 193 Registering size ...

Page 227: ...225 U USB terminal 28 USER FUNCTIONS button 30 User functions mode main screen 117 V Volume adjustment 137 W Walkup screen setting 125 Weekly timer setting 134 X XY ZOOM 81 109 Z Zooming in out copy image 72 ...

Page 228: ...226 INDEX ...

Page 229: ...Printed in China DP 1830 2120 2420 OME090060B0 ...

Page 230: ...HIBA TEC CORPORATION All rights reserved 2 17 2 HIGASHIGOTANDA SHINAGAWA KU TOKYO 141 8664 JAPAN MULTIFUNCTIONAL DIGITAL SYSTEMS Operator s Manual for Copying Functions 6LH94738000 R090620H8801 TTEC Ver02 2011 02 LT ...

Reviews: