7 CHECKING THE EQUIPMENT STATUS WITH TopAccess
114 Error Messages
Error Messages
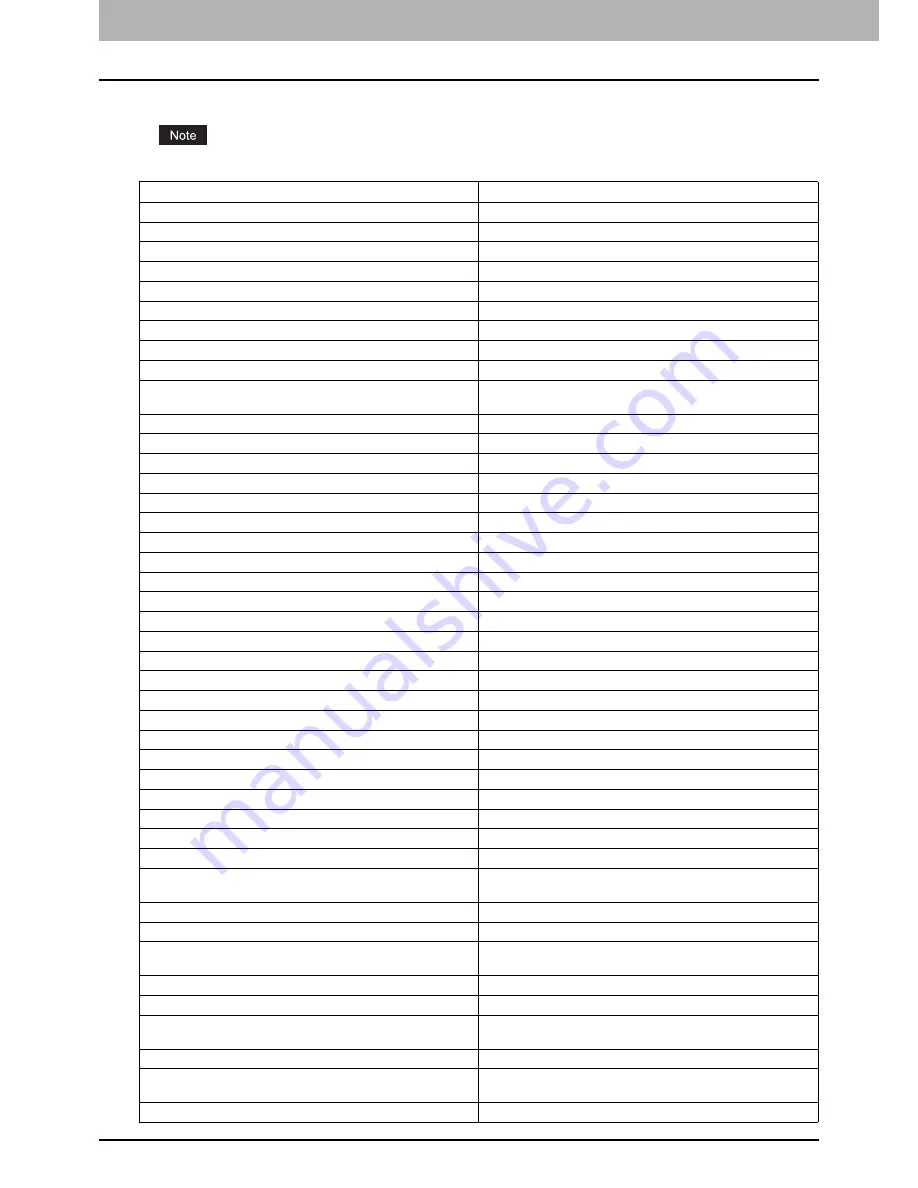
When a message appears on the [Device] Tab of TopAccess, see the table below for the corrective action.
Messages concerning color printing are displayed only on MFPs and copiers that support color printing.
TopAccess Message
Corrective Action
Cover Open - Please Close Cover.
Close the front cover.
Paper Feeding Cover Open - Please Close Cover.
Close the paper feeder cover.
Transfer/Transport unit Cover Open - Please Close Cover.
Close the transfer/transport unit.
Bypass Cover Open - Please Close Cover.
Close the bypass cover.
Exit Cover Open - Please Close Cover.
Close the exit cover.
Toner Cover Open - Please Close Cover.
Close the toner cover.
Platen Cover Open - Please Close Cover.
Close the platen cover.
Lower Tray Transport Cover Open - Please Close Cover
Close the lower tray transport cover.
Inserter Cover Open - Please Close Cover.
Close the Inserter cover.
External Large Capacity Feeder Disconnect - Please Joint it to
Copier.
Connect the External Large Capacity Feeder to the equipment.
LCF Cover Open - Please Close LCF Cover.
Close the Large Capacity Feeder cover.
Drawer 1 Open - Please Close Drawer 1.
Close the drawer.
Drawer 2 Open - Please Close Drawer 2.
Close the drawer.
Drawer 3 Open - Please Close Drawer 3.
Close the drawer.
Drawer 4 Open - Please Close Drawer 4.
Close the drawer.
Automatic Duplexing Unit Cover Open - Please Close Cover.
Close the automatic duplexing unit cover.
Relay Unit Cover Open - Please Close Cover.
Close the Bridge Unit cover.
Finisher Joint Cover Open - Please Close Cover.
Close the Finisher joint cover.
Finisher Door Open - Please Close Door.
Close the Finisher door.
Lower Tray Delivery Cover Open - Please Close Cover
Close the lower tray delivery cover.
Lower Tray Front Cover Open - Please Close Cover
Close the lower tray front cover.
Punch Unit Front Cover Open - Please Close Cover
Close the Punch unit front cover.
Hole Punch Unit Open - Please Close Cover.
Close the Hole Punch Unit cover.
Standard Output Tray Paper Full - Please Remove Paper.
Remove the paper from the tray.
Upper Tray Paper Full - Please Remove Paper.
Remove the paper from the tray.
Lower Tray Paper Full - Please Remove Paper.
Remove the paper from the tray.
Saddle Tray Full - Please Remove Paper.
Remove the paper from the tray.
Job Separator 1 Full - Please Remove Paper.
Remove the paper from the tray.
Job Separator 2 Full - Please Remove Paper.
Remove the paper from the tray.
Paper Empty in Drawer 1 - Please Add Paper.
Set the paper in the drawer.
Paper Empty in Drawer 2 - Please Add Paper.
Set the paper in the drawer.
Paper Empty in Drawer 3 - Please Add Paper.
Set the paper in the drawer.
Paper Empty in Drawer 4 - Please Add Paper.
Set the paper in the drawer.
Paper Empty in External Large Capacity Feeder - Please Add
Paper.
Set the paper in the External Large Capacity Feeder.
Paper Empty in Large Capacity Feeder - Please Add Paper.
Set the paper in the Large Capacity Feeder.
Paper Misfeed in Job Separator - Please Clear Paper Path.
Refer to the guidance on the touch panel to remove misfed paper.
Paper Misfeed in Automatic Duplexing Unit - Please Clear Paper
Path.
Refer to the guidance on the touch panel to remove misfed paper.
Paper Insertion Misfeed - Please Clear Paper Path.
Refer to the guidance on the touch panel to remove misfed paper.
Paper Misfeed in Printer - Please Clear Paper Path.
Refer to the guidance on the touch panel to remove misfed paper.
Paper Misfeed in Finisher - Please Clear Paper Path.
Remove the misfed paper from the Finisher.
See
P.14 “Clearing a Paper Misfeed”.
Used Toner Container Full - Please Replace.
Replace the waste toner box.
Staple Empty - Please Set Staple Cartridge
Refill the Finisher staples.
See
P.68 “Refilling finisher staples”.
Open the front cover, and clean the slit glass and main charger.
Clean the slit glass and the main chargers.
Summary of Contents for e-STUDIO
Page 1: ...MULTIFUNCTIONAL DIGITAL SYSTEMS Troubleshooting Guide ...
Page 8: ...6 CONTENTS ...
Page 10: ...Removal and Installation of the Exit Support Tray 80 ...
Page 64: ...1 TROUBLESHOOTING FOR THE HARDWARE 62 Replacing a Toner Cartridge For e STUDIO306LP ...
Page 86: ......
Page 133: ...DP 2095 2530 3020 3590 4590 5010 DP 3030 OME110056E0 ...


