Servicing the Groomer Reel
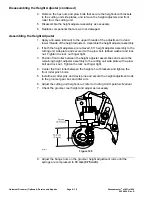
g282211
Figure 123
1.
Groomer reel shaft
3.
Spacer (50 each)
2.
Groomer blade (51 each)
4.
Locknut (2 each)
Inspect the groomer reel blades frequently for any damage and wear. Straighten
the bent blades. Either replace the worn blades or reverse the individual blades
to put the sharpest blade edge forward: refer to
1. Remove the groomer reel from the cutting unit; refer to
Groomer Reel (page 8–14)
.
2. Remove the lock nut from either end of the groomer reel shaft.
3. Remove the blades from the groomer shaft. If necessary, remove second
lock nut from the shaft.
4. Inspect and replace worn or damaged components.
5. Assemble the groomer reel as follows:
Note:
New lock nuts have an adhesive patch to prevent the lock nut from
loosening. If a used lock nut is being installed, apply a medium strength
thread locker (Loctite #242 or equivalent) to the threads of the lock nut.
A.
Install a lock nut on one end of the groomer reel shaft.
B.
Install a groomer blade against the lock nut.
C. Install the remaining spacers and blades in an alternating manner making
sure that all blades are separated by a spacer.
Greensmaster
®
e1021/e1026
Page 8–15
Universal Groomer (Optional): Service and Repairs
20246SL Rev A
Summary of Contents for 04831
Page 4: ...NOTES NOTES Page 4 Greensmaster e1021 e1026 20246SL Rev A ...
Page 6: ...g340650 Figure 1 Model 04831 shown Preface Page 6 Greensmaster e1021 e1026 20246SL Rev A ...
Page 14: ...Safety Safety and Instructional Decals Page 1 6 Greensmaster e1021 e1026 20246SL Rev A ...
Page 136: ...Electrical System Service and Repairs Page 5 56 Greensmaster e1021 e1026 20246SL Rev A ...
Page 216: ......

