


Greensmaster 3300
Page 3 -- 13
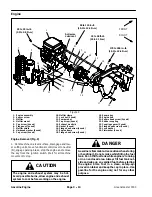
Gasoline Engine
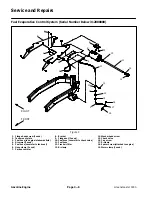
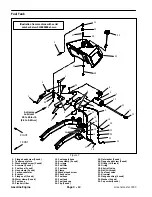
Fuel Tank Removal (Fig. 7)
1. Park machine on a level surface, disengage and low-
er cutting units, move functional control lever to neutral
(N), engage parking brake, stop the engine and remove
the key from the ignition switch. Wait for all machine
movement to stop.
CAUTION
The muffler and exhaust manifold may be hot.
Avoid possible burns, allow exhaust system to
cool before working on the engine.
DANGER
Gasoline is flammable. Use caution when storing
or handling it. Do not smoke while filling the fuel
tank. Do not fill fuel tank while engine is running
or in an enclosed area. Always fill fuel tank out-
side and wipe up any spilled fuel before starting
the engine. Store fuel in a clean, safety--ap-
proved container and keep the cap in place. Use
gasoline for the engine only; not for any other
purpose.
2. Drain fuel tank:
A. Close fuel shut--off valve (item 29).
B. Disconnect fuel supply hose (item 13) at the fuel
filter (item 16) and drain any fuel trapped in the fuel
filter and fuel hose into a suitable container.
C. Place end of fuel hose into a suitable container for
draining the tank.
D. Drain fuel tank by opening the fuel shut off valve.
3. Remove fuel hose (item 5) from fuel vent valve (item
31).
4. Remove four (4) cap screws (item 35), flat washers
(item 34) and flange bushings (item 33) that secure the
fuel tank to the tank mount plate (item 2). Remove the
fuel tank from the machine.
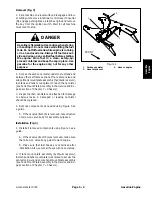
5. If necessary, remove fuel supply hose (item 13) from
fuel shut--off valve.
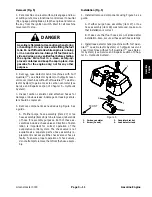
6. If necessary, remove shut--off valve and fitting as-
sembly from fuel tank (Fig. 8). The nut and fitting have
left hand threads.
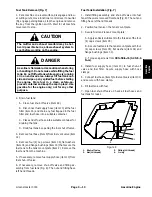
Fuel Tank Installation (Fig. 7)
1. Install fitting assembly and shut--off valve into fuel
tank if they were removed from tank (Fig. 8). The nut and
fitting have left hand threads.
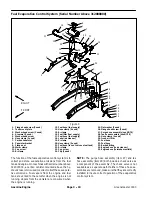
2. Position fuel tank on the tank mount plate.
3. Secure fuel tank to tank mount plate:
A. Apply antiseize lubricant to the threads of the four
(4) cap screws (item 35).
B. Secure fuel tank to the tank mount plate with four
(4) cap screws (item 35), flat washers (item 34) and
flange bushings (item 33).
C. Torque cap screws from
30 to 50 in--lb (3.4 to 5.6
N--m)
.
4. Install fuel supply hose (item 13) to fuel shut--off
valve and fuel filter. Secure supply hose with hose
clamps.
5. Connect fuel hose (item 5) to fuel vent valve (item 31)
and secure with hose clamp.
6. Fill fuel tank with fuel.
7. Open fuel shut--off valve. Check all fuel hoses and
fuel tank for leaks.
Figure 8
1. Shut--off valve
2. Nut (LH thread)
3. Fitting (LH thread)
4. O--ring
1
2
3
4
Gasoline Engine
Summary of Contents for 04510 Greensmaster 3300 TriFlex
Page 2: ...Greensmaster 3300 3400 This page is intentionally blank ...
Page 4: ...Greensmaster 3300 3400 This page is intentionally blank ...
Page 6: ...Greensmaster 3300 3400 This page is intentionally blank ...
Page 24: ...Greensmaster 3300 Page 3 6 Gasoline Engine This page is intentionally blank ...
Page 38: ...Greensmaster 3400 Page 4 4 Diesel Engine This page is intentionally blank ...
Page 54: ...Greensmaster 3300 3400 Hydraulic System Page 5 2 This page is intentionally blank ...
Page 170: ...Greensmaster 3300 3400 Hydraulic System Page 5 118 This page is intentionally blank ...
Page 172: ...Greensmaster 3300 3400 Page 6 2 Electrical System This page is intentionally blank ...
Page 230: ...Greensmaster 3300 3400 Page 6 60 Electrical System This page is intentionally blank ...
Page 303: ...Greensmaster 3300 3400 Groomer Page 9 13 This page is intentionally blank Groomer ...
Page 318: ...Greensmaster 3300 3400 Page 10 2 Foldout Drawings This page is intentionally blank ...
Page 332: ...Page 10 16 This page is intentionally blank ...


