background image

[ How to create a noise table ] 

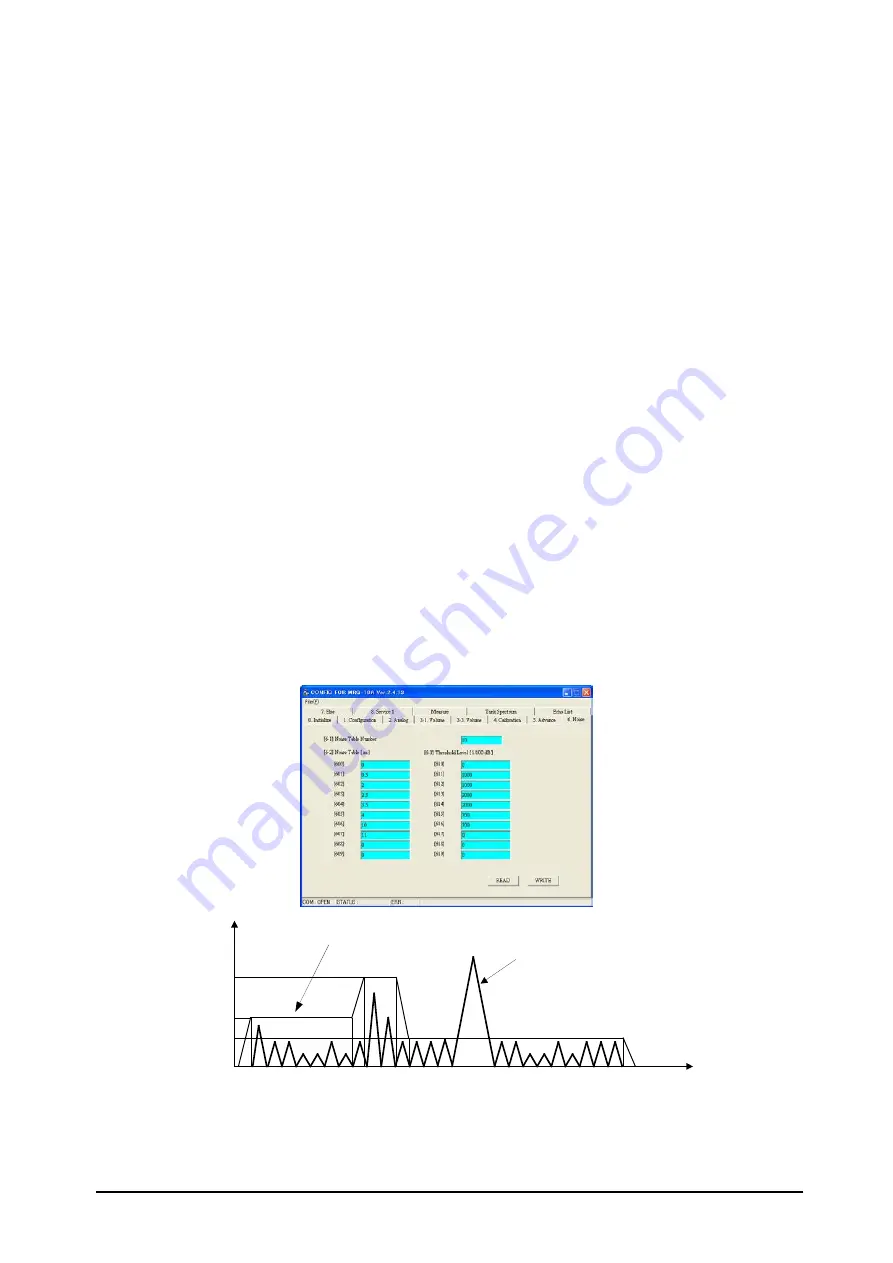
1) Open Menu tab [6-1] and then set the noise table number (maximum10 points). 

 
2)  Open  Menu tab  [6-2],  and  set distance parameters into the data field in accordance 

with selected numbers. (For example, if “10” is set at [6-1], you will need to set data 
[600]~[609] for distance values.) 


3) Set distance data for [600], and push “ENTER key”  of PC  to complete the entry. 

Similarly set distance values for [601]…[609]. 


4) After completing input of distance values, the next step is entering amplitude values. 


5)  Open Menu tab  [6-3]  and  set threshold level parameters into the data fields in 

accordance with selected numbers. For example, if “10” is set at [6-1], you will need to 
set data [610]~[619] for amplitude values.)  


6) Amplitude points must correlate to the distances defined under [6-2]. Select table 

address

ex.  [610]  and enter amplitude data, then push  “ENTER key”  of PC to 

complete the entry.  Similarly, set amplitude data for [611]…[619].  


7) After setting all data, then click “WRITE”. 

Setting of distance data must be in ascending order, that is, from shortest to longest 
distance.  Noise table error and noise table malfunction will occur if settings are mis-
ordered. Error status will appear under [7-3] 


Example of a noise table is shown above. All noise lower than the noise threshold line will be ignored. 

1

2

3

4

5

6

7

8

[60 0]

[601]

[602]

[603]

[604]

[605]

[606]

[607]

[610]

[611]

[612]

[613]

[614]

[615]

[616]

[6167

S

ignal

 A
mpl

itude

Distance

Noise Table

Surface Echo

5- 3 

Summary of Contents for MRF-10

Page 1: ...Doc No B Flat Radar Level Sensor MRF 10 Installation Operation Manual...

Page 2: ...o ensure the equipment is used safety and to protect operators and property from possible hazards or damage Read the explanations below carefully and familiarize yourself with the symbols before readi...

Page 3: ...or mechanical shock Place the main unit transducer and cable in a location without noise interference Use the equipment within the predetermined ambient temperature and humidity range 2 If the signal...

Page 4: ...roperly attached If the warning label is illegible or has come off contact the manufacturer to purchase a new label Precautions regarding the Manual This Manual was written in accordance with the stan...

Page 5: ...stallation 3 1 3 1 Wiring connection 3 1 1 Transmitter side 3 1 2 Connection fro commissioning software 3 2 3 2 Cables 3 2 3 3 Load 3 2 3 4 Power Supply 3 2 3 5 Grounding 3 3 1 Connecting only with at...

Page 6: ...measurement 5 1 5 3 Avoiding Disturbance Echoes 5 2 1 Dead Band 5 2 2 Noise table 5 2 5 4 Volume calculation 5 5 1 Defined tanks 5 5 2 User defined tank 5 6 5 5 Analog value compensation 5 7 1 Analog...

Page 7: ...blank 6...

Page 8: ...t measurement principle involving short microwave pulses Installed at the top of tanks or channels it emits short microwave pulses toward liquids or pastes Reflected microwave signals from the surface...

Page 9: ...blank 1 2...

Page 10: ...transmitter head properly Fig 2 1 1 Beam angle 2 Free space requirement The transmitter should be mounted so that no obstacles are present in the radar beam Obstacles in the radar beam may reduce the...

Page 11: ...educed due to poorer reflection 2 Deposit buildup on the antenna foaming on liquid surfaces powder granules in air suspension and other interior tank conditions may affect measuring range and performa...

Page 12: ...direction as below Also please keep the required free space from the wall Fig 2 3 1 example of wall side mounting installation Fig 2 3 2 example of top roof mounting installation below grating cover W...

Page 13: ...rallel against the nearest tank wall In such case required free space to the nearest tank wall will be more than measuring range x 0 2 Fig 2 3 4 example of tank installation Note Any obstructions whic...

Page 14: ...the end of cable to keep water protection class Fig 3 1 1 1 wiring connection FG frame ground must be connected to ground line with cable shield as below Fig 3 1 1 2 Standard wiring diagram Connet to...

Page 15: ...em Fig 3 1 2 1 Connection to commissioning software 3 2 Cables Requirement Use shielded twisted cable 2 core or 3 core Cross sectional area of conductor is 0 2 2 5mm2 AWG24 14 Recommended cable KNEE S...

Page 16: ...Extended 2 core cable with shield Please connect shield line to FG line at connection part then grounding at power source side as below 3 With lightening arrester Please connect only FG line to arres...

Page 17: ...h the grounding line already Please connect the grounding terminal near by cable entry to the ground Do not use FG line only with cable shield connects to grounding line as below MRF 10 FG Power sourc...

Page 18: ...ed file MRFConfig exe Main program of configuration software MRFConfig ini Initial File When the configuration software was quitted this file is automatically created Note This software has no install...

Page 19: ...tup Screen Fig 4 4 1 is Start up Screen Fig 4 4 1 Start up Screen Menu Tab in Fig 4 4 1 can select each kind of parameter Progress bar at the lower end of window shows communication status Fig 4 4 2 i...

Page 20: ...wnload of HART ID individual ID and software version No will be filled in each column All communication with MRF 10 will use this ID Fig 4 4 4 After getting HART ID SET button Retrieve HART ID from th...

Page 21: ...ge of Successful Communication In case of communication failure or time out error the status will indicate FAIL or TIME OUT as Fig 4 4 6 These messages are mostly caused by improper connection of HART...

Page 22: ...lumn means the parameter was not read yet READ button make start to retrieve all parameters that are on the screen from the sensor In Fig 4 5 1 1 1 1 5 will be downloaded Fig 4 5 2 Screen of 1 Configu...

Page 23: ...s changed without retrieving parameter The column that was changed inside value or item choice will be light blue color Fig 4 5 3 Parameter change by Combo Box As Fig 4 5 3 Combo Box can select listed...

Page 24: ...n are changed repeat same operations after select other tabs 4 6 Measuring Value 1 Monitoring of measuring value Measuring value can monitor by HART communication Select Measure tab and the menu shows...

Page 25: ...a Log and input logging interval as Fig 4 6 2 Fig 4 6 2 Logging setup button can open a dialogue Fig 4 6 3 to browse create a save file Please input file name and select repository here Fig 4 6 3 Dial...

Page 26: ...f Tank Spectrum will be active by clicking Tank Spectrum tab as Fig 4 7 1 Before clicking Start select Signal Amplitude Range Y axis and Observation Range X axis After completion of data communication...

Page 27: ...4 7 4 hold down the left button of mouse and drag the mouse pointer from lower right end to upper left end of the area that was zoomed in Fig 4 7 4 Zoom out operation Hold down the left button of mous...

Page 28: ...a Save or Bitmap Clicking Image Save Data Save button can open a dialogue Fig 4 7 6 to browse create a save file Please input file name and select repository here Fig 4 7 6 Dialogue to save Spectrum D...

Page 29: ...1 Plotting points After retrieving data of Noise Table the table will be shown by blue line as Fig 4 8 1 Fig 4 8 1 Noise Table No points In order to plot a point right click on the plotting point The...

Page 30: ...mple of Noise Table After all plotting click Noise Write button to upload the data to MRF 10 Fig 4 8 4 Uploading of Noise Table data After uploading all data can be shown in the menu of 6 Noise The da...

Page 31: ...blue point Fig 4 8 6 Delete a point After deleting click Noise Write button to upload the data to MRF 10 After uploading all data can be shown in the menu of 6 Noise The deleted data was eliminated fr...

Page 32: ...unit is ft display will be converted to show feet units 1 3 R parameter Measurement range Parameter Default Value Description 0 000 13 000 10 000 R C G 10 Parameter range in metric m units If measure...

Page 33: ...s are selected for Level or Ullage display parameter range is calculated in feet 2 3 Maximum output 20 mA Parameter Output Default Value Description 3 000 13 000 Level 10 000 Parameter range in metric...

Page 34: ...rement unit is ft display will be converted to show feet units 3 4 Volume point 320 339 Parameter Default Value Description 0 99999 99 0 000 Display will be converted to the volumetric unit setting un...

Page 35: ...ion 0 000 10 000 1 000 Parameter range in metric m units If measurement unit is ft display will be converted to show feet units 3 8 Offset level Parameter Default Value Description 3 000 13 000 0 000...

Page 36: ...arameter range in metric m units If measurement unit is ft display will be converted to show feet units 4 4 Span Calibration Parameter Default Value 0 90 1 10 1 00 5 Advanced Setting 5 1 Averaging Tim...

Page 37: ...5 7 is set at 0 5 6 First Echo Flag Parameter Description Max Echo Max strength echo defined as surface echo First Echo First echo defined as surface echo 5 7 Bottom Visible Parameter Description Bot...

Page 38: ...0 00 0 00 dB If you create a noise table incorporating settings 6 1 6 3 you can produce a line chart such as that shown below which enables you to eliminate lower signal strength noises below the line...

Page 39: ...rdware reset 7 4 Self check Parameter Value Description SET Self check Execute self check Check parameters are as follows ROM EEPROM Volume table Noise table Transmitting gain In case of RED lamp turn...

Page 40: ...zero H Dead band Fig 5 1 1 Basic Parameters for Measurement 5 2 Negative level measurement Value C defines below zero level When C values are set the Hart communicating PC will show negative values i...

Page 41: ...ring range and the gauge tracks such echoes set up Noise Table parameters You can adjust the threshold level for sections of the measurement range with these parameters Noise Table parameters are comp...

Page 42: ...numbers For example if 10 is set at 6 1 you will need to set data 610 619 for amplitude values 6 Amplitude points must correlate to the distances defined under 6 2 Select table address ex 610 and ente...

Page 43: ...ng the PC configuration software you can add or change the position of the noise table with a right click 1 On the Tank Spectrum tab when the START button is clicked you may view the red line wave for...

Page 44: ...d measured level Diameter is the diameter of the sphere and offset level is the measurement level compensation factor Cylindrical Tank Horizontal Cylinder Tank Volume is calculated from diameter lengt...

Page 45: ...l data then enter values for 300 319 5 After completing input of Level data the next step is entering the Volume data 6 Then Open Menu tab 3 3 and set the volume parameters into the data fields in acc...

Page 46: ...Analog calibration When analog output current is not correct revise the value in the following manner Input 4 000mA under Fixed Current Output 2 5 then input the measured current value under 4mA Calib...

Page 47: ...e gauge can not distinguish the surface reflection echo from the bottom echo 5 7 Bottom Visible and 4 5 Zero cut parameters of the gauge function to avoid the tracking of bottom echoes Initial setting...

Page 48: ...Transmitting power less than 35 V m at 3m Measuring range Max 10 m 33 2 Power Supply voltage 16 36 VDC 3 Output Variable Ullage Level Volume Current Signal amplitude Volume Max Unit Level Ullage m ft...

Page 49: ...rface ambient temperature 25 C 77 F atmospheric pressure 6 2 Environment resistance Ambient temperature 20 70 C 40 158 F Storage temperature 40 80 C 40 176 F Degree of protection IP68 under water 10m...

Page 50: ...Shielded twisted 3 cores Cross section area of cable 0 2 2 5 mm2 AWG24 14 Cable Length 10m 2 Material and Mass Transmitter Case Stainless steel Di cast SCS 14 Antenna face panel For sewer PVC For open...

Page 51: ...6 4 Dimension mm 4 M6 depth 5 5 Grounding Terminal Radiation face 6 4...

Page 52: ...blank 6 5...

Page 53: ...2015 August 3rd Edition TOKYO KEIKI INC Measurement Systems Company 2 16 46 Minami Kamata Ohta ku Tokyo 144 8551 Japan TEL 81 3 3737 8621 FAX 81 3 3737 8665 Web http www tokyo keiki co jp Copyright 20...

Reviews: