background image

Preparing job computer sprayer for use 


31 

990267EN  ind. A


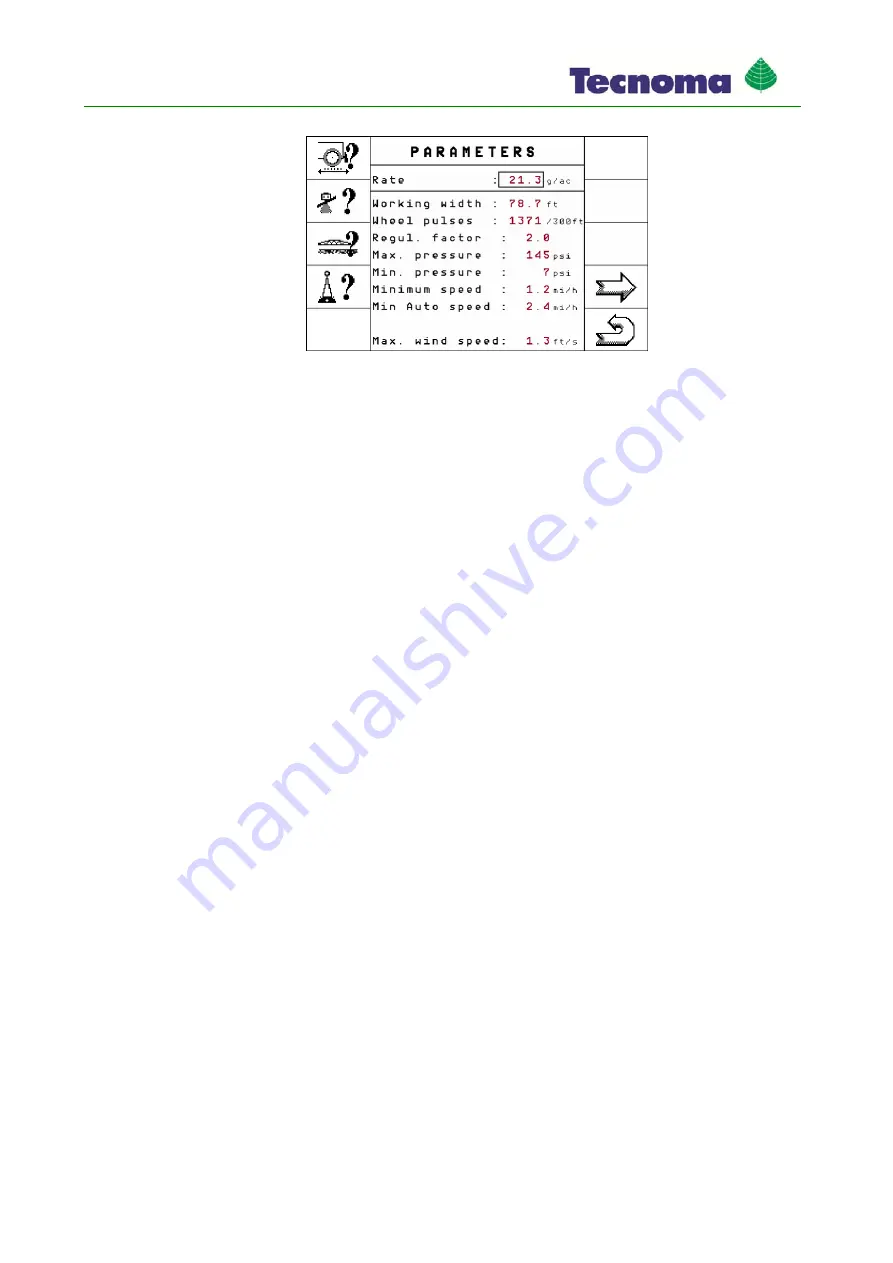
  The following screen will appear: 


2. 

Click on the line with the desired parameter. 
 

  The data input screen appears. 

3. 

Input desired value. 

4. 

Highlight and click on "OK" to terminate the input and apply it. 
 

  The new value appears in the "Parameters" screen. 


The list contains all parameters that can appear on the screen. Which parameters appear on your 
screen depends on the type and configuration of your field sprayer. 

Nozzle 

Color of the activated nozzles. 

The colors are specified by the ISO standard. They can also be calibrated. [

 43] 

Rate 

The volume entered as the rate will be applied when the field sprayer is working in automatic mode. 

Working width 

Field sprayer working width. 

Wheel pulses 

Number of pulses the wheel sensor sends to the job computer on a 100m route. Used to calculate 
speed. 

The number is determined by the wheel sensor calibration. 

Regul. factor 

In Automatic mode the spray pressure of the nozzles will be adapted to the current speed of the field 
sprayer. The adaption should ensure that the volume of spray liquid that is spread is exactly what you 
defined in the rate. In this the regul. factor plays a decisive role. 

The regul. factor adjusts the control speed: 
 

  The higher the regul. factor, the faster the spray pressure is adjusted. 


  The lower the regul. factor, the more slowly the spray pressure is adjusted. 

When setting the regul. factor, take note of the following: 

List of parameters 

Summary of Contents for ECO

Page 1: ...Operating instructions Job computer ECO 990267EN SEPTEMBER 2014 Read and follow these operating instructions Keep these operating instructions in a safe place for later reference ...

Page 2: ...Imprint Operating instructions Product Job computer ECO Document number 990267EN From software version SPRECO1 V619a SPRECO2 629a Original language German Document ...

Page 3: ... 11 2 4 Layout of references 12 3 Product description 13 3 1 Performance description 13 3 2 System requirements 13 3 3 Understanding manufacturer s plates 13 4 Mounting and installation 15 4 1 System overview 15 4 2 Connecting job computer to the basic tractor equipment 16 4 3 Fitting multi function joystick MFG 17 4 4 Mounting the gyroscope 18 4 4 1 Mounting the bracket for the gyroscope 19 4 4 2...

Page 4: ... Determining pulses per 100 meters 40 6 6 Configuring sections 41 6 6 1 Entering the number of sections 41 6 6 2 Entering the number of nozzles per section 42 6 6 3 Switching off section permanently 42 6 7 Configuring nozzles 43 6 7 1 Layout of the NOZZLE PRESSURE screen 43 6 7 2 Selecting nozzle type 43 6 7 3 Calculating theoretical application rates 45 6 7 4 Calibrating nozzles 46 6 7 5 Configur...

Page 5: ...ANCE Control 69 8 3 1 Calibrating DISTANCE Control 69 8 3 2 Configuring work height 72 8 3 3 Configuring clearance height 73 8 3 4 Selecting work mode 75 8 4 Operating DISTANCE Control while working 76 9 TRAIL Control 77 9 1 Configuring TRAIL Control 77 9 1 1 TRAIL Control parameters 77 9 1 2 Calibrating TRAIL Control 77 Teaching in the middle position and end stops 78 Calibrating the hydraulics o...

Page 6: ... 2 1 Technical data for the job computer 87 11 2 2 Field sprayer technical data 88 11 3 Checking the software version 89 11 4 Fault diagnostics 89 11 4 1 Simulated speed function 89 11 5 Multi function joystick button assignment 90 12 Alarm messages 92 ...

Page 7: ...ed safety industrial and medical rules as well as all road traffic laws Before charging the tractor battery always disconnect the tractor from the job computer Use only clear water when you are testing the field sprayer Do not use a poisonous spray during the tests or when calibrating the systems Layout and meaning of warnings All safety instructions found in these Operating Instructions are compo...

Page 8: ...larm messages are structured Layout of alarm messages Type of alarm Name of the component that caused the alarm ALARMS message Problem description and solution What the exact cause of an alarm message is or how you rectify a fault can be read in the section Alarm messages 92 Type of alarm There are three types of alarm Info The status of a sensor has changed If applicable you must do something Err...

Page 9: ...s made to the unit will void the manufacturer s warranty EC declaration of conformity This product has been manufactured in conformity with the following national and harmonised standards as specified in the current EMC Directive 2004 108 EC EN ISO 14982 Disposing When it has reached the end of its service life please dispose of this product as electronic scrap in accordance with all applicable wa...

Page 10: ...ty sign Where to attach Meaning Close to the bend area between tractor and trailer device Do not stay in the bend area during operation Safety sticker on the product Sticker on the job computer Do not clean with a high pressure cleaner 1 9 ...

Page 11: ...ormation from the terminal The instructions were written for the operation of the job computer on terminals from Müller Elektronik If the job computer is operated with other ISOBUS terminals the screen layout and the information represented may differ from the diagrams in this operating manual Layout of operating instructions The operating instructions explain step by step how you can perform cert...

Page 12: ...rences are given in these Operating Instructions they will appear thus Example of a reference 12 References can be identified by their square brackets and an arrow The number following the arrow shows you on what page the chapter starts where you can find further information 2 4 ...

Page 13: ...puter F2 has these functions Several hydraulics functions For example Sloping the boom folding the boom in and out TRAIL Control automatic drawbar and axle steering System requirements For the job computer to be used the tractor must meet the following requirements For ISOBUS systems The tractor must be fitted with basic ISOBUS equipment The terminal must be ISOBUS compliant For ECO systems The tr...

Page 14: ...mber Customer number If the product was manufactured for an agricultural machinery manufacturer the agricultural machinery manufacturer s item number will be shown here Software version If you update the software this version will no longer be up to date Operating voltage The product may only be connected to voltages within this range ...

Page 15: ...or job computer F2 Different configurations are possible Multi function joystick Optional Used to operate the field sprayer Job computer F2 Slave job computer Different configurations possible ISOBUS basic equipment Connects the job computers with the tractor Supplies the job computers and the terminal with voltage Cable harness and distributor for job computer F1 Different configurations possible...

Page 16: ...possible Wheel sensor Cable harness and distributor for job computer F1 Different configurations possible Connection cable for ECO basic equipment Connection of the job computer sprayer to the tractor s basic equipment Job computer F1 Master job computer Different configurations possible Connecting job computer to the basic tractor equipment For you to operate the field sprayer with the terminal y...

Page 17: ...pment Tractor is fitted with basic ECO equipment from Müller Elektronik Job computer is fitted to the field sprayer Field sprayer has been attached to or is trailed by the tractor 1 Pull cable from the field sprayer to the ECO basic equipment socket 2 Insert the plug of the ECO basic equipment into the socket First insert the hook on the tip of the plug into the opening in the socket 3 Let the plu...

Page 18: ...connector of the basic equipment to the jack on the multi function joystick 3 Plug in connector A on the multi function joystick to jack A on the terminal The multi function joystick is connected between the basic equipment and the terminal When the terminal is switched on the LED on the multi function joystick lights up Mounting the gyroscope The gyroscope is a measuring device to determine the d...

Page 19: ...e the position for mounting the bracket on the tractor The bracket must be mounted vertically and without vibration on the rear of the tractor Make sure that the connection cable of the gyroscope does not become too taut when fastened in the bracket 2 CAUTION Before drilling a hole make sure that for drilling you do not damage any cables 3 Drill the holes for the screws 4 Fasten the bracket The br...

Page 20: ... Fasten the gyroscope into the bracket on the tractor and screw tight with the wing screw The side with the TOP OBEN label must be on the top 2 After work fasten the gyroscope into the bracket on the trailer device and screw tight with the wing screw 4 4 2 Procedure ...

Page 21: ...ition key b For non ISOBUS tractors Switch off the terminal c For all tractors Pull cable between the tractor and the field sprayer from the jack d When you are using an ECO terminal Switch off the terminal 2 Wait until the LED on the multi function joystick goes out You have switched off the job computer Initial start up Once the job computer is fitted installed and connected to the terminal you ...

Page 22: ...ions For example in the Farm Management Information System More on this 35 Version of the object pool The object pool is the part of the software that contains images and text You can learn how to check the full software version in the section Checking the software version 89 Browsing between screens There are screens that have too many entries to display them all on one screen In these screens yo...

Page 23: ...in the input field where a new number will be entered 1 Mark the desired number with cursor 2 2 Click on the marked number The number clicked appears in the input field Cursor 1 moves one field to the right 3 Set additional numbers 4 Highlight and click on OK to terminate the input and apply it Screen structure Work screen with a field sprayer The work screen is always displayed during work and co...

Page 24: ...y data area The following information is shown in this area Spray data area Rate Specified application rate in l ha Additional icons Actual value Current application rate in l ha Spray pressure Current pressure of the sprayed liquid in bar only when the pressure sensor is configured Speed Current speed of the field sprayer in km h The following symbols may appear depending on the configuration Ico...

Page 25: ...ith information about the activated functions Page with counters Switch between page 1 and page 2 Information on page 1 This page always tells you about the current status of the field sprayer The following diagram shows the information that can appear in this area Selectable area 1 Page 1 The following symbols may appear depending on the configuration Icon Meaning or TRAIL Control activated as dr...

Page 26: ... following diagram shows the information that can appear in this area Selectable area 1 Page 2 Current tank content Depending on the field sprayer equipment this will show either the calculated or measured tank content Flow rate per minute Flow rate through the main flow meter Workable area With the current tank content and the current spread rate the area shown here can still be processed Area ou...

Page 27: ...how the sections in the boom terminal area may look Boom terminal area example 1 Section 1 is switched off Sections 2 to 7 are preselected and applying Boom terminal area example 2 Section 1 is switched off Sections 2 to 7 are preselected but are not applying The following symbols may appear depending on the configuration Icon Meaning DISTANCE Control is deactivated This icon only appears on the b...

Page 28: ...on to you about the additional functions that are activated The following symbols may appear depending on the configuration Icon Meaning Light is switched on Additional function A is activated The field sprayer manufacturer can assign a function to this function The field sprayer manufacturer provides you with information about what function this icon has Additional function B is activated The fie...

Page 29: ...ons Layout of additional screens Many functions of the job computer are dependent on the model of the field sprayer and its equipment These functions are operated via the function keys whose function icons are in the so called Additional Screens Depending on how many additional functions your field sprayer has the function icons may appear on different additional screens You will only see in the o...

Page 30: ...tart up Start of season Rate Working width Wheel pulses Regul factor Max pressure Min pressure Minimum speed Min Auto speed Max wind speed Tank size Tank level alarm Pulses main flow Pulses filling Pump rpm Entering field sprayer parameters Enter the parameters in the following cases Before the first start up When the field sprayer parameters change This is how you change the value of a parameter ...

Page 31: ...e applied when the field sprayer is working in automatic mode Working width Field sprayer working width Wheel pulses Number of pulses the wheel sensor sends to the job computer on a 100m route Used to calculate speed The number is determined by the wheel sensor calibration Regul factor In Automatic mode the spray pressure of the nozzles will be adapted to the current speed of the field sprayer The...

Page 32: ...talled on your sprayer you must deactivate this function as follows Enter value 0 in the min pressure line Enter value 0 in the max pressure line Minimum speed Minimum work speed If the field sprayer falls below the minimum work speed the following happens Spreading will be switched off automatically The work screen displays the icon Min Auto speed Minimum auto speed If the field sprayer falls bel...

Page 33: ...alues Current Indicates what the maximum pump speed is currently set to Set value Used to change the maximum pump speed This is how you save the current pump speed as the maximum permitted speed 1 Highlight Set value line 2 Bring pump speed to the desired value In the Set value line the current pump speed will be shown 3 Press The pump speed from the Set value line appears in the Current line In t...

Page 34: ...sprayers with TANK Control Setting joystick type Joystick type Without Joystick For the functions that are normally operated with the joystick additional function icons appear on the terminal The field sprayer can be operated with the terminal buttons The function icons appear in the work screen extension The multi function joystick can continue to be used ME Joystick An ME Joystick is connected t...

Page 35: ...the lifespan of a flow meter calibration must be carried out in the following cases Before the first start up At the start of each season When you detect deviations between the amount actually sprayed and the amount displayed When you have replaced or repaired the flow meter There are two ways you can calibrate the flow meter The tank method it is time consuming but precise The nozzle method it is...

Page 36: ...r required protective equipment All sections are switched on Manual mode is activated in the Spray data area of the work screen the icon appears The tank is filled with clear water For this you need several hundred liters of clear water You have the option of weighing the entire trailer or measuring the volume of water applied with another method Pump is switched on 1 Make sure that all preconditi...

Page 37: ...ighing the tank before and after spreading and so working out the difference 9 Enter the applied quantity in liters in the Water volume line 10 Exit screen You have calibrated the flow meter with the tank method Calibrating the flow meter with the nozzle method During calibration of the flow meter with the nozzle method you determine the quantity of the liquid applied through a nozzle in a specifi...

Page 38: ...repared a measuring beaker you can use to measure the quantity sprayed You have prepared a stopwatch to be able to count one minute precisely Only one section is preselected Manual mode is activated in the Spray data area of the work screen the icon appears The tank is filled with clear water The set working width is correct The number of nozzles per section and the number of sections is entered c...

Page 39: ...termine and note down an average of several measurements 9 Stop applying The application will be stopped 10 Stop calibration Line Real flow appears 11 Enter the average applied quantity in liters in the Real flow line 12 Exit screen The value of the parameter Pulses main flow will be updated You have calibrated the flow meter with the nozzle method Manually entering the number of pulses per liter ...

Page 40: ... the wheel sensor very precisely Determining pulses per 100 meters When calibrating the wheel sensor with the 100m method you determine the number of pulses received by the sensor in a distance of 100m In order for the system to function correctly the wheel sensor must receive at least 250 pulses over a distance of 100 meters To increase the number of pulses you must mount additional magnets oppos...

Page 41: ...ar Stop calibration Abort calibration 5 Drive the previously measured 100m distance and stop at the end During the drive the currently determined pulses are displayed 6 Stop calibration 7 Exit screen The number of pulses appears in the line Wheel pulses Configuring sections Entering the number of sections Enter the number of sections as follows 1 Switch to the SECTIONS screen 6 6 6 6 1 Procedure ...

Page 42: ...ction as follows 1 Switch to the SECTIONS screen The following screen will appear Next to each section appears the number of nozzles 2 Set the number of nozzles that must be changed The data input screen appears 3 Enter desired number of nozzles 4 Exit screen Switching off section permanently You can permanently switch off any section Switching off the outer sections has the following effects The ...

Page 43: ...sensor is fitted If no pressure sensor is fitted to the field sprayer and the application rate is regulated only via the flow rate then you do not need to configure the nozzles Layout of the NOZZLE PRESSURE screen In the NOZZLE PRESSURE screen you can configure the nozzles used NOZZLE PRESSURE screen consists of three areas Current nozzle settings Calculating possible application rates Nozzle cali...

Page 44: ... meter If the field sprayer has no pressure sensor and the spray pressure should be shown The nozzle selection list contains 15 standard nozzle types as defined by ISO 10625 and 4 user specific freely configurable nozzles types A B C and D The following table shows an overview of the nozzles their color and output Nozzle color in accordance with ISO 10625 ISO identifier Output in l min at 3 bar li...

Page 45: ...en The following screen appears 2 Click on the field next to the Nozzle line A selection list will appear 3 Select the desired nozzle color In the NOZZLE PRESSURE screen the selected nozzle with the calculated application rate appears Calculating theoretical application rates In the lower part of the NOZZLE PRESSURE screen you can calculate theoretical application rates This allows you to see how ...

Page 46: ...mum and maximum application rates Calibrating nozzles NOZZLE PRESSURE when calibrating an undefined nozzle Nozzle output at a pressure of 3 bar Minimum nozzle pressure Only appears for undefined nozzles Minimum output of the nozzle Only appears for undefined nozzles CAUTION Poisonous spray liquid Poisoning Always calibrate the nozzles using only clear water Ensure that there are no spray liquid re...

Page 47: ...d the selected nozzle Configuring wide area nozzles Wide area nozzles are nozzles fitted to the outer edge of the boom They can spray further than the normal nozzles Wide area nozzles and corner nozzles cannot be used at the same time Determining the spray range of the wide area nozzles The spray range of a wide area nozzle is considered by the job computer to be the spray range of several normal ...

Page 48: ...n 6 Check if the Working width is set correctly If not correct the Working width parameter 7 Check whether the spray geometry is set correctly Tank filling After each fill up of the spray liquid tank you can tell the job computer how much water you added Depending on what additional equipment is fitted to your field sprayer the process may be different In this you can Fill up the tank manually wit...

Page 49: ...e fill up is taking place the filled quantity appears in the screen Tank filling TANK Control in the line Active tank content 3 When the tank is full switch off pump Setting sprayer geometry Sprayer geometry is set of parameters that describe the dimensions of your machine Setting the sprayer geometry lets the software know exactly how long and how wide the machine is and where the individual sect...

Page 50: ...ttachment point Half the current working width Self propelled sprayer with rear boom Distance between the work point and the GPS antenna Half the current working width Self propelled sprayer with boom in front Distance between the work point and the GPS antenna Half the current working width The trailed sprayer is shown on the diagram If you have activated another sprayer it appears on the termina...

Page 51: ... following screen will appear 3 Press the rotary knob The following screen will appear 4 Click on your sprayer type A diagram of the sprayer appears 5 Measure following distances on the sprayer CRP_X DRP_Y ERP_X 6 Enter the values in the fields one after another ...

Page 52: ...d sprayer needs to be operated safely Locking boom This function makes it possible to lock the boom so it remains stable when the weight is unbalanced You will reach the screen with this function as follows Use the following function keys to operate the function Function icon Meaning Lock boom Unlock boom If you lock the boom and a locking sensor is fitted to the field sprayer in the work screen a...

Page 53: ...ng diagram shows the structure of booms and what the individual boom parts are called The diagram shows a field sprayer with a seven part boom but it also applies to smaller booms Parts of the boom in a field sprayer Three part boom Boom part Inner left Five part boom Boom part Unmoving part Seven part boom Boom part Inner right Boom part Outer left Boom part Middle right Boom part Middle left Boo...

Page 54: ...gram you see how a seven part boom is shown on the function icons Representation of the function icons Directional arrows Arrow pointing inwards means Fold in Arrow pointing outwards means Fold out Sections of the boom marked in white are not folded in or out with this function icon Sections of the boom marked in black are folded in or out with this function icon Use the following function keys to...

Page 55: ...ou will reach the screen with this function as follows or To operate this function the user needs the multi function joystick first of all Use the following function keys to operate the function Function icon Function Lift boom Lower boom Activate and deactivate DISTANCE Control On the following diagram you see how this function is shown on the work screen Lifting boom on the work screen Lowering ...

Page 56: ...n the work screen Slope boom raise left lower right Slope boom lower left raise right The arrows only appear on page 1 of the boom display area Tilting booms up and down When booms are being tilted down and up the left and right sides of the boom change their angle independently of one another When tilting up the selected side of the boom is arched upwards When tilting down the selected side of th...

Page 57: ... Setting rate The rate is the amount of spray liquid you want to apply per hectare The job computer will attempt to stick to this set value during the work There are several ways to specify the rate Enter rate in the Parameters screen Take rate from the TaskManager application Enter rate in the Parameters screen as follows 1 Switch to the Parameters screen 2 Enter rate in the Rate line The rate en...

Page 58: ...sprayer can apply Spray pressure is not regulated The speed of the field sprayer is below Min Auto speed Field sprayer automatically switches off The spray pressure will be adjusted automatically in the following cases Speed of the field sprayer has changed Number of switched on sections has changed You have changed the set value manually The speed and precision the rate will be adjusted with depe...

Page 59: ...ds the multi function joystick first of all Use the following function keys to operate the function Function icon Function Increase application rate Reduce application rate You can increase the spread rate as follows Manual spreading mode is active 1 press and keep pressed As long as the button is pressed the regulation valve is continuously closed further The spread rate continuously increases Th...

Page 60: ...eady for spreading As long as the field sprayer does not move the icon appears in the work screen 3 In Automatic mode Start up and exceed minimum auto speed Parameter Min Auto speed As soon as the minimum auto speed is exceeded the field sprayer starts to spread Spray cones appear below the boom icon You have started the spreading Stopping spreading You can stop spreading in the following ways sto...

Page 61: ... the field sprayer they must be activated on the job computer You will reach the screen with this function as follows or Use the following function keys to operate the function Function icon Function Activate and deactivate corner nozzle on the left Activate and deactivate corner nozzle on the right On the following diagram you see how corner nozzles are shown on the work screen Corner nozzles on ...

Page 62: ...y activate or deactivate right section with the wide area nozzle You cannot permanently activate or deactivate the wide area nozzles with the multi function joystick With the multi function joystick you can switch the wide area nozzle sections on and off On the following diagram you see how wide area nozzles are displayed in the work screen Left wide area nozzle permanently activated Right wide ar...

Page 63: ...ers can be activated at the same time Configuration B Only one foam marker can be switched on Use the following function keys to operate the function Function icon Function with configuration A Function with configuration B Switch on left foam marker Switch on left foam marker The right foam marker will be switched off Switch on right foam marker Switch on right foam marker The left foam marker wi...

Page 64: ... the right Preselect or switch off marked section When some sections are preselected start spreading on these sections When no sections are preselected start spreading on all sections Activating localized mode 1 Switch to the screen Parameters Options activation 2 Click on the value under the line Section switching A list appears 3 Click on Localized mode Under the line Section switching the value...

Page 65: ...ional valve The job computer can control the proportional valve and specify the desired speed to it The are two ways to use PWM regulation Permanent PWM control Manual activation of the PWM control Permanent PWM control In this type of PWM control the PWM control is always active As soon as you start the job computer the spray liquid pump will be automatically set to the speed at which it was last...

Page 66: ...e following information Volume applied volume Area area processed Distance distance driven during the application Work time Total duration of the application Use the following function keys to operate the function Function icon Function Clear Volume counter Clear Area counter Clear Distance counter Clear Work time counter Back to work screen Delete the contents of the day counter shown Stop day co...

Page 67: ...multi function joystick Which function is executed when a button is pressed depends on the position of the side switch Position of the switch Color of the LED Red Yellow Green The multi function joystick is operated as follows The work screen is called up 1 Bring side switch into the desired position and fasten The LED on the multi function joystick lights in the corresponding color 2 Press button...

Page 68: ... maximum speed is 15 km h When the user starts the DISTANCE Control calibration During the calibration the boom will be controlled automatically in some phases When an alarm message connected with DISTANCE Control appears on the screen When one of the following sensors sends a signal to the job computer Boom locking sensor Lifting tower sensor Position sensor Boom folded in Mode of operation DISTA...

Page 69: ... has been fully carried out NOTICE For it to function correctly over the long term regular maintenance of the moving parts is absolutely necessary Changes in the mobility of the boom suspension can have serious negative effects on the regular behavior Furthermore it may not necessarily be corrected through recalibration Maintain the boom suspension regularly in accordance with the manufacturer s g...

Page 70: ...oped The spray liquid lines on both sides of the boom have the same weight They must either be empty or completely filled with water There are no depressions in the surface below the USonic sensors The surface is not too smooth no asphalt or concrete The ultrasonic signal is lost on a surface that is too smooth All moving parts of the boom suspension are sufficiently lubricated Field sprayer param...

Page 71: ...e the following message appears Release the boom back to horizontal and press If the message Release the boom back to horizontal and press does not appear it means that the slope angle was too small when the calibration began Repeat the calibration from Phase 1 Lift the boom a bit higher so that the slope angle becomes greater 4 Release boom and let it hang back in the horizontal position The boom...

Page 72: ...ll be brought into the horizontal position In the process the boom may not touch the ground If at the end the horizontal position is not correctly set it does not mean the calibration has failed 2 Observe the movements of the boom 3 Should something not be OK break off the procedure with All three steps must then be carried out again The calibration has successfully completed when the following me...

Page 73: ...n Function icon Function Lift boom Lower boom You adjust the work height while working as follows DISTANCE Control is active All USonic sensors are above the plants At least one section is spreading 1 Switch to the DISTANCE Control screen 2 or Set boom to the desired height over the plants The boom moves each time the function buttons are pressed The work height will be saved as soon as you stop r...

Page 74: ...ield sprayer is at rest When the field sprayer is at rest you adjust the clearance height as follows DISTANCE Control is deactivated All USonic sensors are above the plants Field sprayer is not spreading 1 Set boom to desired clearance height 2 Switch to the DISTANCE Control screen 3 Save clearance height The clearance height will be saved Adjusting clearance height while working Use the following...

Page 75: ...TANCE Control should regulate automatically In the DISTANCE Control screen the work modes are represented as follows Work mode Function Regulating boom height Regulating boom slope Regulating boom height and slope You will set the desired work mode as follows 1 Switch to the DISTANCE Control screen 2 Press to set the desired work mode In the line Work mode you see the current work mode 3 Deactivat...

Page 76: ...raised to the clearance height During work DISTANCE Control works as follows If at least one section is spreading the boom will be set to work height If no section is spreading the boom will be set to the height saved in the parameter Sprayer off height You must fulfill the following preconditions before using DISTANCE Control during work DISTANCE Control is calibrated 69 Work height is configured...

Page 77: ... and 3 Deviation tolerance The deviation tolerance influences the behavior of steering in the middle position area The lower the tolerance is set the more sensitively the control responds to small changes Normally the value lies between 2 and 3 Wheels drawbar Distance between the center of the rear axle of the tractor and the towing hook of the tractor Calibrating TRAIL Control WARNING Danger of i...

Page 78: ...ng calibration depends upon whether your trailer device is steered via drawbar or stud axle The procedure is however identical for both cases Phase 1 Teach in middle position TRAIL Control is in manual mode Subsurface is not sloped Slope sensor must not recognize any slope Otherwise the Slope counter steering will not work properly 1 Switch to the TRAIL Control screen The following screen appears ...

Page 79: ...amaged 2 Steer the trailer device almost fully to the left 3 Start calibration The following message appears Most left position the calibration is ready 4 Confirm within 3 seconds Calibration is initiated The following message appears Most left position the calibration runs 5 Wait until the message Most left position the calibration runs is no longer displayed 6 Steer the trailer device almost ful...

Page 80: ...s in manual mode Subsurface is not sloped Slope sensor must not recognize any slope Otherwise the Slope counter steering will not work properly 1 Switch to the TRAIL Control screen The following screen appears 2 Set up the trailer device on flat ground in a line behind the tractor Drive straight for a few meters until the tracks of the field sprayer run precisely into the tracks of the tractor or ...

Page 81: ...l to work Minimum speed 3 km h Steering is not possible at lower speeds Maximum speed 15 km h If you drive faster than 15 km h TRAIL Control will be automatically switched off Minimum oil throughput for the hydraulic system of the tractor 25 l min The minimum oil throughput may be greater for large field sprayers Work mode TRAIL Control lets you work in two modes in automatic mode in manual mode F...

Page 82: ...e trailer device is being steered Steering in manual mode In manual mode you must steer the trailer device manually Drive in a curve to the right as follows 1 Driving the tractor to the right 2 Steer the trailer device for the drive to the right With drawbar steering The drawbar is steered to the left With stub axle steering The wheels are steered to the left An arrow pointing left appears on the ...

Page 83: ...device driving obliquely to the direction of work on a slope Steering the trailer device against the slope Without TRAIL Control TRAIL Control with axle steering TRAIL Control with drawbar steering The following icons appear in the work screen They show the direction in which the trailer device is being steered Meaning Icon for drawbar steering Icon for axle steering The trailer device is being st...

Page 84: ... it should be offset Preparing TRAIL Control for road driving Before driving with the field sprayer on a public road you must switch TRAIL Control off and if possible lock it with a locking bolt WARNING Risk of accident through lateral movement of the trailer device In road traffic TRAIL Control can lead the trailer device to the side of the tractor track This may cause a traffic accident Before y...

Page 85: ...icon or 2 Steer the trailer device in the middle position Drawbar or axle will be steered in the middle position 3 Lock drawbar steering with the locking bolt In Selectable area 25 of the work screen the following icon appears TRAIL Control is ready for traveling on the road Procedure ...

Page 86: ...o the job computer when you create the field sprayer s job computer in the TaskManager as a new machine For this read the operating manual for the TaskManager application SECTION Control You must take note of the following changes and additional settings if you are using both applications Sections switching SECTION Control takes over control of the sections switching In the work screen of the Spra...

Page 87: ... 8V without power output without supply to external sensors Temperature range 20 to 70 ºC in accordance with IEC68 2 14 Nb IEC68 2 30 and IEC68 2 14Na Housing Anodized aluminum continuous cast casing lid with pressure compensation element and stainless steel screws Protection degree IP66K dustproof and protected against hose water at elevated pressure in accordance with DIN40050 Part 9 1993 Enviro...

Page 88: ... compensation element and stainless steel screws Protection degree IP66K dustproof and protected against hose water at elevated pressure in accordance with DIN40050 Part 9 1993 Environmental tests Vibration and impact test in accordance with IEC68 2 Dimensions 262 mm x 148 mm x 62 mm LxWxH Weight 0 84 kg Field sprayer technical data Note the machine data set for your field sprayer here Parameter V...

Page 89: ...on is only used during tests and when looking for faults It simulates the movement of the machine when the machine is still By activating the Simulated speed function it is possible for customer service employees to check the correct function of a sensor By default the value is set to 0 km h and the function is switched off After a restart of the computer the function is always deactivated The mos...

Page 90: ...and automatic mode Switch TRAIL Control on and off Buttons 1 4 are not assigned Steer trailer device to the left Steer trailer device to the right Set rate to 100 Switch section main switch on and off Switch on sections from right to left Switch on sections from left to right Switch off sections from right to left Switching off sections from left to right In automatic mode Reduce rate by 10 In man...

Page 91: ...a 91 990267EN ind A Switch between manual and automatic mode Lift boom Lower boom Tilt boom up symmetrically Tilt boom down symmetrically Raise boom on the left lower boom on the right Raise boom on the right lower boom on the left ...

Page 92: ...utside of the valid range Valid range 0 5 V to 4 5 V 1 Replace the slope sensor TRAIL Control Defective gyroscope The analog input voltage is outside of the valid range Valid range 0 5 V to 4 5 V 1 Replace the gyroscope TRAIL Control Calibration must be done No valid value for the drawbar middle position 1 Calibrate TRAIL Control TRAIL Control Verify the parameters Values in the configuration outs...

Page 93: ...EGULATION Set value out of reach The system cannot adjust the application rate to the rate SPRAYER Pump speed too low The spray liquid pump s speed could be not achieved SPRAYER Pump speed too high The spray liquid pump s maximum speed was exceeded SPRAY REGULATION The pressure is too low The minimum spray pressure could not be achieved SPRAY REGULATION The pressure is too high The maximum spray p...

Page 94: ...el 33 0 3 26 51 99 99 Fax 33 0 3 26 51 83 51 After Sales Service Tel 33 0 3 26 51 18 55 Fax 33 0 3 26 51 18 38 Spare Parts information Tel 33 0 3 26 51 18 55 Fax 33 0 3 26 51 18 38 order deadlines Tel 33 0 3 26 51 18 77 Fax 33 0 3 26 51 18 38 Website www tecnoma com E mail tecnoma tecnoma com ...

Reviews: