7-4
7. WIRELESS LAN PARAMETER SETTING
EO18-33014
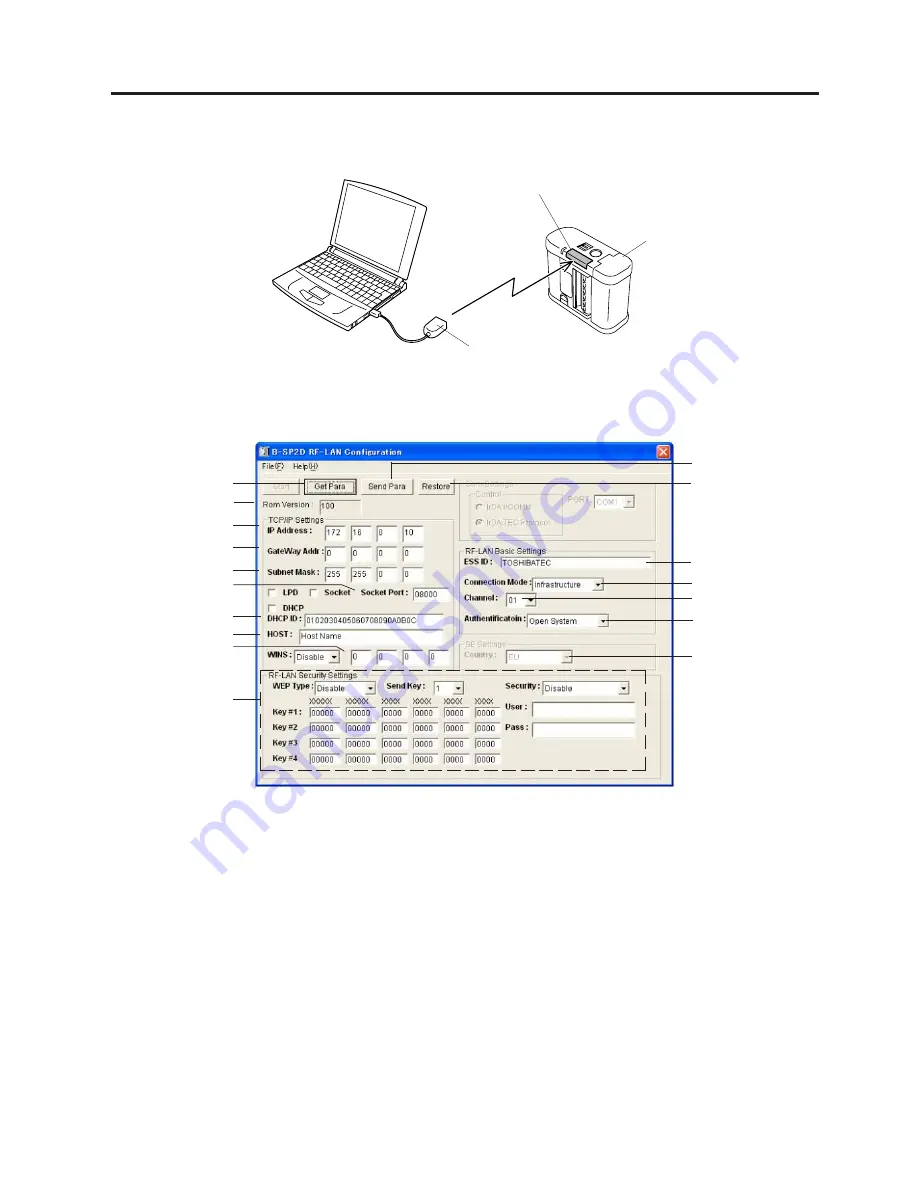
5 Place the ACT-IR220+ so that it faces to the IrDA interface window. Then, click on the [Start] button on
the screen to be ready for downloading. (When the [Start] button is clicked, the printer's LED will blink in
green.)
IrDA Interface Window
B-SP2D Printer
ACT-IR220+
6 After setting each parameter, click on the [Send Para] button. The setting data will be donwloaded to the
wireless LAN module. During transmission, the parameters being downloaded are shown below the [Send
Para] button.
NOTES:
1. How to call the factory set initial settings
Clicking on the [Restore] button resets the parameter settings to the initial values that were set at the
shipment from the factory. Regarding the IP address, the upper 2 bytes are fixed to "172.16", and the
lower 2-byte number is set to the printer ID. However, the IP address called by the [Restore] button will
be always "172.16.0.10".
Also, clicking on the [Restore] button disables the [Get Para], [Send Para], and [Restore] buttons until
the factory set initial values have been displayed.
2. How to call the currernt settings
Clicking on the [Get Para] button displays the current settings.
If an unavailable channel has been set for the selected country, it will be automatically changed to a
proper channel on this tool. (Applicable from the RFLAN Configuration Tool V1.1.)
3. How to save and load the settings
It is possible to save the parameter settings shown on the screen and to load the saved parameter
settings.
(Revision Date: Oct. 26, 2004)
7.1 WHEN USING THE RFLAN CONFIGURATION TOOL
[Get Para] button
ROM Version
IP Address
Gateway Address
Subnet Mask
Socket Port No.
DHCP ID
Host Name
WINS Server
Address
RF-LAN
Security Setting
WEP Type
Send Key
Key #1 to #4
User Name
Password
[Send Para] button
[Restore] button
ESS ID
Connection Mode
Channel No.
Authentication
SE Mode


