background image

Setup Mode

USING SETUP MODE

User's Manual

5-61

Quick

Reference

Introduc-

tion

Setting Up

Paper

Handling

Printing

Setup Mode

Differences in IBM Proprinter XL24E Emulation

In the IBM Proprinter XL24E emulation, MENU1 and MENU2 differ from

the ESC/P2 emulation in the following ways:

The following options are different:

The AGM item is provided:

The LF-CODE item is provided:

The ZEROFNT item is provided:

CHR-SET: SET 2 *
                  SET 1

AGM: OFF *

      ON

PRF-SKIP: NO-SKIP *
                   SKIP

LF-CODE: LF & CR
                  LF ONLY *

ZEROFNT: NOSLASH*
                   SLASH

Summary of Contents for 2248

Page 1: ...User Guide Matrix Printer ...

Page 2: ... 4 WARNING To comply with FCC regulations on electromagnetic inter ference for a class B computing device the printer cable must be shielded To assure compliance with FCC regulations for a computing device use a shielded interface cable with a metal shell connector The use of cables not properly shielded may result in violating FCC regulations This digital apparatus does not exceed the class B lim...

Page 3: ...adio or television reception which can be determined by turning the equipment off and on the user is encouraged to try to correct the interference by one or more of the following measure Reorient or relocate the receiving antenna Increase the separation between the equipment and receiver Connect the equipment into an outlet on a circuit different from that to which the receiver is connected Consul...

Page 4: ...porteurs Hiermit wird bescheinigt daß der die das 2248 110 V 2248 220 V 2348 110 V 2348 220 V in Übereinstimmung mit den Bestimmungen der EN 45014 CE funk entstört ist Der Deutschen Bundespost wurde das Inverkehrbringen dieses Gerätes angezeigt und die Berechtigung zur Überprüfung der Serie auf Einhaltung der Bestimmungen eingeräumt Maschinenlärminformationsverordnung 3 GSGV 06 01 2004 Der höchste...

Page 5: ...oducts are office equipment such as computers displays printers facsimiles and copiers Their standards and logos are uniform among participating nations CE Declaration This product sold in Europe conforms to the standard in accordance with EC Directives The contents of this manual may be revised without prior notice and without obligation to incorporate changes and improvements into units already ...

Page 6: ...tion available from your dealer or authorized TallyGenicom representative TallyGenicom offices are listed at the end of the manual This manual covers model 2248 an 80 column printer and model 2348 a 136 column printer Each model has a 100 120 VAC or 220 240 VAC power supply A serial interface is a factory option A LAN card a user add on option can be installed only on printer models with the Centr...

Page 7: ...operations This chapter describes everyday operations from the printer s control panel such as loading paper and selecting print features in detail After you become more familiar with the printer use Quick Reference at the beginning of the manual to refresh your memory as needed Chapter 5 Using Setup Mode describes how to change the printer s optional settings such as print features hardware optio...

Page 8: ...ollows WARNING A WARNING indicates that personal injury may result if you do not follow a procedure correctly CAUTION A CAUTION indicates that damage to the printer may result if you do not follow a procedure correctly NOTE A NOTE provides how to tips or suggestions to help you perform a procedure correctly NOTEs are particularly useful for first time users For Experienced Users If you are familia...

Page 9: ...ing the Self Test 2 13 Connecting the Printer to Your Computer 2 17 Selecting a Parallel Interface Cable 2 17 Selecting a Serial Interface Cable 2 17 Selecting a USB Cable 2 18 Selecting a LAN cable 2 18 Connecting the Interface Cable 2 18 Selecting an Emulation 2 21 Printing a Sample Page Online 2 24 Installing the Printer Driver 2 27 3 PAPER HANDLING 3 1 Selecting Paper 3 1 Overview of Paper Ope...

Page 10: ...eral Tips 3 18 Multipart Forms 3 18 Envelopes 3 19 Labels 3 19 4PRINTING 4 1 Selecting Print Features 4 1 Using Commercial Software 4 2 Using the Control Panel 4 2 Selecting MENU1 or MENU2 4 3 Starting or Stopping Printing 4 5 Starting Printing 4 5 Stopping Printing 4 5 Resuming from a Paper Out 4 5 Printing the remaining lines on a page 4 6 Continuing printing after supplying paper 4 6 Resuming a...

Page 11: ...esetting Power On Defaults 5 50 Resetting Factory Defaults 5 50 Resetting Factory Defaults in MENU1 and MENU2 5 50 Using the Diagnostic Functions 5 51 Printing the Self Test 5 52 Procedure 5 52 Printing Hex Dumps 5 53 Procedure 5 54 Checking Vertical PrintAlignment V ALMNT 5 56 Procedure 5 56 Setup Mode Reference 5 58 Setup Mode Organization 5 59 Differences in IBM Proprinter XL24E Emulation 5 61 ...

Page 12: ...PAPER SPECIFICATIONS B 1 Physical Specifications B 1 Functional Specifications B 2 Performance Specifications B 4 Paper Specifications B 6 PrintArea B 6 Paper Thickness B 8 C COMMAND SETS C 1 Default Settings C 2 Factory Default Settings C 2 IBM Proprinter XL24E Emulation C 5 Epson ESC P2 Emulation C 10 D INTERFACE INFORMATION D 1 Parallel Interface D 1 Compatible Mode D 2 Nibble Mode D 4 Data Tra...

Page 13: ...2 ESC P2 and IBM XL24E Emulation E 1 Italic and Graphics Character Sets ESC P2 Emulation E 2 National Character Sets All Emulations E 4 National Character Sets ESC P2 and IBM XL24E Emulation E 15 National Character Sets ESC P2 Emulation E 16 National Character Sets and Supported Resident Fonts All Emulations E 20 F RESIDENT FONTS F 1 GLOSSARY OF TERMS GL 1 INDEX IN 1 ...

Page 14: ...User s Manual xii ...

Page 15: ...al non setup mode is covered For details on setup mode see Chapter 5 Normal mode operation includes everyday operations such as paper handling and font selection The printer comes up in normal mode when turned on To enter setup mode press the TEAR OFF and ONLINE buttons at the same time while the ONLINE indicator is off not lit Control panel The table on the next page lists normal mode operations ...

Page 16: ...rinting Self test printing Tear off forms Continuous forms only Unload paper to park position Continuous forms only Required Response Press MENU and TEAR OFF Press LF FF Turn printer on Press on the power switch Press TEAR OFF and ONLINE Press ONLINE then press TEAR OFF or MENU Press and hold LF FF until the operation starts Press LF FF within three seconds Press LOAD Press ONLINE and LOAD Press O...

Page 17: ...y to install and use Dot matrix printer Key printer features and options are listed in the next two sections Software compatibility This printer operates with the IBM Proprinter XL24E command set and the Epson ESC P2 command set Various character sets As basic character sets IBM PC character sets 1 and 2 are available for the IBM Proprinter XL24E emulation and the italic character set and graphics...

Page 18: ...ding fonts A large input data buffer allows you to send files to the printer and return quickly to work in your application A large download buffer allows you to use custom fonts 80 column or 136 column print line 80 column printers are the most suitable for printing in landscape mode using letter or A4 size paper 136 column printers are the most suitable for printing in landscpe mode using legal ...

Page 19: ...ple page using your software Installing the printer driver If you have a problem while setting up the printer review the section Solving Problems in Chapter 7 If the problem persists contact your dealer This printer is suitable for most business office and home environments To obtain peak performance from the printer select a location that meets the following guidelines Place the printer on a stur...

Page 20: ... cord supplied with the printer or recommended by your dealer Do not use an extension cord Do not plug the printer into a power outlet that is shared with heavy industrial equipment such as motors or appliances such as copiers or coffee makers Such equipment often emits electrical noise or causes power degradation ...

Page 21: ...printer as follows 1 Open the carton and remove the printer and its components Make sure that you have all of the items shown below Note that the power cord supplied depends on the printer model 100 120 or 220 240 VAC power supply Checking items received Power cord CD ROM Quick Install Guide Printer Black Ribbon cartridge Cut sheet stand ...

Page 22: ...ing restraint cardboard that holds the print head carriage in place shown below Removing the shipping restraint cardboard Front cover Cardboard 5 Store the original shipping carton and packaging materials for future use For example the original packaging is ideal for use when you move or ship your printer to another location NOTE The interface cable is not included with the printer You must purcha...

Page 23: ...d The cut sheet stand enables smooth feeding of both single sheets and continu ous forms Install the cut sheet stand as described below 1 Referring to the following figure locate the two grooved notches on the top of the printer behind the top cover Note that each notch has a front groove and a rear groove 2 Locate the two mounting pins on each side of the cut sheet stand Installing the cut sheet ...

Page 24: ...e front notches Rotate the cut sheet stand backward to place the upper mounting pins in the rear grooves Installing the Ribbon Cartridge The printer uses a black ribbon cartridge To install the ribbon cartridge 1 Turn the printer off Open the front cover of the printer For easy installation slide the print head carriage so that it does not face a bail roller 2 The paper thickness lever located on ...

Page 25: ...stalling the ribbon cartridge 5 Move the paper thickness lever to the D position 6 Open the front cover Turn the knob clockwise 3 Using the procedure below release the roller from the LOCK position and turn the ribbon feed knob clockwise to take up any ribbon slack Push in the gray ribbon release tabs on the side of the ribbon cartridge to release them and slide the roller from the LOCK position t...

Page 26: ...ead and the print guide then gently press down on the ribbon cartridge against the printer until it clicks into place Make sure that the ribbon feed knob is facing upward 9 Turn the ribbon feed knob clockwise to take up any ribbon slack 10 After the ribbon cartridge has been installed in the printer adjust the paper thickness lever to match the thickness of the paper and the number of sheets of pa...

Page 27: ...ight side you can see the parts of the printer shown in the figure below Printer components front and right The printer control panel has the buttons and indicators used to load and feed paper see Chapter 3 and select print features see Chapter 4 The control panel also allows you to change the printer s optional settings see Chapter 5 Print head Print guide Front cover Cut sheet stand Paper thickn...

Page 28: ...Printer components rear Before you plug in the printer Make sure that the printer power is switched off The side marked 1 on the power switch should be raised Make sure that the power outlet is properly grounded Make sure that you use the power cord shipped with the printer This cord is designed to minimize radio frequency interference CONNECTING THE POWER CORD ...

Page 29: ...will light green NOTE If no forms are loaded the printer may beep and the red PAPER OUT indicator may light and the ONLINE indicator will not light if the paper select lever is set backward to the continuous forms position Move the paper select lever forward to the single sheet position as described in the next section The PAPER OUT indicator will go out This condition is a result of the factory d...

Page 30: ...er for the Self Test To print the self test use paper wider than 215 9 mm 8 5 inches and set the left paper guide all the way to the right to avoid clipping the test pattern Standard letter or A4 size paper can be used lengthwise portrait mode Before loading paper make sure that the printer is on Then proceed as follows 1 Make sure that the paper thickness lever located on the top right of the pri...

Page 31: ...cut sheet stand until its bottom edge touches the platen Then press the LOAD button The paper will advance to the top of form position Printing the Self Test The printer has a built in self test program The self test prints the firmware version the names of the printer s resident emulations and all of the charac ters available in the emulations The self test prints 80 characters per line To print ...

Page 32: ...F line feed form feed button to eject the paper In self test mode LF FF cannot be used to feed paper forward 4 Examine the self test page It should look like the sample on the next page Check that printing is uniform and that there are no light dark or smudged areas If the print quality is good go to step 5 Otherwise try to correct the problem as follows Make sure that the ribbon is installed corr...

Page 33: ...and Turn the platen knob to manually advance the paper until the top edge has moved past the paper bail rollers Press the TEAR OFF button to restart printing If the print quality remains poor turn off the printer and contact your dealer for assistance Sampleself testpage 5 To exit the self test mode press the ONLINE button The printer will return online ...

Page 34: ...emo pattern 1 Load a sheet of letter or A4 size paper 2 Turn the printer off 3 While pressing TEAR OFF button turn the printer back on The printer will start printing the demo pattern 4 The demo pattern stops printing after one page To pause or restart the demo during printing of a page press the ONLINE button 5 To exit demo mode turn the printer off ...

Page 35: ...electing a Parallel Interface Cable For the parallel interface use a cable that meets the following specifications At the printer end use a shielded male Centronics connector such as an Amphenol DDK 57FE 30360 or its equivalent To prevent RFI radio frequency interference the connector cover must be connected to the cable shield At the computer end most computers including IBM PCs require a male DB...

Page 36: ...utter is not required remove it by using the following procedure Selecting a USB Cable WhentheUSBinterfaceisusedtoconnecttothehostcomputer theparallelinterface andtheserialinterface factoryadd onoption cannotbeconnectedsimultaneously The USB interface does not guarantee all connections of USB supported devices Selecting a LAN cable When the LAN cable is connected the parallel and USB cables cannot...

Page 37: ...SETTING UP User s Manual 2 19 Quick Reference Introduction Setting Up Paper Handling Printing Setup Mode ...

Page 38: ...uter Gently pull on the cable to verify that it is secure 6 Close the shutter Connecting the interface cable 3 Attach the interface cable to the connector Do not connect more than one interface cable type to the printer at the same time To reattach the shutter tilt the shutter and insert one of its convex parts into the installation hole of the printer and then insert the other part in the other h...

Page 39: ...mine which emulation to select Determine which emulations your software supports Refer to your software documentation Since most software programs support this printer try to run a program with the factory default emulation first ESC P2 emulation is the factory default Try this emulation even if you are not sure of which emulation to choose See Chapter 5 for detailed information about how your pri...

Page 40: ...al printer settings as described in Chapter 5 you must load continuous forms paper See Chapter 3 for paper loading instructions 2 Enter setup mode Press the ONLINE button to place the printer offline Then press the TEAR OFF button and the ONLINE button As the printer enters offline setup mode it prints the following information Initial printout in setup mode Check that the FUNCTION menu is printed...

Page 41: ... below Press the MENU button to select MENU1 and print the following EMULATE options FUNCTION SAVE END MENU1 MENU2 H ADJUST CONFIG DEFAULT LIST SELF TST HEX DUMP V ALMNT EMULATE ESC P2 XL24E The currently selected emulation is indicated by a short underline In the figure shown above the Epson ESC P2 emulation is selected 4 Select an emulation Press the LOAD button repeatedly to position the red cu...

Page 42: ...using a parallel interface the printer usually prints the correct characters automatically However you may need to adjust the page layout or various print features using your software or the printer setup mode If you are using a serial interface the printer may not work at all or it may print a lot of characters In this case the serial settings on the printer do not match those of your computer or...

Page 43: ...ter emulation selected in your software is the same as that selected on the printer If you are using a serial interface make sure that the printer serial interface settings are the same as those on the computer The printer s preselected factory settings are 8 data bits no parity 1 stop bit 9600 baud and XON XOFF protocol You can change the serial settings on either the printer or your computer To ...

Page 44: ...the MODE COM file is included in your root directory If the printer still doesn t work consult your dealer or someone experienced in serial interface communications If an error occurs during printing with Windows simply printing the page again will cause the printed characters to be garbled To avoid this problem execute reset from the control panel or turn off the printer then print the page again...

Page 45: ...are provided with the printer For information about how to install printer drivers refer to Readme txt of the printer driver to be installed These printer drivers run with ESC P2 emulation Be sure to specify ESC P2 emulation for the printer mode The printer driver ESC P2 is a printer driver for monochrome printing The color data printing result may differ from its print preview or the monochrome d...

Page 46: ...SETTING UP 2 28 User s Manual ...

Page 47: ...orms Continuous forms include labels and multipart forms fed into the printer using the forms tractors For best results use paper that meets the specifications listed below See Appendix B for detailed specifications If you are unsure of the suitability of a particular paper try testing the paper or consult your dealer Length 80 Single sheets 76 to 364 mm 3 to 14 3 in column Continuous forms 102 mm...

Page 48: ... conjunction with the ONLINE button The following figure shows the location of each lever and button Printerleversandbuttons Table 3 1 summarizes the use of levers and buttons in paper handling More detailed information is provided later in this chapter NOTE To load or feed paper the printer must be Online but not receiving or printing data Offline but not in setup mode To micro feed paper which i...

Page 49: ...nload Press LOAD to load paper or to retract continuous forms to the park position Reversemicro Press LOAD and ONLINE to feed feed paper backward by 1 180 inch MENU Saveadjusted Press MEMU and ONLINE to perma load point nently store the load position adjusted by microfeeding Paper Select paper Move the paper select lever forward for select path single sheets cut sheet stand lever Move the paper se...

Page 50: ...ness lever located at the top right corner of the printer allows you to adjust for different paper thicknesses Be sure to adjust the paper thickness lever whenever you change the number of copies being printed The paper thickness lever has nine settings 1 to 5 and A to D Use Table 3 2 to determine the appropriate setting for your paper then move the paper thickness lever to the appropriate positio...

Page 51: ...s turned on Check that rear fed continu ous forms are retracted to the park position For details see the section Unloading Continuous Forms later in this chapter Table 3 2 Paper Thickness Lever Settings Number of Copies Including the Original 1 1 copy 1 2 copies 2 3 copies 3 4 copies 4 5 copies 5 Ribbon replacement D 1 For carbon interleaved paper the carbon counts as one copy 2 Vary the setting u...

Page 52: ... the paper select lever forward This lever is at the top left of the printer 4 Raise the cut sheet stand Position the left paper guide Note that its movablerangeislimited Adjusting the left margin Below the left paper guide the cut sheet stand has a scale graduated in units of 0 1 inch When the left paper guide is positioned all the way to the right the left margin is approximately 5 mm 0 2 inch T...

Page 53: ... alignment Readjust the paper guides if required Top of form setting see Chapter 5 Margin settings Use your software or the printer setup mode see Chapter 5 6 Press the LOAD button The paper will advance to the top of form position The top of form position is the first line on which printing can start To adjust the position of the paper slightly simultaneously press the ONLINE button and the LF FF...

Page 54: ...nt using software each sheet is ejected automatically when the end of the printed page is reached To manually eject sheets of paper use either of the following methods Press and hold down the LF FF button to execute a forward form feed Turn the platen knob clockwise ...

Page 55: ...s fed into the printer using the forms tractors The forms tractors unit at the rear of the printer pushes paper from the rear to the platen This is called push tractor feeding Positioning the Paper Stack Place the stack of continuous forms paper directly below the rear of the printer After the paper is installed in the printer the paper path should look like this Good placement Feed from rear slot...

Page 56: ...s forms paper 1 Make sure that the printer is turned on Remove any single sheet paper from the printer 2 If necessary readjust the paper thickness lever for continuous forms See the section Adjusting for Paper Thickness earlier in this chapter Preparing to load continuous forms paper Paperthicknessleversetting 3 Move the paper select lever to the rear of the printer ...

Page 57: ...rom the rear of the printer Push the right locking lever down to secure the tractor Center the middle forms support Positioningthetractors Adjusting the left margin Below the right tractor as seen from the back there is a tractor guide short inch based ruler graduated in 10 columns per inch Use the ruler to help position the tractor When the paper edge is positioned to the left most line the left ...

Page 58: ...back cover 9 Install the cut sheet stand For installation see the section Installing the Cut Sheet Stand in Chapter 2 10 Press the LOAD button to advance the paper to the top of form position Top of form is the first line on which printing can start 11 Press the ONLINE button to place the printer online Print a sample page and check the page margins Make the following adjustments as necessary Hori...

Page 59: ...ollowing procedure Adjustment procedure 1 Use the TEAR OFF button to advance the paper to its cut position Keep holding down the TEAR OFF button 2 While holding down the TEAR OFF button adjust the cut position by using the LF FF button or LOAD button LF FF button Pressing this button once extends the paper feed amount by 1 180 inches LOAD button Pressing this button once reduces the paper feed amo...

Page 60: ...he paper is parked NOTE The printer can retract continuous forms paper a maximum of 55 8 cm 22 inches per operation 3 To remove the paper raise the tractor paper holders and lift out the paper Installing the Tractor Unit Install the tractor unit by following the procedure below if it happens to be disengaged from the studs 1 Turn off the printer 2 Remove the cut sheet stand and open the acoustic c...

Page 61: ... tear off edge 1 Press the TEAR OFF button The bottom perforation of the last page advances to the tear off edge If you specified TEAR OFF AUTO using the CONFIG function in setup mode the paper automatically advances to the tear off edge at the end of each job or when the printer has printed all the data received NOTE If the bottom perforation of your paper is not positioned at the tear off edge t...

Page 62: ... the position of the paper This function is valid when the printer is offline Press the ONLINE and LF FF buttons simultaneously to micro feed paper forward Press the ONLINE and LOAD buttons simultaneously to micro feed paper backward Remember that the top of form will slip from the original setting Load Position Adjust Use also the micro feed function to adjust the load position of the paper This ...

Page 63: ... Switching to Single Sheets To switch from continuous forms to single sheets 1 Tear off your printed pages 2 Retract the forms paper to the park position by pressing the LOAD button The PAPER OUT indicator turns red CAUTION Failure to retract the forms paper will cause paper jams 3 Move the paper select lever forward to the single sheet position 4 Mount the cut sheet stand For details see the sect...

Page 64: ...are now ready to print using continuous forms paper General Tips Use high quality paper Do not use paper that is wrinkled or curled at the edges Do not use paper with staples or metal parts Do not use paper with unpredictable variations in thickness such as paper with partial multilayers paper with embossed printing and labels with the backing sheet exposed Store paper in a clean dry environment M...

Page 65: ...ted on continuous forms backing sheets Do not print labels mounted on single sheet backing Labels mounted on single sheet backing tend to slip and printing becomes crooked Set the paper thickness lever to best accommodate label thickness Do not feed labels backwards using the LOAD button from the control panel Jamming may occur Do not use the printer tear off feature when printing labels If the la...

Page 66: ...PAPERHANDLING User s Manual 3 20 ...

Page 67: ...racters per horizontal inch Page length and width Line spacing lines per vertical inch To select print features you can use either commercial software or the printer control panel The method you use depends on the capabilities of your software If your software has most of the features you require you may rarely if ever have to use the control panel In fact your software often overrides the printer...

Page 68: ... panel The MENU button specifies MENU1 or MENU2 either of which allows you to specify different sets of options in advance Some of the print features include emulation print quality character pitch and line spacing When you first turn the printer on the MENU 1 indicator is lit that is all of the print features assigned to MENU1 are enabled However you can easily switch to MENU2 before printing You...

Page 69: ...st turn the printer on MENU1 is selected To change to MENU2 or back to MENU1 proceed as follows 1 Press the ONLINE button to place the printer offline 2 Repeatedly press the MENU button The lighted indicator 1 or 2 shows the menu selected When the menu selection is changed the font font pitch and quality assigned in the selected menu becomes valid ...

Page 70: ...ite 12 Compressed 17 Boldface PS Pica 10 Correspondence OCR B 10 OCR A 10 Courier Normal 10 outline Courier Bold 10 outline Courier Italic 10 outline Nimbus Sans Normal PS outline Nimbus Sans Bold PS outline Nimbus Sans Italic PS outline Timeless Normal PS outline Timeless Bold PS outline Timeless Italic PS outline Downloaded font 0 Print quality Letter Report Draft High speed draft Pitch 2 5 3 5 ...

Page 71: ... you resume printing Data in the print buffer is lost if you turn the printer off To resume printing press the ONLINE button again To cancel printing use the cancel commands provided by your software or computer To clear the print buffer place the printer offline and press the MENU and TEAR OFF buttons Any data sent to the print buffer before you canceled printing will be lost Resuming from a Pape...

Page 72: ...emaining lines be careful not to print on the platen Printing on the platen may damage both the platen and the print head Continuing printing after supplying paper 1 Install paper on the forms tractors or on the cut sheet stand or in the cut sheet feeder bin as described in Chapter 3 2 To load the first sheet of paper press the LOAD button The PAPER OUT indicator will turn off 3 Press the ONLINE b...

Page 73: ...tor functions when AREACNT area control is set to ENABLE in setup mode See Chapter 5 for information on setting AREACNT The factory default is not to sense the edges If paper is dark colored or preprinted the printer may not be able to sense the edges correctly In this case disable the sensor To resume printing when the AREA OVER indicator is on 1 Stop your software and press the ONLINE button to ...

Page 74: ... To avoid wasting paper use the printer tear off function to remove continuous forms paper Press the TEAR OFF button to advance the perforation to the tear off edge Tear the paper off and then press any button to retract the paper back to the top of form position See Chapter 3 for more detailed instructions Place the printer offline Press the MENU and TEAR OFF buttons simultane ously to clear all ...

Page 75: ...ode which is reviewed briefly at the end of this chapter is valid in all emulations For details refer to the programmer s manuals Optional settings on the printer include the emulation fonts pitch page length and page width serial interface options and the top of form setting When you save your settings in the printer s permanent memory they become the new settings or defaults These defaults are i...

Page 76: ...setting Defaults later in this chapter For information on using the SELF TST HEX DUMP and V ALMNT functions see the section Using the Diagnostic Functions later in this chapter For Experienced Users Once you are familiar with setup mode you may want to use the flowchart at the end of this chapter for quick reference The flowchart lists all printer setup functions items and options Before entering ...

Page 77: ... Mode 3 Press the TEAR OFF and ONLINE buttons simultaneously until the printer beeps Initial printout in setup mode Entering setup mode If you do not hear a beep or hear an alarm beep beeps four times you are not in setup mode Place the printer offline and try again 4 When the printer enters offline setup mode it prints the following information ...

Page 78: ... menu provides a quick summary of how to use setup mode The FUNCTION menu lists all of the functions available to you in setup mode Note that the red cursor on the plastic print guide is initially positioned below the SAVE END function Setup mode can also be entered by turning off the printer then turning the printer back on while pressing the TEAR OFF and ONLINE buttons simultaneously until the p...

Page 79: ... you require The LOAD button moves the cursor to the next option and the LF FF button moves the cursor to the previous option 2 Press the TEAR OFF button or the MENU button to select the function If the function has items and options the printer prints the first item and its options The MENU1 MENU2 HARDWRE ADJUST and CONFIG functions contain items that have selectable options The other functions h...

Page 80: ...rinter s permanent memory In the previous example the default options are Epson ESC P2 emulation Courier 10 font and letter print quality The chart on the next page summarizes how to select options such as emulation font and print quality and how to use functions that do not have options Setup Mode Example To become familiar with setup mode try the following example This example shows how to chang...

Page 81: ...Setup Mode USING SETUP MODE User s Manual 5 7 Q u i c k R e f e r e n c e I n t r o d u c t i o n Setting Up Paper Handling P r i n t i n g Setup Mode Summary of setup mode ...

Page 82: ...the MENU button to select the current print quality and print the next item PITCH and its options 7 Change the pitch to 12 cpi and exit the MENU2 function Press the LOAD button or the LF FF button once to position the cursor under 12 CPI Since you do not want to make any other changes in MENU2 press the ONLINE button to select 12 CPI and exit MENU2 The FUNCTION menu is then reprinted 8 Exit setup ...

Page 83: ...st To move forward print the next item press the MENU button To move backward print the previous item press the TEAR OFF button While in the FUNCTION menu or when selecting a function that contains items and selectable options press the ONLINE button to reprint the FUNCTION menu An underline under the option indicates that it is the current default setting For example 12 CPI indicates that 12 char...

Page 84: ... function The printer starts to print a list of the currently selected options The preselected factory settings also called factory defaults are shown on the opposite page When the printer finishes printing the list of options it reprints the FUNCTION menu NOTE To remove the printout turn the platen knob until the paper can be torn off at the perforation In setup mode you cannot use the printer te...

Page 85: ...Setup Mode USING SETUP MODE User s Manual 5 11 Q u i c k R e f e r e n c e I n t r o d u c t i o n Setting Up Paper Handling P r i n t i n g Setup Mode Printout of factory defaults using LIST ...

Page 86: ...e section Changing MENU1 and MENU2 Options later in this chapter DECIDINGWHICHOPTIONS TOCHANGE The previous page shows a printout of the printer s factory default settings In this printout options are listed by functional group Menu 1 settings MENU1 function Menu 2 settings MENU2 function Hardware settings HARDWRE function Print position adjustment settings ADJUST function Configuration settings C...

Page 87: ... or will print garbage See the section Changing Hardware Options later in this chapter ADJUST None If you are not using software to specify the top margin of the page use the printer s default top of form setting 1 inch 25 4 mm from the top of the paper If you are using software to specify the top margin of the page change the default setting to 1 6 inch 4 2 mm See the section Changing Print Posit...

Page 88: ... you plan to use two different emulations on a regular basis assign the most frequently used emulation to MENU1 Assign the second emulation to MENU2 All of the other settings available for MENU1 and MENU2 are optional Some of the items and options will vary with the emulation To determine which features your software supports refer to your software documentation Table 5 3 describes the MENU1 and M...

Page 89: ...me emulation as is selected in your software See the section Selecting an Emulation in Chapter 2 for informa tion on selecting an emulation ESC P2 EPSON series printers ESC P2 command set XL24E IBM Proprinter XL24E printers NOTE When you change the emulation all MENU1 or MENU2 options are reset to the factory defaults for that emulation FONT For each of the following fonts the recommended pitch se...

Page 90: ...rint quality This option provides the highest resolution but the slowest print speed It cannot be used with the compressed font REPORT Report print quality This option provides lower resolution than letter quality but at twice the speed If you want only the double speed regardless of fonts use the correspondence font The quality of the correspondence font is higher than that of report DRAFT Regula...

Page 91: ...ESC P2 emulations The notes are defined at the end of the table MENU1and MENU2 Items PITCH CPI 2 5 3 5 6 10 12 15 17 18 or 20 cpi characters per horizontal inch PROP SP Proportional spacing 1 12 inch per character space LINE SP LPI 1 2 3 4 5 6 7 or 8 lpi lines per vertical inch 6 lpi 3 lpi double spacing ABCD ABCD ABCD ABCD ABCD ABCD ABCD ABCD ABCD CHAR W Change also the pitch 2 TIMES or 4 TIMES i...

Page 92: ...cter height 1 ATTRIB Selects an attribute to add emphasis to your documents Only one attribute may be selected at a time NONE ITALICS CONDNSD 1 SHADOW BOLD Table 5 3 MENU1 and MENU2 Items and Options Cont NOTES Underlined options are the factory defaults Asterisks identify items and options that differ for the IBM XL24E and Epson ESC P2 emulations The notes are defined at the end of the table Opti...

Page 93: ... the PG LX10 and PG LX1 Use in combina tion the PG LX10 to set the tens value of the lines per page setting and the PG LX1 to set the ones value of the lines per page setting PG LX10 Tens value 0 LINE 10 LINE 20 LINE 30 LINE setting for 40 LINE 50 LINE 60 LINE 70 LINE setting 80 LINE 90 LINE number of The LINE setting depends on the line lines per page spacing setting LINE SP When 0 LINE is set th...

Page 94: ...G LX1 0 LINE are set LFT END Specifies the print start column for changing the left margin Printing starts at the position given by this column plus your software specified left margin COLM Column 1 2 3 41 MENU1and MENU2 Items Table 5 3 MENU1 and MENU2 Items and Options Cont NOTES Underlined options are the factory defaults Asterisks identify items and options that differ for the IBM XL24E and Eps...

Page 95: ... the above resultant value plus the following two settings top of form default 1 inch and the software specified top margin If you are using software to specify the top margin use the default 1 line for TOP MRG LINE 1 2 3 4 5 6 7 8 9 or 10 lines Table 5 3 MENU1 and MENU2 Items and Options Cont NOTES Underlined options are the factory defaults Asterisks identify items and options that differ for th...

Page 96: ...glish Same as code page 437 UK BritishEnglish GERMAN German SWEDISH Swedish PAGE437 Code page 437 PAGE850 Code page 850 PAGE860 Code page 860 PAGE863 Code page 863 PAGE865 Code page 865 ECMA94 ECMA 94 ISO8859 ISO 8859 1 PG852 Code page 852 PG852 T Code page 852 two pass PG855 Code page 855 PG866 Code page 866 HUNGARY Hungarian HUNG T Hungarian two pass Table 5 3 MENU1 and MENU2 Items and Options C...

Page 97: ... two pass TURKY Turkish TURKY T Turkish two pass CYRILIC Cyrillic IBM437 IBM 437 IBM851 IBM 851 ELOT928 ELOT 928 PG DHN Code page DHN LATIN P Latin Polish ISO LTN ISO Latin LITHUA1 Lithuanian1 LITHUA2 Lithuanian2 MIK MACEDON Macedonian PG MAC ELOT927 ABG ABY DEC GR HBR OLD PG862 HBR DEC GREEK 11 ISO TUK ISO Turkish RUSCII LATIN 9 Table 5 3 MENU1 and MENU2 Items and Options Cont NOTES Underlined op...

Page 98: ...AN Italian SPANSH1 Spanish I SPANSH2 Spanish II JAPAN Japanese NORWEGN Norwegian LATIN A LatinAmerican FRENCH French DANISH2 Danish II KOREA Korea LEGAL Legal Table 5 3 MENU1 and MENU2 Items and Options Cont NOTES Underlined options are the factory defaults Asterisks identify items and options that differ for the IBM XL24E and Epson ESC P2 emulations The notes are defined at the end of the table O...

Page 99: ...setting 3 ITALIC Italiccharactersareavailable GRAPHIC Graphics characters ruled lines are available PRF SKP For continuous forms this option specifies whether an inch is skipped around the perforation If you are not using software to specify a bottom margin select SKIP when using thicker multipart forms SKIP One inch is skipped around the perfora tion NO SKIP The perforation is not skipped Printin...

Page 100: ...entify items and options that differ for the IBM XL24E and Epson ESC P2 emulations The notes are defined at the end of the table Options Description CR CODE CR ONLY No line feed is added to a carriage return CR LF A line feed is added to each carriage return LF CODE LF ONLY No carriage return is added to a line 2 feed LF CR A carriage return is added to each line feed ...

Page 101: ...e notes are defined at the end of the table Options Description RGHTEND WRAP End of line wrap Causes a carriage return plus a line feed OVR PRT Characters are overprinted at the end of a line END Indicates the end of MENU1 items Press the MENU button to print the first item EMULATE Press the TEAR OFF button to print the previous item RGHTEND Press the ONLINE button to reprint the FUNCTION menu 1 U...

Page 102: ...is the RGHTEND item The TEAR OFF button is convenient when the options you need to change are near the end of the list of items NOTE Whenever you select a new emulation all MENU1 or MENU2 options are reset to the factory defaults for that emulation Procedure To change the options assigned to MENU1 or MENU2 make sure that continuous forms paper is loaded and then proceed as follows 1 Enter setup mo...

Page 103: ...s the ONLINE button to exit the selected function and reprint the FUNCTION menu 6 Do either of the following Select another function or Exit setup mode saving your changes For details about other functions see the other sections in this chapter To exit setup mode and save your changes make sure the red cursor is positioned beneath SAVE END and then press the TEAR OFF button or the MENU button Rese...

Page 104: ...rdware options is described after Table 5 4 Table 5 4 HARDWRE Items and Options NOTE Underlined options are the factory defaults PPR OUT Specifies how the printer responds when you run out of paper CNTONLY The printer detects paper out only for continuous forms Printing stops and the PAPER OUT indicator lights red DETECT The printer detects paper out for both continuous forms and single sheets Pri...

Page 105: ...printing is slower than bidirectional printing BUZZER Enables or disables the printer status buzzer ON Buzzer on recommended The printer beeps to indicate paper out or other conditions OFF Buzzer off under any conditions WORD LG To determine the required word length refer to your computer documentation Select 8 BIT to print bit imagegraphics 8 BIT 8 bit word length used by most computers 7 BIT 7 b...

Page 106: ...tch the interface to the optional LAN interface mount the LAN card with the setup mode set to AUTO XS or AUTOXXS under INTERFCE which in turn is under HARDWRE The interface will automatically switch to the optional LAN interface To switch the interface to something other than the optional LAN interface do either of the following To return the setup mode to INTERFCE under HARDWRE remove the LAN car...

Page 107: ...rity bit stop bits 8NONE 1 8 None 1 8NONE 2 8 None 2 8EVEN 1 8 Even 1 8ODD 1 8 Odd 1 7EVEN 1 7 Even 1 7ODD 1 7 Odd 1 7MARK 1 7 Mark 1 7SPACE 1 7 Space 1 7EVEN 2 7 Even 2 7ODD 2 7 Odd 2 The data format also includes a start bit The mark is logical 1 The space islogical0 HARDWRE Items Options Description Table 5 4 HARDWRE Items and Options Cont NOTE Underlined options are the factory defaults ...

Page 108: ...V CHL The Reverse Channel signal is used DSR IGNORE DSR is ignored by the printer DETECT DSR is detected by the printer DUPLEX FULL Simultaneous data transmission occurs in opposite directions HALF Data transmission occurs in either direction but not simultaneously CTS IGNORE CTS is ignored by the printer DETECT CTS is detected by the printer CD IGNORE CD is ignored by the printer DETECT CD is det...

Page 109: ...on for the selected item Press the LOAD button or the LF FF button to move the cursor to the option you require Press the MENU button to select the option and print the next item NOTE To print the previous item press the TEAR OFF button 4 Repeat step 3 until all required options are changed 5 Exit the HARDWRE function Press the ONLINE button to exit the HARDWRE function and reprint the FUNCTION me...

Page 110: ...t item is available for single sheets only The top edge of your paper is the physical top of the page The logical top of the page as understood by the printer when loading paper is called the top of form Printing starts at this position Note that printing actually starts at the position obtained by adding the following Top of form default 1 8 6 inch 7 6mm Top margin specified by your software Prin...

Page 111: ...6 IN is preferable when your top margin is software specified 66 6 IN CNTFINE Fine tunes the top of form position for continuous forms 0 180 29 180 Increases top of form in increments of 1 180 inch 0 14 mm CNT ORG Sets the top of form for single sheets in increments of 1 6 inch 4 2 mm from the physical top of the page 1 6 IN The default is recommended if 1 8 6 IN your top margin is not software sp...

Page 112: ...crements of 1 90 inch 0 28 mm CUT ADJ Compensates the line spacing pitch on the basis of the spacing error accumulated for feeding single sheets by10 inches Decreases or increases in increments of 1 360 inch in total CSF ADJ Compensates the line spacing pitch on the basis of the spacing error accumulated for feeding single sheets by10 inches Decreases or increases in increments of 1 360 inch in to...

Page 113: ...es for the forms feed error accumulated through feeding of continuous forms Last page END Indicates the end of the ADJUST item list Press MENU to print the first item which is CNT ORG Press TEAR OFF to print the last item which is CUTADJL Press ONLINE to reprint the FUNCTION menu 1 When printing graphics selecting GRAPHIC may result in the printing of clearer graphics Options Description 28 360 21...

Page 114: ...OAD button or the LF FF button to position the red cursor under ADJUST Press the MENU button or the TEAR OFF button to select the ADJUST function and print the following CNT ORG options 3 Select an option from 1 6IN to 66 6IN Press the LOAD button or the LF FF button to move the cursor to the required option Press the MENU button to select the option and print the CNTFINE item If necessary fine tu...

Page 115: ...the printer meets your requirements Tear off for continuous forms Autoloading of single sheets Direct decoding of certain commands Enabling of the AREA OVER indicator Table 5 6 describes the CONFIG items and options Items are listed in the order they are printed The procedure for changing the configuration options is described after Table 5 6 Table 5 6 CONFIG Items and Options NOTE Underlined opti...

Page 116: ...e last data The printer performs tearoff feed after adding a form feed when data transfer has stopped Note For both settings tearoff positioning will fail if the page length setting does not match the actual perforation spacing The following TEAR EN item is printed when TEAROFF AUTO is specified for the TEAROFF item TEAR EN Tearoff enabled time offset time 0SEC The offset time is from when data 1S...

Page 117: ... Single sheet paper is automatically loaded a certain time after you set the paper BUTTON Single sheet paper can be loaded by pressing the LOAD button The following LOADTIM item is printed when CUTLOAD AUTO is specified for the CUTLOAD item LOADTIM Autoload start time 0 5 1 0 Autoloading starts when this 1 5 2 0 amount of time passes after you set 2 5 3 0SEC single sheet paper DECODE Commanddecode...

Page 118: ...ins offline after paper loading ONLINE Goes into online after paper loading LOCK Lockfunctionof setupmode NONE Enablesallbuttonsonthecontrolpanel SETUP Disablesthesetup relatedbuttonstokeepthe printerfromenteringsetupmodeduringthe offlinestate ALL Disablesthesetup relatedbuttonsandthe MENUbutton Oncethissettinghasbeenselected setupmode cannotbeenteredfromthecontrolpanel To cancelthissetting turnth...

Page 119: ...continu ous forms GATHER Setting of ribbon protective control at a line feed on continuous forms ENABLE The protective control is executed DISABLE The protective control is not executed CUT CTL Setting of retracting control at canceling TEAR OFF of continuous forms PRCISIN Theprecision prioritizedretracting control is executed It retracts a certain amount of paper the top part of the paper which h...

Page 120: ... of the printing data varies before and after the blank spaces such as LQ characters blank space CQ characters it changes printing speeds regardless of this setting STATUS Setting of the asynchronous status function ENABLE The status information is stored in the send buffer by a nibble mode request DISABLE The status information is not stored in the send buffer by a nibble mode request BANDCTL Set...

Page 121: ...ting of priority on TOF control to a printer driver specification or a setup specification TOF control determines the amout of the top margin when paper is fed to the home position DRIVER Driver specification is given priority SETUP Setup specification is given priority END Indicates the end of the CONFIG item list Press the MENU button to print the first item which is TEAROFF Press the TEAR OFF b...

Page 122: ...or Exit setup mode saving your changes For details on other functions see the other sections in this chapter To exit setup mode and save your changes make sure that the red cursor is positioned under SAVE END then press the MENU button or the TEAR OFF button Procedure To change the printer configuration options make sure that continuous forms paper is loaded and then proceed as follows 1 Enter set...

Page 123: ...in setup mode are saved as the new power on defaults for the printer The new defaults remain active until you change them again NOTE The only way to exit setup mode without saving your changes is to turn off the printer When you turn the printer back on the previous default settings are used Procedure To exit setup mode and save your changes using SAVE END proceed as follows 1 Print the FUNCTION m...

Page 124: ... Factory Defaults Factory defaults are those settings preselected at the factory For a list of the printer s factory defaults see the section Printing a List of Selected Options earlier in this chapter To reset the factory defaults for all func tions proceed as follows 1 Turn off the printer 2 While pressing the MENU TEAR OFF and ONLINE buttons turn on the printer Continue to press all three butto...

Page 125: ...t values in MENU1 and MENU2 are now reset 3 Do either of the following Select new options for MENU1 or MENU2 Exit setup mode saving the factory defaults See the section Changing MENU1 and MENU2 Options To exit setup mode and save the new defaults make sure that the red cursor is positioned under SAVE END then press the TEAR OFF button or the MENU button This section describes how to use the follow...

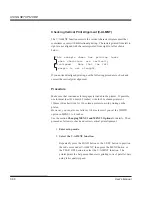
Page 126: ... you are in setup mode To print the self test make sure that continuous forms paper is loaded into the printer Then proceed as follows 1 Enter setup mode 2 Select the SELF TST function Repeatedly press the LOAD button or the LF FF button to position the red cursor under SELF TST and then press the MENU button or the TEAR OFF button The printer selects SELF TST and starts printing A short help menu...

Page 127: ...e in setup mode and returns online The self test can also be started by turning off the printer and then pressing the LF FF button while turning the printer back on As described in Chapter 2 this method is useful when you first set up the printer Printing Hex Dumps The HEX DUMP function prints data and commands in hexadecimal characters and abbreviated control codes The IBM character set 2 is used...

Page 128: ...ENU button to select the HEX DUMP function The printer goes online and prints a header and a short help menu 3 Print the hex dump To start hex dump printing send your file or program to the printer The printer goes online and prints the hex dump Press the MENU button or the TEAR OFF button to pause during hex dump printing To resume hex dump printing press the button again NOTE When hex dump print...

Page 129: ... is then reprinted For details on other functions see other sections in this chapter To return to online normal mode press the ONLINE button If you press the ONLINE button while the hex dump is printing The printer immediately switches to normal online mode Any data that was sent to the printer but not printed is discarded cleared You can also enter hex dump mode by turning off the printer and the...

Page 130: ...hat continuous forms paper is loaded in the printer If possible use forms at least 216 mm 8 5 inches wide for 80 column printers or 356mm 14inches wide for 136 colmun prnters to avoid printing on the platen However you can also use letter or A4 size forms if you set the WIDTH option in MENU1 to 8 inches See the section Changing MENU1 and MENU2 Options for details Then proceed as follows to check a...

Page 131: ... line is assumed to be printed from left to right Bars offset to the left Bars offset to the right 4 Adjust the vertical print alignment at correspondence speed Press the TEAR OFF button to switch from letter speed to corre spondence speed Examine the parallel bars and adjust the vertical print alignment as described step 3 5 Adjust the vertical print alignment at draft speed Press the TEAR OFF bu...

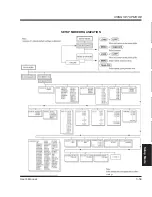
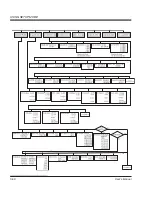
Page 132: ...rint alignment The following flowchart shows how setup mode is organized for the Epson ESC P2 emulation Differences in the IBM Proprinter XL24E are summarized after the flowchart SETUPMODEREFERENCE NOTE To exit the V ALMNT function you must exit setup mode ...

Page 133: ...Setup Mode USING SETUP MODE User s Manual 5 59 Quick Reference Introduction Setting Up Paper Handling Printing Setup Mode SETUPMODEORGANIZATION settings ...

Page 134: ...USING SETUP MODE User s Manual 5 60 ...

Page 135: ...ces in IBM Proprinter XL24E Emulation In the IBM Proprinter XL24E emulation MENU1 and MENU2 differ from the ESC P2 emulation in the following ways The following options are different The AGM item is provided The LF CODE item is provided The ZEROFNT item is provided CHR SET SET 2 SET 1 AGM OFF ON PRF SKIP NO SKIP SKIP LF CODE LF CR LF ONLY ZEROFNT NOSLASH SLASH ...

Page 136: ...USING SETUP MODE User s Manual 5 62 ...

Page 137: ...accumulate inside the printer This section explains how to clean and vacuum the printer and how to clean the platen and paper bail rollers It is easier to clean the printer when the front cover the ejection cover and the cut sheet stand and back cover are removed Cleaning and Vacuuming the Printer WARNING To avoid any possibility of injury before cleaning the printer turn off the power to both the...

Page 138: ...sing a soft vacuum brush gently vacuum the platen print head carriage and surrounding areas You can easily slide the print head to the left or right when the power is off Be careful not to press too hard on the flat ribbon cable that extends from the print head carriage Printer interior 5 Re install the ribbon cartridge Close the front cover 6 Open the ejection cover Vacuum the rollers paper entry...

Page 139: ...ay cause the rubber to harden 2 Place the cloth against the platen and manually rotate the platen knob 3 To dry the platen place a dry cloth against the platen and manually rotate the platen knob 4 Gently wipe the rollers using the cloth moistened with the platen cleaner Dry the rollers using a dry cloth To replace the ribbon cartridge 1 Turn off the printer 2 Open the front cover of the printer F...

Page 140: ...de Print head 3 Move the paper thickness lever to position D Paper thickness lever 4 To remove the ribbon cartridge press the ribbon release levers located on either side of the cartridge and carefully lift the cartridge out of the printer Paper thickness lever Move to D ...

Page 141: ... Move the paper thickness lever to the D position 8 Open the front cover Turn the knob clockwise 5 Using the procedure below release the roller from the LOCK position and turn the ribbon feed knob clockwise to take up any ribbon slack Push in the gray ribbon release tabs on the side of the ribbon cartridge to release them and slide the roller from the LOCK position to the FREE position Ribbon feed...

Page 142: ...hread the ribbon between the print head and the print guide then gently press down on the ribbon cartridge against the printer until it clicks into place Make sure that the ribbon feed knob is facing upward 11 Turn the ribbon feed knob clockwise to take up any ribbon slack 12 Move the paper thickness lever back to its original position For single sheet printing the correct position is 1 Table 3 2 ...

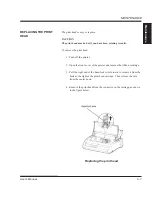
Page 143: ...the print head 1 Turn off the printer 2 Open the front cover of the printer and remove the ribbon cartridge 3 Pull the right end of the head lock wire forward to release it from the hook at the right of the print head carriage Then release the wire from the center hook 4 Remove the print head from the connector on the carriage as shown in the figure below Replacing the print head ...

Page 144: ...CE To install the print head 1 Carefully fit the mounting guide grooves of the print head on the locating studs on the carriage 2 Push the print head into the connector and hook the wire into place in the reverse order of removal ...

Page 145: ...agnostic functions Getting help The tables in this section describe common printer problems and their solutions The following types of problems are considered Print quality problems Paper handling problems Operating problems Printer failures Print Quality Problems Poor print quality or other printing problems are often caused by incorrect printer setup or incorrect software settings A gradual decr...

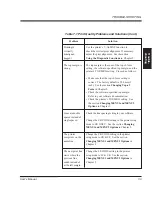
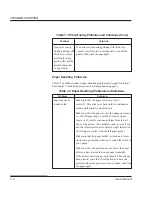
Page 146: ... the ribbon if necessary Check whether the tip of the print head is dirty Clean the head with a soft cloth if necessary The page is blank Make sure that the ribbon cartridge is properly installed Printing is erratic Make sure that the interface cable is securely or the wrong connected to both the printer and computer charactersare printed Many Make sure that the printer emulation selected in chara...

Page 147: ...Changing Top of Form in Chapter 5 Check the software specified top margin Refer to your software documentation Check the printer s TOP MRG setting See the section Changing MENU1 and MENU2 Options in Chapter 5 Lines are double Check the line spacing setting in your software spaced instead of singlespaced Change the CR CODE setting in the printer setup mode to CR ONLY See the section Changing MENU1 ...

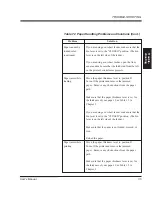
Page 148: ...se the forms tractor unit or insert a single sheet with its left edge in contact with the left paper guide Make sure that the paper holder is closed and forms tractors are positioned correctly to match the width of your paper Make sure that the printer does not detect the paper after you have ejected the loaded paper manually If the printer detects paper even though it has already been ejected pre...

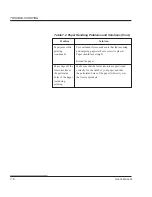
Page 149: ...sition D loading Turn off the printer and remove the jammed paper Remove any obstructions from the paper path Make sure that the paper thickness lever is set for the thickness of your paper See Table 3 2 in Chapter 3 If you are using a cut sheet feeder make sure that the bin lever is set to the CLOSED position The bin lever is on the left side of the feeder Make sure that the paper is not folded c...

Page 150: ... printing and outgoing paper stacks are correctly placed continued Paper should feed straight Reload the paper Paper slips off the Make sure that the forms tractors are positioned forms tractors or correctly for the width of your paper and that the perforated the perforated holes of the paper fit directly over holes of the paper the tractor sprockets tearduring printing ...

Page 151: ...and open the paper holders 3 Move the paper thickness lever to position D 4 Move the print head so that you can remove the jammed sheet easily and clear the sheet NOTE The print head is hot immediately after printing Move it after making sure that it gets cool If you cannot clear the jammed sheet by the above procedure set fourfold continuous forms paper on the forms tractors and turn the platen k...

Page 152: ...ject jam error Paper end is not detected Eject forms or sheets even after a large amount Press the online button of continuous forms or cut to turn the printer sheets were ejected online Continuous form In continuous form loading Switch the continuous cut sheet switch status the continuous form form cut sheet switch lever error cut sheet switch lever is lever back to its switched to cut sheet mode...

Page 153: ...sor does not to turn the printer detect the top of the form online even after line feed is When the cut sheets executed a certain number are loaded remove the of times sheets once and After the set sensor detects then insert them again the sheet at cut sheet They are then loaded loading the TOF sensor automatically does not detect he top of the sheet even after line feed is executed a certain numb...

Page 154: ...ight ONLINE AREA OVER PAPER OUT Paper end Eject jam error Continuous form cut sheet switch levererror Load jam error 1 If the setup item PPR OUT IGNORE is specified paper end is not detected LED status LEDs light up depending on the following error types ...

Page 155: ...ror LED states Light Blink 34 V undervoltage error ONLINE PAPER OUT Left end sensor error MENU1 PAPER OUT Overload error MENU2 PAPER OUT RAM error AREA OVER PAPER OUT Hight voltage error PAPER OUT and AREA OVER The following errors cause the printer to turn off the power Print head error Space motor error Line feed motor error 34 V overvoltage error No error condition is displayed if any of these ...

Page 156: ... V ALMNT allows you to check and if necessary correct the printer s vertical print alignment For details on using these functions all of which are available in the printer setup mode see the section Using the Diagnostic Functions in Chapter 5 If you are not able to correct a problem using this chapter contact your dealer for assistance Be prepared to provide the following information The printer n...

Page 157: ...ws you to expand the capabilities of your printer Options available for the printer include RS 232C serial interface board Note that the RS 232C serial interface is a factory or dealer installable option Options can be purchased from your dealer Order numbers for options are given in Appendix A 8 ...

Page 158: ...INSTALLING OPTIONS 8 2 User s Manual ...

Page 159: ...d options available for the printer Contact your dealer for information on ordering any of these items Supplies Order Number Ribboncartridges Blackribbon 043837 Print head Contact TallyGenicom Options Order Number RS 232C serial interface board Contact TallyGenicom SUPPLIES A OPTIONS ...

Page 160: ...SUPPLIES AND OPTIONS A 2 User s Manual ...

Page 161: ...VAC 10 50 60 Hz Model 2248 2348 220 to 240 VAC 10 6 50 60 Hz Power consumption Model 2248 2348 Average 140 VA Maximum 255 VA Model 2248 2348 Average 150 VA Maximum 255 VA Heat generation Average 251 2 KJ h Interface Centronics parallel Centronics parallel and RS 232C serial Centronics parallel and USB and LAN Data buffer size 0 256 2K 8K 24K 32K 96K or 128K bytes Download buffer Maximum 128K bytes...

Page 162: ...Push tractors rear feed of continuous forms Paper loading by LOAD button Advancing perforations to tear off edge by TEAR OFF button Parking continuous forms when using cut sheets Paper type 1 to 5 part side glued or paper stapled fanfolded continuous forms or label sheets with sprocket holes 1 to 5 part top glued cut sheets and envelopes Paper size 80 columns 136 columns Continuous Width 102 267 m...

Page 163: ...s Number of copies Up to 5 including the original Command sets emulations Resident Epson ESC P2 IBM Proprinter XL24E Character sets ESC P2 Italic character set Graphics character sets 1 and 2 IBM PS 2 character sets code pages 437 850 852 855 860 863 865 866 and DHN IBM 437 and 851 ISO 8859 1 and ECMA 94 Total of 63 national character sets XL24E IBM PC character sets 1 and 2 IBM PS 2 character set...

Page 164: ... Character pitch 2 5 3 5 6 10 12 15 17 1 18 or 20 cpi or proportional spacing Programmable in 1 360 inch or various increments for image graphics Characters per line 80 columns 136 columns 10 cpi 80 cpl 136 cpl 12 cpi 96 cpl 163 cpl 15 cpi 120 cpl 204 cpl 17 1 cpi 136 8 cpl 231 cpl 18 cpi 144 cpl 244 cpl 20 cpi 160 cppl 272 cpl cpi characters per inch cpl characters per line Print speed 10 cpi 12 ...

Page 165: ...gulation Country 2248 2348 UL 60950 United States for 100 to 120 VAC CSA C22 2 No 60950 Canada for 100 to 120 VAC 2248 2348 TÜV EN60950 Germany for 220 to 240 VAC Europe EMI regulation Model Regulation Country 2248 2348 FCC Part 15B class B United States ICES 003 class B Canada 2248 2348 EN 55022 class B Europe AS NZS 3548 class B Australia and New Zealand 2248 2348 CNS 13438 class B Asia 2248 234...

Page 166: ...PRINTER AND PAPER SPECIFICATIONS B 6 User s Manual PAPER SPECIFICATIONS Print Area This section illustrates the recommended print area for single sheets and continuous forms Print area for single sheets ...

Page 167: ...User s Manual B 7 PRINTER AND PAPER SPECIFICATIONS Specifications Print area for continuous forms ...

Page 168: ... of Parts Thickness One part Single 52 81 g m2 45 70 kg or 14 22 lb Carbonless Top 40 64 g m2 34 55 kg or 11 17 lb Bottom 40 81 g m2 34 70 kg or 11 22 lb Top 40 64 g m2 34 55 kg or 11 17 lb Middle 40 64 g m2 34 55 kg or 11 17 lb Bottom 40 81 g m2 34 70 kg or 11 22 lb Top 40 64 g m2 34 55 kg or 11 17 lb Middle 40 64 g m2 34 55 kg or 11 17 lb Middle 40 64 g m2 34 55 kg or 11 17 lb Bottom 40 81 g m2 ...

Page 169: ... 34 70 kg or 11 22 lb Top 40 52 g m2 34 45 kg or 11 14 lb Middle 40 52 g m2 34 45 kg or 11 14 lb Middle 40 52 g m2 34 45 kg or 11 14 lb Middle 40 52 g m2 34 45 kg or 11 14 lb Bottom 40 64 g m2 34 55 kg or 11 17 lb Carbon Avoid using carbon interleaved single sheets interleaved Top 35 64 g m2 30 55 kg or 9 17 lb Carbon Counted as one sheet Bottom 35 81 g m2 30 70 kg or 9 22 lb Top 35 52 g m2 30 45 ...

Page 170: ...PRINTER AND PAPER SPECIFICATIONS B 10 User s Manual ...

Page 171: ...s printer commands and their parameters This printer has two resident command sets IBM Proprinter XL24EEpson ESC P2 Epson ESC P2 Select the same emulation on the printer and in your software If your software emulations include Epson ESC P2 select Epson ESC P2 for optimum performance ...

Page 172: ... ESC e t BOLDFCE PICA 10 CORRESP ESC e F COUR N COUR B COUR I ESC TIMLS N TIMLS B TIMLS I N SAN N N SAN B N SAN I OCR B OCR A DOWNLD 0 DOWNLD 1 Quality LETTER REPORT DRAFT HI DRFT ESC e q Pitch 2 5 3 5 6 10 12 15 17 18 20 CPI ESC e p or PROP SP ESC e H ESC h ESC US ESC M ESC P ESC p ESC i ESC e s Line 1 2 3 4 5 6 7 8 LPI ESC e V space ESC 0 ESC 1 ESC 2 ESC 3 ESC A Character NORMAL 2 TIMES 4 TIMES ...

Page 173: ...E Controllable in margin online setup mode Language USA UK GERMAN FRENCH ESC R ITALIAN SPANISH SWEDISH ESC e C FINNISH DANISH1 DANISH2 NORWEGN PAGE437 PAGE850 PAGE860 PAGE863 PAGE865 ISO8859 ECMA94 PG852 PG852 T PG855 PG866 Uncontrollable HUNGARY HUNG T SOLV by commands SOLV T POLISH POLSH T but MAZOWIA MAZOW T LATIN7 controllable in LATIN2 LATN2 T KAMENIC online setup KAMEN T TURKY TURKY T mode C...

Page 174: ...80 column printer and online setup 13 6 IN is default for 136 column printer mode Zero font NO SLSH SLASH Controllable in online setup mode DC3 ENABLE DISABLE Controllable in online setup mode CR code CR ONLY CR LF ESC e r LF code LF ONLY LF CR ESC e l Right WRAP OVR PRT Controllable in end wrap online setup mode Paper out CNTONLY DETECT IGNORE ESC 9 ESC 8 Print BI DIR UNI DIR ESC U direction Unde...

Page 175: ...sized shadow printing on ESC E Emphasized shadow printing off ESC F One line double width characters on SO or ESC SO One line double width characters off DC4 Double width characters on off ESC W n on n 1 off n 0 Double height double width characters ESC n1 n2 n1 4 n2 0 m1 0 m2 0 m1 m4 m3 controls character height and line spacing m3 Height Spacing 0 Unchanged Unchanged 1 Normal Unchanged 2 Double ...

Page 176: ...e characters on ESC Proportionally spaced characters on off ESC P n on n 1 off n 0 Vertical Control Line feed LF Form feed FF Advance paper n 216 inch 1 n 255 ESC J n Advance paper n 180 inch in AG mode ESC J n 1 n 255 Set line spacing to 1 8 lines ESC 0 Set line spacing to 7 72 inch ESC 1 Set line spacing to n 216 inch ESC 3 n 0 n 255 Set line spacing to n 180 inch in AG mode ESC 3 n 0 n 255 Pres...

Page 177: ...tal tabs ESC D NUL Move print position right by n 120 inch ESC d n1 n2 0 n1 n2 255 n n1 n2 x 256 Vertical tab execution VT Set vertical tabs ESC B n1 The values of n1 to nk in this command nk NUL are the ASCII values of the lines at the current line spacing at which tabs are to be set 1 n 255 1 k 64 Clear all vertical tabs ESC B NUL Reset tabs to default values ESC R Page Formatting Set left margi...

Page 178: ...r a code of character to print 0 char 255 Select code page table n ESC T n1 n2 0 n1 n2 255 n n1 n2 x 256 0 0 c1 c2 c1 c2 Code page ID 0 0 Ignore command 1 181 Code page 437 3 82 Code page 850 3 92 Code page 860 3 95 Code page 863 3 97 Code page 865 Clear input buffer CAN Select printer DC1 Deselect printer ignore input ESC Q Downloading Select resident or downloaded font ESC I n Ex n 0 Resident Dr...

Page 179: ...eeder Control Feed a sheet from bin 1 ESC EM 1 Feed a sheet from bin 2 ESC EM 2 Eject a page from the printer ESC EM R Select bin 1 for following pages 1 Select bin 2 for following pages 2 Change bins at next page C Cut sheet feed selection S Miscellaneous Sound the bell BEL Unidirectional printing on off ESC U n on n 1 off n 0 Add a carriage return to all line feeds ESC 5 n on n 1 off n 0 Printer...

Page 180: ...ng off ESC F Italic printing on ESC 4 Italic printing off ESC 5 Select character style ESC q n n 0 Normal 1 Outlined 2 Shaded 3 Outlined and shadowed One line double width characters on SO or ESC SO One line double width characters off DC4 Double width characters on off ESC W n on n 1 off n 0 Double height characters on off ESC w n on n 1 off n 0 Condensed characters on SI or ESC SI Condensed char...

Page 181: ...s you to combine various printing styles The value of n is the sum of the values of the styles you want to combine n 0 Pica pitch 1 Elite pitch 2 Proportional spacing 4 Condensed 8 Shadow 16 Bold 32 Double width 64 Italics 128 Underline Horizontal Control Space SP Backspace BS Carriage return CR Set elite pitch ESC M Set pica pitch ESC P Set 15 CPI ESC g Proportionally spaced characters on off ESC...

Page 182: ...0 Set line spacing to n 180 inch 0 n 255 ESC 3 n Set line spacing to n 60 inch 0 n 127 ESC A n Set line spacing to 1 6 inch ESC 2 Set line spacing to n 360 inch 0 n 255 ESC n Tabulation Horizontal tab execution HT Set horizontal tabs ESC D The values of n1 to nk in this n1 nk NUL command are the ASCII values of the print columns at the current character width at which tabs are to be set 1 n 255 1 ...

Page 183: ... x 256 32768 Page Formatting Set right margin to column n ESC Q n 1 n 255 Set left margin to column n ESC l n 0 n 255 Set top and bottom margins from top of page ESC c n1 n2 n1 4 n2 0 t1 t2 b1 b2 Top margin t1 t2 x 256 360 1 inch 0 t1 255 0 t2 127 Bottom margin b1 b2 x 256 360 1 inch 0 b1 255 0 b2 127 Set perforation skip by n lines ESC N n 1 n 127 Perforation skip off ESC O Set page length to n l...

Page 184: ...ect character set table ESC t n n 0 Italics character set 1 Graphics character set 2 Downloaded character set 3 Graphics character set Select international character set ESC R n n 0 USA 1 France 2 Germany 3 United Kingdom 4 Denmark 1 5 Sweden 6 Italy 7 Spanish 1 8 Japan 9 Norway 10 Denmark 2 11 Spanish 2 12 Latin America 13 Korea 64 Legal ...

Page 185: ...ingual 7 PC 860 Portugal 8 PC 863 Canada French 9 PC 865 Norway d3 0 Print n1 n2 x 256 characters from all ESC n1 n2 character set character codes 0 n1 255 0 n2 127 0 n1 n2 x 256 255 0 character codes 254 Clear input buffer CAN Delete a character DEL Force most significant bit to 1 ESC Force most significant bit to 0 ESC Cancel control over most significant bit ESC Font Selection and Downloading S...

Page 186: ...Timeless 4 Timeless 5 Timeless 6 Timeless 7 Timeless 8 Timeless 9 Timeless Set scalable font mode ESC X m n1 n2 m sets character pitch m 0 Keep previous pitch 1 Set proportional space mode m 5 Select character pitch m 360 inch Reset proportional space mode n1 and n2 set point size of font Point size n1 n2 x 256 x 0 5 point 0 n1 255 0 n2 127 Copy resident character set to download area ESC NUL n s ...

Page 187: ...d 1 Raster image graphics mode Print raster image graphics ESC c v h m n1 n2 data Cut Sheet Feeder Control Feed a sheet from bin 1 ESC EM 1 Feed a sheet from bin 2 ESC EM 2 Eject a page from the printer ESC EM R Select bin 1 for following pages 1 Select bin 2 for following pages 2 Change bins at next page C Cut sheet feed selection S Miscellaneous Sound the bell BEL Move print head to home positio...

Page 188: ...C 18 User s Manual COMMAND SETS ESC P2 ...

Page 189: ...ons in Chapter 2 This parallel interface can operate in the following two modes Unidirectional forward channel mode or conventional mode This printer supports a conventional Centronics interface Bidirectional forward reverse channel mode or nibble mode This printer supports a bidirectional communication per Nibble mode of the IEEE 1284 Standard The cable connector at the printer side should be a s...

Page 190: ...ignals must go high at least 1 µs before the falling edge of the Data Strobe signal and must stay high for at least 1 µs after the rising edge 10 28 Acknowledge Output This pulse signal indicates ACK that the printer has received data and is ready to accept the next set of data This signal is also sent when the printer is switched from offline to online 11 29 Busy Output Data cannot be received wh...

Page 191: ...nd line FG and SG are connected 18 5V Output 5 V source up to 300 mA 19 Signal Ground Twisted pair return lines 30 31 Input Prime Input If this signal is low for more INPRM than 50 µs the printer is reset to the initial condition and is placed online 32 Fault Output This signal is low when the printer is offline paper is out or when there is a printer error 33 Signal Ground Logic ground level 0 V ...

Page 192: ... goes high when data being sent to the host is estab lished Reverse idle phase This signal is set low then goes high to interrupt the host indicating that data is available 11 29 Printer Busy Output Reverse data transfer phase Data bit 3 data bit 7 then forward path host to printer busy status 12 30 Ack Data Req Output Reverse data transfer phase Data bit 2 then data bit 6 Reverse idle phase This ...

Page 193: ...es high when the Printer Clock signal goes low so that the interface re enters the reverse data transfer phase If it goes high with the 1284 Active signal low the 1284 idle phase is aborted and the interface returns to the compatibility mode 32 Data Available Output Reverse data transfer phase This signal is set low when the printer is ready to send data to the host During the data transfer it is ...

Page 194: ...iming with respect to the Busy and Acknowledge signals from the printer T5 T6 T1 T2 T3 1 µs T4 1 µs 0 µs T5 3 µs 2 µs T6 6 µs T1 Data 1 to Data 8 Data Strobe BUSY Acknowledge T2 T3 T4 In bidirectional mode nibblemode this printer can send data to the compu ter Data is sent in units of four bits nibble using four output signal lines as data paths The following outlines one byte of data sent during ...

Page 195: ...mitted Data This pin carries information from the printer to the computer 3 RD Input Received Data This pin carries information from the computer to the printer 4 RTS Output Request To Send Spaces are sent when the printer is ready to transmit data 5 CTS Input Clear To Send Spaces are sent when the computer is ready to receive data 6 DSR Input Data Set Ready Spaces are sent when the computer has b...

Page 196: ...tes selectable Cable Wiring This printer allows two types of serial communication control DSR enabled and DSR disabled The type of control required is determined by your computer requirements The type of control also affects the way the interface cable is wired To determine whether you need DSR enabled control or DSR disabled control use the printer HARDWRE function see Chapter 5 DSR disabled cont...

Page 197: ...nored DSR must be high when the printer receives data If the printer has data to be transmitted to the computer the printer transmits the data when both DSR and CTS are high When using DSR enabled control use a straight through cable to connect to a DCE data communications equipment device Use a null modem cable to connect to a DTE data terminal equipment device as shown below ...

Page 198: ...r than 255 bytes of space remain in the buffer or when the printer is taken offline the printer sends the XOFF DC3 code hex 13 When the input buffer is configured for 256 bytes the buffer limit is reduced from 255 bytes to 63 bytes The computer must stop transmitting data within 255 63 characters of receiving the XOFF code or information may be lost If paper runs out the printer sends an NAK code ...

Page 199: ...nnector pin alignment No Signal line name Function 1 vbus Power supply 2 D Data transfer 3 D Data transfer 4 GND Signal ground Shell Shield Connector specification Printer side Type B receptacle female Upstream port Cable side Type B plug male Specification Basic specification USB interface compliant Note It does not guarantee all operations on hosts Power control Self power device Transmission mo...

Page 200: ...TERFACE Cable This printer supports the 10Base T and 100Base TX cables Connector pin alignment 1 8 No Signal line name DIR Function 1 TXO NIC HUB Transmit data 2 TXO NIC HUB Transmit data 3 RXI HUB NIC Receive data 4 5 6 RXI HUB NIC Receive data 7 8 ...

Page 201: ...e ESC P2 command set and the IBM Proprinter XL24E emulation Characters enclosed in boxes differ for sets 1 and 2 Characters in set 2 also vary with the national character set Code Page 437 is for the USA character set Code Page 437 Character Set 1 CHARACTERSETS1 AND2 ESC P2AND IBM XL24E EMULATION E Code Page 437 Character Set 2 ...

Page 202: ... SETS The following shows character sets available in the Epson ESC P2 emulation Characters differ in codes 128 to 255 hex 80 to FF Italic Character Set ITALIC AND GRAPHICS CHARACTER SETS ESC P2 EMULATION Graphics Character Set 1 ...

Page 203: ...User s Manual E 3 CHARACTER SETS Character Sets Graphics Character Set 2 ...

Page 204: ... font and that some national character sets do not have some characters and symbols whose use depends on resident fonts For details see the table at the end of this appendix When the following character sets are used with the Epson ESC P2 emula tion the printing of FFh code characters is not supported ECMA94 ISO8859 ISO LTN ISO TUK CYRILIC LATIN 9 NATIONAL CHARACTER SETS ALL EMULATIONS PAGE437 USA...

Page 205: ...User s Manual E 5 CHARACTER SETS Character Sets ISO8859 ECMA94 ISO 8859 1 ECMA94 PAGE850 CodePage850 Multilingual PAGE852 PG852 T Code Page 852 PAGE855 Code Page 855 ...

Page 206: ...E 6 User s Manual CHARACTER SETS PAGE865 Code Page 865 Nordic PAGE866 Code Page 866 Cyrillic PAGE860 Code Page 860 Portugal PAGE863 Code Page 863 Canada French ...

Page 207: ...User s Manual E 7 CHARACTER SETS Character Sets HUNGARY HUNG T Hungarian SLOV SLOV T Slovenian POLISH POLSH T Polish MAZOWIA MAZOW T Mazowian ...

Page 208: ...E 8 User s Manual CHARACTER SETS TURKY TURKY T Turkish CYRILIC Cyrillic LATIN2 LATN2 T Latin2 KAMENIC KAMEN T Kamenicky ...

Page 209: ...User s Manual E 9 CHARACTER SETS Character Sets IBM437 IBM 437 IBM851 IBM 851 ELOT928 ELOT 928 PG DHN Code Page DHN ...

Page 210: ...E 10 User s Manual CHARACTER SETS LATIN P Latin Polish ISO LTN ISO Latin LITHUA1 Lithuanian 1 LITHUA2 Lithuanian 2 ...

Page 211: ...User s Manual E 11 CHARACTER SETS Character Sets MIK MACEDON Macedonian ABG ABY ...

Page 212: ...E 12 User s Manual CHARACTER SETS DECGR GREEK 11 PG MAC ELOT927 ...

Page 213: ...User s Manual E 13 CHARACTER SETS Character Sets PAGE862 HBR OLD HBR DEC ISO TUK ...

Page 214: ...E 14 User s Manual CHARACTER SETS LATIN 9 RUSCII ...

Page 215: ...following character sets differ from those of Code Page 437 USA available in the ESC P2 command set and the IBM Proprinter XL24E emulation NATIONAL CHARACTER SETS ESC P2 AND IBM XL24EEMULATION FRENCH French ITALIAN Italian SPANISH Spanish FINNISH Finnish ...

Page 216: ...S DANISH1 NORWEGN Danish1 Norwegian DANISH2 Danish2 NATIONAL CHARACTER SETS ESC P2 EMULATION The following character sets differ from the graphics character sets available in the Epson ESC P2 emulation DANISH1 Danish1 SPANSH1 Spanish1 ...

Page 217: ...User s Manual E 17 CHARACTER SETS Character Sets ITALIAN Italian SPANSH2 Spanish2 JAPAN Japanese LATIN A Latin American ...

Page 218: ...E 18 User s Manual CHARACTER SETS NORWEGN Norwegian FRENCH French DANISH2 Danish2 KOREA Korea ...

Page 219: ...User s Manual E 19 CHARACTER SETS Character Sets LEGAL Legal ...

Page 220: ...ferent languages Some national character sets however do not have some characters and symbols and may not be usable depending on resident fonts The following tables show which of the resident fonts are supported for each national character set NATIONAL CHARACTER SETS AND SUPPORTED RESIDENT FONTS ALL EMULATIONS USA USA United Kingdom UK German GERMAN Resident font National character set Name in set...

Page 221: ...wo pass Slovenian SLOV Slovenian SLOV T two pass Polish POLISH Polish two pass POLSH T Mazovian MAZOWIA Mazovian MAZOW T two pass Latin 2 LATIN2 Latin 2 two pass LATIN2 T Resident font National character set Name in setup menu OCR A OCR B H draft Correspondence Nimbus Sans Timeless Courier scalable Pica 10 Bold PS Draft Compress Elite 12 Courier 10 Continued on the next page USA is the same as Cod...

Page 222: ......
Page 223: ... RESIDENTFONTS RESIDENT FONTS This appendix provides print samples of the printer s nineteen resident fonts COURIER10 DRAFT12 F PRESTIGEELITE12 COMPRESSED PICA10 CORRESPONDENCE10 HIGH SPEED BOLDFACEPS OCR B10 OCR A10 DRAFT 12 ...

Page 224: ...F 2 User s Manual RESIDENTFONTS COURIER SCALABLE Normal Bold Italic NIMBUS SANS SCALABLE Normal Bold Italic TIMELESS SCALABLE Normal Bold Italic ...

Page 225: ...0 baud equals approximately 120 characters per second Alternate printing of lines from left to right and right to left Bidirectional printing is faster than unidirectional printing because there are no carriage returns The smallest unit of information in computer memory A bit is a single digit either a 1 or a 0 in the binary numbering system Eight bits equal one byte A storage area for data in the...

Page 226: ...he fan folded sheets are separated by tearing them at their perforations A panel containing the printer indicators and buttons The control panel is used to control printer operations such as loading paper selecting print features and changing setup options Characters per horizontal inch Also referred to as pitch For example 12 pitchmeans12cpi Characters per second See Single sheets An option that ...

Page 227: ...r control panel Controlling the print head wires dots individually to produce a picture or an image on the page A base 16 numbering system also commonly referred to as hex numbers Since a base 16 system requires 16 digits numbers 0 through 9 and letters A through F are used Expressing binary numbers in hexadecimal uses fewer digits A hexadecimal printout of control codes and data Hex dumps are use...

Page 228: ...t is typically monospaced Fonts not present resident in the printer s permanent memory Soft fonts and fonts on font cards are examples of nonresident fonts One of the printer s two operating modes In normal mode the control panel can be used to perform everyday printer operations such as loading and unloading paper feeding paper and selecting print features See also Setup mode When the printer is ...

Page 229: ...portional spacing is the opposite of monospacing A set of instructions that control how data is transmitted between devices such as a computer and printer In rear feed paper is fed from the rear of the printer The forms tractor unit pushes paper into the printer Fonts present resident in the printer s permanent memory For this printer the resident fonts are Courier 10 Prestige Elite 12 Pica 10 OCR...

Page 230: ...s and noncontinuous multipart forms fed into the printer using the cut sheet stand Single sheets are also called cut sheets Fonts downloaded from a disk to the printer memory Soft fonts are also referred to as downloaded fonts Unlike resident fonts soft fonts are available only when in the printer memory Programs that control the computer and printer to perform specified tasks such as word process...

Page 231: ...d for rear feeding Printing is performed in one direction only left to right Unidirectional printing is slower than bidirectional printing but the vertical alignment is more accurate Unidirectional printing is useful when precise vertical alignment is required as in ruled tables A serial bus standard An abbreviation of Universal Serial Bus HotSwap using Plug Play is available The maximum cable len...

Page 232: ...GL 8 User s Manual GLOSSARY OF TERMS ...

Page 233: ...on 2 18 Change ribbon cartridge 6 3 Changing hardware options 5 30 CHAR H 5 18 CHAR W 5 17 Character enlargement 5 17 height 5 18 pitch 5 17 sets 5 25 width 5 17 CHR SET 5 25 Cleaning 6 1 Clear print buffer 4 8 Command sets resident C 1 Compatible mode D 2 Compressed font 5 15 Condensed printing 5 18 Connecting interface cable 2 18 power cord 2 10 Continuous forms loading 3 10 placement 3 9 tearin...

Page 234: ...NCTION menu 5 3 Functions 5 12 ADJUST 5 36 CONFIG 5 41 DEFAULT 5 29 HARDWRE 5 30 HEX DUMP 5 53 7 12 LIST 5 10 MENU1 5 14 MENU2 5 14 SAVE END 5 4 selecting 5 5 SELF TST 5 52 7 12 V ALMNT 5 56 7 12 G Glossary of terms GL 1 GRAPHIC 5 39 H Hardware options in setup mode 5 30 order numbers A 1 HARDWRE function 5 30 Help menus 5 4 5 9 Help where to get 7 12 HEX DUMP function 5 53 7 12 HI DRFT 5 16 I IBM...

Page 235: ...ional character sets all emulations E 4 DPL24C PLUS IBM XL24E E 15 ESC P2 E 16 Number of copies 3 1 B 3 O ON LOAD 5 44 ONLINE button 2 24 5 7 indicator 2 11 Options hardware Installing 8 1 order numbers A 1 Options setup adjustment 5 36 configuration 5 41 currently selected 5 10 hardware 5 30 MENU1 5 14 MENU2 5 14 required 5 12 top of form 5 40 Order number A 1 P Page length 5 19 PAGE LG 5 19 Pape...

Page 236: ...ntly selected options 5 10 problems 7 2 7 3 7 4 self test 2 13 start 4 5 stop 4 5 using software 4 2 with parallel interface 2 24 with serial interface 2 24 Problems operating 7 8 paper handling 7 4 7 5 7 6 printer failures 7 1 7 11 printing 7 1 solving 7 1 Protocols serial D 10 PRT DIR 5 31 Q QUALITY 5 16 Quick Reference operation QR 1 R RC Protocol D 9 Removing printed pages 4 8 Replacing ribbon...

Page 237: ...line feed LF 5 26 line spacing LINE SP 5 17 line spacing adjust CUT ADJ single sheet 5 38 list of selected options 5 10 lock function of setup mode LOCK 5 44 MENU1 and MENU2 options 5 14 page length PAGE LG 5 19 paper out response PPR OUT 5 30 perforation skip PRF SKP 5 25 pitch 5 17 print direction PRT DIR 5 31 print quality 5 16 setting of printing speed change processing SKIP PR 5 46 setting of...

Page 238: ...Testing printer offline 2 12 online 2 24 Top margin changing 5 21 TOP MRG 5 21 U Unidirectional printing 5 31 Unpacking 2 3 USB interface cable connection 2 18 optional setting 5 32 specifications D 11 V V ALMNT function 7 12 Vertical character displacement correcting 7 12 W WIDTH 5 25 Word length 5 31 WORD LG 5 31 X XON XOFF protocol D 10 Z ZEROFNT 5 25 S 5 44 ...

Page 239: ...s or inaccuracies of information herein TRADEMARK ACKNOWLEDGEMENTS Centronics is a trademark of Centronics Data Computer Corporation PCLandPCL6aretrademarksofHewlett PackardCompany IBM and IBM PC are trademarks of International Business Machines Corporation Apple AppleTalk TrueType Laser Writer and Macintosh are trade marks of AppleComputer Inc Microsoft Windows Windows9x Windows2000 WindowsNTandM...

Page 240: ...Y TallyGenicom S R L Via Borsini 6 I 20094 Corsico MI Italia Tel 39 02 48608 1 Fax 39 02 48601 141 http www tallygenicom it CANADA TallyGenicom 125 Traders Boulevard 9 Missisauga Ontario L4Z 2E5 Canada Phone 1 905 8904646 Fax 1 905 8904567 http www tallygenicom com MALAYSIA TallyGenicom Sdn Bhd Wisma KT Suite 3 02 No 14 Jalan 19 1 46300 Petaling Jaya Selangor Darul Ehsan Malaysia Phone 3 7625 1988...

Reviews: