


Operation panel
3-3
1
2
3
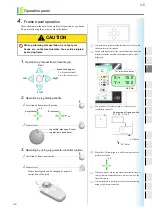
4
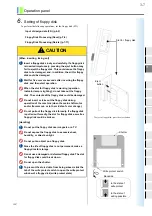
5
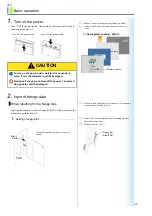
6
7
8
9
10
11
12
13
14
15
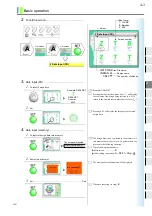
2.
Screen display
1.
The screen after turning on the power
Turning “ON” the power switch will perform self-check of the
software and will cause the confirmation mode key ( ) to blink in red.
After that, the screen will switch to the following main screen.
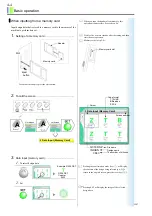
2.
Main screen
1.
Design name
2.
The number of stitches of design
3.
The looper number that is currently selected
a to f: CM head
4.
Setting for automatic offset (p.5-12)
With setting:
No setting:
5.
Step number and looper number
6.
Setting for offsetting at automatic color change (p.5-10)
With setting:
7.
Max. revolutions (rpm) of the selected head (p.3-6, p.9-2)
8.
Stitch counter of design unit (the number of current stitches)
9.
The current frame position (a position from the absolute origin
position)
*Unit: mm
10.
Ratio of finish of embroidery
11.
Start point of design (point of start to sew)
12.
Confirmation mode key (p.6-2)
CAUTION
During self check, do not turn off the power. The stored
design data could be damaged.
Flow of screens during self check
Progressing status up to switching to the main screen
will be displayed by “%” (It takes a while until the
screen switches to the main screen).
Award modular BIOS ********
***************
***************
***************
***************
***************
Press DEL to set up
*********************
1
2
3
4
6
10
5
7
8
11
An example of ratio of finish of embroidery 50%
700
9
0
X:+
Y:-
50.0
15.0
>> Now System Loading...40[%]!!
Windows CE.net
Microsoft
Software version
>> Now System Loading...40[%]!!
!
Step number
Looper number
L (loop) / C (chain)
Needle bar color
Needle height
The position of absolute origin (X: 0, Y:0) of the
machine is the center of embroidery space.
X:0,Y:0
Embroidery
space
JZ07
Summary of Contents for TCMX 601
Page 1: ...USER S MANUAL TCMX 601 M XL01 E 2006 07 TCMX 601 ...
Page 18: ...Name of each part and function 2 7 1 2 3 4 5 6 7 8 9 10 11 12 13 14 15 ...
Page 19: ...2 8 Name of each part and function ...
Page 41: ...4 14 Basic operation ...
Page 65: ...6 8 Convenient functions ...
Page 105: ...11 12 Software installation and necessary ...
Page 119: ...14 6 Maintenance ...
Page 129: ...15 10 Supplemental documentation ...


