


137
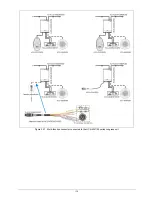
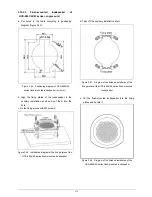
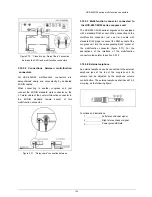
3.10.2.2 Installation of terminating panels for
HCS-4841/42/43 series congress unit
a. Put the terminating panel marked “L” at the left side
and align it with the installed congress unit. Fix it with
the black M3 Phillips screws;
b. Put the terminating panel marked “R” at the right
side and align it with the installed congress unit. Fix it
with the black M3 Phillips screws;
c. Stick PVCs to them.
Figure 3.63 Installation diagram of the HCS-4841/42/43 series terminating panels
Figure 3.64 Diagram showing the finished installation of the HCS-4841/42/43 series congress units
Note:
)
Terminating panel must be ordered separately;
)
If needed, protective covers with different
dimensions can also be ordered separately
according to actual installation.
Summary of Contents for HCS-4100/50 Series
Page 46: ...33 Figure 2 10 Floor mode setting Normal Mode Figure 2 11 Floor mode setting Insert Mode...
Page 47: ...34 Figure 2 12 Floor mode setting Sync Line Out1 Mixer...
Page 59: ...46 Figure 3 4 Cutout of HCS 48U8 series flush mounted congress unit unit mm...
Page 61: ...48 Figure 3 6 Cutout of HCS 48U9DFFF flush mounted congress unit unit mm...
Page 62: ...49 3 2 2 2 Installation Figure 3 7 Installation of HCS 48U7 series flush mounted congress unit...
Page 63: ...50 Figure 3 8 Installation of HCS 48U8 series and HCS 48U9 series flush mounted congress unit...
Page 65: ...52 Figure 3 11 Disassembly caution of HCS 48U8 and HCS 48U9 series flush mounted congress unit...
Page 130: ...117 Figure 3 43 Installation of HCS 4325U 50 congress unit unit mm...
Page 143: ...130 Figure 3 57 Multi function connector connected to the HCS 4341 50 series congress unit...
Page 155: ...141 Figure 3 72 Multi function connector connected to HCS 4841 42 43 series congress units...
Page 170: ...156 4 1 Functions and indications Front Side Bottom Figure 4 1 HCS 4385U 50 Interpreter unit...
Page 223: ...www taiden com TAIDEN INDUSTRIAL CO LTD Copyright by TAIDEN Last Revision 06 2013...