4-9
Chapter 4 Chassis Setup and Maintenance
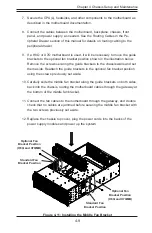
Figure 4-11: Installing the Middle Fan Bracket
7. Secure the CPU(s), heatsinks, and other components to the motherboard as
described in the motherboard documentation.
8. Connect the cables between the motherboard, backplane, chassis, front
panel, and power supply, as needed. See the Routing Cables in the Pe-
ripheral Drawer section of this manual for details on routing cabling to the
peripheral drawer.
9. If a H8Q or X7Q motherboard is used, it will be necessary to move the guide
brackets to the optional fan bracket position shown in the illustration below.
Remove the screws securing the guide brackets to the chassis walls and set
them aside. Reattach the guide brackets in the optional fan bracket position
using the screws previously set aside.
10. Carefully slide the middle fan bracket along the guide brackets on both sides,
back into the chassis, routing the motherboard cables through the gateway at
the bottom of the middle fan bracket.
11. Connect the fan cables to the motherboard through the gateway, and double
check that no cables are jammed before securing the middle fan bracket with
the two screws previously set aside.
12. Replace the chassis top cover, plug the power cords into the backs of the
power supply modules and power up the system.
Standard Fan
Bracket Position
Standard Fan
Bracket Position
Optional Fan
Bracket Position
(H8Q and X7QMB)
Optional Fan
Bracket Position
(H8Q and X7QMB)
Summary of Contents for SC848 Series
Page 1: ...SC848 CHASSIS SERIES USER S MANUAL 1 0b SUPER SC848A R1K62B SC848E16 R1K62B SC848E26 R1K62B...
Page 32: ...2 20 SC848 Chassis Notes...
Page 38: ...SC848 Chassis Manual 3 6 Notes...
Page 72: ...SC848 Chassis Manual 4 34 Notes...
Page 82: ...SC848 Chassis Manual 5 10 Notes...
Page 86: ...SC848 Chassis Manual A 4 Notes...
Page 88: ...SC848 Chassis Manual B 2 Notes...


