THIS PRODUCT IS MANUFACTURED AND CONTROLLED UNDER A QUALITY MANAGEMENT SYSTEM CERTIFIED TO ISO 13485 MEDICAL DEVICE STANDARDS.
FOR RESEARCH USE ONLY. NOT INTENDED FOR HUMAN OR ANIMAL DIAGNOSTIC OR THERAPEUTIC USES.
TOLL FREE PHONE
1 800 667 0322
y
PHONE
+1 604 877 0713
VERSION 2.4.0
y
y
FOR GLOBAL CONTACT DETAILS VISIT WWW.STEMCELL.COM
DOCUMENT #28940
10
x
When loading the tip rack, make sure that the cap has been removed (see Figure 4). Be careful not to open the
lower joint when removing the cap from the tip rack. The rack must be fully seated so that the tips are in the correct
location for pick-up by the robotic arm.
x
The cap must be removed from the RoboSep™ Buffer Bottle (Catalog #20104) and ensure there is sufficient
volume, as indicated on the screen.
5. Press the green “Loaded” button when all the reagents and resources are loaded on the active quadrant(s). The
reagents and resources required for the next selected protocol will appear.
6. Repeat steps 2 – 4 until all the required quadrants are loaded. Close the instrument lid. The instrument is now ready to
run a separation.
2.2.6
Entering Reagent Lot ID with a Barcode Scanner
Lot numbers on RoboSep™ reagents can be scanned and automatically recognized by a barcode scanner (Catalog #20501). The
scanned information will record the lot number in the “Reagent Lot ID” field shown on the right hand corner of Figure 15. All recorded
information can be retrieved from the RoboSep™ Log Files (see Section 2.4 Report Files) for convenient tracking of RoboSep™
reagents.
To use the barcode scanner, connect the scanner to the RoboSep™ unit via the USB outlet. Wait for a few seconds for the scanner to
connect to the unit. A red scanning laser should appear when the scanner is triggered. Upon loading the carousel and recording the lot
number, align the scanner and scan the barcode on the RoboSep™ reagent vial to record the lot number. The lot number should
appear on the “Reagent Lot ID” field.
2.2.7
Running the Separation
After the instrument has been readied for separation, the following steps will
start the experiment:
1. Press the green “Run” button (Figure 15) to start the cell
separation experiment. A warning message will appear asking
the user to verify that all the reagents and resources are
correctly loaded and that nothing can interfere with the
movements of the instrument.
Please ensure that the lids
have been removed from all vials and
resources, including the buffer bottle.
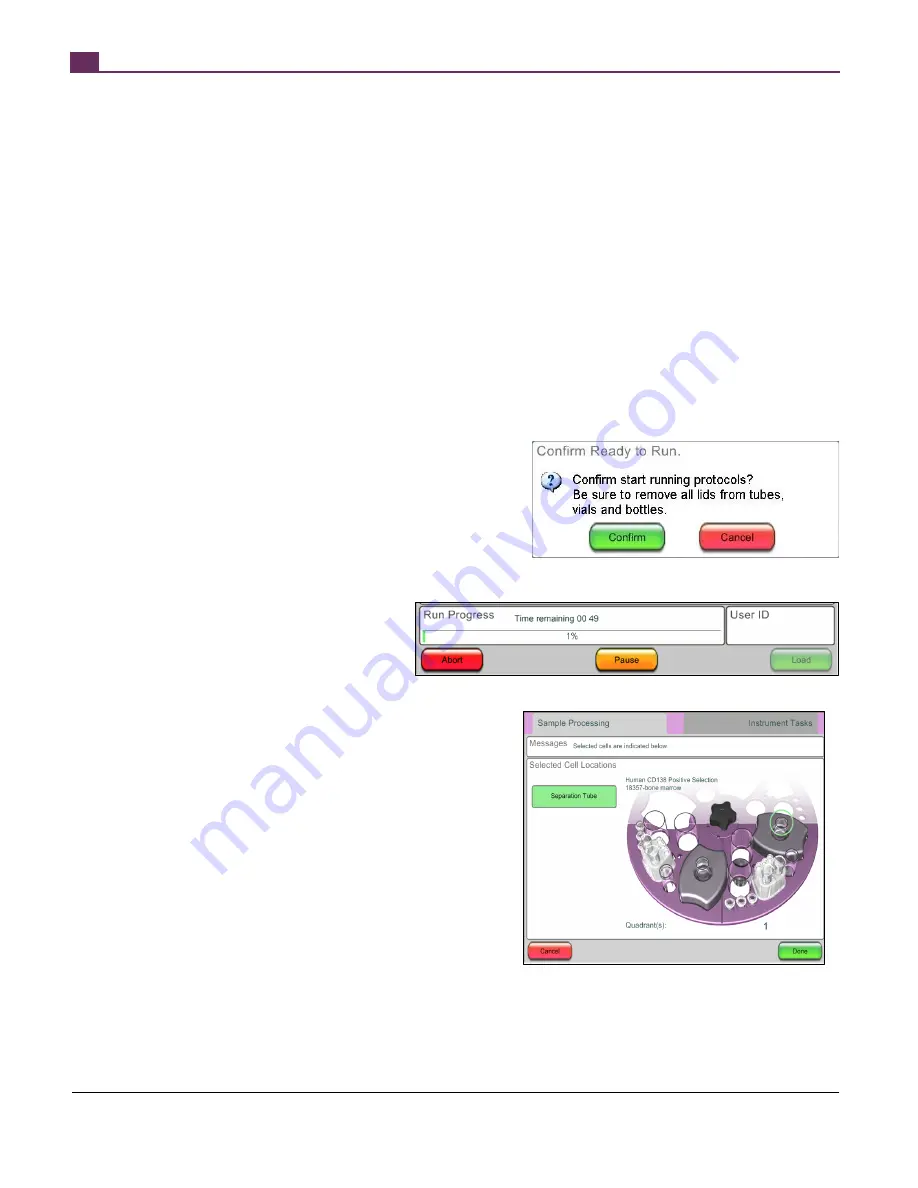
2. Once everything is verified to be clear,
press “Confirm” (Figure 16). Observe that
the initial prime step ejects water from the
tip head into the waste tube in carousel
Quadrant 1 (Q1). This ensures that the
hydraulic fluid system is properly
connected.
The experiment is now in progress. The time remaining until completion is
displayed at the bottom of the screen (Figure 17). The machine will beep
when all separations are complete.
2.2.8
Collecting Cells
To collect the cells of interest, press “Unload” and allow 5 seconds for the
robotic arm and carousel to move to a safe position before opening the
instrument lid. The position of the isolated target cells will be indicated on the
RoboSep™ touchscreen (Figure 18).
For positive selection:
x
Remove the 14 mL tube containing the isolated cells from the
magnet. Promptly re-suspend the selected cells in an appropriate
volume of buffer.
x
If desired, collect the 50 mL tube containing the depleted fraction located to the left of the tip box.
Figure 17 – Run Progress. Once a run has begun, progress is shown at the bottom left,
with an indication of how much time remains.
Figure 16 – Warning message
Figure 18 – Following separation, the location of the desired
cells is indicated by a green circle.
Summary of Contents for RoboSep 20000
Page 1: ...RoboSep The Fully Automated Cell Separator T E C H N I C A L M A N U A L V E R S I O N 2 4 0 ...
Page 33: ......
Page 34: ......
Page 35: ......


