background image


THIS PRODUCT IS MANUFACTURED AND CONTROLLED UNDER A QUALITY MANAGEMENT SYSTEM CERTIFIED TO ISO 13485 MEDICAL DEVICE STANDARDS. 

FOR RESEARCH USE ONLY. NOT INTENDED FOR HUMAN OR ANIMAL DIAGNOSTIC OR THERAPEUTIC USES. 

TOLL FREE PHONE

   1 800 667 0322   

y

   PHONE   

+1 604 877 0713     


VERSION 2.4.0


[email protected]


y


[email protected]


y


FOR GLOBAL CONTACT DETAILS VISIT WWW.STEMCELL.COM 

DOCUMENT #28940 

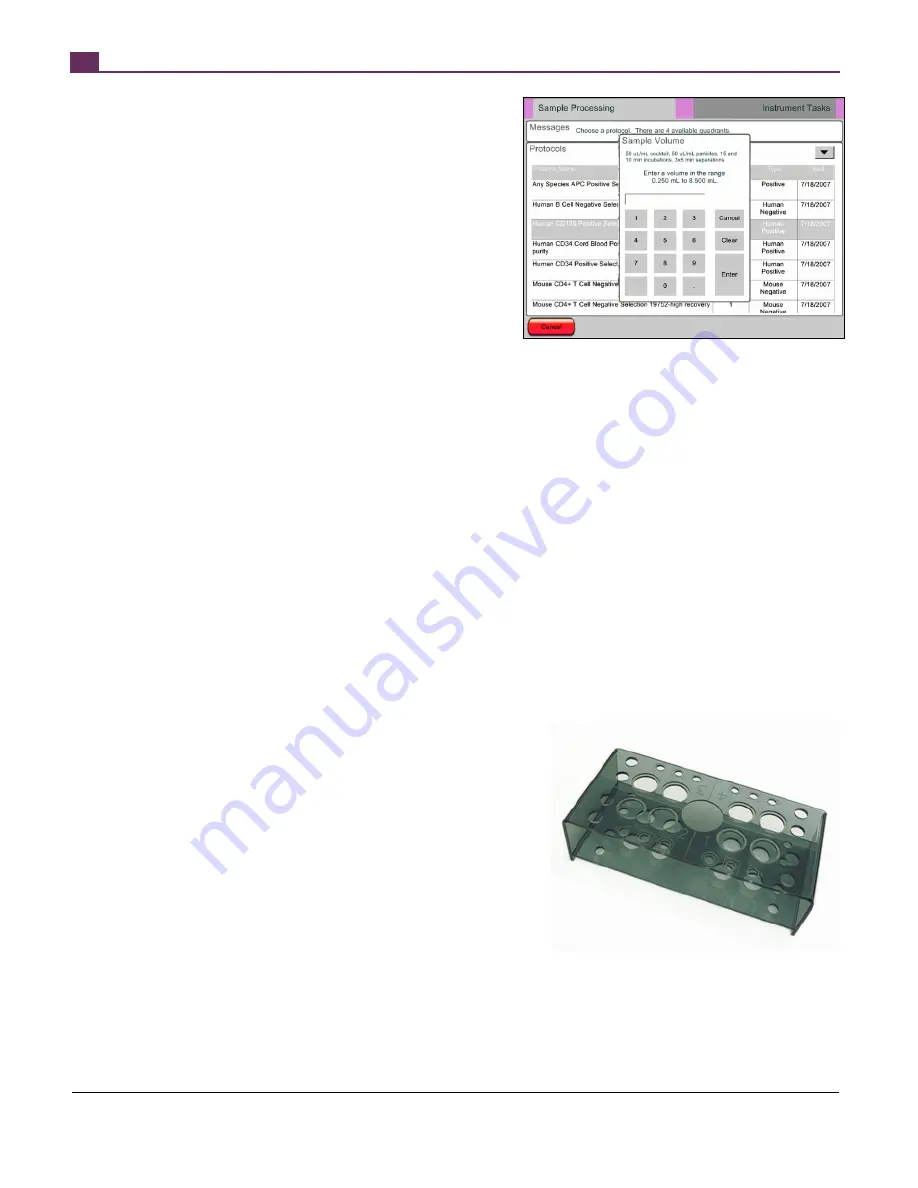
c.  Key in the sample volume in mL, and press the 

“Enter” key. The original “Sample Processing” screen 
will re-appear with the selected protocol in the 
appropriate quadrant row. 

Note: A short description of the protocol appears in the Samples area. 

2.  Review/edit the information:  

a.  To remove the protocol, press the “X” in the last 

column. 

b.  To change the protocol, press the protocol name and 

repeat the protocol selection process above. 

c.  To change the sample volume while keeping the 

same protocol selected, press the sample volume for 
this protocol, and enter a new volume (Figure 12). 

3.  Repeat the protocol selection process until all the desired 

protocols are entered. 

Up to four protocols can be chosen (they can be the same or different). When a negative selection protocol with two rounds of 
separation is selected, the interface automatically assigns two adjacent quadrants for the protocol. Once three quadrants are occupied, 
only protocols that use one quadrant will be displayed. 

Protocol Order 

The protocols are listed in order of last use, with the most recently used protocols at the top of the list (Figure 11). The protocols can 
also be sorted by name or type. To change the basis of sorting, touch the appropriate column heading. For example, to sort protocols 
in alphabetical order press the Protocol Name heading. An arrow in the heading indicates if the list is sorted in ascending or 
descending order; touch the column heading again to toggle between these two options. The user can move up and down the list by 
using the arrows at the top right corner of the protocols window. 

2.2.3


Preparing Cells 

Refer to the Product Information Sheets that come with your EasySep™ reagents and/or magnet for instructions on how to prepare 
cells for separation using RoboSep™. It is important to use the recommended cell concentration for best results. Ideally the sample 
should be a single cell suspension. However, RoboSep™ tips will not clog if small aggregates are present. 

2.2.4


Reagents and Resources 

The sample tube and separation tube are 14 mL (17 x 100 mm) round-bottom 
tubes. We recommend Falcon™ 14 mL Polystyrene Round-Bottom Tubes (BD 
Biosciences, Catalog #352057). The waste tube and negative fraction tube/lysis 
buffer tube are 50 mL conical bottom tubes (e.g. BD Biosciences, Catalog 
#352070). The Service Rack (Catalog #20101) is provided to hold the reagents 
and sample prior to loading them on the carousel and to keep track of the caps 
during a run (Figure 13). Like the carousel, the rack is laid out in quadrants, with 
symbols on the reagent storage locations to assist with keeping tubes together 
with the correct caps (

c

 corresponds to the Magnetic Particles vial; 


corresponds to Selection Cocktail vial; 

z

 corresponds to Primary Antibody vial). 


Figure 12 – Entering sample volumes


Figure 13 – The Service Rack is divided into quadrants and 
features symbols on the reagent storage locations to assist 
keeping tubes together with the correct caps.


Summary of Contents for RoboSep 20000

Page 1: ...RoboSep The Fully Automated Cell Separator T E C H N I C A L M A N U A L V E R S I O N 2 4 0 ...

Page 2: ...3485 MEDICAL DEVICE STANDARDS FOR RESEARCH USE ONLY NOT INTENDED FOR HUMAN OR ANIMAL DIAGNOSTIC OR THERAPEUTIC USES TOLL FREE PHONE 1 800 667 0322 y PHONE 1 604 877 0713 VERSION 2 4 0 INFO STEMCELL COM y TECHSUPPORT STEMCELL COM y FOR GLOBAL CONTACT DETAILS VISIT WWW STEMCELL COM DOCUMENT 28940 i ...

Page 3: ...ot exert excess pressure on the screen The EasySep magnets on the RoboSep carousel generate strong magnetic fields Keep away from pacemakers watches and other objects that respond to magnetic fields As RoboSep weighs 32 6 kg 72 lb exercise caution when moving the instrument It is recommended that two people are present to lift or move the instrument safely In case of malfunction call STEMCELL Tech...

Page 4: ...2 3 Power and Data Connections 5 1 2 4 Powering Up and Shutting Down 5 1 2 5 Priming the System 6 1 3 Running RoboSep Quick Start Instructions 6 2 Running RoboSep Detailed Instructions 7 2 1 Introduction 7 2 2 Setting Up a Run 7 2 2 1 Entering a User ID 7 2 2 2 Selecting Protocols 7 2 2 3 Preparing Cells 8 2 2 4 Reagents and Resources 8 2 2 5 Loading the Carousel 9 2 2 6 Entering Reagent Lot ID wi...

Page 5: ...e and Command Specific Details 17 3 3 3 Advanced Protocol Editor Features 21 3 4 Saving a Protocol 21 3 5 Printing a Protocol 21 4 Communications and File Transfer 22 4 1 Set Up for Network Connection 22 4 2 Locating and Connecting to RoboSep on the Network 22 4 3 Adding Protocols Remotely 22 4 4 Accessing Reports and Log Files Remotely 22 4 5 Transferring Protocols via USB Key 22 5 Care and Maint...

Page 6: ...of a column free magnetic system EasySep can be used as either a positive or a negative selection approach to purify your cells of interest With EasySep positive selection highly purified cells are obtained by targeting the cells of interest with antibodies directed against one or more specific cell surface antigens These targeted cells are cross linked to EasySep magnetic particles The sample tub...

Page 7: ...urately dispenses magnetic labeling reagents into the cell samples using disposable 1 mL tips x Mixes and transfers the sample between tubes using a 5 mL tip x Transfers buffer from the buffer bottle to tubes on the carousel using a second 5 mL tip x Keeps track of the appropriate incubation times Scheduling software sets the sequence in which RoboSep will execute all of the actions required to pr...

Page 8: ... the arm with the rotation of the carousel RoboSep picks up disposable tips from the custom tip racks on the carousel and then uses them to transfer fluids from one container to another or to mix the fluids in a given tube Fluids are dispensed into the sample liquid to ensure aerosol containment The robotic arm can pick up both 1 mL and 5 mL disposable pipette tips using a unique tip head that has...

Page 9: ...te with a dead air volume similar to that of a manual pipettor 1 1 6 Homing the Carousel and Robotic Arm RoboSep tracks the position of the robotic arm and carousel relative to physical markers called homing flags A home position is registered by the computer when a homing flag trips an optical sensor The carousel homing flag is readily visible as a projection on the bottom plate Figure 8 This pro...

Page 10: ...tainment hood 1 2 3 Power and Data Connections Plug in the power cord provided with RoboSep to the power supply outlet located at the bottom right side of the instrument next to the fuse box and the power switch Figure 9 and connect to a 3 prong grounded AC outlet rated 4A 110 240 V Do not use an adapter to a two terminal outlet Data connections to RoboSep are through an Ethernet port and 2 USB po...

Page 11: ...vided in Section 2 of this manual To quickly execute a run on RoboSep 1 Power up RoboSep and wait for initialization to complete 2 Follow the instructions on the message bar at the top of the screen Press Select Protocol to bring up the list of available protocols see Section 3 1 2 to customize the protocol list Choose the desired protocol from the list and then enter the sample volume Repeat this...

Page 12: ...has columns to display the protocol name the sample volume in mL and the type of cell selection protocol Once protocols have been selected this area indicates on which quadrant of the carousel each protocol will be run x The Run Progress area has a progress bar and countdown clock that shows the time to completion of the current run x The User ID area allows the user to enter his her unique code f...

Page 13: ...e the basis of sorting touch the appropriate column heading For example to sort protocols in alphabetical order press the Protocol Name heading An arrow in the heading indicates if the list is sorted in ascending or descending order touch the column heading again to toggle between these two options The user can move up and down the list by using the arrows at the top right corner of the protocols ...

Page 14: ...ws located above and below 3 Touch the first item on the list The item will be highlighted in green and its location on the carousel indicated by a green circle Turn the carousel so that the indicated quadrant is in a convenient position and place the item in the indicated location Continue down the list loading each item in turn 4 Load reagents The minimum reagent volume required for a given cell...

Page 15: ... scanner is triggered Upon loading the carousel and recording the lot number align the scanner and scan the barcode on the RoboSep reagent vial to record the lot number The lot number should appear on the Reagent Lot ID field 2 2 7 Running the Separation After the instrument has been readied for separation the following steps will start the experiment 1 Press the green Run button Figure 15 to star...

Page 16: ...g and unloading of the samples and reagents Some users may prefer to remove the magnets prior to removing the carousel to reduce its weight Position the carousel with Quadrant 1 on the front side of the machine facing the user before removing it so that the optical sensor is not damaged To remove the carousel 1 Rotate the carousel so that Quadrant 1 is on the front side of the machine 2 Unscrew th...

Page 17: ...e and Home all If an issue arises STEMCELL Technologies Technical Support may ask that these protocols be run and the results observed in order to assist with troubleshooting Note The Service software and Package for Diagnosis can be launched from this window allowing for calibration adjustment and diagnostics This is not necessary unless requested by a STEMCELL Technologies representative 2 3 2 A...

Page 18: ...n 2 2 5 2 4 2 Log Files Log files are used by authorized STEMCELL Technologies personnel to assist with troubleshooting and diagnostics 2 4 3 Accessing Report Files The Run Log page under the Instrument Tasks tab lists diagnostic and run information The End of Run Report and Log Files are accessed via the buttons at the bottom of the page Figure 21 Selecting the green Reports button brings up a fo...

Page 19: ...ft of the screen from the Profile page This will bring up a standard Windows dialog box giving access to protocol files on a USB memory stick or a shared folder on a networked computer See Section 3 2 for details on creating custom protocols To remove protocols from the global database highlight a protocol and select the Remove button The selected protocol is moved from the protocol folder to an a...

Page 20: ...Editor click on Open on the File menu and select the desired protocol This will populate the editor screen with the commands and settings for that protocol Once the desired protocol is opened any of its settings and fields can be changed Figure 25 A description of the commands is found in Section 3 3 Protocol Structure When satisfied with the edited protocol click on Check Protocol to ensure that ...

Page 21: ...be used for top up commands with any sample smaller than the threshold volumes see Section 3 3 1 6 Command Sequence The list of programmed commands will appear here in the order of execution 7 Move Up Move Down Selected commands can be moved up or down to change the order in which they will be executed 8 Add Use the pull down menu to select the type of command to be added and click the Add button ...

Page 22: ...ns is less than 10 mL For example if cocktail is added at 100 µL mL and particles at 50 µL mL of cells then the maximum sample volume should be set at 8 5 mL 8 5 mL 0 1 x 8 5 0 05 x 8 5 9 8 mL Working Volume Threshold Low and High After the magnetic labeling steps RoboSep tops up the sample to a given working volume before transferring the sample to the magnet for separation The top up volume can ...

Page 23: ...ve selection protocols Destination This is the container into which the pipette will dispense The destination container is also selected via pull down menu The list is sorted by relative quadrant number A protocol with a source in Quadrant 1 and a destination in Quadrant 2 will occupy two quadrants on the carousel If this protocol is loaded in Quadrant 3 the destination will be in Quadrant 4 Free ...

Page 24: ...aining the sample or reagent to be mixed and there is an option to specify the extension time see Section 3 3 3 and the tip rack to be used There are tip use rules which decide which tip will be used for each mixing step these rules are automatically applied by RoboSep Selecting Home prompts RoboSep to perform the Home All command see below prior to the Mix step this option is not necessary for mo...

Page 25: ...o resuspend cells after magnetic separation steps Both commands should use a free air dispense to prevent contamination of the buffer tip with sample Home All This command re initializes the carousel and robot arm movements Figure 32 As there is an automatic re initialization each time RoboSep is turned on or when a protocol is run this option is not required in standard separation protocols A lab...

Page 26: ... the Loading screen This feature can be used to create names in different languages or to make the names more appropriate for a given set of custom applications Highlight the default name you wish to change and enter a new name Figure 35 Note Names longer than 50 characters may not fit properly on the user interface x The Multiple Samples Selection menu allows the advanced user to create customize...

Page 27: ...pted For instructions on how to mount remote folders in other operating systems contact the local network administrator 4 3 ADDING PROTOCOLS REMOTELY RoboSep comes with pre installed protocols that have been optimized for cell separation from normal samples using supported EasySep products Protocols that have been created for other applications using the protocol editor see Section 3 can be copied...

Page 28: ...Tip Head Polishing Compound is specially formulated to help remove the build up of plastic residue and disinfect the tip head 1 Apply 1 2 drops of RoboSep Tip Head Polishing Compound to a paper tissue or other laboratory wipe 2 Wipe the RoboSep tip head 3 Using a new piece of tissue or laboratory wipe polish the tip head to make sure that all traces of the cleaner are removed 5 4 CLEANING ROBOSEP ...

Page 29: ...till not successful the tip can be removed manually If a tip strip failure occurs the tip head may need to be cleaned as described in Section 5 3 5 6 REPLACING THE FUSES The two fuses are located at the bottom right side of the instrument next to the power supply outlet and the power switch If RoboSep does not turn on when plugged in and the power switch is activated the fuses may need to be repla...

Page 30: ... leaves a residual volume in tips when pipetting small volumes This is a normal operation and is required to meet the accuracy requirements for low volume reagent addition The residual volume is 20 µL or less Missed tip pick up Tip rack not placed properly on the carousel Make sure that the tip rack is seated properly by pushing down firmly on the outside of the exposed portion Robotic arm or caro...

Page 31: ...h it was intended RoboSep meets the requirements of EC directive 2006 95 EC low voltage directive and 2004 108 EC RoboSep meets the requirements of CAN CSA C22 2 No 61010 1 04 and UL standard No 61010 1 safety requirements for electrical equipment for measurement control and laboratory use x The RoboSep unit has a symbol affixed to the side similar to the following This symbol denotes that the dev...

Page 32: ...over Cable 20106 RoboSep Carousel 20107 The Big Easy EasySep Magnet 18001 RoboSep Barcode Scanner 20501 9 WARRANTY The following is an overview of the warranty and service options available for RoboSep For answers to any maintenance or warranty questions please contact STEMCELL Technical Support contact information is available in Section 10 WARRANTY PLAN COVERAGE COVERAGE DETAILS CATALOG RoboSep ...

Page 33: ......

Page 34: ......

Page 35: ......

Page 36: ...FO STEMCELL COM t TECHSUPPORT STEMCELL COM FOR GLOBAL CONTACT DETAILS VISIT OUR WEBSITE FOR RESEARCH USE ONLY NOT INTENDED FOR HUMAN OR ANIMAL DIAGNOSTIC OR THERAPEUTIC USES DOCUMENT 28940 VERSION 2 4 0 STEMCELL TECHNOLOGIES INC S QUALITY MANAGEMENT SYSTEM IS CERTIFIED TO ISO 13485 MEDICAL DEVICE STANDARDS ...

Reviews: