1-3
Getting Started
12
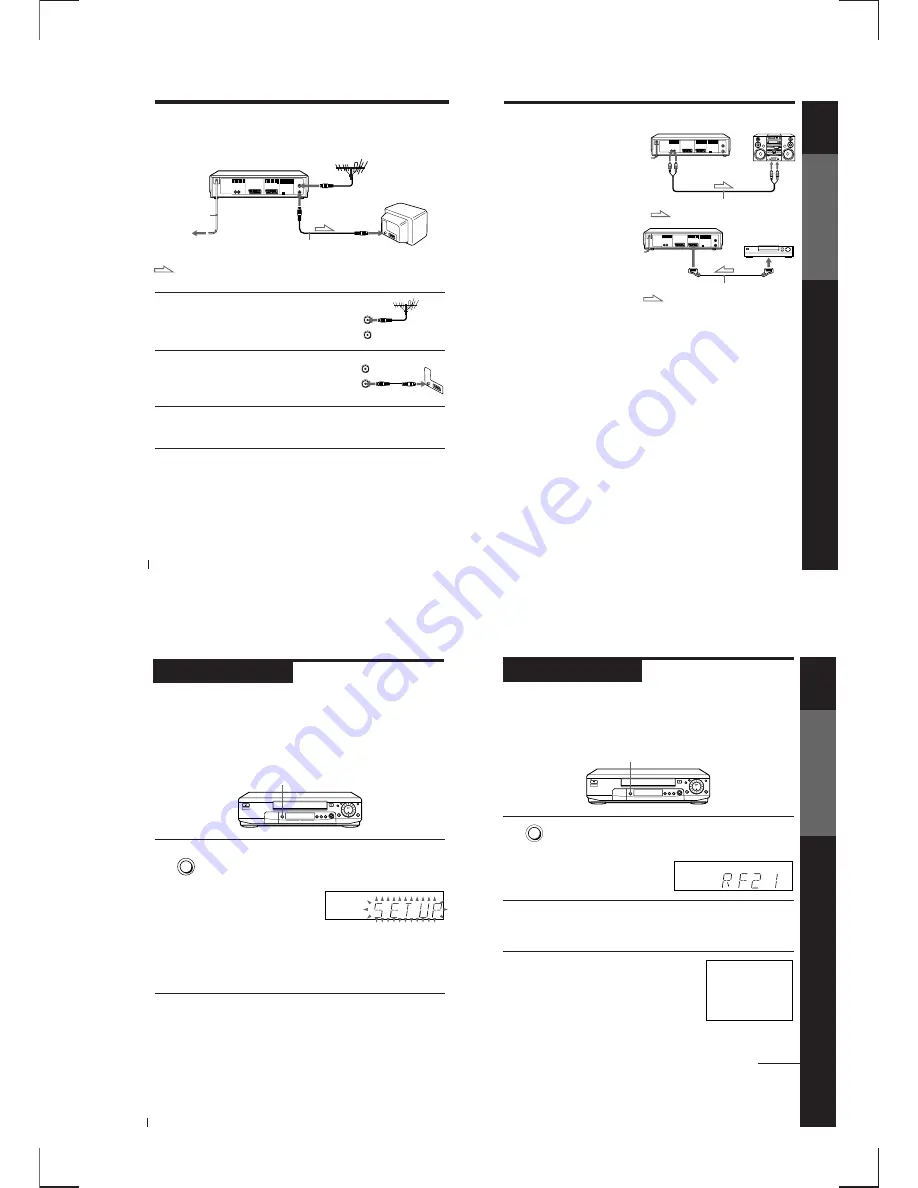
If your TV does not have a EURO-AV (Scart)
connector
: Signal flow
AERIAL IN
Aerial cable (supplied)
AERIAL IN
AERIAL OUT
to mains
1
Disconnect the aerial cable from your
TV and connect it to AERIAL IN on the
rear panel of the VCR.
2
Connect AERIAL OUT of the VCR and
the aerial input of your TV using the
supplied aerial cable.
3
Connect the mains lead to the mains.
If the mains plug does not fit in the mains, use the supplied plug
adapter.
Note
• When you connect the VCR and your TV only with an aerial cable, you have to set
RF MODULATOR in the OPTIONS-2 menu to ON (initial setting) (see page 67).
Mains lead
AERIAL
ANTENNE
IN
ENTREE
OUT
SORTIE
AERIAL
ANTENNE
IN
ENTREE
OUT
SORTIE
Step 3 : Connecting the VCR (continued)
Getting Started
Getting Started
13
Additional connections
To a stereo system
You can improve sound quality by
connecting a stereo system to the
AUDIO OUT R/L jacks as shown on the
right.
To a satellite tuner
You can watch programmes from the
satellite tuner connected to this VCR on
the TV even when the VCR is turned off
using the Line Through function. When
you turn on the satellite tuner, this VCR
automatically sends the signal from the
satellite tuner to the TV without turning
itself on.
1
Connect the satellite tuner to the LINE-3 IN connector as shown above.
2
Set POWER SAVE to OFF in the OPTIONS-2 menu.
3
Turn off the VCR.
To watch a satellite programme, turn on the satellite tuner and the TV.
Note
• You cannot watch satellite programmes on the TV while recording unless you
record a satellite programme.
LINE IN
Audio cable (not supplied)
AUDIO OUT
R/L
LINE OUT
EURO-AV cable (not supplied)
…
LINE-3 IN
: Signal flow
: Signal flow
Getting Started
14
Step 4
Setting up the VCR with the Auto Set
Up function
Before using the VCR for the first time, set up the VCR using the Auto
Set Up function. With this function, you can set TV channels, guide
channels for the VIDEO Plus+ system, the RF channel, and VCR clock
automatically.
AUTO SET UP
Hold down AUTO SET UP on the VCR for more than three seconds.
The VCR automatically turns on and starts searching for all of the
receivable channels and presets them in the appropriate order for
your local area.
If you use the SMARTLINK connection, the Preset Download
function starts and the SMARTLINK indicator flashes in the display
window during download.
After the search or download is complete, the current time appears
in the display window for any stations that transmit a time signal.
If the time does not appear, set the clock manually. See page 28.
To cancel the Auto Set Up function
Press AUTO SET UP.
Note
• Do not cancel the Auto Set Up function. If you do, repeat the step above.
AUTO
SET UP
Getting Started
Getting Started
15
Step 5
Tuning your TV to the VCR
If you have connected the VCR to your TV using the EURO-AV cable,
skip this step.
RF CHANNEL
1
Press RF CHANNEL on the VCR.
The factory-preset RF channel appears in the display window.
The VCR signal is output through this channel to the TV.
2
Turn on your TV and select a programme position for the VCR
picture.
This programme position will now be referred to as the video
channel.
3
Tune the TV to the same channel as that
shown in the display window so that
the picture on the right appears clearly
on the TV screen.
Refer to your TV manual for tuning
instructions.
If the picture does not appear clearly,
see “To obtain a clear picture from the
VCR” below.
RF CHANNEL
SONY VIDEO CASSETTE RECORDER
continued
Summary of Contents for RMT-V256A
Page 83: ......


