


1-19
78
To play the Playlist title
Press TOOLS while the Title List menu is turned
on. Then, select “Playlist” and press ENTER.
When the Title List (Playlist) menu appears, select
a title and press
H
.
z
Hint
When a Playlist title is created, the IN and OUT points
will become chapter marks, and each scene will become
a chapter.
b
Note
The picture may pause when the edited scene is played.
You can change the Playlist title order within the
Title List (Playlist).
1
Press TITLE LIST to turn on the Title List
(Playlist) menu.
If the Title List (Original) menu appears, press
TOOLS and select “Playlist.”
2
Select the title you want to move, and
press ENTER.
The sub-menu appears.
3
Select “Change Order,” and press ENTER.
4
Select a new location for the title by
pressing
M
/
m
, and press ENTER.
The title moves to the new location.
1
Press TITLE LIST to turn on the Title List
(Playlist) menu.
If the Title List (Original) menu appears, press
TOOLS and select “Playlist.”
2
Press TOOLS to select “Combine,” and
press ENTER.
The display for selecting titles appears.
3
Select a title, and press ENTER.
A number indicating the order in which you
selected the title appears.
To cancel the selection, press ENTER again.
4
Repeat step 3 to select all of the titles you
want to combine.
To cancel all of the selections, select “Reset
All.”
5
Select “OK,” and press ENTER.
The list of titles to be combined appears.
To change the selection, select “Change” and
go to step 3.
6
Select “OK,” and press ENTER.
The display for selecting a title name from
among the selected titles appears.
To enter a new name, select “Enter Text,” and
follow the explanations on page 36.
To change the selection, select “Change” and
go to step 3.
7
Select a name, and press ENTER.
The titles are combined.
b
Note
When the number of chapters in the title to be combined
exceeds the limit, the chapters at the end are combined
into a single chapter.
You can divide a Playlist title. For operations, see
page 75.
Moving a Playlist title (Change
Order)
Combining multiple Playlist titles
(Combine)
-RW
VR
Cancel
1 Vacation
2 Journey
Where do you want to move this title?
15.9
17.9
Change Order
-RW
VR
HDD
Dividing a Playlist title (Divide)
4 Yacht
25. 9
3 Cruising
25. 9
2 Journey
17. 9
1 Vacation
15. 9
Combine
Select the titles to combine.
Cancel
Reset All
OK
1
4 Yacht
25. 9
3 Cruising
25. 9
Combine
Combine the titles in the following order.
OK
Change
Cancel
2
1
-RW
VR
HDD
79
D
u
bb
in
g
(H
DD
y
D
V
D
)
Dubbing (HDD
y
DVD)
Before Dubbing
In this section, “dubbing” refers to “copying a
recorded title on the internal hard disk drive
(HDD) to another disc, or vice versa.” You can
select to dub one title at a time (Title Dubbing –
see “Dubbing a single title (Title Dub)” on
page 81), or multiple titles all at once (Multiple
Title Dubbing – see “Dubbing multiple titles (Dub
Selected Titles)” on page 82).
Before you start, read the following precautions,
which are common to both dubbing methods.
If you want to record from a digital video camera
connected to the DV IN jack, see “DV Dubbing”
on page 84. To record from equipment connected
to the LINE IN jacks, see “Recording from
connected equipment without a timer” on page 59.
Before you start…
• Select the disc type according to your needs
(page 10). This recorder can record on various
discs.
• You cannot record both the main and sub sound
on a DVD+RW, DVD-RW (Video mode),
DVD+R, or DVD-R. You can only record the
main sound.
• Timer recordings and Synchro-Recording do not
start during dubbing. Before you start, check the
Timer List menu to see if there is any timer
recording due to start during dubbing.
• When “Auto Chapter” of “Features” setup is set
to “On,” chapter marks are automatically
inserted at approximately 6-minute intervals
while dubbing from the HDD to a DVD, or when
the recorder detects picture and sound changes
while dubbing from a DVD to the HDD. The
chapter marks in the dubbing source are not
retained in the dubbed title.
• For a title whose picture size (16:9 or 4:3) is
mixed:
– When dubbed from the HDD to DVD-RW
(Video mode) or DVD-R, the picture size is
determined by the setting in “DVD Line Rec.
Picture Size” (page 53).
– When dubbed from HDD to DVD+RW or
DVD+R, the picture size is always 4:3.
– When dubbed from HDD to DVD-RW (VR
mode), the originally recorded picture size is
retained.
z
Hints
• When you dub a Playlist title, it is recorded as an
Original title.
• When dubbed from a DVD to the HDD, the picture size
and the sound types originally recorded are retained.
b
Notes
• To play a dubbed disc on other DVD equipment,
finalise the disc (page 39).
• The recorder may not function as described depending
on the disc status. Follow the instructions that appear on
the screen.
• You cannot dub from DVD VIDEOs to the HDD.
• Thumbnails that you have set for the originally
recorded title (page 34) will not be retained in the
dubbed title.
With this recorder, the recording mode for
dubbing is displayed as “Dub Mode.” Two
dubbing method are available: High-speed
Dubbing and Rec Mode Conversion Dubbing.
Read the following and select according to the
required time, disc space, and picture quality.
Dubbing at high-speed (High-speed Dubbing)
,
/
/
/
/
Allows you to dub what you have stored in the
HDD to a high-speed DVD (8x-speed
DVD+RWs/6x-speed DVD-RWs/16x-speed
DVD+Rs/16x-speed DVD-Rs, or slower versions
of each disc type), without changing the recording
mode.
Set “Dub Mode” to “Fast” in “Title Dub” or “Dub
Selected Titles” display (page 81). You cannot
select “Fast” when titles that cannot be dubbed at
high speed are selected (such as the titles displayed
in “Notes” below). The minimum required time is
as follows (approximate).
-RW
VR
-RW
Video
+
RW
+
R
HDD
-
R
About “Dub Mode”
HDD
+
RW
-RW
VR
-RW
Video
+
R
-
R
,
continued
80
Required times for High-speed Dubbing from
HDD to DVD (for 60-minute programme)
*1
*1
The values in the above table are for reference only.
Actual times for dubbing also require time for creating
disc’s control information and other data.
*2
This is the maximum recording speed of this recorder.
The value may vary depending on the disc condition.
Also, this recorder may be unable to record at the
maximum speed for discs that support recording
speeds exceeding the maximum value.
*3
The maximum drive speed of this recorder is 6x when
using 6x-speed or faster DVD+RWs.
*4
The maximum drive speed of this recorder is 8x when
using 8x-speed or faster DVD+Rs/DVD-Rs.
*5
High-speed dubbing is not available when dubbing
titles recorded in SLP and SEP mode to DVD+RWs
and DVD+Rs.
b
Notes
• High-speed Dubbing is not available for the following
titles:
– Titles recorded in HQ+.
– Titles that contain both main and sub sounds (except
DVD-RWs (VR mode)).
– Titles recorded in mixed picture size (4:3 and 16:9
etc.), (except DVD-RWs (VR mode)).
• When dubbed to a DVD-RW (Video mode)/
DVD+RW/DVD+R/DVD-R, remnants of edited titles
may remain on the disc. If you edit a title, use the Rec
Mode Conversion Dubbing method. This will smooth
out the pauses between the scenes.
• When dubbing to a DVD+R DL disc, the video may be
momentarily interrupted at the point where the layers
switch.
Rec Mode Conversion Dubbing
n
/
/
/
/
Allows you to dub from the HDD to a DVD or vice
versa, in a dubbing mode that differs from the
original recordings. For example, when you dub
an HQ title (data size is large) in SP mode, you can
reduce the data size, saving more titles using less
space.
Select a mode different from the original recording
in “Dub Mode” in the steps of “Dubbing a single
title (Title Dub)” on page 81 or “Dubbing multiple
titles (Dub Selected Titles)” on page 82.
When a title recorded to HDD in HQ or HQ+ mode
is converted to another mode, the recorder
automatically assigns an appropriate bit rate, thus
retaining the original picture quality as much as
possible.
b
Note
The picture quality will not improve even if a title is
converted to a recording mode of better picture quality.
Dubbing restriction
You cannot dub movies and other DVD Videos to
the HDD. Also, when dubbing from a DVD to the
HDD, a gray, blank screen will be recorded for
scenes that contain a copy protection signal.
* CPRM-compatible DVD-RWs (VR mode) only
CPRM (Content Protection for Recordable Media) is a
coding technology that protects copyrights for images.
Speed
*2
6x
6x
*3
8x
*4
8x
*4
2.4x
Rec.
mode
High-
speed
DVD-
RW
High-
speed
DVD+
RW
High-
speed
DVD-R
High-
speed
DVD+R
DVD+R
(Double
Layer)
HQ
10 min. 10 min. 8 min.
8 min.
25 min.
HSP
6 min.
40 sec.
6 min.
40 sec.
5 min.
5 min.
16 min.
40 sec.
SP
5 min.
5 min.
3 min.
45 sec.
3 min.
45 sec.
12 min.
30 sec.
LSP
4 min.
4 min.
3 min.
3 min.
10 min.
LP
3 min.
20 sec.
3 min.
20 sec.
2 min.
30 sec.
2 min.
30 sec.
8 min.
20 sec.
EP
2 min.
30 sec.
2 min.
30 sec.
2 min.
2 min.
6 min.
15 sec.
SLP
1 min.
40 sec.
60
min.
*5
1 min.
15 sec.
60
min.
*5
60
min.
*5
SEP
1 min.
15 sec.
60
min.
*5
56 sec. 60
min.
*5
60
min.
*5
Copy
protection
signals
Dubbing
Copy-Free
(No copy
protection
signal)
Copy-Once
HDD
+
RW
-RW
VR
-RW
Video
+
R
-
R
HDD
,,
-RW
VR
-RW
Video
+
RW
-
R
+
R
HDD
,
-RW
VR
*
81
D
u
bb
in
g
(H
DD
y
D
V
D
)
Move
,
Titles containing “Copy-Once” copy protection
signals can be moved only from HDD to DVD-
RW (VR mode)* (after the title is moved, the
original title in the HDD is erased). The “Move”
function is performed using the same procedure as
dubbing (page 81). Titles containing “Copy-
Once” copy protection signals are indicated with
.
b
Notes
• The following titles in the HDD cannot be moved.
– Protected titles
– Playlist titles
– Original titles referenced from the playlist
• If the move operation is stopped before completion, the
title in the HDD is not erased.
* CPRM-compatible DVD-RWs (VR mode) only.
Dubbing
1
Insert the DVD that you are going to dub to
or from.
2
Press HDD or DVD to select the source.
3
Press TITLE LIST to turn on the Title List
menu.
4
Select a title, and press ENTER.
The sub-menu appears.
5
Select “Dubbing,” and press ENTER.
The display for selecting the dubbing mode
appears.
If a title with
(page 81) is selected in the
title list, a confirmation screen is displayed.
To “Move,” select “Yes.”
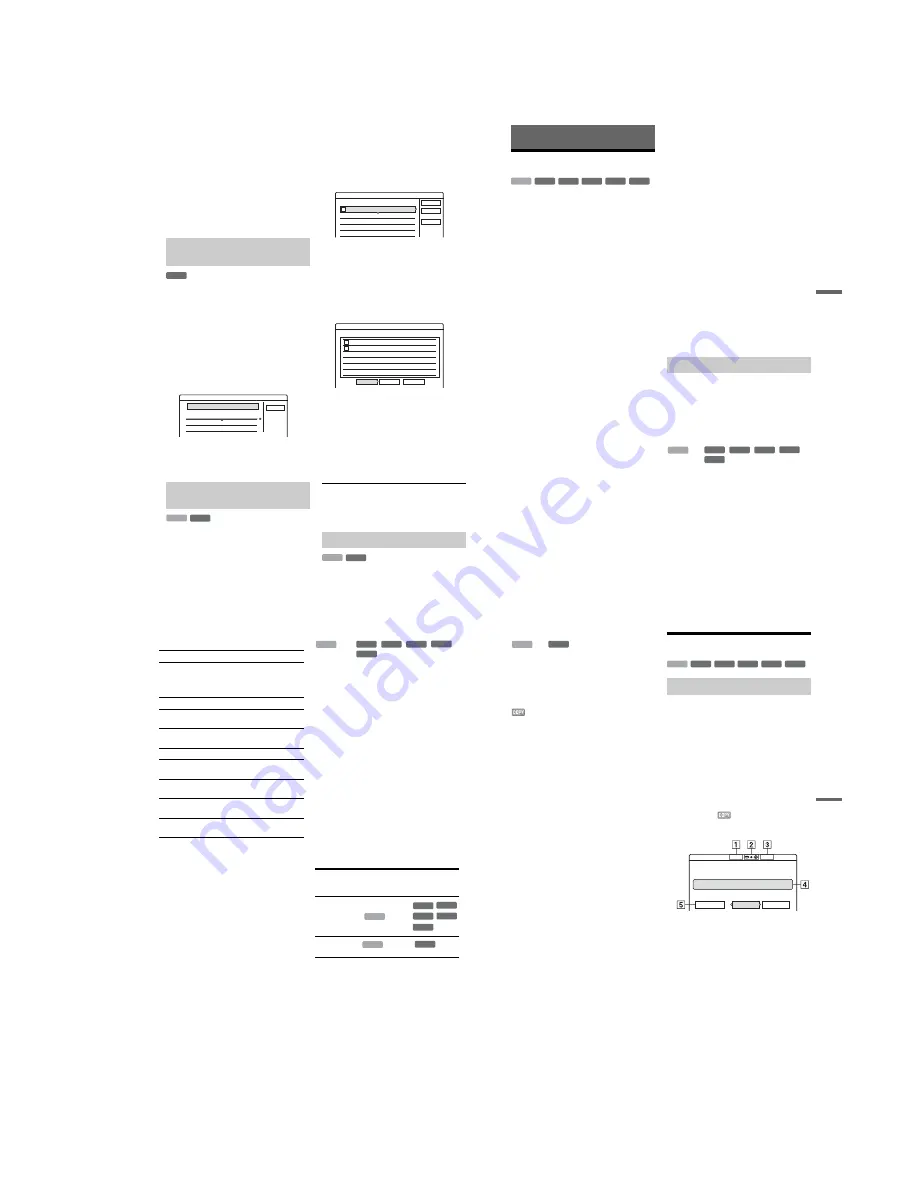
A
Size of the title (approximate)
B
Direction of dubbing
C
Available space on the disc to be
dubbed (approximate)
D
Information about the title to be dubbed
E
Dubbing mode and the space that
remains after dubbing (approximate)
6
Select “Dub Mode.”
HDD
-RW
VR
Dubbing a single title (Title Dub)
-RW
VR
-RW
Video
+
RW
+
R
HDD
-
R
Dub Mode
Title Dub
This title will be dubbed. Set the dub mode.
GB
GB
GB
1 World Cup Final
SP
Cancel
Start
2.0
2.6
Rec Mode:
SP
2.0
,
continued
Summary of Contents for RDR-GXD310
Page 6: ...MEMO 6 ...
Page 36: ...1 30E MEMO ...
Page 103: ...MEMO 5 10E ...
Page 109: ...6 6E MEMO ...


