


1-15
62
To check the position of the buttons below, see the illustration on page 60.
To resume normal playback, press
H
.
Playback options
Buttons
Operations
(audio)
Selects one of the audio tracks recorded on the disc when pressed repeatedly.
: Selects the language.
: Selects the main or sub sound.
: Selects stereo or monaural audio tracks.
(subtitle)
Selects a subtitle language when pressed repeatedly.
(angle)
Selects an angle when pressed repeatedly.
If various angles (multi-angles) for a scene are recorded on the disc, “
”
appears in the front panel display.
PROGRESSIVE
Switches the type of video output signal to interlace or progressive format
(page 19).
/
(instant replay/
instant advance)
Replays the scene/briefly fast forwards the scene.
.
(previous)/
>
(next)
Goes to the beginning of the previous/next title/chapter/scene/track.
For the HDD, you cannot go to the beginning of the previous/next title.
(fast reverse/fast forward)
Fast reverses/fast forwards the disc when pressed during playback.
Search speed changes as follows:
fast reverse
fast forward
m
1
T
t
1
M
*1
m
2
T
T
t
t
2
M
m
3
*2
T
T
T
t
t
t
3
M
*2
When you press and hold the button, fast forward/fast reverse continues at the
selected speed until you release the button.
*1
When you press
M
once during playback of a title recorded in the HDD, you
can play quickly with sound (“x1.5” appears).
*2
m
3 and 3
M
are only available for the HDD and DVDs.
(slow, freeze frame)
* Playback direction only
Plays in slow motion when pressed for more than one second in pause mode.
Plays one frame at a time when pressed briefly in pause mode.
X
(pause)
Pauses playback.
-RW
VR
DVD
VCD
CD
HDD
DVD
-RW
VR
HDD
CD
VCD
DVD
DVD
-RW
VR
-RW
Video
+
RW
-
R
+
R
VCD
DVD
+
RW
HDD
-RW
VR
-RW
Video
HDD
-
R
+
R
DVD
+
RW
-RW
VR
-RW
Video
+
RW
-
R
+
R
VCD
DVD
*
+
RW
HDD
63
Pl
a
ybac
k
b
Notes
• Angles and subtitles cannot be changed with titles
recorded on this recorder.
• 96 kHz PCM audio and DTS audio do not have
surround effects.
• The surround effects do not work while performing
playback quickly with sound.
Notes on playing DTS sound tracks on a CD
• When playing DTS-encoded CDs, excessive noise will
be heard from the analogue stereo jacks. To avoid
possible damage to the audio system, the consumer
should take proper precautions when the analogue
stereo jacks of the recorder are connected to an
amplification system. To enjoy DTS Digital
Surround™ playback, an external 5.1-channel decoder
system must be connected to the digital jack of the
recorder.
• Set the sound to “Stereo” using the
(audio)
button when you play DTS sound tracks on a CD
(page 62).
Notes on playing DVDs with a DTS sound track
DTS audio signals are output only through the DIGITAL
OUT (COAXIAL or OPTICAL) jack.
When you play a DVD with DTS sound tracks, set
“DTS” to “On” in “Audio” setup (page 97).
1
Press TOOLS during playback to select
“Video Settings,” and press ENTER.
2
Select an item, and press ENTER.
The adjustment display appears.
“Y NR” (luminance noise reduction):
Reduces noise contained in the luminance
element of the video signal.
“C NR” (chroma noise reduction): Reduces
noise contained in the colour element of the
video signal.
“BNR” (block noise reduction): Reduces
“block noise” or mosaic like patterns in the
picture.
“MNR” (mosquito noise reduction): Reduces
the faint noise appearing around the outlines
of the images. The noise reduction effects are
automatically adjusted within each setting
range according to the video bit rate and other
factors.
“DVE” (digital video enhancer): Sharpens the
outlines of the images.
“PB Video Equalizer” (Playback video
equalizer): Adjusts the picture in greater
detail.
Select an item and press ENTER.
• Contrast: changes the contrast.
• Brightness: changes the overall brightness.
• Colour: makes the colours deeper or lighter.
• Hue: changes the colour balance.
3
Press
<
/
,
to adjust the setting, and
press ENTER.
The default settings are underlined.
“
Y NR
”
: (weak) Off 1 2 3 (strong)
“
C NR
”
: (weak) Off 1 2 3 (strong)
“
BNR
”
: (weak) Off 1 2 3 (strong)
“MNR”: (weak) Off 1 2 3 (strong)
“
DVE
”
*: (weak) Off 1 2 3 (strong)
Adjusting the picture quality
+
R
DVD
VCD
-RW
VR
-RW
Video
+
RW
-
R
HDD
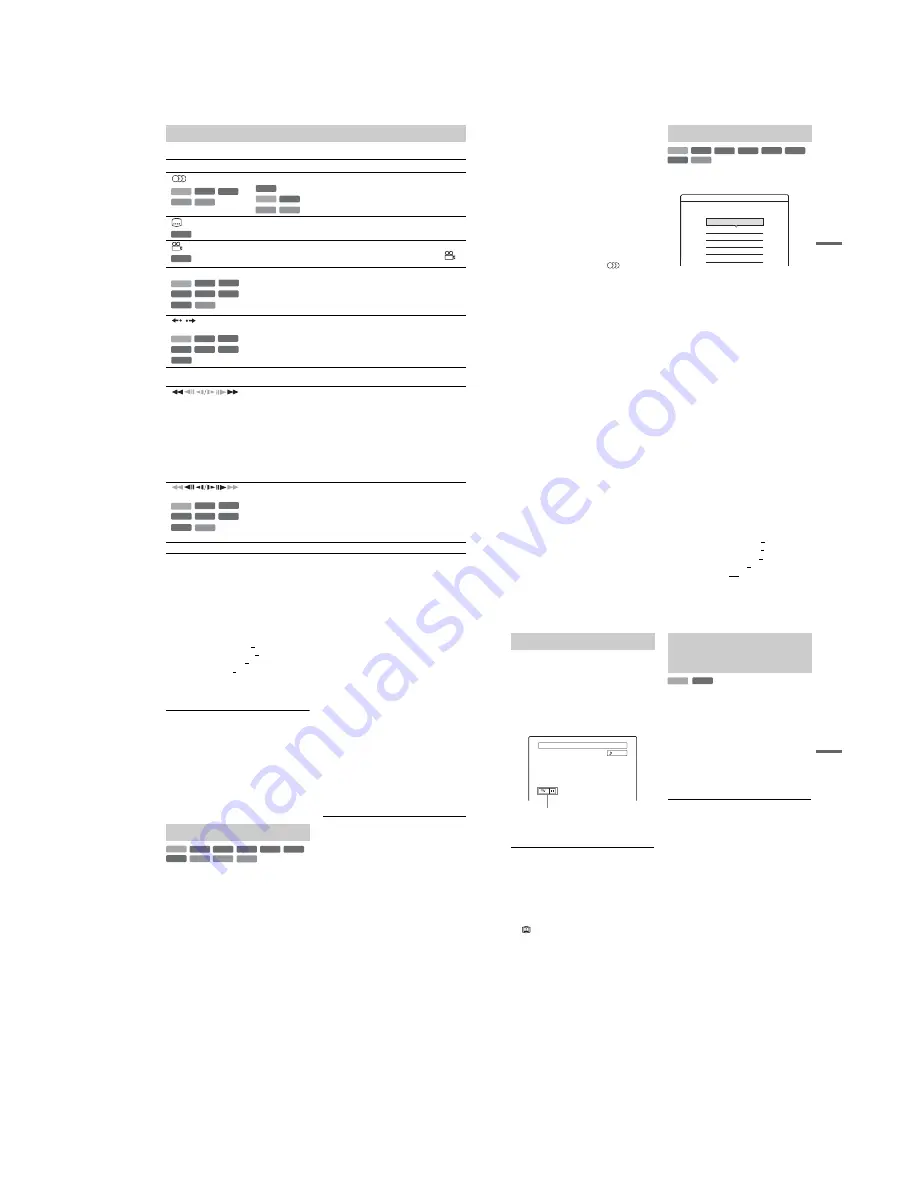
Video Settings
Select the item you want to change.
Y NR :
2
2
2
1
PB Video Equalizer
DVE :
MNR :
BNR :
C NR :
Off
,
continued
64
“
PB Video Equalizer
”:
• Contrast: (weak) –3 ~ 0 ~ 3 (strong)
• Brightness: (dark) –3 ~ 0 ~ 3 (bright)
• Colour: (light) –3 ~ 0 ~ 3 (deep)
• Hue: (red) –3 ~ 0 ~ 3 (green)
Repeat steps 2 and 3 to adjust any other items.
* “1” softens the outlines of the images. “2”
enhances the outlines and “3” enhances them more
than “2.”
b
Notes
• If the outlines of the images on your screen become
blurred, set “BNR” and/or “MNR” to “Off.”
• Depending on the disc or the scene being played, the
above BNR, MNR, Y NR, or C NR effects may be hard
to discern. And, these functions may not work with
some screen sizes.
• When using the DVE function, noise found in the title
may become more apparent. In this case, it is
recommended that you use the BNR function with the
DVE function. If the condition still does not improve,
set the DVE level to “1” or “Off.”
1
Press TOOLS during playback to select
“Audio Settings,” and press ENTER.
2
Select an item, and press ENTER.
“Surround” (TVS): Selects one of the
surround modes.
TVS* (TV Virtual Surround) lets you enjoy
virtual surround sound effects created from
the front left and right speakers. The selected
setting is displayed in the front panel display
for a few seconds.
• Off: No surround effect
• Dynamic: Creates one set of virtual rear
speakers.
• Wide: Creates five sets of virtual rear
speakers.
• Night: Creates five sets of virtual rear
speakers. Effective at low volume.
• Standard: Creates three sets of virtual rear
speakers. Effective when you use two
separate front speakers.
*TVS was developed by Sony to produce home
surround sound with just a stereo TV.
“Audio Filter”: Selects the digital filter to
reduce noise above 22.05 kHz (Fs* is 44.1
kHz), 24 kHz (Fs is 48 kHz), or 48 kHz (Fs is
above 96 kHz).
• Sharp(default): Provides a wide frequency
range and spatial feeling.
• Slow: Provides smooth and warm sound.
“AV SYNC”: When the video is delayed, this
function delays the audio for synchronization
with the video (0 to 120 milliseconds). Larger
numbers indicate a longer audio delay for
synchronization with the video. When
dubbing to a VCR or other video recording
equipment, be sure to return this setting to 0
ms (default).
* Sampling frequency of audio source. This
function only adjusts the output signals from the
LINE 1 – TV, LINE 3, or LINE 2 OUT (AUDIO
L/R).
3
Press
<
/
M
/
m
/
,
to select the option,
and press ENTER.
b
Notes
• There may be little effect by changing the Audio Filter
depending on the disc or playback environment.
• To enjoy the surround TVS modes, set “Digital Out” to
“On” and “Dolby Digital” to “D-PCM” and “MPEG”
to “PCM” in “Audio” setup.
• The volume may be reduced when surround effects are
set.
• When the playback signal does not contain a signal for
the rear speakers, the surround effects will be difficult
to hear.
• In addition, the surround effects may also be difficult to
hear depending on the title being played and the
environment where the recorder is being used.
• When you select one of the surround modes, turn off
the surround settings of the connected TV or amplifier
(receiver).
• Make sure that your listening position is between and
at an equal distance from your speakers, and that the
speakers are located in similar surroundings.
• When you use the DIGITAL OUT (COAXIAL) jack to
listen to MPEG audio signals and set “MPEG” to
“MPEG” in “Audio” setup, no sound will come from
your speakers if you select one of the TVS modes.
• The surround effects do not work while performing
playback quickly with sound.
Adjusting the sound quality
+
R
DVD
VCD
-RW
VR
-RW
Video
+
RW
-
R
HDD
CD
DATA CD
65
P
lay
ba
ck
You can pause a current TV broadcast, and then
continue watching the programme at a later time.
This is useful when you receive an unexpected
phone call or visitor while watching TV.
1
While viewing a TV broadcast with this
recorder, press
X
.
The picture pauses. You can pause the picture
for up to three hours.
2
Press
X
or
H
again to resume watching
the programme.
b
Notes
• Paused titles are not saved to the HDD.
• This function is cancelled when:
–
x
(stop) is pressed.
– PROG +/– is pressed.
– DVD is pressed.
–
Z
(open/close) is pressed.
– TITLE LIST is pressed.
– INPUT SELECT is pressed.
–
(Electronic Programme Guide) is pressed.
– the recorder is turned off.
– a timer recording or Synchro Recording is started.
– DV dubbing or regular dubbing is started.
• It may take a few seconds to resume playback of the
paused programme.
• Even if you fast forward the recorded programme,
there will always be a time difference of about one
minute or more between the recorded programme and
the current TV broadcast.
“Chasing Playback” allows you to view the
recorded part of a programme while the recording
is being made. You do not need to wait until the
recording finishes.
Press TOOLS while recording to select
“Chasing Playback,” and press ENTER.
Playback starts from the beginning of the
programme you are recording.
When you fast forward to the point that you are
recording, Chasing Playback returns to normal
playback.
b
Notes
• For DVD-RWs (VR mode), this function does not
work when recording:
– on a 1x-speed DVD-RW.
– in the HQ or HSP recording mode.
• The DVD’s picture on your TV screen freezes for a few
seconds when you fast forward/fast reverse or instant
replay/advance the recording.
• Chasing Playback is possible from one minute or more
after recording starts.
• Even if you fast forward the recorded programme,
there will always be a time difference of about one
minute or more between the recorded programme and
the current TV broadcast.
Pausing a TV Broadcast (TV Pause)
News
ABCD 9
Stereo
TV pause
Playing from the beginning of the
programme you are recording
(Chasing Playback)
HDD
-RW
VR
Summary of Contents for RDR-GXD310
Page 6: ...MEMO 6 ...
Page 36: ...1 30E MEMO ...
Page 103: ...MEMO 5 10E ...
Page 109: ...6 6E MEMO ...


