


1-13
54
“DVD Line Rec. Picture Size”: Sets the
picture size of the programme to be recorded
on the DVD.
• 4:3: Sets the picture size to 4:3.
• 16:9 (default): Sets the picture size to 16:9
(wide mode).
“DVD Line Rec. Picture Size” works with
DVD-Rs and DVD-RWs (Video mode) when
the recording mode is set to HQ, HSP, SP, or
LSP. For all other recording modes, the screen
size is fixed at “4:3.”
For DVD-RWs (VR mode), the actual picture
size is recorded regardless of the setting. For
example, if a 16:9 size picture is received, the
disc records the picture as 16:9 even if “DVD
Line Rec. Picture Size” is set to “4:3.”
For DVD+RWs/DVD+Rs, the screen size is
fixed at “4:3.”
“Rec NR” (noise reduction): Reduces noise
contained in the video signal.
“Rec Video Equalizer”: Adjusts the picture in
greater detail.
Press
M
/
m
to select the item you want to
adjust, then press ENTER.
• Contrast: Changes the contrast.
• Brightness: Changes the overall brightness.
• Colour: Makes the colours deeper or lighter.
3
Adjust the setting using
<
/
M
/
m
/
,
, and
press ENTER.
The default setting is underlined.
“Rec NR”: (weak) Off 1 ~ 2 ~ 3 (strong)
“Rec Video Equalizer”:
• Contrast: (weak) –3 ~ 0 ~ 3 (strong)
• Brightness: (dark) –3 ~ 0 ~ 3 (bright)
• Colour: (light) –3 ~ 0 ~ 3 (deep)
Repeat steps 2 and 3 to adjust any other items.
b
Notes
• If one programme contains two picture sizes, the
selected size is recorded. However, if the 16:9 signal
cannot be recorded as 16:9, it is recorded as 4:3.
• Remnants of images may appear on your screen when
using “Rec NR.”
• “Rec Video Equalizer” does not affect the input of the
DV IN jack and does not work with RGB signals.
The recorder can automatically divide a recording
(a title) into chapters by inserting chapter marks
during recording. To disable this function, set
“Auto Chapter” in “Features” setup to “Off”
(page 99).
When recording on the HDD or a DVD-RW (VR
mode)
The recorder detects changes in the picture and
sound and automatically inserts chapter marks.
You can also insert and erase chapter marks
manually (page 76).
When recording on other recordable discs
Chapter marks are inserted at approximately 6-
minute intervals during recording.
b
Note
When dubbing (page 79), the chapter marks in the
dubbing source are not retained in the dubbed title.
Creating chapters in a title
55
Ti
me
r
Re
co
rd
in
g
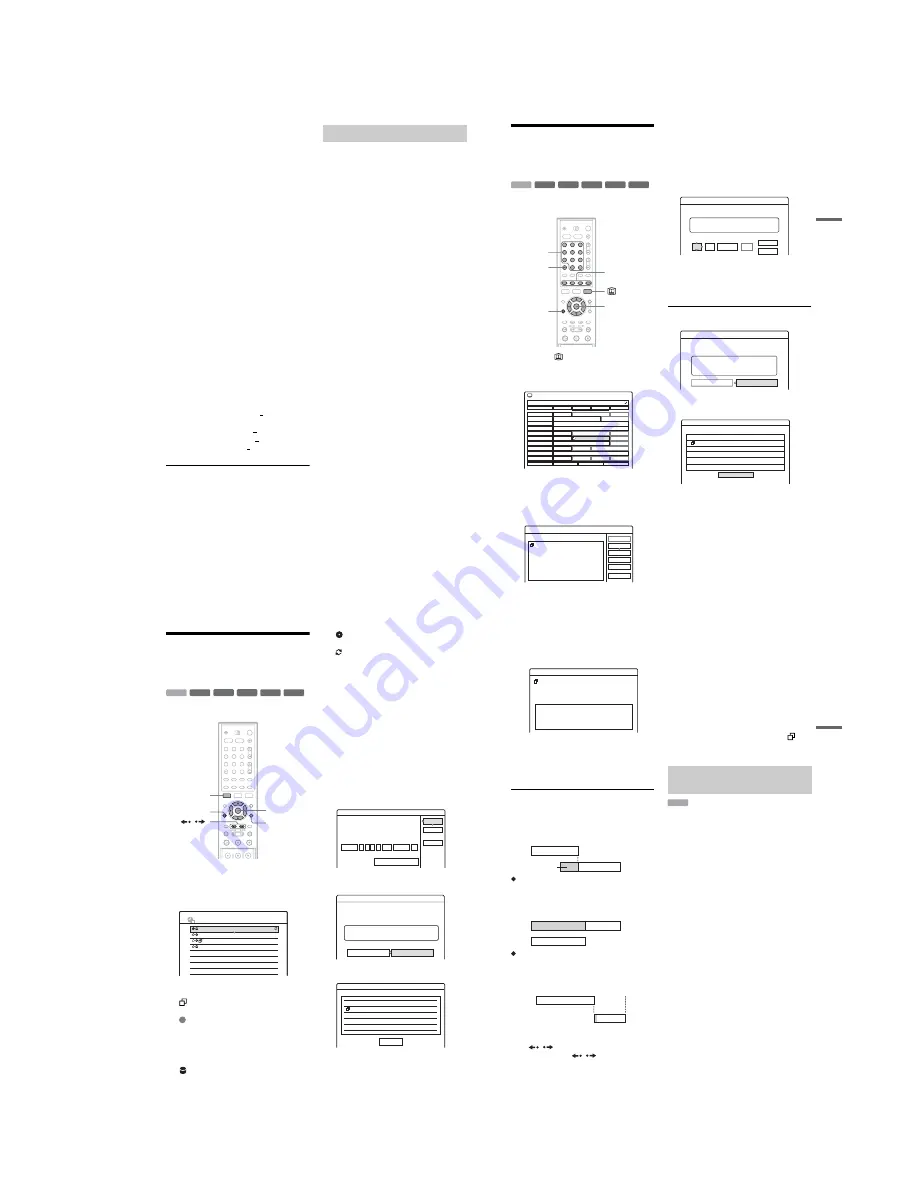
Checking/Changing/
Cancelling Timer Settings
(EPG)
You can check, change, or cancel timer settings
using the EPG menu.
1
Press the
button to display the EPG.
A timer setting can be identified thanks to the
event bar and the timer event icon displayed in
the EPG screen. For details, see page 51.
2
Press the
<
/
M
/
m
/
,
buttons to select a
future timer event you want to check/
change/cancel. Once highlighted, press
the ENTER button.
The Event Action menu appears.
3
Press the
M
/
m
buttons to select the
options. Once highlighted, press the
ENTER button.
The sub menu appears:
“Modify”: Changes the timer setting. Select
an item using
<
/
,
and adjust using
M
/
m
.
Select “OK” and press ENTER.
b
Note
If you set “Record every” to an other option than “Off”,
then your EPG timer recording will be converted into a
standard timer recording: the timer event icon disappears
from the EPG display.
“Erase”: Erases the timer setting. Select “OK”
and press ENTER.
“Check Overlap”: Checks for overlapped
settings.
Select “Close” to return to the EPG screen.
To change or cancel the setting, repeat steps 2
and 3 above.
-RW
VR
+
RW
-
R
+
R
-RW
Video
+
R
HDD
1
2
3
4
5
6
7
8
9
0
<
/
M
/
m
/
,
,
ENTER
Coloured
control
buttons
Number
buttons, SET
O
RETURN
CLEAR
DDE NEWS 15
NCE
J9
CMY
AAC
NCE 1
EFF News
Channel J
HGF
NCE 5
DDE News
Live from Prague
No Event Information
No Event Information
Opening...
John's...
EFF
News
Weather
No Event Information
City
DDE News
Foreign Markets - Mor...
Hobbies and Interests
Family
Houses
DDE News
No Event...
Fabulous...
EFF
News
Tennis
NCE News
Drive in ...
No Event...
Thu 27 Oct
040 DDE NEWS 15
10:30
11:00
11:30
12:00
All Programmes
Thu 27 Oct 10:32
Category
30 min View
+ 24H
Event Action
Select an action for this event
Timer
Cancel
Check Overlap
View Channel
Erase
Modify
Hobbies and Interests
Thu 27.10 11:00-12:00
HDD
NCE 1
SP 2.7GB
Today's Hint: How to make finger puppets.
Modify
Modify the timer setting.
Hobbies and Interests
Thu 27.10 11:00-12:00 NCE 1
OK
Mode
SP
Record every
Off
Update
- -
Cancel
Media
HDD
Erase
Are you sure you want to erase this timer setting?
OK
Cancel
Hobbies and Interests
Thu 27.10 11:00-12:00 NCE 1
Media:HDD Mode:SP
Check Overlap
These timer settings overlap.
Close
Thu 27.10 11:00-12:00 Hobbies and Intere
Thu 27.10 11:30-14:00 News
HDD SP
HDD LP
,
continued
56
Checking/Changing/
Cancelling Timer Settings
(Timer List)
You can check, change, or cancel timer settings
using the Timer List.
1
Press SYSTEM MENU.
The System Menu appears.
2
Select “TIMER LIST,” and press ENTER.
The Timer List appears.
Timer information displays the recording
date, time, recording mode, etc.
: Indicates that the setting is overlapped by
another setting.
(green): Indicates the setting can be
recorded.
z
(red): Indicates the setting currently being
recorded.
a
(grey): Indicates that the setting cannot be
recorded in the selected recording mode.
: Indicates the setting being recorded on
the HDD.
: Indicates the setting being recorded on a
DVD.
: Indicates the setting that the Update
function is set for.
When all of the timer settings do not fit on the
list, scroll bar appears.
To view the hidden timer settings, press
M
/
m
.
3
Select the timer setting you want to check/
change/cancel, and press ENTER.
The sub-menu appears.
4
Select one of the options, and press
ENTER.
“Modify”: Changes the timer setting.
Select an item using
<
/
,
and adjust using
M
/
m
. For the recording Mode or Update
functions, select “Details” and change the
settings (page 50). Select “OK,” and press
ENTER.
“Erase”: Erases the timer setting. Select
“OK,” and press ENTER.
“Check Overlap”: Checks for overlapped
settings.
Select “Close” to return to the Timer List.
-RW
VR
+
RW
-
R
+
R
-RW
Video
+
R
HDD
1
2
3
4
5
6
7
8
9
0
<
/
M
/
m
/
,
,
ENTER
O
RETURN
SYSTEM
MENU
TOOLS
/
10:30
TIMER LIST
22:00-22:15
AAB
DEF
GHI
DEF
SP
SP
SLP
SLP
16:00-17:00
21:00-22:00
20:30-21:30
Mon-Sat
Fri 29.10
Fri 29.10
Sat 30.10
Modify
Modify the timer setting.
OK
Cancel
Details
On
SP
Mode:
Update:
Date
Mon-Sat
Source
Media
Prog.
Start
00
:
Stop
15
TV
AAB
HDD
:
22
22
22:00-22:15 AAB
Mon-Sat
Media:HDD Mode:SP
Erase
Are you sure you want to erase this timer setting?
OK
Cancel
Check Overlap
These timer settings overlap.
29.10 20:30-21:30 DEF
DVD SP
Close
29.10 21:00-22:00 GHI
Fri
Fri
DVD SLP
57
Ti
me
r
Re
co
rd
in
g
“Info”: Displays the timer setting information
box along with the disc space required to
record the whole programme (according to the
selected recording mode).
Press
O
RETURN to come back to the
Timer List.
To change or cancel the setting, repeat steps 3
and 4 above.
When the timer settings overlap
The programme that starts first has priority and the
second programme starts recording only after the
first programme has finished.
When the recordings start at the same time
The programme that is set last has priority. In this
example, timer setting B is set after A, so the first
part of timer setting A will not be recorded.
When the end time of one recording and the
start time of another are the same
After finishing the previous recording, the other
recording may be delayed.
To scroll the list display by page (Page mode)
Press
/
while the list display is turned on.
Each time you press
/
, the entire Timer
List changes to the previous/next page of timer
settings.
To turn off the Timer List
Press TIMER LIST or
O
RETURN.
z
Hint
While recording, you cannot modify the timer setting for
the current recording, but you can extend the recording
duration of the recording time (page 50).
b
Notes
• Even if the timer is set, timer recordings cannot be
made while recording a programme that has priority.
• Even if the timer is set for the same daily or weekly
programme, the timer recording cannot be made if it
overlaps with a programme that has priority. “
” will
appear next to the overlapped setting in the Timer List.
Check the priority order of the settings.
If there is not enough space for a timer recording,
the recorder automatically erases old titles
recorded on the HDD. The oldest, played title is
erased. The protected titles are not erased.
1
Press TIMER LIST.
The Timer List appears.
2
Press TOOLS to select “Auto Title Erase,”
and press ENTER.
3
Select “On,” and press ENTER.
The default setting is “Off.”
Information
Mon-Sat 22:30-22:15
AAB
Media:HDD
Mode:SP 1.4GB
7:00
8:00
9:00
10:00
A
B
will be cut off
7:00
8:00
A
B
9:00
10:00
7:00
9:00
10:00
A
B
Automatically erasing old titles
(Auto Title Erase)
HDD
Summary of Contents for RDR-GXD310
Page 6: ...MEMO 6 ...
Page 36: ...1 30E MEMO ...
Page 103: ...MEMO 5 10E ...
Page 109: ...6 6E MEMO ...


