background image

14 

GB

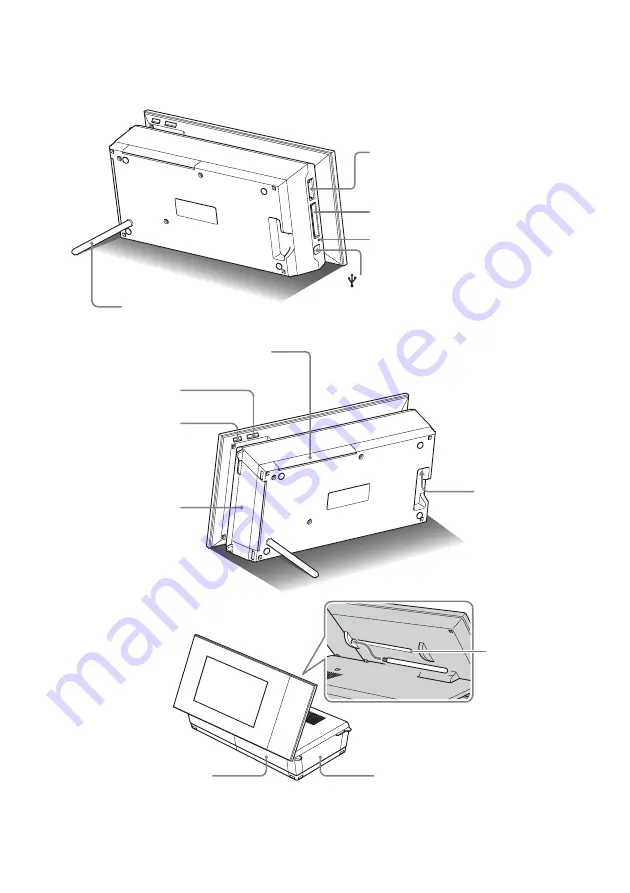
Rear

CompactFlash card slot (

.

 page 25)

“Memory Stick” (Standard/Duo)/SD 
Memory Card/MMC/xD-Picture Card 
slot (

.

 page 25)

Access lamp

USB B connector (

.

 page 70)

Stand (

.


page 21)

VIEW MODE button 
(

.

 page 26)

Space for 
storing stand 
(

.

 page 32)

Ink ribbon 
compartment door

Paper outlet 
(

.

 page 35)

DC IN 24V jack 
(

.

 page 22)

1

 (on/standby) 

button/Standby 
indicator

Paper tray 
comparment door

Ink ribbon 
compartment door

Summary of Contents for DPP-F700 - Digital Photo Printer/frame

Page 1: ... operating this unit please read Read This First and About the Print Packs supplied and this manual Operating Instructions thoroughly and retain them for future reference These models are not available in every country and region Owner s Record The model and serial numbers are located at the rear Record the serial number in the space provided below Refer to these numbers whenever you call upon you...

Page 2: ...mful interference to radio communications However there is no guarantee that interference will not occur in a particular installation If this equipment does cause harmful interference to radio or television reception which can be determined by turning the equipment off and on the user is encouraged to try to correct the interference by one or more of the following measures Reorient or relocate the...

Page 3: ...are disposed of correctly you will help prevent potentially negative consequences for the environment and human health which could otherwise be caused by inappropriate waste handling of the battery The recycling of the materials will help to conserve natural resources In case of products that for safety performance or data integrity reasons require a permanent connection with an incorporated batte...

Page 4: ...ls except for your own recording or creation is limited to private or domestic use only Unless you hold copyright or have permission from copyright holders for the materials to be duplicated use of those materials beyond this limit may infringe the provisions of the copyright law and be subject to the copyright holder s claim for damages When using photo images with this unit pay special attention...

Page 5: ...accept these terms and conditions please return this disk envelope unopened along with the rest of the package immediately to the dealer where you obtained it Sony Corporation reserves the right to make any modification to this manual or the information contained herein at any time without notice The software described herein may also be governed by the terms of a separate user license agreement A...

Page 6: ...he print paper 34 Basic printing 36 Printing in single view mode 36 Printing in slideshow mode 36 Enjoying a slideshow 40 Changing the settings of the slideshow 40 Importing images from a memory card to the internal memory 42 Refresh mode 44 Specifying the playback device 44 Exporting an image from the internal memory to a memory card 45 Deleting an image 46 Registering a mark 48 Sorting images Fi...

Page 7: ...g the software 73 Installing the printer driver 73 Installing the PMB Picture Motion Browser 75 Printing photos from a computer 76 Printing from the PMB Picture Motion Browser 76 Registering a browsing folder 80 Printing from a commercially available software application 80 Error messages 84 If trouble occurs 87 If the paper jams 96 Cleaning 97 About the Memory Cards 100 Memory Stick media 100 SD ...

Page 8: ...8 GB ...

Page 9: ...9 GB Before you start Overview ...

Page 10: ...t using a computer Enjoy slideshows of your photos page 40 Enjoy various display styles page 29 31 Enjoy viewing sorted photos page 49 View photos in portrait or landscape orientation page 22 View photos for as long as you like page 51 How to use as a photo frame Single view Multi image view Clock view Calendar view Clock display Calendar display Single view Index view Sort by folder Sort by shoot...

Page 11: ...a printer Print date Print with without border Pages Per Sheet Calendar Layout print ID photo You can even do this Import images to the internal memory page 42 You can import images from your memory card to the internal memory Export images page 45 You can export images from the internal memory to your memory card Connect to a computer to exchange or print images page 68 ...

Page 12: ...1 Read This First 1 About the Print Packs 1 Warranty In some regions the warranty is not supplied 1 Sony End User Software License Agreement 1 1The plug shape and specifications of the power cord differ depending on the region in which you purchased this unit About Sony Print Packs sold separately Please use a Sony optional color print pack designed for this unit You cannot use other print packs A...

Page 13: ...ng the parts For details see the pages indicated in the parentheses Front LCD screen Remote sensor Sony logo page 23 MENU button Direction B b v V buttons enter button BACK button PRINT button Operation panel page 24 Continued ...

Page 14: ...ture Card slot page 25 Access lamp USB B connector page 70 Stand page 21 VIEW MODE button page 26 Space for storing stand page 32 Ink ribbon compartment door Paper outlet page 35 DC IN 24V jack page 22 1 on standby button Standby indicator Paper tray comparment door Ink ribbon compartment door ...

Page 15: ...26 CLOCK button page 26 MENU button MARKING button page 48 SORT button page 49 ROTATE button page 51 PRINT button INDEX button page 26 Zoom in button page 50 ENTER button Zoom out button page 50 IMPORT button page 42 DELETE button page 46 SELECT DEVICE button page 44 1 on standby button VIEW MODE buttons page 26 ...

Page 16: ...xif Fit to screen with Exif Index view Index1 Index2 Index3 2 Image no Total no of images The number of the displayed image and the total number of images are shown 3 Device information An icon is shown indicating the media from which the displayed image is input Internal memory Memory Stick CompactFlash SD Memory Card xD Picture Card 4 Ink ribbon type The type of installed ink ribbon is shown P P...

Page 17: ...rint Order Format 7 Image number Folder File number Shown if an image is DCF compliant If not a file name is shown The file name may differ from the one that is shown on your computer 8 Shooting date time The date and time when the displayed image was shot is shown 9 Guide message Operating guide is shown 0 Set No of prints No of prints set is shown qz Print setting information The print settings ...

Page 18: ...18 GB ...

Page 19: ...19 GB Let s get started basic operations Using as a photo frame Using as a printer ...

Page 20: ...ress the tab in 2 Pull the battery holder out 3 Insert a new battery and slide the battery holder back into the remote control Insert the battery so that is facing upwards Notes When the lithium battery becomes weak the operating distance of the Remote control may shorten or the Remote control may not function properly In this case replace the battery with a Sony CR2025 lithium battery Use of anot...

Page 21: ... corrosion Do not recharge the battery When the remote control will not be used for a long period of time remove the battery from the remote control to prevent leaking and corrosion Incorrectly inserting shorting dismantling or heating the battery or throwing it into a fire may cause the battery to rupture or leak Setting the stand 1 Hold this unit tightly and insert the stand straight into the sc...

Page 22: ...n flat position page 32 Connecting to the AC power source 1 Insert the plug of the AC Adaptor into the DC IN 24V jack on the back of this unit 2 Connect one plug of the power cord to the connector of the AC Adaptor and the other plug to the wall outlet This unit automatically turns on A socket outlet should be as close as possible to the unit and easily accessible Notes Do not place this unit in a...

Page 23: ...40 V AC 50 60 Hz Do not use an electronics transformer travel converter as this may cause a malfunction Turning this unit on When you have already turned on this unit in the previous section skip to the next section Turning on the power Press 1 on standby on this unit or remote control to turn on the power The standby indicator turns to green from red The Sony logo on the front panel lights up Tur...

Page 24: ...ime See next section Setting the current date and time 1 Press MENU 2 Press B b to select the Settings tab Tips You can only use the B b buttons when the clock and calendar settings item page 29 is not selected 3 Press v V to select Date time Settings and then press 4 Adjust the date 1Press v V to select Date and then press 2Press B b to select year month and day and then press v V to select a val...

Page 25: ...hours and then press 9 Press MENU The menu screen is closed Inserting a memory card Insert the memory card firmly into the corresponding slot with its label side facing toward you when you are facing the back side of this unit The access lamp flashes when the memory card is inserted correctly Reinsert the memory card after checking the label side of the memory card if the access lamp does not flas...

Page 26: ...lamp is flashing Notes The slot is both a Memory Stick standard and Duo size compatible slot so you do not need a Memory Stick adaptor The Memory Stick Standard Duo SD memory card MMC xD Picture Card multi purpose slot automatically detects the card type Do not insert multiple memory cards into A B slots simultaneously If multiple memory cards are inserted this unit will not work properly Changing...

Page 27: ...w style Tips If the cursor is in the display selection area move it to the style selection area by pressing v You can move it within the style selection area by pressing the button corresponding to currently selected view mode or or VIEW MODE on this unit repeatedly Notes If you do not operate this unit for a certain period of time the style indicated by the cursor is automatically selected Displa...

Page 28: ...es are displayed on a single screen one after another Multi image view Displays multiple images at the same time Clock view Displays images one after another while showing the present date and time Calendar view Displays images one after another while showing a calendar The present date and time is shown Time Machine Displays images one after another while showing the shooting date and time The pr...

Page 29: ...lable in the clock and calendar display mode Clock1 Clock2 Clock3 Clock4 Clock5 Clock6 Clock7 Clock8 Clock9 Clock10 Clock11 Calendar1 Calendar2 Calendar3 Lunar Calendar when you select Simplified Chinese in Language Setting Arabic calendar when you select Arabic in Language setting Farsi calendar when you select Persian in Language setting ...

Page 30: ...e image with Exif Displays image information such as the image number file name and shooting date while displaying the entire image You can switch the images to be displayed by pressing B b Refer to About the information display page 16 for details on the image information Fit to screen with Exif Displays image information such as the image number file name and shooting date in fit to screen mode ...

Page 31: ...You can select the single view mode when you press when the image you want appears in the index image display Display Style Description Index Index1 Displays a list of large thumbnails You can select an image by pressing B b v V Index2 Displays a list of thumbnails You can select an image by pressing B b v V Index3 Displays a list of small thumbnails You can select an image by pressing B b v V ...

Page 32: ...ting this unit in the print position flat position To use this unit as a printer do the following 1 Remove the stand 2 Lay this unit flat print position and open the paper tray compartment door 3 Tilt the display up Notes When using this unit in the print position remove the stand and put it in the space on the back of this unit for storing it The stand is held in place by a magnet built into the ...

Page 33: ... to be loaded keep pressing the core of the ribbon and wind the ink ribbon in the direction of the arrow to remove the slack Do not disassemble the ink ribbon Do not pull out the ribbon from the ink ribbon Do not remove the ink ribbon while printing Notes on storing printing packs Avoid placing the printing pack in locations that are subject to high temperature more than 30 C 86 F high humidity ex...

Page 34: ... 3 Close the paper tray cover 4 Open the slide cover Notes You can set up to 20 sheets of print paper Riffle the print paper thoroughly Insert the print paper with the protective sheet facing up Remove the protective sheet from the tray If there is no protective sheet insert the print paper into the paper tray with its printing surface the side with no imprint facing up Do not touch the printing s...

Page 35: ... unit and close the slide door of the paper tray Avoid storing the paper with the printed faces touching each other or in contact with rubber or plastic products including vinyl chloride or plasticizer for an extended period of time color changes or deterioration of the printed image may occur Avoid placing the print paper in a location subject to high temperatures high humidity excessive dust or ...

Page 36: ...ith the quantity set in step 4 To print multiple images Repeat steps 3 and 4 To change the print quantity Display the image whose print quantity you want to change and press to set the print quantity If you select 0 printing is canceled Tips If you press PRINT in index view mode page 31 the image indicated by the cursor and ones you set the No of prints will be printed To print an index page see P...

Page 37: ...tuck or paper jam may occur In case you turn off the power keep the paper tray inserted and turn on this unit After the paper is ejected resume printing Do not remove the paper tray during printing Otherwise malfunction may occur The print paper emerges a few times during printing Do not touch nor pull the emerged paper If print paper is jammed see page 97 Date Print Borders Pages Per Sheet can on...

Page 38: ...38 GB ...

Page 39: ...39 GB Try using various functions advanced operations Using various functions ...

Page 40: ...ings tab 3 Press v V to select Slideshow Settings and then press 4 Press v V to select the item and then press Refer to the tables on the next page for details on the setting items Notes Note the following when you select a slideshow using the image stored on the memory card Due to the characteristics of memory cards frequent reading can lead to errors and images may not be displayed correctly Do ...

Page 41: ...ng lowered vertically Horiz blinds Transitions to the next image as though blinds are being pulled horizontally Fade Transitions to the next image by fading out the current image and fading in the next image Wipe Transitions to the next image as though the current image is being wiped off the screen to reveal the next image Random Uses the above five effects randomly Shuffle ON Displays images ran...

Page 42: ...ss Import when an image stored on the memory card is displayed on the screen Tips If using the buttons on this unit press MENU select the Editing tab with B b select Import with v V and press Single view mode Single image display Slideshow display Index image display 2 Press v V to select Import this image Import multiple images or Import all images and then press If you select Import this image t...

Page 43: ... selecting a folder is displayed 5 Press v V to select the folder you want and press The confirmation screen used to decide whether to import an image or not to the internal memory is displayed Tips A new folder is created automatically when you select New folder 6 Press v V to select Yes and then press The image is saved in the specified folder in the internal memory 7 Press when the confirmation...

Page 44: ...al memory is being refreshed It may cause a malfunction It may take approximately 5 minutes to refresh the internal memory Notes We recommend that you perform a backup of your data periodically to avoid losing it Do not run a slideshow with less than 10 images continuously if you have set the interval time for the slideshow to 3 seconds You may not be able to protect some images in the internal me...

Page 45: ...Go to step 5 If you select Export all images the image list is displayed A check mark is attached to the check box of all the images Go to step 6 5 Use B b v V to select the image from the image list to be exported and press is added to the selected image If you want to export multiple images at a time repeat this step If you want to clear the selection the image select the image and press disappe...

Page 46: ... B b select Delete with v V and press 2 Press v V to select Delete this image Delete multiple images or Delete all images and then press If you select Delete this image the image currently displayed is deleted Go to step 5 This item cannot be selected on the slideshow display If you select Delete multiple images you can select the image you want to delete from the image list Go to step 3 If you se...

Page 47: ... computer In this case connect this unit to a computer and delete this file using the computer The total capacity of the internal memory is not equal to the remaining capacity even immediately after initialization If deletion has started the deleted image cannot be recovered even if you stop deletion Delete images only after confirming you actually want to delete them Tips You can change the thumb...

Page 48: ...all the images Go to step 5 4 Use B b v V to select the image from the image list to be marked and press is added to the selected image If you want to mark multiple images at a time repeat this step If you want to clear the selection select the image and press disappears from the image About image sorting in the image list During a sort Lists all images that meet the sorting criteria Not during a ...

Page 49: ...images stored in the internal memory or on a memory card according to date folder image orientation or marks 1 Press SORT when an image is displayed on the screen Tips If using the buttons on this unit press MENU select the Editing tab with B b select Sort with v V and press 2 Select a sort style using v V and press Sort by date Filters by the shooting date Sort by folder Filters by the folder Sor...

Page 50: ...press of the button enlarges the image further You can enlarge an image to a maximum of 5 times the original scale You can move an enlarged image up down left and right To save an enlarged or a reduced image Crop and save 1Press MENU while the enlarged or reduced image is displayed 2Press v V to select the saving method If you select Save as new image a copy of the image is saved Proceed to step 3...

Page 51: ...counterclockwise every time you press the button When displaying the images in the internal memory the information used to rotate the image is retained even after the power is turned off You can rotate the image of the index image display Changing the settings of the auto power on off function You can use the timer function to turn this unit on or off automatically when this unit is turned on 1 Pr...

Page 52: ...nd press to make it checked Press v V to move the cursor to OK and press Advanced 1Press B b v V to select the time you want to use the auto power on off function You can set this function according to a day of the week by one hour units The color of the selected time zone changes to blue after you press The power supply of this unit will be turned on when the blue time zone time occurs The color ...

Page 53: ...53 GB Enjoy various printing advanced printing Printing in various ways ...

Page 54: ...ing value and press The set value is confirmed page 65 Tips When the print setting is set to Date Print Pages Per Sheet and Borders printing is only enabled when the image is displayed in single view mode page 36 This section describes only Date Print Borders and Pages Per Sheet patterns You can select any images from a memory card or the internal memory and print them as a Layout print page 57 Da...

Page 55: ...u can also exit the CreativePrint menu by pressing B b v V to select and then pressing on the preview screen The dialog box for saving an image may be displayed 1 From the CreativePrint menu press B b v V to select Calendar then press The window used for selecting the calendar template is displayed 2 Press B b v V to select the desired template and then press The preview of the selected template i...

Page 56: ...INT Operate by following the instructions on the screen Tips You can save the created calendar data See page 59 Item Description Start Y M Set the first month and the year starting the calendar Press B b to select the month or year and press v V to set the number Press First day of the week Set the day of the week placed furthest left in the calendar Press b and then v V to select Sunday or Monday...

Page 57: ...following the instructions on the screen Tips You can save the layout See page 59 1 From the CreativePrint menu press B b v V to select ID Photo then press The window used for setting the height and width of an ID photo is displayed Tips You can set a maximum size of 7 0 width 9 0 height cm 2 Press B b v V to select the item that you want to adjust and press To specify the unit Select the text box...

Page 58: ...acceptable to be used for an identification card or passport Please check the requirements for the photo to be used in the certificate before you submit the card or passport You can edit an image on the image edit screen Image editing screen for Calendar 1 Press v V to select the desired editing items and press 2 Press v V to select OK and press The image preview screen appears Editing an image It...

Page 59: ...creen appears 2 Press v V to select a device to export the image to and press 3 Press v V to select the folder you want to save and press Tips If you select New folder a new folder is created automatically 4 Press on the confirmation screen Tips The previous image is not overwritten Notes Do not turn this unit off or remove a memory card while saving the image Doing so may damage this unit or the ...

Page 60: ...rint All You can print all the images stored on a memory card or in the internal memory Notes Only selected images are displayed during sort For how to preset images for printing refer to the manual of your digital camera Some types of digital cameras do not support the DPOF function or this unit may not support some of the functions of the digital camera 1 Press MENU 2 Press B b to select the Edi...

Page 61: ...ou want to change and then press For example when Slideshow Settings is selected 4 Press v V to select the item you want to change and then press This enables you to set each of the items page 63 Notes When this unit is for instance displaying a slideshow some settings of some items cannot be changed They are shown in gray and cannot be selected 5 Press v V to select a setting value and then press...

Page 62: ... then B b to select Settings tab 2 Press v V to select Initialize and press 3 Press v V to select Initialize settings and then press All settings except for clock time and date are reset to the default settings Tips You can also use the MENU button on this unit ...

Page 63: ...tically OK Returns to the previous screen after confirming the operation Cancel Returns to the previous screen after canceling the operation Reset all Deletes all the selected times Setup method Advanced Sets the auto power ON OFF function according to a day of the week by one hour units Simple Sets the auto power ON OFF function finely in one minute increments Date time Settings Sets the date tim...

Page 64: ...ights or not Language Setting Sets the display language on the LCD screen Japanese English French Spanish German Italian Russian Korean Simplified Chinese Traditional Chinese Dutch Portuguese Arabic Persian Hungarian Polish Czech Thai Greek Turkish Malay Swedish Norwegian Danish Finnish Notes Default language setting may vary in some regions Initialize Format internal memory You can format the int...

Page 65: ... Borders Border 1 Border 2 Prints an image with borders around the image To print an image without being cut select Border 1 To leave almost equal borders in the top bottom right and left around an image select Border 2 Notes When you select Border 2 the top and bottom edges or right and left edges may be trimmed and printed depending on the image Borderless Prints an image without blank space aro...

Page 66: ...ess of a print Press B b to select a color element R red G green or B blue or S Sharpness and then press v V to set the level You can set the levels for R G B in the range from 4 to 4 and for S in the range from 7 to 0 R Adjusts the red and blue elements The higher you set the level the more reddish the picture becomes as if it receives red light The lower you set the level the darker the picture ...

Page 67: ...67 GB Connecting to a computer lets you do even more Using with a computer Using the internal memory of this unit Printing from a computer ...

Page 68: ...sconnect the USB cable during data communication Operation with all computers that satisfy the recommended system requirements is not guaranteed This unit has been demonstrated as operable when connected to a computer When other devices are connected to this unit these devices may not recognize the internal memory of this unit When printing To use the supplied printer driver and PMB PictureMotionB...

Page 69: ...all computers that satisfy the recommended system requirements is not guaranteed PMB supports DirectX technology and DirectX installation may be required DirectX is available on the CD ROM If the PMB is installed on a computer on which the Cyber shot Viewer is already installed the Cyber shot Viewer will be overwritten and replaced by the PMB The browsing folders once registered in the Cyber shot ...

Page 70: ...e computer 2 Press B b to select Use internal memory or Print and then press For how to use the various functions see the following pages Use internal memory page 71 Print page 73 The first time you select Print install the supplied printer driver before pressing the button page 73 Tips If you disconnect this unit from your computer and reconnect it the PC mode selection screen appears and you can...

Page 71: ...indow and right click and then click New Folder Name this new folder In this manual the folder name sony is used as an example 4 Double click to open this sony folder 5 Open the folder that contains the image files you want to copy and then copy the image files by using drag and drop Notes When saving images from a computer in the internal memory make a folder in the internal memory and save the i...

Page 72: ...rn this unit off after disconnecting it from your computer 1 Double click Disconnect on the Task Tray of your computer 2 Click USB Mass Storage Device t Stop 3 Click OK after checking the drive you want to remove Tips When using Print you do not need to do this step ...

Page 73: ...PMB Picture Motion Browser Sony s original software application that allows you to handle photographs and moving images this includes capturing managing processing and printing Installing the software Follow the procedures below to install the driver Notes Do not connect this unit to the computer before installing the driver Please log on to Windows using a Computer administrator user account Be s...

Page 74: ...er 5 Click Install Installation starts 6 When the Sony DPP F700 printer driver has been successfully installed dialog is displayed click Finish 7 Press the 1 on standby button to turn on this unit 8 Connect the USB connectors of this unit and your computer with the USB cable Notes Use a USB cable with a B type plug for the USB B connector of this unit shorter than 3 meters 9 On the mode selection ...

Page 75: ...license agreement dialog box is displayed 5Read the agreement thoroughly and if you agree check I accept this agreement and click Next The confirmation dialog box used for removing the software is displayed 6Click Yes The confirmation dialog box used for restart is displayed 7Check Yes I want to restart my computer now and click OK After the computer is restarted the relevant files will be deleted...

Page 76: ... Panel is displayed 2Click Uninstall a program Depending on the operating system it may be called Programs and Features or Add or Remove Programs 3Select Sony Picture Utility and click Change Remove The software uninstallation process starts Printing photos from a computer You can use the PMB to print an image from your computer 1 Press B b to select Print on the PC mode selection screen of this u...

Page 77: ...t you want to print and click print The Print dialog box is displayed 6 In the Printer drop down list box select Sony DPP F700 To set the paper orientation or other print options go to step 7 To print skip to step 12 Items Description Printer Select the printer you are using Sony DPP F700 Paper size To change the size click Properties Note In some regions L size print paper is not sold Print Optio...

Page 78: ...Page Order Select the order of the pages when printed Front to Back Back to Front Pages Per Sheet Specify the number of copies per sheet to be printed Select 1 Advanced Specifies the paper size or other options Items Description Paper Output Paper Size From the drop down list box select the paper size you actually use for printing P size L size Note L size print paper is not sold in some regions C...

Page 79: ...ch as Page Order If a compatibility problem occurs disable this feature Color Printing Mode To print in colors select True Color 24bpp To print in monochrome select Monochrome Printer Features Borderless Print To print an image without borders select ON To print with borders select OFF Depending on the application software an image will be printed with borders even if ON is selected Set an image t...

Page 80: ...lly You cannot cancel registration of the folder you register here To change the browsing folder Click Tools Settings Viewed folders Tips If a sub folder is contained in the source folder the images in the sub folder will also be registered When the software is first started a message prompting you to register Pictures will be displayed Depending on the number of images it may take some tens of mi...

Page 81: ...ng on the software application you use orientation may not change even if you change portrait or landscape setting With the Borders Borderless setting of the printer driver When the software application you use has Borders Borderless setting we suggest you select ON for Borderless Print in Printer Features of the Sony DPP F700 Advanced Options dialog box as the printer driver setting No of prints ...

Page 82: ...82 GB ...

Page 83: ...83 GB Troubleshooting Error messages If trouble occurs If the paper jams Cleaning ...

Page 84: ... your digital camera or computer Memory card is protected Remove protection then try again The memory card is write protected Slide the write protect switch to the enable position page 100 The Memory Stick is full The CompactFlash card is full The SD Memory Card is full The xD Picture Card is full The internal memory is full No more data can be saved because the memory card or the internal memory ...

Page 85: ...Solutions Error messages Meaning Solutions Cannot open the image This unit cannot display or open an image file whose format is not supported No DPOF file There are no DPOF preset image files in the memory card Specify the print DPOF mark with your camera Error messages Meaning Solutions No ink ribbon Insert P size ink ribbon and press PRINT The ink ribbon is not inserted in this unit Set the ink ...

Page 86: ...Set the print paper for the P Size and press PRINT No cleaning sheet Set the cleaning sheet and press PRINT There is no cleaning sheet in the paper tray Insert the cleaning sheet into the paper tray and set the paper tray into this unit page 97 Wrong print paper Set the print paper for the P Size and press PRINT The print paper and ink ribbon do not match Check the ink ribbon size actually loaded ...

Page 87: ...ns No images are displayed on the screen Is a memory card inserted properly c Insert a memory card properly page 25 Does the memory card contain images saved with a digital camera or other device c Insert a memory card containing images c Check the file formats that can be displayed page 103 Is the file format compatible with DCF c A file that is not compatible with DCF may not be able to be displ...

Page 88: ...e view mode the image file is not supported by this unit and cannot be displayed or printed Does the mark displayed below appear in the index view c If the mark shown on the left is displayed the image file is supported by this unit but the thumbnail data or image itself cannot be opened Select the mark and press to change the screen to single view mode and if the image is displayed it can be prin...

Page 89: ...ion setting of this unit set to OFF Does the rotation information on the image information display say No Rotation c Set the Auto display orientation setting to ON page 63 c If the rotation information says No Rotation you can rotate the image manually page 51 Symptom Check item Cause Solutions Cannot save an image Is the memory card write protected c Cancel write protection and try saving again I...

Page 90: ...k is set to Read Only You cannot delete it on this unit An image was deleted accidentally c An image cannot be recovered once it is deleted Symptom Check item Cause Solutions Nothing happens even if you operate the remote control Is the battery inserted in the remote control properly c Replace the battery page 20 c Insert a battery page 20 c Insert a battery in the proper orientation page 20 c Poi...

Page 91: ... is ejected without being printed Is the perforation of the print paper removed Are you using print paper that was not designed for this unit c Use print paper designed for this unit If you use incompatible print paper this unit may develop trouble About the Print Packs Symptom Check item Cause Solutions The printed pictures are inferior in quality Did you print preview image data c Depending on t...

Page 92: ...rint in the Print Settings to Date or Date Time page 65 Does the image support DCF c The Date Print function of this unit supports an image that is compatible with the DCF standards Are you printing in slideshow mode c The layout of the LCD screen is printed as it appears so the Date Print setting is invalid The date is printed unintentionally Is Date Print set to OFF c Press MENU button select Se...

Page 93: ...rinted at an angle Is the paper tray inserted properly c Re insert the paper tray firmly straight in to the end There are white lines or dots on the printed pictures c The print head or paper path may be soiled Use the supplied cleaning cartridge and sheet to clean the head and path page 98 The picture is too bright dark reddish yellowish or greenish c Adjust the image quality on the image quality...

Page 94: ...ns to install the driver c The USB driver may not be installed properly Follow the operating instructions to install the USB driver again Is there an anti virus program or other program running on the system c If there is an anti virus program or other program running on the system exit it and then start installing the driver Did you log on using an Administrator user account c To install the driv...

Page 95: ...iver dialog box Colors of the printed image from a computer are different from those printed from a memory card c Since the process in printing an image from a memory card differs that in printing from a computer the colors may not be exactly identical An error stating Error was found while a document is output to the USB device is displayed c Disconnect the USB cable and then connect it again Sym...

Page 96: ...omatically 1 on standby 2 Remove the ejected print paper from this unit 3 Remove the paper tray and ink ribbon from this unit and check to ensure if there is no jammed print paper inside Tips If you cannot remove the jammed paper contact your Sony dealer Print paper Check to see if there is jammed paper If any remove it ...

Page 97: ... sheet into the paper tray with the no imprint side facing up 5 Set the paper tray into this unit and press PRINT The cleaning cartridge and cleaning sheet will clean inside this unit After the cleaning is finished the cleaning sheet is automatically ejected 6 Remove the cleaning cartridge and sheet from this unit Tips Keep the cleaning cartridge and cleaning sheet together for future cleaning Be ...

Page 98: ...98 GB ...

Page 99: ...99 GB Miscellaneous Additional information ...

Page 100: ...nit When using the Memory Stick Micro media with this unit always insert it into an M2 adaptor If you insert a Memory Stick Micro media into this unit without an M2 adaptor you may be unable to remove the Memory Stick Micro media If you insert the Memory Stick Micro media into an M2 adaptor and insert the M2 adaptor into a Memory Stick Duo media adaptor this unit may not operate properly When you ...

Page 101: ...cording that requires copyright protection cannot be performed With the SD memory card xD Picture Card dual format slot of this unit you can use an xD Picture Card 5 Not all the memory card operations are supported and we do not guarantee proper operations for all types of xD Picture Card 5 This unit has been demonstrated as operable with an xD Picture Card with a capacity of 2 GB or smaller The C...

Page 102: ...n you carry or store a card put it in the case supplied with it Do not touch the terminal of a card with your hand or a metal object Do not strike bend or drop a card Do not disassemble or modify a card Do not expose a card to water Do not use or store a card under the following conditions Locations beyond the required operational conditions including locations such as the hot interior of a car pa...

Page 103: ... connectors USB connector TypeB Full Speed USB Slots Memory Stick slot Standard Duo SD memory card slot xD Picture Card slot MMC card slot CompactFlash card slot Compatible image file formats JPEG DCF 2 0 compatible Exif 2 21 compatible JFIF 6 TIFF Exif 2 21 compatible BMP 7 1 4 8 16 24 32 bit Windows format Some image file formats are not compatible Max no of pixels that can be displayed and prin...

Page 104: ...s set to Borderless Date Print is set to OFF and Auto Fine Print7 is set to ON 3 Images shot on a Sony digital still camera with an effective pixel count of approximately 12 100 000 file size about 4 1 MB and stored on the internal memory with this unit set to Resize file size about 400 KB page 64 4 Images in 3 stored on a Sony Memory Stick PRO Duo Printed from the Memory Stick PRO Duo in the slot...

Page 105: ...are those of their respective owners Precautions Be careful not to set or drop any heavy objects on the power cord or to damage the power cord in any way Never operate this unit with a damaged power cord Should any solid object or liquid fall into the cabinet unplug this unit and have it checked by qualified personnel before operating it any further Never disassemble this unit To disconnect the po...

Page 106: ...rom heating devices Do not let it get hot Always unplug this unit by holding the plug and pulling it If the AC Adaptor is damaged consult your Sony dealer or Sony customer center On moisture condensation If this unit is brought directly from a cold location to a warm location or placed in an extremely warm or humid room moisture may condense inside the unit In such cases this unit will probably no...

Page 107: ...ing so may cause hearing loss or damage speakers or earphones and cause malfunction Formatting of this unit may not erase the data in the internal memory completely When you dispose of this unit we recommend that you physically destroy this unit Notes on disposal of this unit Data stored on the internal memory of this unit may not be deleted completely by Format internal memory Sony recommends tha...

Page 108: ...nternal memory 42 Index image display 31 Index Print 60 Initial state 24 Initialize 64 Inserting a memory card 25 Inserting an ink ribbon 33 Inserting the print paper 34 Installing PMB Picture Motion Browser 75 Printer driver 73 L Language setting 64 Layout print 57 LCD screen 13 M Memory cards Inserting 25 Memory cards Notes on use 102 Monochrome 41 58 Moving an image 58 N No of print 36 O On sta...

Page 109: ...8 Slideshow Settings 41 Color effect 41 Display Mode 41 Effect 41 Interval 41 Shuffle 41 Sorting images 49 Specifications 103 Supplied accessories 12 System requirements Macintosh 68 Windows 68 T Tint 59 U Uninstalling PMB Picture Motion Browser 76 Printer driver 75 USB cable 70 74 W Write protect switch 100 X xD Picture Card Inserting 25 Types 101 Z Zooming an image in out 50 ...

Page 110: ...110 GB memo ...

Reviews: