70
GB
Connecting to a
computer
1
Connect this unit to the AC power
source. (
.
page 22)
2
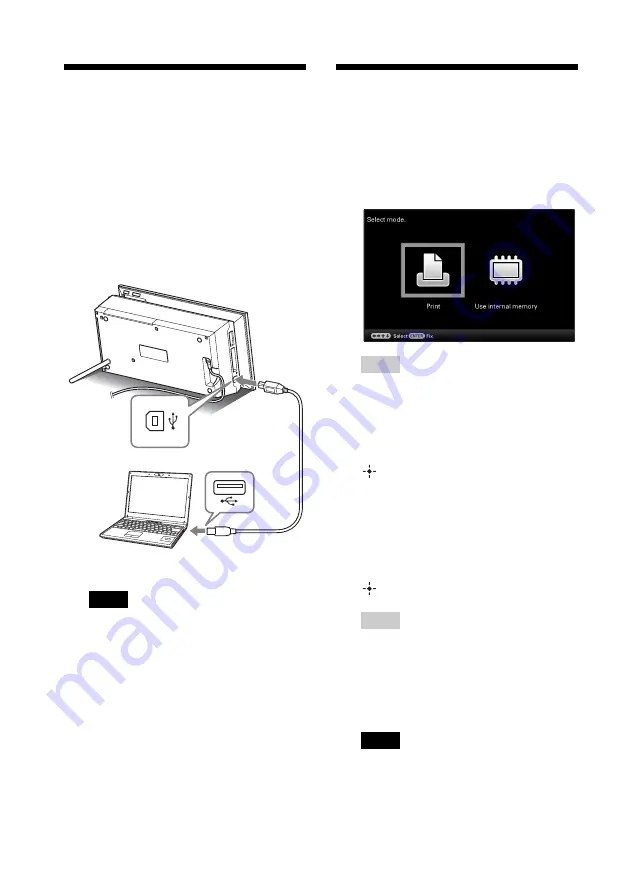
Connect the computer and this unit
with a commercially available USB
cable.
Notes
• Use a USB cable with a B-type plug (for
the USB B connector of this unit) shorter
than 3 meters.
3
Turn this unit on. (
Selecting the function
of this unit
1
Turn your computer on.
The PC mode selection screen appears on
the LCD of this unit.
Tips
• If the computer is already switched on, the
mode selection screen is displayed when
this unit is connected to the computer.
2
Press
B
/
b
to select [Use internal
memory] or [Print] and then press
.
For how to use the various functions, see
the following pages.
• [Use internal memory]
.
page 71
• [Print]
.
page 73
The first time you select [Print], install the
supplied printer driver before pressing the
button. (page 73)
Tips
• If you disconnect this unit from your
computer and reconnect it, the PC mode
selection screen appears and you can
change the mode.
For details on how to disconnect this unit
from your computer, see page 72.
Notes
• The dialog boxes shown in this section are
from Windows Vista, unless otherwise
specified. The installation procedures and
the dialog boxes shown differ depending on
the operating system.
To USB B
connector
To USB connector
Computer
Summary of Contents for DPP-F700 - Digital Photo Printer/frame
Page 8: ...8 GB ...
Page 9: ...9 GB Before you start Overview ...
Page 18: ...18 GB ...
Page 19: ...19 GB Let s get started basic operations Using as a photo frame Using as a printer ...
Page 38: ...38 GB ...
Page 39: ...39 GB Try using various functions advanced operations Using various functions ...
Page 53: ...53 GB Enjoy various printing advanced printing Printing in various ways ...
Page 82: ...82 GB ...
Page 83: ...83 GB Troubleshooting Error messages If trouble occurs If the paper jams Cleaning ...
Page 98: ...98 GB ...
Page 99: ...99 GB Miscellaneous Additional information ...
Page 110: ...110 GB memo ...


