


1-6
CCU-TX7 (E)/V1
11
3
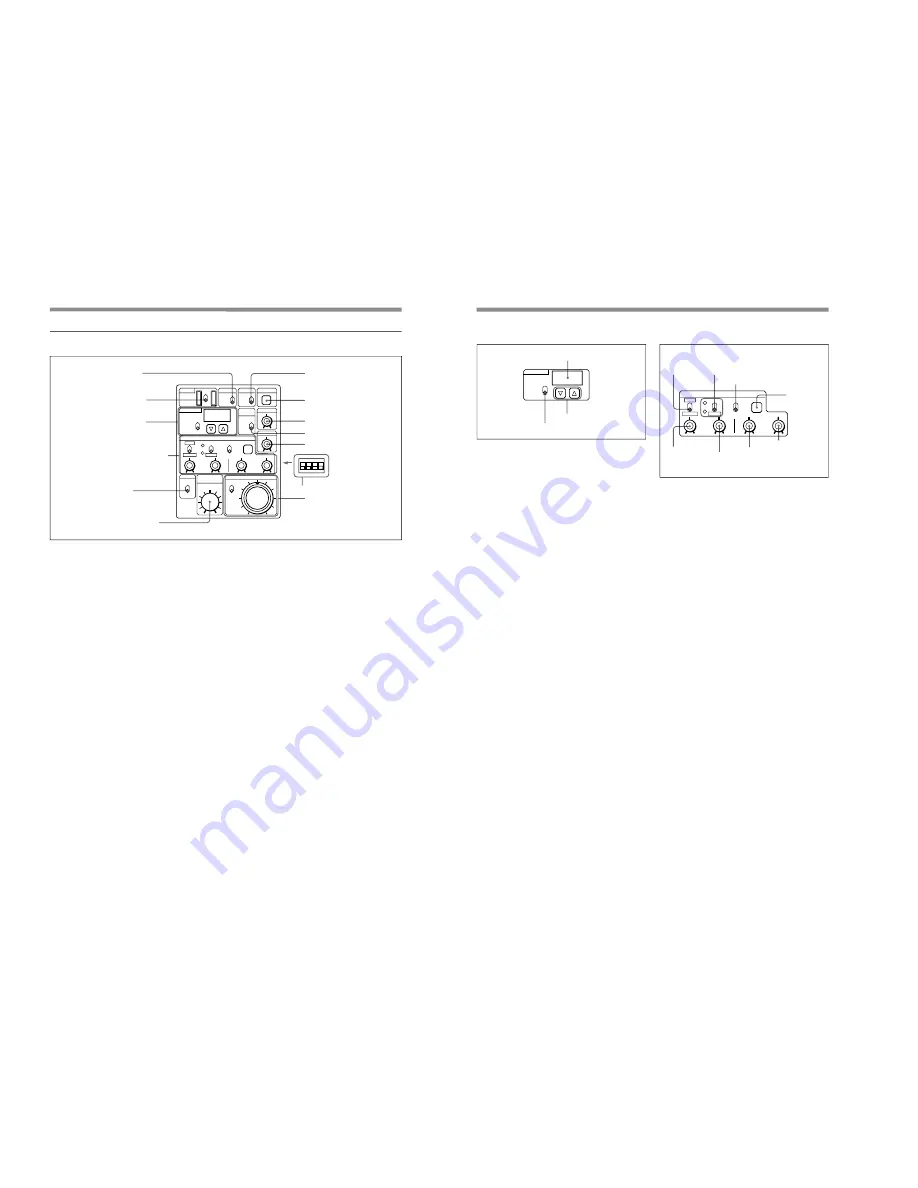
SHUTTER setting section
SHUTTER switch: Use this switch to select a
shutter setting. This switch does not function
when the TLCS switch is on.
• C. SCAN: This activates the clear scan function.
• ON: This activates the normal shutter function.
• OFF: This turns off the shutter.
$
button and
4
button: When the SHUTTER
switch is set to either C. SCAN or ON, pressing
one of these buttons changes the shutter speed or
clear scan frequency as described below.
• When SHUTTER switch is set to C. SCAN
Pressing and holding one of these buttons
gradually reduces (
$
button) or increases (
4
button) the clear scan frequency.
• When SHUTTER switch is set to ON
Each time one of these buttons is pressed, the
shutter speed is reduced (
$
button) or increased
(
4
button) by one step.
If you press both of these buttons at once, it
resets the clear scan frequency or shutter speed
(depending on the SHUTTER switch’s position)
to their factory settings.
Display: This displays the clear scan frequency
when the SHUTTER switch is set to C. SCAN or
the shutter speed when it is set to ON. “OFF” is
displayed here when the SHUTTER switch is set
to the OFF position.
When the TLCS switch is on, the display is blank.
SHUTTER
Hz
ON
C.SCAN
OFF
Display
SHUTTER switch
$
button and
4
button
4
WHITE/BLACK BALANCE control section
BLACK AUTO/MANUAL switch
Use this switch to select whether to automatically
(AUTO) or manually (MANUAL) adjust the black
balance.
(When a DXC-637 series video camera is connected,
this switch is invalid and the black balance mode is
determined by the position of the WHITE AUTO/PRE/
MANUAL switch.)
WHITE/BLACK (white/black balance
adjustment) switch and indicators
When the WHITE AUTO/PRE/MANUAL switch is
set to AUTO, press this switch to the WHITE position
to automatically adjust the white balance.
When the BLACK AUTO/MANUAL switch is set to
AUTO, press this switch to the BLACK position to
automatically adjust the black balance.
The indicator by the WHITE or BLACK position
blinks at a one-second interval while the white balance
or black balance is being automatically adjusted. When
the automatic adjustment is completed, it stays lit for
about ten seconds, then goes out. If the automatic
adjustment fails, it blinks at a half-second interval for
about ten seconds and then goes out.
WHITE/BLACK BALANCE
AUTO
MANUAL
WHITE
BLACK
BLACK
WHITE
AUTO
ATW
MANUAL
PRE
WHITE/BLACK switch and
indicators
WHITE AUTO/PRE/MANUAL switch
ATW button
BLACK knob
(red)
WHITE knob
(red)
BLACK knob
(blue)
WHITE knob
(blue)
BLACK AUTO/
MANUAL
switch
10
Location and Function of Par t s
Camera operation unit switches and knobs
SHUTTER
KNEE
IRIS
WHITE/BLACK BALANCE
OUTPUT
M.GAMMA
GAIN
TLCS
DETAIL
OPERATE
SKIN
DETAIL
MASTER
BLACK
LOCK
PART
FULL
HIGH
MID
LOW
CAM
BARS
ON
Hz
OFF
ON
C.SCAN
AUTO
MANUAL
AUTO
PRESET
WHITE
BLACK
BLACK
WHITE
AUTO
ATW
MANUAL
AUTO
MANUAL
OFF
PRE
ON
1
2
3
4
7
GAIN switch
8
TLCS switch
9
M. GAMMA knob
0
SKIN DETAIL switch
!¡
DETAIL knob
!£
DIP switch
!™
IRIS control section
1
OUTPUT switch
2
OPERATE switch
3
SHUTTER setting
section
4
WHITE/BLACK BALANCE
control section
5
KNEE switch
6
MASTER BLACK knob
The camera operation unit’s switches and knobs are
used to set and adjust video camera functions.
For details about the video camera functions and settings,
refer to operating instructions for your video camera.
1
OUTPUT switch
Use this switch to select the video to be output from
this unit.
CAM: Image being shot via video camera
BARS: Color bars generated by this unit
2
OPERATE (operation range setting) switch
Use this switch to set the operation range of the
camera operation unit.
LOCK: This setting disables all of the camera
operation unit’s functions.
PART: This setting enables only the IRIS control
section and MASTER BLACK knob to be
operated.
FULL: This setting enables all of the camera
operation unit’s functions to be used. Settings
changed while this switch was set to LOCK
become valid when this switch is set to FULL.


