NOTE:
Due to some handle designs, you may not be able to sharpen the entire length of the blade
using the mechanical sharpening wheel. Smith’s recommends using the manual sharpening slot in
these limited cases.
The speed at which you pull the blade through the sharpening slots will determine the amount of
metal removed from the edge. A very slow pass will remove more metal than a quick pass. When
drawing the blade through the slots, allow approximately one second for each one inch of blade. For
example, if sharpening a knife with a 6 inch blade, you should take approximately six seconds for
each pass.
5. Move to the other sharpening slot and repeat this process to sharpen the other side of your blade.
6. Continue alternating passes at the recommended speed, through either the COARSE or FINE
sharpening slots, until your knife blade is sharp. For best results and to reduce excessive wheel
wear, do the same number of pulls on each side of your blade. Normally, 8 to 10 passes on each
side will sharpen a dull knife blade. However, knives made of extremely hard steel may require
additional pulls on both sides of the knife blade to achieve sharpness. If you began the sharpening
process in the COARSE slot, move to the FINE ceramic wheel and repeat steps 4 through 6. If you
started the sharpening process in the FINE slot, continue to Step #7.
7. Check the sharpness of your blade by cutting a piece of paper or a fruit or vegetable. If additional
sharpening is needed, repeat process until sharp but make sure to clean your knife before
continuing. If not, turn off power to the unit.
Manual Sharpening of Serrated Blades
The manual slot has two specially-shaped, triangular ceramic stones that are designed to sharpen
serrated blades without damaging the serrations. The ceramic stone will follow the shape of the
serrations on your blade as you pull the knife through the slot. The characteristic scallops of a
serrated blade are usually only ground on one side of the knife blade. For this reason, it is not
recommended that serrated blades be sharpened on both sides using the mechanical sharpening
wheels. This will considerably alter the original geometry of the blade.
1. Hold the blade straight up and down and
center the heel of the blade in the bottom
of the crossed ceramic stones.
2. Starting at the heel of the blade, pull the blade
through the crossed ceramic stones while
applying light, downward pressure (never back
and forth). When pulling serrated portion of your
blade through the slot, allow the knife blade to rise
and fall as the serrations crossover the ceramic
stones. (Fig. 3).
3. Repeat this process 8 to 10 times or until blade is
sharp.
Maintenance and Care
There is little maintenance required with your Smith’s electric sharpener. To clean the exte-
rior housing, unplug the unit from the electrical outlet and simply wipe with a damp cloth.
• Do not use a powdered abrasive cleaner to clean sharpener.
• To protect against risk of electrical shock do not put any part of appliance in water or
other liquid.
• Do not use any lubricant or water to clean the abrasive wheel.
• Do not use a lubricant on any other component.
HOW TO USE
Electric Sharpening - Straight Edge Blades Only
1. Clean all food or dirt off your blade. Never sharpen a dirty knife blade as this could
cause the sharpener to malfunction or damage to the sharpening wheel.
2. Insert the plug on the end of the power cord into a standard 120 volt electrical outlet.
3. Place the unit on a flat, sturdy surface and turn the unit ON by pressing the ON/OFF
switch. You will notice two sharpening areas for mechanical sharpening. Select the sharpening
area you would like to use.
COARSE -
This sharpening wheel is used for knives that are very dull and require more metal
removal to restore the edge sharpness.
FINE -
This sharpening wheel is best for knives that are fairly sharp and just need a quick touch-up
with little metal removal. In many cases, and particularly after the initial reshaping of your blade’s
edge, use of the FINE slot, will be all the sharpening your blade will need.
SERRATED
- This manual, pull-through slot should be used for sharpening most all types of serrated
blades or the serrated portion of your blade.
NOTE:
A reasonably sharp blade may only require light honing in the FINE sharpening slots. The
COARSE slots are intended for dull blades that require more maintenance.
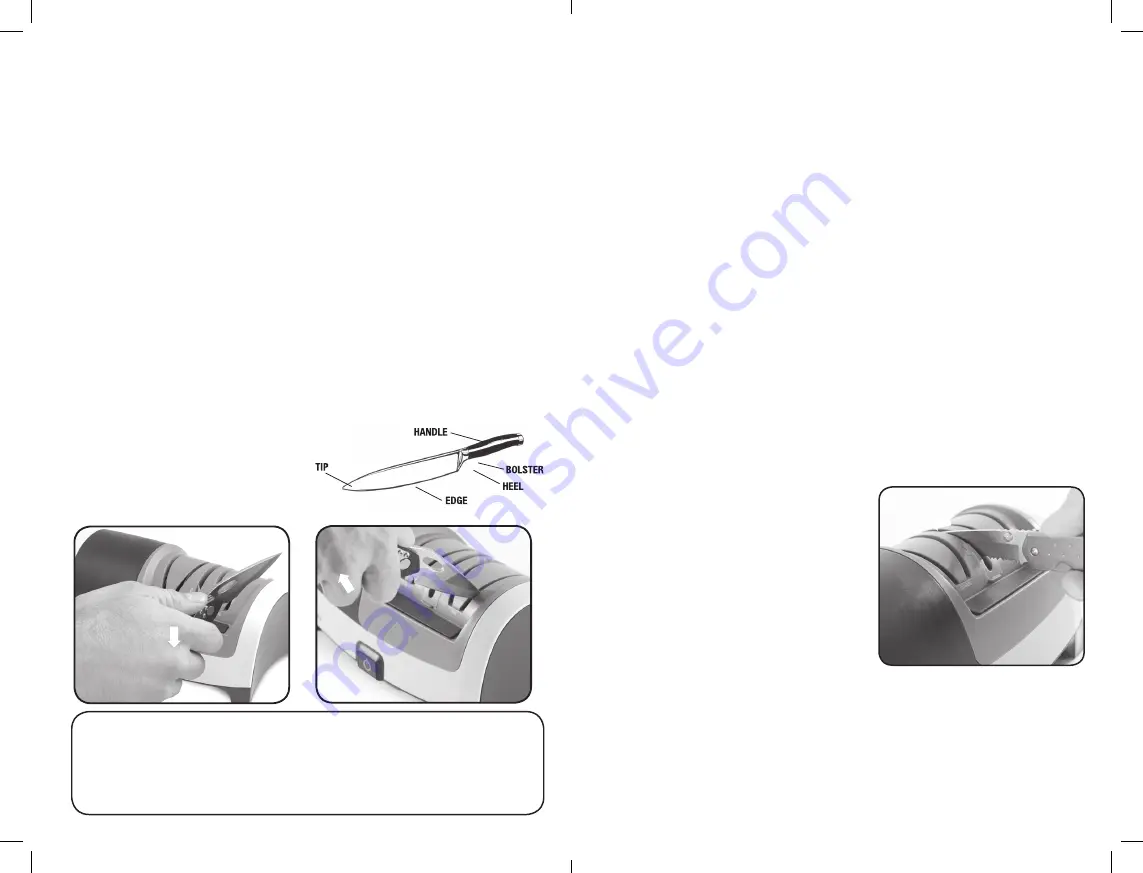
4. Hold the knife securely by the handle as you would in normal usage and position the
heel of the blade over the selected sharpening slot. Insert the blade into the upper
portion of the sharpening slot then rotate the handle of the knife down (slightly raising
the tip of the blade) until the heel of the blade contacts the sharpening wheel (Fig. 1). As soon
as contact is made and you hear the distinctive
grinding sound, pull the blade at a consistent
speed through the sharpening slot using light,
downward pressure. To sharpen all the way out
to the tip of the blade, lift up on the knife handle
slightly as the curved portion of the blade is
drawn through the blade guides. (Fig. 2)
CAUTION:
Always sharpen your knife blade from the heel to the
tip of the blade. Never insert the tip of the knife blade into the
blade guide first or push your knife blade through the sharpening
slot. This could damage the knife sharpener and/or your knife.
Fig. 2
Fig. 1
Fig. 3


